
Popular categories
Looking for a yarn?


Comments / Questions (4)
![]() Mette Dalum wrote:
Mette Dalum wrote:
Hej. På 4. række i hulmønstret slutter mønstret med kast. Det er det sidste i rækken- før det gentages. Hvad betyder det?
15.05.2018 - 12:58DROPS Design answered:
Hej Mette, et kast er norsk og betyder et omslag på dansk. Vi skal sørge for at det bliver oversat :)
15.05.2018 - 15:55
![]() Mette Dalum wrote:
Mette Dalum wrote:
Når jeg beder om siden på dansk kommer der ikke noget diagram og heller ingen forklaring på dette. Hilsen Mette -
17.04.2018 - 19:25DROPS Design answered:
Hei Mette. Dette er nå fikset, takk for beskjed. God fornøyelse
25.04.2018 - 14:07
![]() Mette Dalum wrote:
Mette Dalum wrote:
Når jeg får siden frem på dansk, er der ikke noget diagram med forklaring.
17.04.2018 - 19:23
![]() Sian wrote:
Sian wrote:
Yet again, the yarn requirements are not correct, I am at least 100g short to the amount stated in the pattern this is very annoying because of the postage charges to order extra yarn which costs as much as the yarn, my tension is absolutely spot on
23.04.2013 - 00:15
|
|||||||
Marcella |
|||||||
 |
 |
||||||
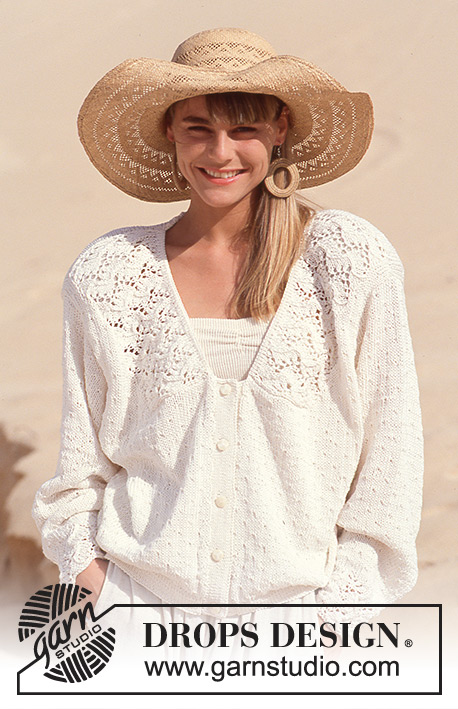
DROPS jacket with collar and sleeves in lace pattern in “Muskat”.
DROPS 21-1 |
|||||||
|
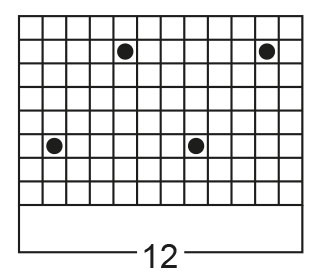
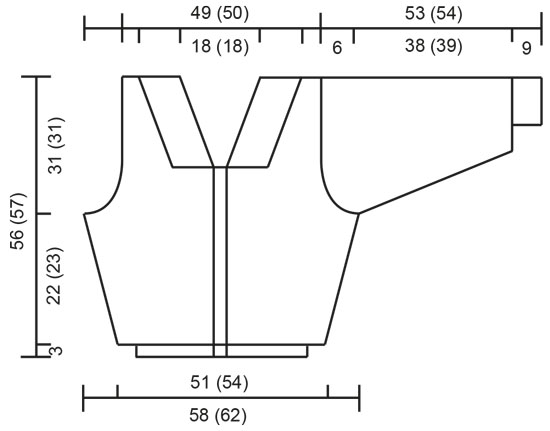
Pattern: See pattern diagram. The diagram shows the pattern from the RS. Edge: 3 cm stocking st, P 1 round (= folding edge, measure piece from here), 3 cm stocking st. Lace pattern (for collar and sleeve): number of sts dividable by 8 + edge st. Row 1 from RS: 1 edge st, *1YO, K1 into back of loop, 1 YO, slip 1 st as if to K, K1, psso, K5*, repeat from *-* and finish with 1 edge st. Row 2: 1 edge st, *P4, P2 tog into back of loop, P3*, repeat from *-* and finish with 1 edge st. Row 3: 1 edge st, *1 YO, K1 into back of loop, 1 YO, K2, slip 1 st as if to K, K1, psso, K3*, repeat from *-* and finish with 1 edge st. Row 4: 1 edge st, *P2, P2 tog into back of loop, P5*, repeat from *-* and finish with 1 edge st. Row 5: 1 edge st, *K1 into back of loop, 1 YO, K4, slip 1 st as if to K, K1, psso, K1, 1 YO*, repeat from *-* and finish with 1 edge st. Row 6: 1 edge st, *P1, P2 tog into back of loop, P6*, repeat from *-* and finish with 1 edge st. Row 7: 1 edge st, *K5, K2 tog, 1 YO, K1 into back of loop, 1 YO*, repeat from *-* and finish with 1 edge st. Row 8: 1 edge st, *P3, P2 tog, P4*, repeat from *-* and finish with 1 edge st. Row 9: 1 edge st, *K3, K2 tog, K2, 1 YO, K1 into back of loop, 1 YO*, repeat from *-* and finish with 1 edge st Row 10: 1 edge st, *P5, P2 tog, P2*, repeat from *-* and finish with 1 edge st. Row 11: 1 edge st, *1 YO, K1, K2 tog, K4, 1 YO, K1 into back of loop*, repeat from *-* and finish with 1 edge st Row 12: 1 edge st, *P6, P2 tog, P1*, repeat from *-* and finish with 1 edge st. Repeat row 1 to 12. Body: The jacket is knitted back and forth on circular needle from mid front. Cast on 180-190 sts on circular needle size 2.5 mm and work Edge. Change to needle size 4 mm and work Pattern (see diagram), at the same time inc 24-26 sts evenly on first row = 204-216 sts. Now inc 2 sts each side (51 sts in from mid front) on every 6th row a total of 7-8 times = 232-248 sts. Remember the knitting tension! When piece measures 25-26 cm work next row as follows: 56-60 sts = front piece, cast off 4 sts for armhole, 112-120 sts = back piece, cast off 4 sts for armhole, 56-60 sts = front piece and now complete front and back pieces separately. Back piece: = 122-120 sts. Dec to shape the armhole each side on every other row: 3 sts 0-1 time, 2 sts 2 times, 1 st 3 times = 98-100 sts. When piece measures 55-56 cm cast off the middle 34-34 sts for neck and dec 1 st on neckline on next row. Cast off remaining sts on shoulder when piece measures 56-57 cm. Front piece: = 56-60 sts. Dec for armhole as described for back piece = 49-50 sts. When piece measures 33-34 cm cast off 25-25 sts for neck and dec to shape the neckline on *every other, every 3rd* row alternately: 1 st a total of 18-18 times. Cast off remaining sts when piece measures 56-57 cm. Sleeve: Cast on 44-44 sts on circular needle size 4 mm and K 2 rows back and forth on needle. Change to pointed needle size 3.5 mm and work 24 rows Lace Pattern (see above) with 2 edge sts each side. After Lace Pattern change to double pointed needles size 4 mm and continue in Pattern (see diagram), at the same time inc 14-16 sts evenly on first round = 58-60 sts. At the same time inc 2 sts mid under arm a total of 33-33 times on *every other and every 3rd round* alternately = 124-126 sts. When piece measures 47-48 cm cast off 6 sts mid under arm and complete piece back and forth on needle. Dec each side to shape the sleeve cap on every other row: 5 sts 7 times. Cast off remaining sts, piece measures approx 53-54 cm. Sew tog sleeves at bottom using duplicate sts from the RS. Assembly: Sew the shoulder seams. Left front band: Pick up approx 80 sts along left front piece on needle size 2.5 mm and work Edge, cast off and fold Edge double towards WS and fasten. Right front band: Like left front band, but after 1 cm make 5 buttonholes evenly distributed. 1 buttonhole = cast off 2 sts and cast on 2 new sts on return row. Remember buttonholes on piece in stocking st to be folded towards WS! Neckline, back piece: Pick up approx 30 sts on needle size 3.5 mm and work 1.5 cm stocking st, P 1 row, 1.5 cm stocking st. Cast off, fold edge double towards WS and fasten. Left collar: Pick up 58 sts on needle size 3.5 mm along left neckline on front piece and work approx 13 cm Lace Pattern. Change to needle size 2.5 mm and work 1 cm stocking st, P 1 row (= folding edge), 1 cm stocking st and cast off. Fold the outer edge double towards WS and fasten. Right collar: Like left collar. Sew the shorter side of the collars to back piece. Set in sleeves and sew on buttons. |
|||||||
Diagram explanations |
|||||||
|
|||||||
 |
|||||||
 |
|||||||
Have you finished this pattern?Tag your pictures with #dropspattern or submit them to the #dropsfan gallery. Do you need help with this pattern?You'll find 22 tutorial videos, a Comments/Questions area and more by visiting the pattern on garnstudio.com. © 1982-2026 DROPS Design A/S. We reserve all rights. This document, including all its sub-sections, has copyrights. Read more about what you can do with our patterns at the bottom of each pattern on our site. |
|||||||


With over 40 years in knitting and crochet design, DROPS Design offers one of the most extensive collections of free patterns on the internet - translated to 17 languages. As of today we count 324 catalogues and 12290 patterns translated into English (UK/cm). 12290
We work hard to bring you the best knitting and crochet have to offer, inspiration and advice as well as great quality yarns at incredible prices! Would you like to use our patterns for other than personal use? You can read what you are allowed to do in the Copyright text at the bottom of all our patterns. Happy crafting!
Post a comment to pattern DROPS 21-1
We would love to hear what you have to say about this pattern!
If you want to leave a question, please make sure you select the correct category in the form below, to speed up the answering process. Required fields are marked *.