
Popular categories
Looking for a yarn?


Comments / Questions (50)
![]() Botje wrote:
Botje wrote:
Ik wil de trui breien van patroon 95-9 . Er staat dat het patroon de heengaande en teruggaande naalden aangeeft. Maar het werk wordt toch op een rondbreinaald gebreid?
31.12.2025 - 14:39DROPS Design answered:
Dag Botje,
Ja daar heb je gelijk aan, dus het klopt eigenlijk niet wat er staat. Wat er bedoeld wordt is dat alle naalden zijn weergegeven in het telpatroon.
03.01.2026 - 16:15
![]() GIUSEPPINA wrote:
GIUSEPPINA wrote:
In questo modello alla penultima riga del diagramma M 2 all\'inizio e alla fine del prospetto si evidenzia un triangolo che non è segnalato nella legenda. Cosa vuol dire? Grazie per la risposta.
10.06.2025 - 13:00DROPS Design answered:
Buonasera Giuseppina, quel simbolo è l'ultimo simbolo della legenda, l'accavallata doppia. Buon lavoro!
10.06.2025 - 23:45
![]() Micki wrote:
Micki wrote:
Vielen Dank für die Antwort. Ich hatte übersehen, dass die Arbeit von unten angefangen wird.
19.03.2025 - 16:25
![]() Micki wrote:
Micki wrote:
Katharina hat recht, es fehlt nach den Krausrippen am Anfang die Lochmusterreihe. Ich vermute, es werden immer 2 Maschen zusammen gestrickt und ein Umschlag gemacht. Dann eine Reihe rechts und eine Reihe links. Erst dann beginnt M1. Ist das richtig?
19.03.2025 - 12:32DROPS Design answered:
Liebe Micki, die Arbeit wird von unten nach oben gestrickt, unten beginnt man mit 1 Runde rechts + 1 Runde links + 1 Runde rechts dann strickt man A.1; oder misverstehe ich Ihre Frage?
19.03.2025 - 16:19
![]() Alison Smith wrote:
Alison Smith wrote:
Hi everyone 😊 Can anyone please explain what the slip 1 st as if k, k2tog, passo means. The only video I can find shows slipping 1 stitch, knitting 2 sts from 1 stitch and passo. Is this what I am supposed to do.
06.03.2025 - 17:26DROPS Design answered:
Hi Alison, The 2 methods are the same, apart from the 2 stitches after the slip stitch are knitted together (rather than knitting 2 stitches in 1 stitch as in the video), before passing the slip stitch over the stitches. Hope this helps :)
07.03.2025 - 06:59
![]() Behr wrote:
Behr wrote:
Bonjour comment faire pour savoir quelle taille choisir ? etant donné que je fais 90cm de tour de poitrine et selon les patrons je ne sais pas quoi prendre , merci
30.05.2024 - 11:40DROPS Design answered:
Bonjour Mme Behr, mesurez un vêtement similaire que vous avez et dont vous aimez la forme et comparez ces mesures à celles du schéma pour trouver la taille correspondante; retrouvez plus d'infos ici. Bon tricot!
30.05.2024 - 12:42
![]() MARGAT NATHALIE wrote:
MARGAT NATHALIE wrote:
Modèle 95.9 faut il monter les mailles et tricoter en rond endroit envers quelle longueur de fils.merci
30.03.2024 - 23:09DROPS Design answered:
Bonjour Mme Margat, le top se tricote en rond; on monte les mailles sur 2 aiguilles (cf a href="https://www.garnstudio.com/video.php?id=1778&lang=fr>vidéo) et on tricote en rond. Cette autre vidéo explique comment calculer la longueur nécessaire avant le montage (utilisez les 2 aiguilles comme pour le montage). Bon tricot!
02.04.2024 - 14:40
![]() Katharina wrote:
Katharina wrote:
Guten Morgen, ich würde so gerne den Pullover nachstricken aber die Diagramme stimmen nicht. M1 ist das obere Muster für die Passe aber nicht für den Beginn der Arbeit. Das muss ein anderes Diagramm sein. Könnten Sie das bitte veröffentlichen. Vielen Dank.
05.03.2024 - 09:26DROPS Design answered:
Liebe Katharina, am Anfang schlägt man 100-110-120-140-150-170 Maschen dann wird die 10 Maschen M.1 insgesamt 10-11-12-14-15-17 Mal wiederholt. Viel Spaß beim Stricken!
05.03.2024 - 15:30
![]() Carina wrote:
Carina wrote:
Hola En este patrón se puede hacer levantamiento del escote? Y si es así cuando se haría en las primeras vueltas de derecho y revés o cuándo? Gracias
03.03.2024 - 14:11DROPS Design answered:
Hola Carina, en este patrón es complicado hacer la elevación para el escote, ya que tiene un escote abierto y un dibujo de calados en redondo. Normalmente la elevación se hace justo después de terminar la cenefa del escote, mientras se empieza el canesú o antes de empezar. En este caso, el escote es demasiado abierto y es muy difícil trabajar una elevación en el sitio correcto.
03.03.2024 - 23:52
![]() Kay Reddy wrote:
Kay Reddy wrote:
Hi sorry I wasn't clear the first time. I cast on 150 st for the extra large. I completed 7 repeats of M1 - 140 stitches and I have 10 stitches extra. Do I knit half of the repeat?
03.08.2022 - 11:21DROPS Design answered:
Dear Mrs Reddy, diagram M.1 is worked over 10 stitches, this means you will repeat these 10 sts a total of 15 times - note that first row is worked as follows: K1, YO, K3, slip 1, k2 tog, pass slipped st over knitted together sts, K3, YO (= 10 sts). But note that on the next row after M.1 you will adjust the number of sts to 156 (increase 6 sts evenly - see here how to). Happy knitting!
03.08.2022 - 15:16
|
||||||||||||||||
DROPS 95-9 |
||||||||||||||||
|
|
||||||||||||||||
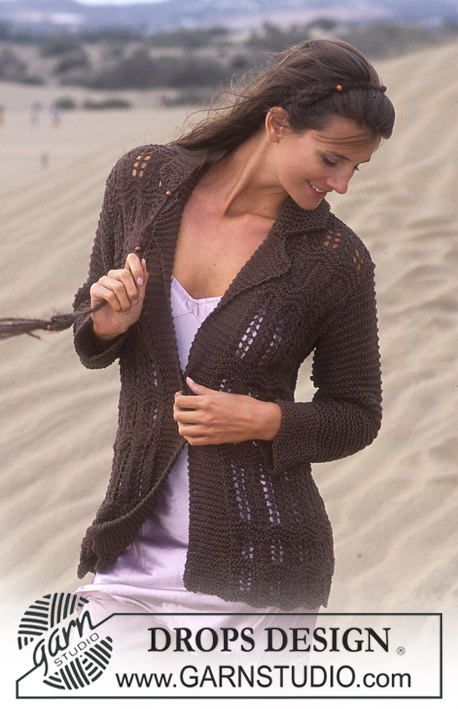
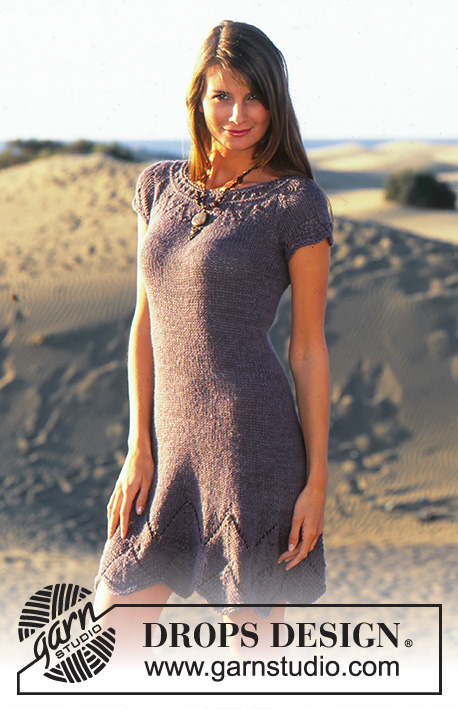
DROPS Short sleeved top in in Safran and Alpaca
DROPS 95-9 |
||||||||||||||||
|
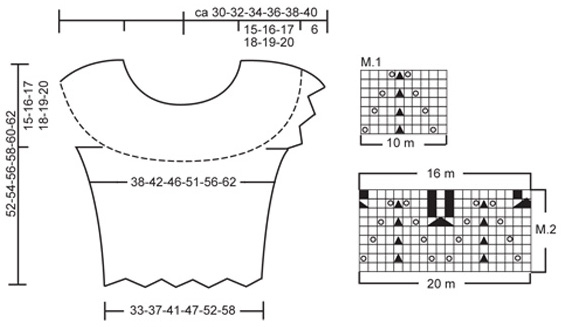
Knitting tension: 15 sts x 19 rows on needles size 6mm with 1 thread of each quality in stocking sts. = 10 x 10 cm. Pattern: see diagram M.1 and M.2. The diagram shows the pattern from the right side Increasing tips: Inc 1 st by picking up a st in st from previous row and knit it. Body: The top is knitted round on circular needles. Cast on 100-110-120-140-150-170 sts using both ends of the circular needle (to make sure the edge becomes elastic) with 1 thread of each quality (= double thread). Remove 1 needle. Then K1 round, P 1 round and K 1 round and continue to knit M.1 round. After 1 repeat of M.1 continue in stocking whilst adjusting number of sts to 98-110-122-142-156-174 on first round after M.1. When piece measures 14-14-15-16-16-17 cm, insert 4 marking threads as follows: Knit 15-17-20-24-26-30 sts, insert marking thread before next st (= 1st mt), knit 19-21-21-23-26-27 sts, insert marking thread before next st (= 2nd mt), knit 30-34-40-48-52-60 sts, insert marking thread before next st (= 3rd mt), knit 19-21-21-23-26-27 sts, insert marking thread before next st (= 4th mt), knit the remaining 15-17-20-24-26-30 sts. Now inc 1 st after the 1st and 3rd marking thread and before the 2nd and 4th marking thread - see Increasing tips above – as follows: Size XS - S: on every 5th round a total of 4-4 times = 114-126 sts Size M: On every 6th round a total of 4 times = 138 sts Size L - XL - XXL: on every 10th round a total of 3-3-3 times = 154-168-186 sts. After all inc have been made, remove marking threads and insert 2 new marking threads, 1 at the beginning of round and 1 after 57-63-69-77-84-93 sts. When piece measures 37-38-39-40-41-42 cm cast off 8 sts each side for armhole (i.e. 4 sts both sides of marking threads) = 49-55-61-69-76-85 sts left on front and back piece. Put the piece aside and knit the sleeves. Sleeve: Cast on 40-40-50-50-50-50 sts using 2 double pointed needles size 6mm with 1 thread of each yarn quality (= double thread). Remove 1 needle and knit 1 round on double pointed needles, purl 1 round and knit 1 round. Now knit M.1. After 1 repeat of M.1 cast off 8 sts mid under arm = 32-32-42-42-42-42 sts. Put the sts on a thread and knit the other sleeve. Yoke: Put the sleeves in on the same circular needle as the body where you cast off for armholes = 162-174-206-222-236-254 sts. Knit 8-10-12-14-16-18 rounds in stocking st, at the same time dec 1-7-13-11-18-17 sts evenly on the 2-3-4-5-5-6 round and again on the 4-7-8-9-10-12 round = 160-160-180-200-200-220 sts. Now knit M.2. After M.2 there are 128-128-144-160-160-176 sts remaining. Knit 2 round stocking sts whilst adjusting number of sts to 117-123-129-135-144-159 on the last round. Purl 1 round, knit 2 rounds and knit a round of holes as follows: *yo, K3 tog*, repeat from *-* = 78-82-86-90-96-106 sts left. Knit 2 rounds, purl 1 round and cast off in purled sts. The top measures approx 52-54-56-58-60-62 cm from lowest point. Assembly: Sew the openings under the arms. |
||||||||||||||||
Diagram explanations |
||||||||||||||||
|
||||||||||||||||
 |
||||||||||||||||
Have you finished this pattern?Tag your pictures with #dropspattern or submit them to the #dropsfan gallery. Do you need help with this pattern?You'll find 21 tutorial videos, a Comments/Questions area and more by visiting the pattern on garnstudio.com. © 1982-2026 DROPS Design A/S. We reserve all rights. This document, including all its sub-sections, has copyrights. Read more about what you can do with our patterns at the bottom of each pattern on our site. |
||||||||||||||||


With over 40 years in knitting and crochet design, DROPS Design offers one of the most extensive collections of free patterns on the internet - translated to 17 languages. As of today we count 324 catalogues and 12290 patterns translated into English (UK/cm). 12290
We work hard to bring you the best knitting and crochet have to offer, inspiration and advice as well as great quality yarns at incredible prices! Would you like to use our patterns for other than personal use? You can read what you are allowed to do in the Copyright text at the bottom of all our patterns. Happy crafting!
Post a comment to pattern DROPS 95-9
We would love to hear what you have to say about this pattern!
If you want to leave a question, please make sure you select the correct category in the form below, to speed up the answering process. Required fields are marked *.