Clicking the ORDER button will redirect you to Saules siulas website
The yarn cost is calculated from the pattern’s smallest size and the yarn’s cheapest product type. Looking for an even better price? You might find it on the DROPS Deals!
DROPS 92-2
Change language:
English (UK/cm), Lithuania
-------------------------------------------------------
Alternative Yarn – See how to change yarns here
Yarn Groups A to F – Use the same pattern and change the yarn here
Yarn usage using an alternative yarn – Use our yarn converter here
-------------------------------------------------------
Clicking the ORDER button will redirect you to Saules siulas website
The yarn cost is calculated from the pattern’s smallest size and the yarn’s cheapest product type. Looking for an even better price? You might find it on the DROPS Deals!
![]() |
= K |
![]() |
= P |
Each of our patterns has specific tutorial videos to help you.
These step-by-step tutorials might also help you:
Why is the knitting/crochet tension so important?
Knitting tension is what determines the final measurements of your work, and is usually measured per 10 x 10 cm. It is provided like so: number of stitches in width x number of rows in height - eg: 19 stitches x 26 rows = 10 x 10 cm.
The knitting tension is very individual; some people knit/crochet loosely while others work tightly. You adjust the knitting tension with the needle size, which is why the suggested needle size is only meant as a guide! You need to adjust this (up or down) to ensure that YOUR knitting tension matches the knitting tension provided in the pattern. If you work with a different knitting tension than provided you will have a different yarn consumption, and your work will have different measurements than what the pattern suggests.
The knitting tension also determines which yarns can replace each other. As long as you achieve the same knitting tension you can replace one yarn with another.
See DROPS lesson: How to measure your tension/gauge
See DROPS video: How to make a gauge tension swatch
How do I know how many balls of yarn I need?
The required amount of yarn is provided in grams, eg: 450 g. To calculate how many balls you’ll need you first need to know how many grams are in 1 ball (25g, 50g or 100g). This information is available if you click on the individual yarn quality on our pages. Divide the amount required with the amount of each ball. For example, if each ball is 50g (the most common amount), the calculation will be as follows: 450 / 50 = 9 balls.
Can I use a different yarn than what the pattern suggests?
The important thing when changing from one yarn to another is that the knitting/crochet tension remains the same. This is so that the measurements of the finished piece will be the same as on the sketch provided. It is easier to achieve the same knitting tension using yarns from the same yarn group. It is also possible to work with multiple strands of a thinner yarn to achieve the knitting tension of a thicker one. Please try our yarn converter. We recommend you to always work a test swatch.
Please NOTE: when changing yarn the garment might have a different look and feel to the garment in the photo, due to individual properties and qualities of each yarn.
See DROPS lesson: Can I use a different yarn than the one mentioned in the pattern?
What are the yarn groups?
All our yarns are categorised into yarn groups (from A to F) according to thickness and knitting tension – group A contains the thinnest yarns and group F the thickest. This makes it easier for you to find alternative yarns to our patterns, should you wish to switch yarn. All yarns within the same group have a similar knitting tension and can easily replace each other. However, different yarn qualities have different structures and properties which will give the finished work a unique look and feel.
How do I use the yarn calculator?
At the top of all our patterns you’ll find a link to our yarn calculator, which is a helpful tool should you wish to use a different yarn than suggested. By filling in the yarn quality you wish to replace, the amount (in your size) and number of strands, the calculator will present good alternative yarns with the same knitting tension. Additionally it will tell you how much you’ll require in the new qualities and whether you’ll need to work with multiple strands. Most skeins are 50g (some are 25g or 100g).
If the pattern is worked with multiple colours, every colour will have to be calculated separately. Similarly, if the pattern is worked with several strands of different yarns (for example 1 strand Alpaca and 1 strand Kid-Silk) you will have to find alternatives for each, individually.
Why do you show discontinued yarns in the patterns?
Since different yarns have different qualities and textures we have chosen to keep the original yarn in our patterns. However, you can easily find options among our available qualities by using our yarn calculator, or simply pick a yarn from the same yarn group.
It is possible that some retailers still have discontinued yarns in stock, or that someone has a few skeins at home that they would like to find patterns for.
The yarn calculator will provide both alternative yarn as well as required amount in the new quality.
What size should I knit?
If you think it's hard to decide what size to make, it can be a good idea to measure a garment you own already and like the size of. Then you can pick the size by comparing those measures with the ones available in the pattern's size chart.
You'll find the size chart at the bottom of the pattern.
See DROPS lesson: How to read size chart
Why do I get the wrong knitting tension with the suggested needle size?
The needle size provided in the pattern serves only as a guide, the important thing is to follow the knitting tension. And since knitting tension is very individual, you will have to adjust the needle size to ensure that YOUR tension is the same as in the pattern – maybe you’ll have to adjust 1, or even 2 needle sizes, up or down to achieve the correct tension. For this, we recommend that you work test swatches.
Should you work with a different knitting tension than the one provided, the measurements of the finished garment might deviate from the measurement sketch.
See DROPS lesson: How to measure your tension/gauge
See DROPS video: How to make a tension/gauge swatch
Why is the pattern worked top-down?
Working a garment top-down provides more flexibility and room for personal adjustment. For example it is easier to try the garment on while working, as well as making adjustments to length of yoke and shoulder caps.
The instructions are carefully explaining every step, in the correct order. Diagrams are adjusted to the knitting direction and are worked as usual.
How do I work according to a knitting diagram?
The diagram depicts all rows/rounds, and every stitch seen from the right side. It is read from bottom to top, from right to left. 1 square = 1 stitch.
When working back and forth, every other row is worked from the right side and every other row is worked from the wrong side. When working from the wrong side, the diagram will have to be worked reversed: from left to right, knit stitches are purled, purl stitches are knit etc.
When working in the round every round is worked from the right side and the diagram are worked from right to left on all rounds.
See DROPS lesson: How to read knitting diagrams
How do I work according to a crochet diagram?
The diagram depicts all rows/rounds, and every stitch seen from the right side. It is worked from bottom to top, from right to left.
When working back and forth every other row is worked from the right side: from right to left and every other row is worked from the wrong side: from left to right.
When working in the round, every row in the diagram are worked from the right side, from right to left.
When working a circular diagram you start in the middle and work your way outwards, counter clockwise, row by row.
The rows usually start with a given number of chain stitches (equivalent to the height of the following stitch), this will either be depicted in the diagram or explained in the pattern.
See DROPS lesson: How to read crochet diagrams
How do I work several diagrams simultaneously on the same row/round?
Instructions for working several diagrams after each other on the same row/round, will often be written like so: “work A.1, A.2, A.3 a total of 0-0-2-3-4 times". This means you work A.1 once, then A.2 is worked once, and A.3 is repeated (in width) the number of times provided for your size – in this case like so: S = 0 times, M = 0 times, L=2 times, XL= 3 times and XXL = 4 times.
The diagrams are worked as usual: begin with the first row in A.1, then work the first row in A.2 etc.
See DROPS lesson: How to read knitting diagrams
See DROPS lesson: How to read crochet diagrams
Why are the sleeves shorter in larger sizes?
The total width of the garment (from wrist-to-wrist) will be larger in the larger sizes, despite the actual sleeves being shorter. The larger sizes have longer sleeve caps and wider shoulders, so there will be a good fit in all sizes.
Where on the garment is the length measured?
The measurement sketch/schematic drawing provides information regarding the full length of the garment. If it’s a jumper or a jacket the length is measured from the highest point on the shoulder closest to the neckline, and straight down to the bottom of the garment. It is NOT measured from the tip of shoulder. Similarly, the length of yoke is measured from the highest point on the shoulder and down to where yoke is split into body and sleeves.
On a jacket measures are never taken along bands, unless specifically stated. Always measure inside band stitches when measuring the length.
See DROPS lesson: How to read a schematic drawing
What is a repeat?
Diagrams are often repeated on the round or in height. 1 repeat is the diagram the way it appears in the pattern. If it says to work 5 repeats of A.1 in the round, then you work A.1 a total of 5 times after/next to each other in the round. If it says to work 2 repeats of A.1 vertically/in height you work the entire diagram once, then begin again at the start and work the entire diagram one more time.
Why does the piece start with more chain stitches than it’s worked with?
Chain stitches are slightly narrower than other stitches and to avoid working the cast-on edge too tight, we simply chain more stitches to begin with. The stitch count will be adjusted on the following row to fit the pattern and measurement sketch.
Why increase before the rib edge when the piece is worked top-down?
The rib edge is more elastic and will contract slightly compared to, for example, stocking stitch. By increasing before the rib edge, you avoid a visible difference in width between the rib edge and the rest of the body.
Why increase in the cast-off edge?
It’s very easy to cast off too tightly, and by making yarn overs while casting off (and simultaneously casting these off) you avoid a too tight cast off edge.
See DROPS video: How to bind off with yarn overs (yo)
How do I increase/decrease on every 3rd and 4th row/round alternately?
To achieve an even increase (or decrease) you can increase on, for example: every 3rd and 4th row alternately, like so: work 2 rows and increase on the 3rd row, work 3 rows and increase on the 4th. Repeat this until the increase is complete.
See DROPS lesson: Increase or decrease 1 st on every 3rd and 4th row alternately
How can I work a jacket in the round instead of back and forth?
Should you prefer to work in the round instead of back and forth, you may of course adjust the pattern. You’ll need to add steeks mid-front (usually 5 stitches), and follow the instructions. When you would normally turn and work from the wrong side, simply work across the steek and continue in the round. At the end you’ll cut the piece open, pick up stitches to work bands, and cover the cut edges.
See DROPS video: How to knit steeks and cut open
Can I work a jumper back and forth instead of in the round?
Should you prefer to work back and forth instead of in the round, you may of course adjust the pattern so you work the pieces separately and then assemble them at the end. Divide the stitches for the body in 2, add 1 edge stitch in each side (for sewing) and work the front and back pieces separately.
See DROPS lesson: Can I adapt a pattern for circular needles into straight needles?
Why is the pattern slightly different than what I see in the photo?
Pattern repeats can vary slightly in the different sizes, in order to get the correct proportions. If you’re not working the exact same size as the garment in the photo, yours might deviate slightly. This has been carefully developed and adjusted so that the complete impression of the garment is the same in all sizes.
Make sure to follow instructions and diagrams for your size!
How do I make a women’s size garment into a men’s size one?
If you have found a pattern you like which is available in women’s size it’s not very difficult to convert it to men’s size. The biggest difference will be the length of sleeves and body. Start working on the women size that you think would fit across the chest. The additional length will be worked right before you cast off for the armhole/sleeve cap. If the pattern is worked top-down you can add the length right after the armhole or before the first decrease on sleeve.
Regarding additional yarn amount, this will depend on how much length you add, but it is better with a skein too many than too few.
How do I prevent a hairy garment from shedding?
All yarns will have excess fibres (from production) that might come off as lint or shedding. Brushed yarns (ie hairier yarns) have more of these loose, excess fibres, causing more shedding.
Shedding also depends on what is worn under or over the garment, and whether this pulls at the yarn fibres. It’s therefore not possible to guarantee that there will be no shedding
Below are some tips on how to get the best result when working with hairier yarns:
1. When the garment is finished (before you wash it) shake it vigorously so the looser hairs come off. NOTE: do NOT use a lint roller, brush or any method that pulls at the yarn.
2. Place the garment in a plastic bag and put it in your freezer - the temperature will cause the fibres to become less attached to each other, and excess fibres will come off easier.
3. Leave in the freezer for a few hours before taking it out and shaking it again.
4. Wash the garment according to the instructions on the yarn label.
Why does my garment pill?
Pilling is a natural process that happens to even the most exclusive of fibers. It's a natural sign of wear and tear that is hard to avoid, and that is most visible in high friction areas of your garment like a sweater's arms and cuffs.
You can make your garment look as new by removing the pilling, using a fabric comb or a pill/lint remover.
Drops Design wrote:
Jo, for at de større størrelser har bredere skuldervidde, og når et stykke længere ud over skulderen.
23.05.2011 - 11:59
Lærke wrote:
Jeg forstår ikke, hvorfor ærmet skal være længere jo mindre størrelsen er. Kan I forklare mig det? Venlig hilsen Lærke
23.05.2011 - 11:55
DROPS 92-2 |
|||||||
|
|||||||
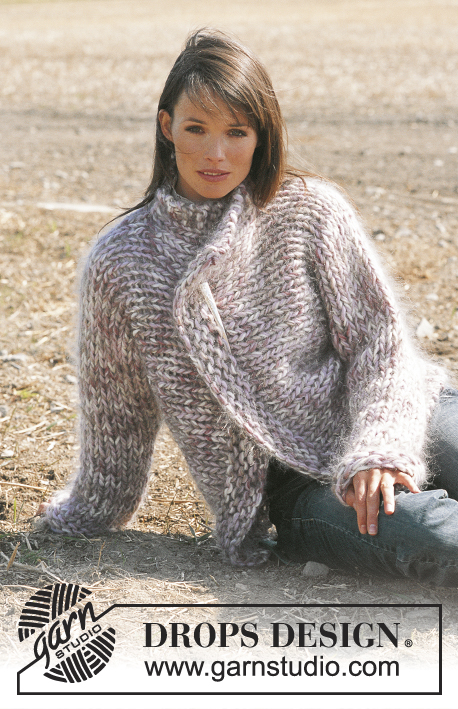
DROPS Cardigan Knitted in Moss stitch in Snow, Stripy Scarf with tassels in Snow and open-finger mittens in Alpaca.
DROPS 92-2 |
|||||||
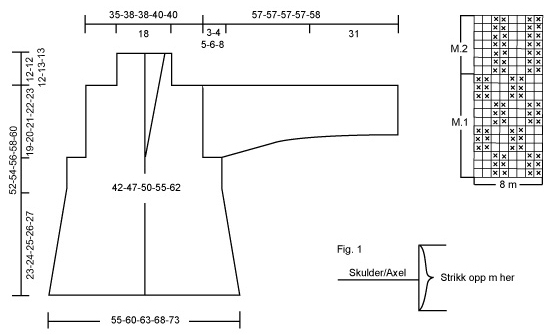
Knitting Gauge: 8 sts x 12 rows on needles size 12mm in moss stitch = 10 x 10 cm. Moss stitch: 1st row: * K1, P1* repeat from *-*. 2nd Row: Knit P over K and K over P. repeat these 2 rows. Note for increasing: Knit all the increased sts tight to make the outer edge even. All parts are knitted back and front on circular needles (As you would do on pointed needles) Back: Cast on 46-50-52-56-60 sts (inclusive of 1 seam sts each side) on needles size 12 mm in Snow. Knit moss stitch – see explanation above. Remember to check the knitting gauge. When piece measures 5-6-5-6-7 cm bind off as follows: 1 st each side every 4.5-4.5-5-5-6.5 cm a total of 5-5-5-5-4 times = 36-40-42-46-52 sts. When piece measures 33-34-35-36-37 cm bind off for armhole 4-5-6-7-10 sts each side = 28-30-30-32-32 sts. When piece measures 52-54-56-58-60 cm bind off each side 7-8-8-9-9 sts for the shoulder, put the remaining 14 sts on a thread. Left front: Cast on 27-29-30-32-34 sts (inclusive of 1 seam st at the side and 2 edge sts mid front) on needles size 12 mm in Snow. Knit in moss stitch – except for the 2 edge sts mid front, they are knitted in garter sts on all rows until increasing starts mid front (approx. when the piece measures 33-34-35-36-37 cm). Afterwards, knit all sts in moss stitch. At the same time when piece measures 5-6-5-6-7 cm bind off at the side, as described for the back piece = 22-24-25-27-30 sts. When piece measures 33-34-35-36-37 cm bind off for armhole at the side, as described for the back piece = 19-19-19-20-20 sts. At the same time when piece measures 33-34-35-36-37 cm increase 1 st mid front every 3.5-3.5-4-4-4.5 cm –see note for increasing: 6 times = 24-25-25-26-26 sts. When piece measures 52-54-56-58-60 cm bind off 7-8-8-9-9 sts at the shoulder side, the remaining 17 sts are left on a thread. Right front: Knit as left front but reversed. Assembly: Sew shoulder seams on each side in the outermost sts. Sleeve: Pick up sts along the side of the armhole and note that the sleeve is knitted from top to bottom. Pick up 30-32-34-35-37 sts on needle size 12 mm in Snow - see fig. 1(please note - do not pick up sts on the 4-5-6-7-10 sts which were bind off for the armhole on the front and back pieces). Knit in moss stitch. When sleeve measures 3-4-5-6-8 cm insert a marking thread either side (this marks where the sleeve needs to be sewed together to the front and back piece) - from now on all measures are from this point. When piece measures 2 cm bind off 1 st each side every 5-3.5-3.5-3-2.5 cm, a total of 5-6-6-6-7 times = 20-20-22-23-23 sts. When the piece measures 54-53-52-51-50 cm bind off loosely. More assembly: Collar: Pick up all the collar sts left on the threads = 48 sts. Knit in moss stitch and at the same time on row 1, inc. 8 sts evenly spread over the 14 sts from the back piece = 56 sts. When the collar measures 5 cm inc. 1 st. on each side – see note for increasing. Repeat when the collar measures 11 cm = 60 sts. Bind off loosely when the collar measures 12-12-12-13-13 cm. Sew the side seams together in seam sts. Sew the sleeves together in outermost st up to the marking thread, and now sew the sleeve to the front and back piece where you bind off for the armhole. The cardigan can be held together with either a pin, a kilt pin, a brooch or a belt. SCARF: Length: Approx. 270 cm Materials: DROPS Snow from Garnstudio 50 g colour no. 30, Pastel rose 50 g colour no. 35, Lime green 50 g colour no. 01, Off’ white 50 g colour no. 09, Old rose 50 g colour no. 32, Blue Lilac mix 50 g colour no. 11, Grey green DROPS pointed needle size 10 mm or size needed to obtain the correct gauge. Knitting Gauge: 9 sts x 12 rows on needles size 10mm in stocking stitch = 10 x 10 cm. Stripy pattern: 16 cm Pastel rose 10 cm Lime green 6 cm Off’ white 6 cm Old rose 12 cm Blue-lilac mix 14 cm Grey-green 14 cm Pastel rose 8 cm Lime green 12 cm Old rose 17 cm Off’ white 17 cm Grey-Green 10 cm Blue-lilac mix 8 cm Pastel rose 14 cm Old rose 18 cm Lime green 8 cm Off’ white 20 cm Blue-lilac mix Scarf: Cast on 18 sts on needle size 10 mm in Snow Colour Pastel rose. Knit the Stripy pattern –see explanation above. NB: Knit the 1st. row from the wrong side and then knit in stocking st, except for the 3 sts at each end, which are knitted in garter st. When the scarf measures 209 cm (19 cm knitted of the last Blue-lilac mix stripe) knit 1 row from the wrong side. Bind off loosely. Tassels: 1 tassel = 1 thread of each colour (=6 threads in total) 64 cm long. Fold the threads in half and pull the folded end through the outer st. of the short side of the scarf, then pull the ends and the yarn left hanging through the loop. Hint: If the yarn in the tassels “curl up”, wet the threads and shake them so they stretch out. OPEN FINGER MITTENS: Size: S/M Materials: DROPS Alpaca from Garnstudio 50 g colour no. 3800, Heather Drops double-pointed needle size 3 mm or size needed to obtain the correct gauge. Knitting Gauge: 24 sts x 32 rows on needles size 3 mm in stocking stitch = 10 x 10 cm. Rib: *K2, P3*, repeat from *-* Pattern: See diagram M.1 and M.2 Right Glove: Cast on 60 sts. on double pointed needle size 3 mm in Alpaca and distribute sts evenly on 3 double pointed needles and knit 2 rounds stocking stitch. Continue in Rib – see explanation above. When piece measures 10 cm reduce every other purl report from 3P to 2P. When piece measures 14 cm, reduce the remaining purl reports from 3P to 2P = 48 sts. When piece measures 16 cm knit M.1 – make sure the pattern starts with purl over knit and knit over purl. At the same time, after 2 rows in M.1 increase for thumb gusset on both sides of the 3rd and 4th st at the beg of the row. Increase on every other row a total of 6 times = 14 sts in the gusset (incorporate the inc. sts in M.1 as you go along). When piece measures 21 cm put these 14 sts on a safety pin. On next row, cast on 2 new sts behind sts on safety pin = 48 sts on needle and continue in pattern M.1 as before. When piece measures 25 cm – make sure it fits with a “window” – knit M.2 over all sts - make sure the pattern starts with P over K and K over P. When piece measures 28cm, bind off in Rib. Thumb: Put the 14 sts from safety pin back on needle and pick up 6 sts behind these 14 sts = 20 sts. Distribute the 20 sts on 3 double pointed needles and knit M.2 approx. 2 cm. Bind off in Rib. Knit another mitten, but mirrored. _______________________________________________________________ Fig 1. Skulder/Axel = Shoulder Strikk opp m her = Pick up sts here |
|||||||
Diagram explanations |
|||||||
|
|||||||
![]() |
|||||||
Have you finished this pattern?Tag your pictures with #dropspattern or submit them to the #dropsfan gallery. Do you need help with this pattern?You'll find 21 tutorial videos, a Comments/Questions area and more by visiting the pattern on garnstudio.com. © 1982-2025 DROPS Design A/S. We reserve all rights. This document, including all its sub-sections, has copyrights. Read more about what you can do with our patterns at the bottom of each pattern on our site. |
With over 40 years in knitting and crochet design, DROPS Design offers one of the most extensive collections of free patterns on the internet - translated to 17 languages. As of today we count 314 catalogues and 11824 patterns translated into English (UK/cm). 11824
We work hard to bring you the best knitting and crochet have to offer, inspiration and advice as well as great quality yarns at incredible prices! Would you like to use our patterns for other than personal use? You can read what you are allowed to do in the Copyright text at the bottom of all our patterns. Happy crafting!
Post a comment to pattern DROPS 92-2
We would love to hear what you have to say about this pattern!
If you want to leave a question, please make sure you select the correct category in the form below, to speed up the answering process. Required fields are marked *.