
Popular categories
Looking for a yarn?


Comments / Questions (25)
![]() Marjanne wrote:
Marjanne wrote:
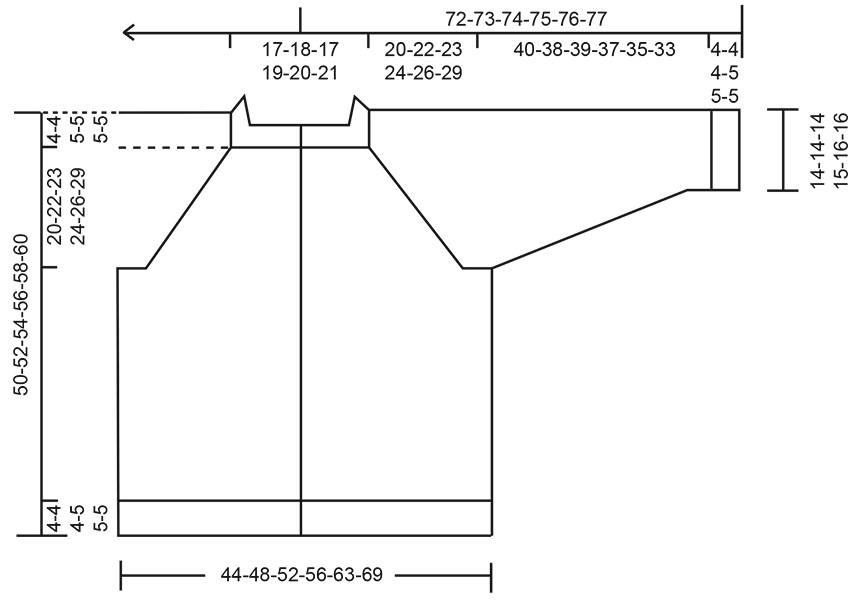
First of all I love this pattern! My question is, do you really increase that many stitches before starting the ribbing on the bottom? It seems like a lot to me! AT THE SAME TIME as increasing 74-78-84-88-104-112 stitches evenly on the row = 299-325-349-375-421-459 stitches.
12.03.2026 - 14:14DROPS Design answered:
Dear Marjanne, thank you so much! Yes you need to increase so much to avoid the ribbing tightening piece together at the bottom edge, as y ou need more stitches for ribbing K1,P1 with smaller needle size as for stocking stitch with larger needle size. Happy knitting!
12.03.2026 - 16:09
![]() Irmgard wrote:
Irmgard wrote:
Das Knopfloch wird viel zu klein wenn man lediglich mit einem Umschlag arbeitet. Bei Nadeln 3,5 passt höchstens ein Knopf von 10 mm durch, keinesfalls einer von 20 mm. Außerdem sieht ein solches Knopfloch in Form eines „Lochs“ nicht besonders schön aus. Haben Sie eine bessere Lösung? Vielen Dank
25.02.2026 - 09:19DROPS Design answered:
Liebe Irmgard, das Loch verschwindet ja mehr oder weniger in den Krausrippen. Wenn Sie ein größeres Loch wünschen, können Sie einen doppelten Umschlag machen und wie einen Umschlag abstricken. Eleganter wird es so: 2 Maschen rechts zusammenstricken, 2 Umschläge, 2 Maschen rechts zusammenstricken, in der nächsten Reihe die beiden Umschläge nacheinander rechts verschränkt stricken. Sie können auch 1 oder 2 Maschen abketten und in der nächsten Reihe darüber 1 oder 2 Maschen anschlagen. Varianten von Knopflöchern finden Sie auch bei unseren Videos unter "Tipps & Hilfe" => Strickvideos => Tipps & Tricks => Blenden & Knopflöcher.
25.02.2026 - 21:55
![]() Livia wrote:
Livia wrote:
Buongiorno, perché le maniche vengono lavorate con i ferri 4 mm? Potrebbe essere un errore ?
14.11.2025 - 21:30DROPS Design answered:
Buongiorno Livia, c'è un errore nella versione inglese: grazie per la segnalazione, abbiamo corretto il testo. Buon lavoro!
16.11.2025 - 09:24
![]() Livia wrote:
Livia wrote:
Buongiorno, perché le maniche vengono lavorate con i ferri 4 mm? Potrebbe essere un errore ?
14.11.2025 - 21:29DROPS Design answered:
Buongiorno Livia, c'è un errore nella versione inglese: grazie per la segnalazione, abbiamo corretto il testo. Buon lavoro!
16.11.2025 - 09:24
![]() Leila wrote:
Leila wrote:
Silmukkajako väärin, kudon koko M, silmukoita yhteensä 141. Kun jaan silmukat etu/2x29s hihat/2x19s ja takakappaleelle/1x41 = 137s. Laskuvirhe ilmeisesti joka koossa. Ratkaisi niin että lisään yhden silmukan etukappaleille ja takakpl. Ystävällisinterveisin
06.03.2025 - 07:48
![]() Margaretha Astin Lind wrote:
Margaretha Astin Lind wrote:
Jag stickar Soft Soul Cardigan xxl och har ökat för raglan 22 gånger i min storlek till 335 maskor. Sen står: Öka till raglan vartannat varv och här hänger jag med men...på ärmarna ökas det var 4:e varv. Det finns ju bara två framstycken och två till bakstycken, alltså fyra raglanökningar. Förklara tack! Står det fel i mönstret?
26.02.2025 - 21:43DROPS Design answered:
Hej Margaretha, du ökar på varje sida om raglan-markören = 8 ggr pr öknings-varv. När du bara skall öka på fram och bakstycke, så blir det 4 ökningar (inte de 2 på varje ärm). :)
06.03.2025 - 10:59
![]() Marina wrote:
Marina wrote:
Bonjour, pour la 2eme serie d'augmentations, je ne comprends pas quels raglans je dois augmenter ou pas. En parlant de dos et de devants, cela veut dire qu'il faut tricoter seulement 1 seule maille du raglan ? En commençant par le demi devant droit, ça ferait : Marqueur 1 : 1 aug avant / pas après Marqueur 2 : pas d'aug avant / 1 aug après Marqueur 3 : 1 aug avant / pas après Marqueur 4 : pas avant / 1 aug après Merci d'avance pour votre aide
19.02.2025 - 19:53DROPS Design answered:
Bonjour Marina, vous devez augmenter avant le 1er marqueur (devant gauche), après le 2ème marqueur (début du dos) + avant le 3ème marqueur (fin du dos) et enfin après le 4ème marqueur (début du devant droit) - vous augmentez ainsi 4 mailles. Bon tricot!
20.02.2025 - 11:33
![]() Margaretha Astin Lind wrote:
Margaretha Astin Lind wrote:
Kan frågor och svar i översättas till olika språk? Eftersom andra med andra språk antagligen frågar samma frågor om och om igen. Det är omöjligt att förstå vad de undrar när de skriver på spanska, tyska m.fl Det borde bli enklare för er som svarar om någon frågar samma sak på tyska och på spanska, för att inte säga svenska. Ett så litet språk. Svar önskas snarast. Tack !!
21.01.2025 - 21:45
![]() Margaretha Astin Lind wrote:
Margaretha Astin Lind wrote:
Jag stickar denna modell i atorlek XXL, men upptäcker att antal maskor när jag ska sticka oket inte stämmer. Jag lade upp 159 maskor och skulle sätta 4 markörer för raglan med 31, 23, 47, 23, 31 maskors mellanrum. Det blir då 155 maskor. Alltså stämmer inte mönstret eftersom det fattas 4 maskor. Jag upplever mönstret rörigt och svårt att hänga med i. Kollar ni inte att mönstret stämmer innan ni publicerar det? Förklaring önskas. Tack!!
18.01.2025 - 22:10
![]() Katharina wrote:
Katharina wrote:
Wird die Blende in kraus rechts nicht kürzer als der glatt rechts gestrickte Teil der Jacke? Von anderen Mustern kenne ich es, dass in solchen Fällen in der Blende zusätzliche Reihen gestrickt werden. Ist hier etwas ähnliches zu beachten? Vielen Dank!
05.01.2025 - 19:56DROPS Design answered:
Liebe Katharina, sollte die Blende etwas zu kurz sein, dann können Sie gerne einige verkürzten Reihen beideitig stricken. Passen Sie ja in der Höhe wie Sie es möchten. Viel Spaß beim Stricken!
06.01.2025 - 10:51
|
|
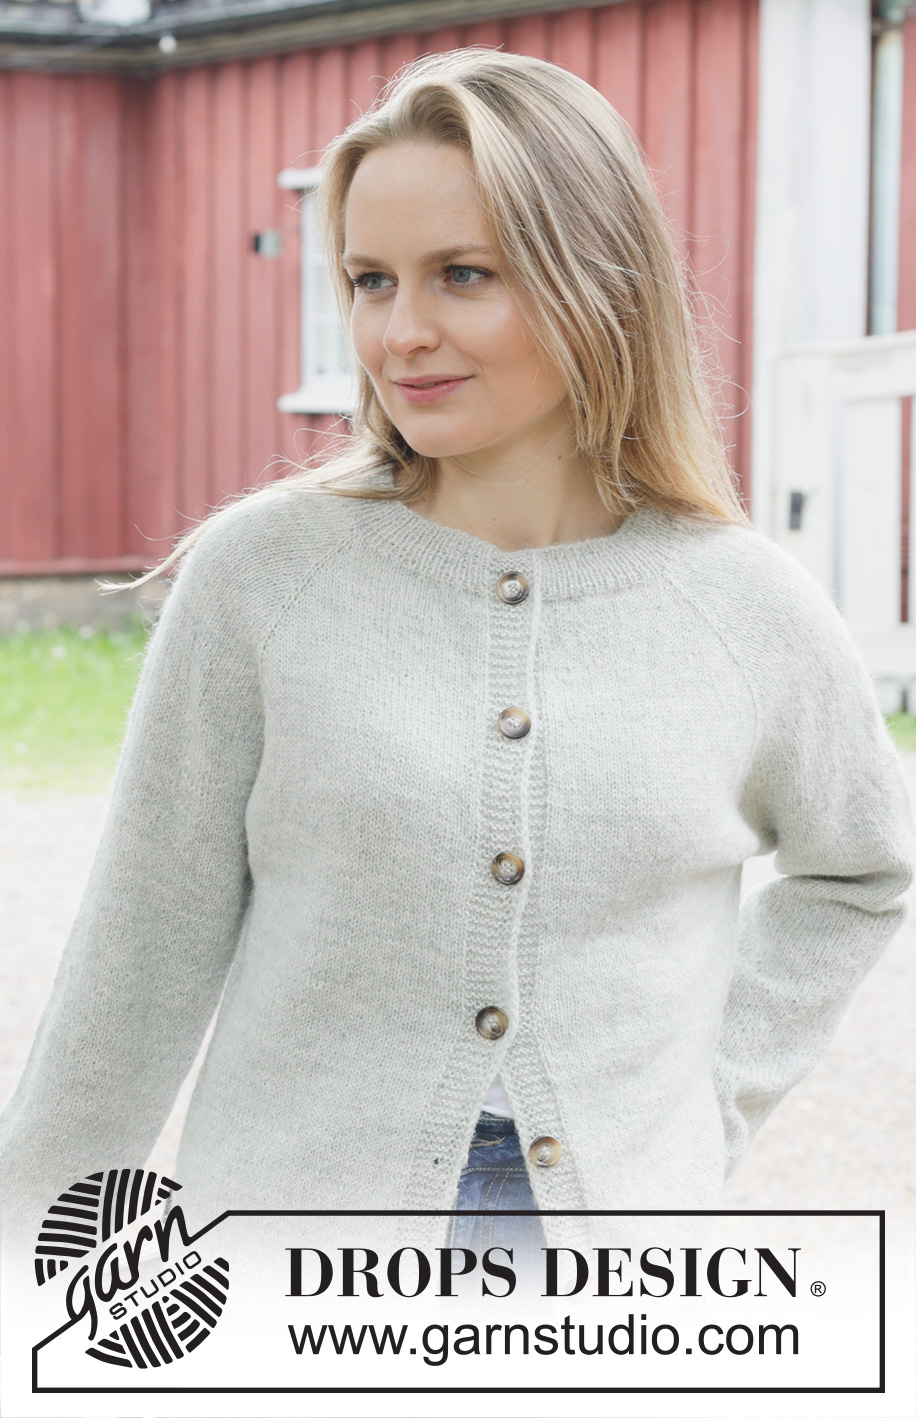
Soft Soul Cardigan#softsoulcardigan |
|
 |
 |
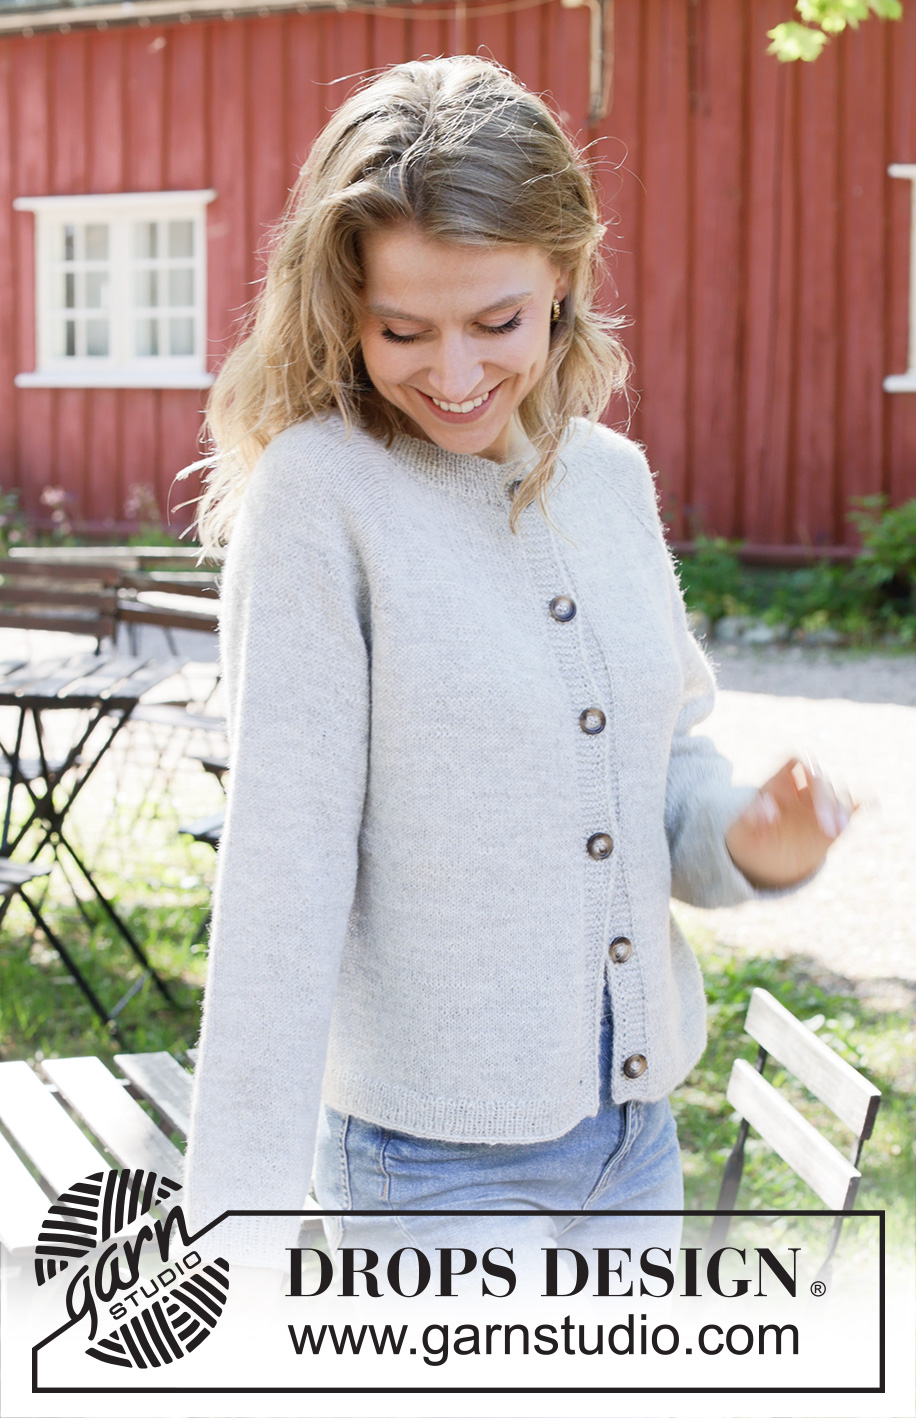
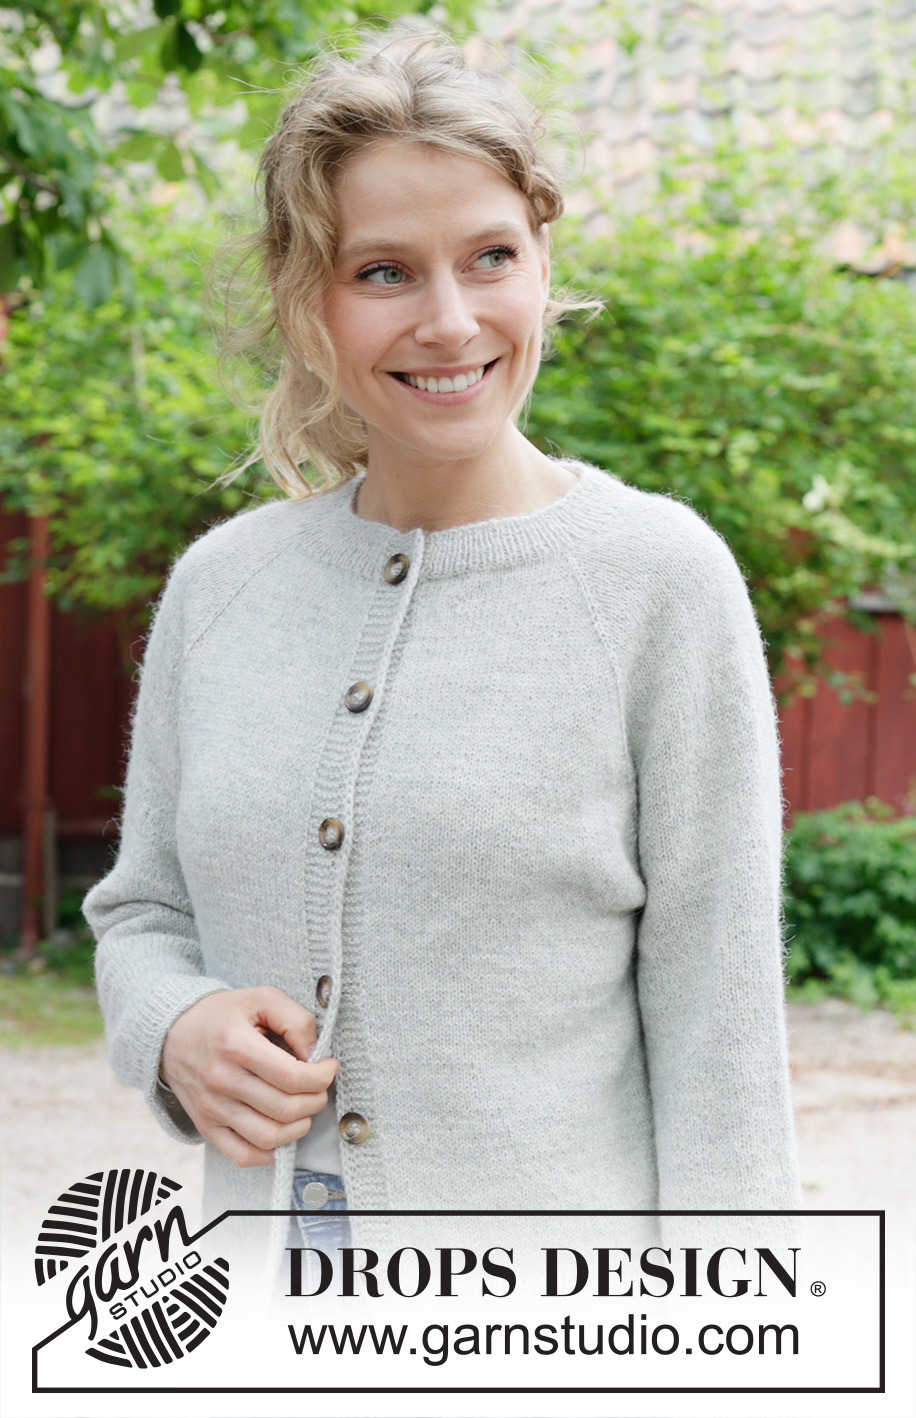
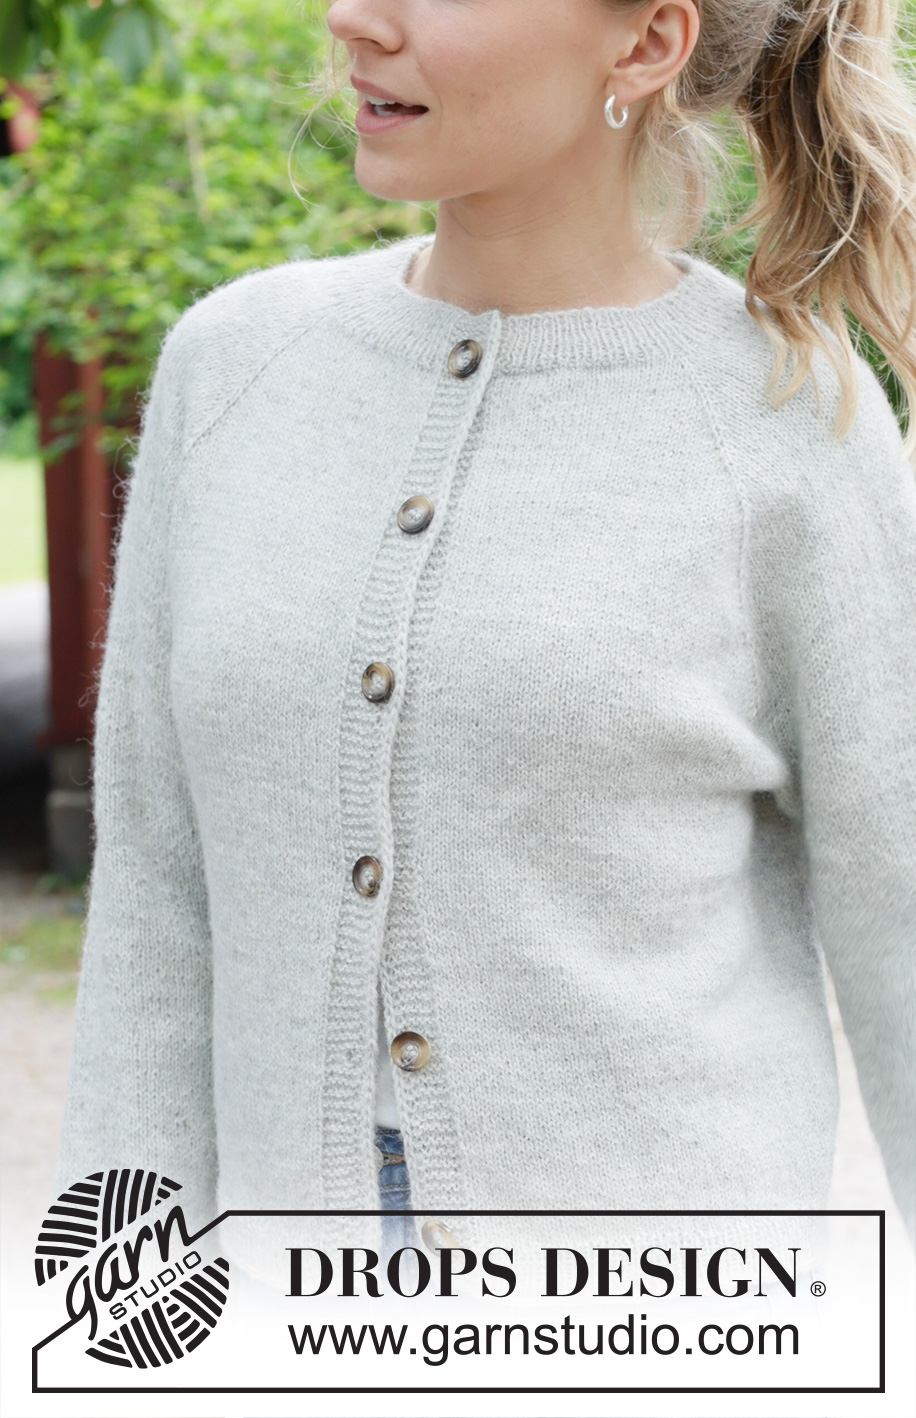
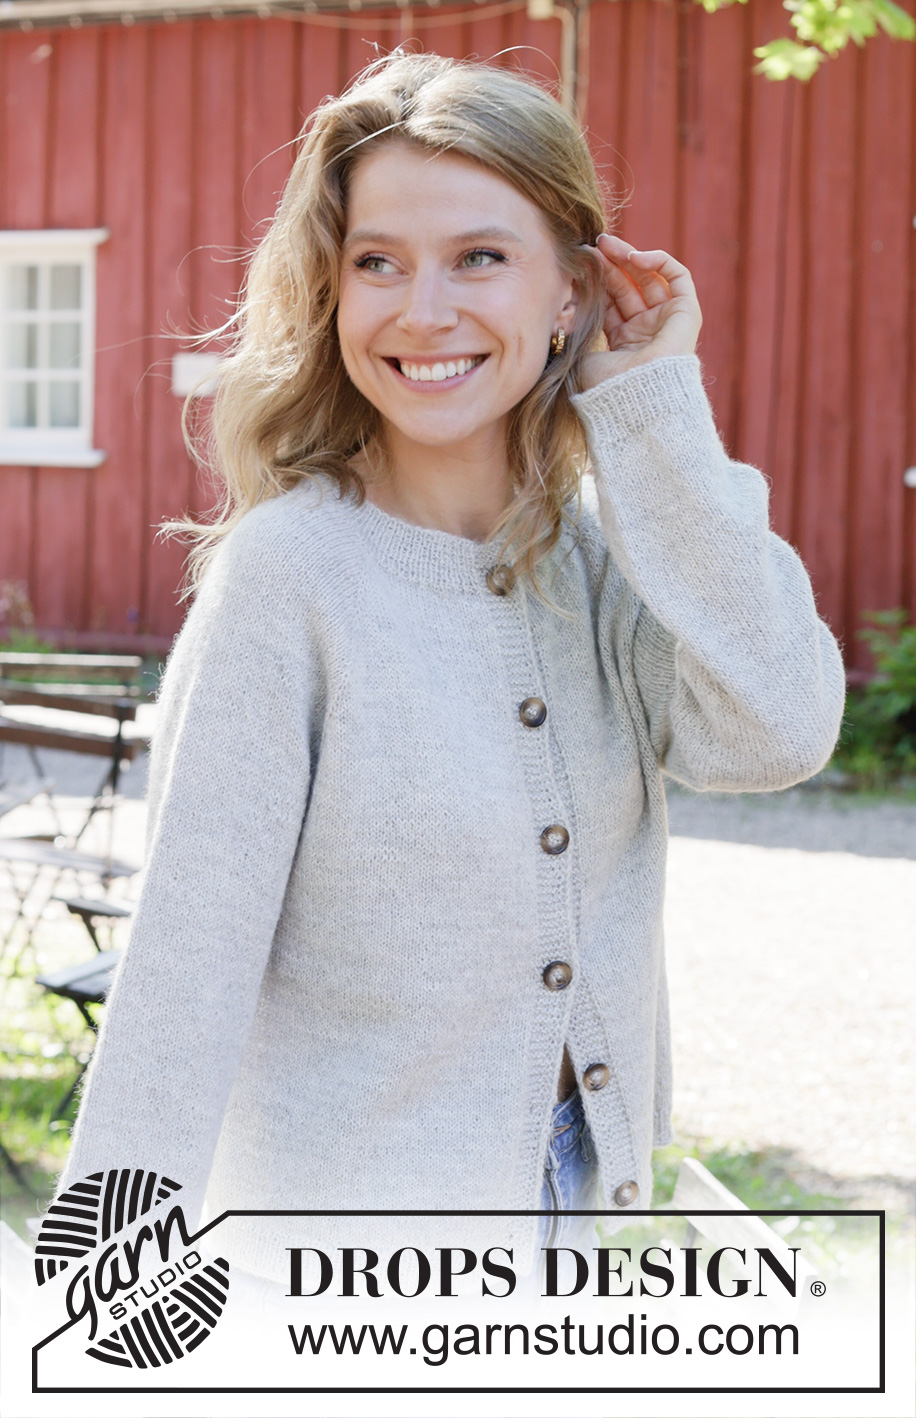
Knitted jacket in DROPS Alpaca. The piece is worked top down with raglan and I-cord. Sizes S - XXXL.
DROPS 252-9 |
|
|
------------------------------------------------------- EXPLANATIONS FOR THE PATTERN: ------------------------------------------------------- BANDS WITH I-CORD BEGINNING OF ROW: Slip 1 stitch purl-wise with strand in front, knit 1, work 6 garter stitches. END OF ROW: Work until there are 8 stitches left on the row, work 6 garter stitches, slip 1 stitch purl-wise with strand in front, knit 1. Work in the same way from both the right and wrong side. GARTER STITCH (worked back and forth): Knit all rows, from both the right and wrong side. 1 ridge in height = knit 2 rows. BUTTONHOLES: Work the buttonholes on the right front band (when garment is worn), from the right side, when there are 5 stitches left on the row. ROW 1 (right side): Make 1 yarn over, knit 2 together, knit 1, slip 1 purl-wise with strand in front, knit 1. ROW 2 (wrong side): Work the band as before, knit the yarn over to leave a hole. The first buttonhole is worked on the first row from the right side after the neck is finished. Then work the other 5-5-5-5-6-6 buttonholes with 8½-9-9-9-8-8½ cm between each one. The bottom buttonhole is worked in the transition between the stocking stitch and rib. RAGLAN: All increases are worked from the right side! Increase 1 stitch by making 1 yarn over, which is worked as follows on the next row: BEFORE MARKER: Purl through the back loop to avoid a hole. Then work the new stitches in stocking stitch. AFTER MARKER: Slip the yarn over off the left needle and replace it twisted (insert the left needle through the back when replacing it). Purl the front loop to avoid a hole. Then work the new stitches in stocking stitch. DECREASE TIP (for sleeves): Decrease 1 stitch on each side of the marker-thread as follows: Work until there are 3 stitches left before the marker-thread, knit 2 together, knit 2 (marker-thread sits between these 2 stitches), slip 1 stitch knit-wise, knit 1 and pass the slipped stitch over the knitted stitch (2 stitches decreased). I-CORD CAST OFF: Cast on 2 stitches on right needle. Slip these 2 stitches onto the left needle, with the strand 2 stitches in on the needle (the strand tightens when working to form a small tube). ROW 1 (right side): Knit 1, knit 2 twisted together. ROW 2 (right side): Slip the 2 stitches on the right needle onto the left needle, knit 1, knit 2 twisted together. AFTER ROW 2: Repeat ROW 2 until there are 2 stitches left on the right needle. Slip these 2 stitches onto the left needle. Cast off. Sew a small stitch, joining the beginning and the end of the I-cord. ------------------------------------------------------- START THE PIECE HERE: ------------------------------------------------------- JACKET – SHORT OVERVIEW OF THE PIECE. The pattern uses both long and short needles; start with the length which fits the number of stitches and change when necessary. The neck and yoke are worked back and forth with circular needle, from mid front and top down. When the yoke is finished, it is divided for body and sleeves and the body continued back and forth with circular needle, while the sleeves wait. The sleeves are worked in the round, top down. NECK: Cast on 135-141-147-153-159-165 stitches with circular needle size 2.5 mm and DROPS Alpaca. Work the first row as follows from the wrong side: 8 stitches according to BANDS WITH I-CORD – read description above, work rib (purl 1, knit 1) until there are 9 stitches left, purl 1 and work 8 stitches according to bands with I-cord. Continue this rib for 4-4-4-5-5-5 cm. Insert 1 marker inside one band, mid-front; the piece is now measured from here. YOKE: Change to circular needle size 3.5 mm. Insert 4 markers from the right side, without working the stitches, inserting them in stitches which are now called raglan-stitches and which are continued in stocking stitch. Count 27-29-29-31-31-33 stitches (= left front piece), insert 1 marker in the next stitch, count 19-19-21-21-23-23 stitches (= sleeve), insert 1 marker in the next stitch, count 39-41-43-45-47-49 stitches (= back piece), insert 1 marker in the next stitch, count 19-19-21-21-23-23 stitches (= sleeve), insert 1 marker in the next stitch, there are 27-29-29-31-31-33 stitches left after the last marker (= right front piece). Remember to work the first BUTTONHOLE - read description above, on the first row from the right side. Work stocking stitch, with the bands as before, and increase for RAGLAN on each side of all 4 raglan-stitches - read description above. Increase every 2nd row a total of 20-22-22-27-22-19 times = 295-317-323-369-335-317 stitches (= 8 increased stitches on each increase-row). Remember to maintain the knitting tension. Now continue increasing as follows: Increase for raglan every 2nd row on the front and back pieces and every 4th row on the sleeves (= alternately 4 and 8 increased stitches). Increase like this 8-10-12-10-20-28 times on the front and back pieces (4-5-6-5-10-14 times on the sleeves). After the last increase there are 343-377-395-429-455-485 stitches and the piece measures approx. 18-20-21-23-26-29 cm from the marker on the neck. Continue working without further increases until the piece measures 20-22-23-24-26-29 cm from the marker. Now divide for the body and sleeves. DIVIDE FOR BODY AND SLEEVES: AT THE SAME TIME as working the next row, divide yoke as follows: Work 55-61-63-68-73-80 stitches as before (= front piece), place the next 69-75-79-87-89-91 stitches on a thread for the sleeve, cast on 10-10-14-16-20-22 stitches (in side mid-under sleeve), work 95-105-111-119-131-143 stitches (= back piece), place the next 69-75-79-87-89-91 stitches on a thread for the sleeve, cast on 10-10-14-16-20-22 stitches (in side mid-under sleeve), work the last 55-61-63-68-73-80 stitches as before (= front piece). The body and sleeves are finished separately. BODY: = 225-247-265-287-317-347 stitches. Work stocking stitch, with the bands as before, until the piece measures 42-44-45-46-48-50 cm from the marker mid-front. On the next row from the right side, begin working rib, AT THE SAME TIME as increasing 74-78-84-88-104-112 stitches evenly on the row = 299-325-349-375-421-459 stitches. Work as follows: Change to circular needle size 2.5 mm. Work the band as before, rib (knit 1, purl 1 – remember to increase) until there are 9 stitches left, knit 1 and work the band as before. When the rib measures 4-4-4-5-5-5 cm and the last row was from the wrong side, cast off a little loosely from the right side with I-CORD – read description above. The jacket measures approx. 46-48-49-51-53-55 cm from the marker mid-front and 50-52-54-56-58-60 cm from top of shoulder. SLEEVES: Place the 69-75-79-87-89-91 sleeve-stitches from the thread on one side of the piece on circular needle size 3.5 mm and knit up 1 stitch in each of the 10-10-14-16-20-22 stitches cast on under the sleeve = 79-85-93-103-109-113 stitches. Insert a marker-thread in the middle of the 10-10-14-16-20-22 stitches under the sleeve. Start at the marker-thread and work stocking stitch in the round. When the sleeve measures 1 cm, decrease 2 stitches under the sleeve – read DECREASE TIP. Decrease like this every 2nd round a total of 2-2-3-5-5-6 times = 75-81-87-93-99-101 stitches. Then decrease 2 stitches every 5-4-3-2½-2-1½ cm 5-7-9-10-12-12 times = 65-67-69-73-75-77 stitches. Continue working until the sleeve measures 40-39-38-37-35-33 cm from the division. Change to double pointed needles size 2.5 mm. Work rib (knit 1, purl 1), AT THE SAME TIME increase 21-23-23-25-25-27 stitches evenly on the first round = 86-90-92-98-100-104 stitches. When the rib measures 4-4-4-5-5-5 cm, cast off with I-CORD. The sleeve measures approx. 44-43-42-42-40-38 cm from the division. ASSEMBLY: Sew the buttons onto the left band. |
|
 |
|
Have you finished this pattern?Tag your pictures with #dropspattern #softsoulcardigan or submit them to the #dropsfan gallery. Do you need help with this pattern?You'll find 30 tutorial videos, a Comments/Questions area and more by visiting the pattern on garnstudio.com. © 1982-2026 DROPS Design A/S. We reserve all rights. This document, including all its sub-sections, has copyrights. Read more about what you can do with our patterns at the bottom of each pattern on our site. |
|


With over 40 years in knitting and crochet design, DROPS Design offers one of the most extensive collections of free patterns on the internet - translated to 17 languages. As of today we count 325 catalogues and 12298 patterns translated into English (UK/cm). 12298
We work hard to bring you the best knitting and crochet have to offer, inspiration and advice as well as great quality yarns at incredible prices! Would you like to use our patterns for other than personal use? You can read what you are allowed to do in the Copyright text at the bottom of all our patterns. Happy crafting!
Post a comment to pattern DROPS 252-9
We would love to hear what you have to say about this pattern!
If you want to leave a question, please make sure you select the correct category in the form below, to speed up the answering process. Required fields are marked *.