
Popular categories
Looking for a yarn?


Comments / Questions (24)
![]() Kim wrote:
Kim wrote:
Hello~Thank you so much for this nice design!:) I love it! I started to work on it just a few hours ago, and I have a question. I've just finished with neck edge,and now I'm about to start with yoke. But sadly, because I'm just a beginner, I don't know how to put the marker without working the stitches. It looks like the markers are also counted as stitches. But I don't know how to make it. Before, I just learned to put marker between stitches. Please help me with this ~
07.01.2024 - 11:33DROPS Design answered:
Dear Kim, if you use locking markers (the ones in shape of a lock or that can easily be opened) simply insert them as follows: count the number of stitches as indicated and then insert the marker inside the stitch. This will then be a stitch with a marker; it doesn't count separately, it's just counting the stitch it's sitting in. Then, you will move it upwards; when you reach the stitch with the marker in the next row, unlock it, take it out, work the stitch and then put the marker in the new stitch. Happy knitting!
07.01.2024 - 18:26
![]() HKBS wrote:
HKBS wrote:
Hei! Takk for oppskrifta - dette ser ut som ein veldig fin topp! Men me har no lese oppskrifta mange ganger, og det ser ut som det er ein feil: Når ein har strikka høgare nakke har ein hatt 2 skulderaukingar. Då skal det berre strikkast 12 skulderaukingar vidare (ikkje 14, som det står i mønsteret - det gjeld berre om ein ikkje har strikka høgare nakke). Vonar de vil rette dette.
01.10.2023 - 15:14
![]() Dagmara wrote:
Dagmara wrote:
DODAWANIE OCZEK NA RAMIONA: Czy nie ma błędu w liczbie oczek rozmiar L? „Dalej przerabiać tak samo, dodając oczka w sumie 14 razy w każdym okrążeniu = 194” Nabrane 114 oczek + 8 (podwyższenie) + (14x4) = 178
28.07.2023 - 19:09DROPS Design answered:
Witaj Dagmaro, w rozmiarze L na początku masz 114 oczek. Na wykończeniu dekoltu równomiernie dodajesz 24 oczka =138. Później dodajesz oczka na ramiona już na podwyższeniu dekoltu, w sumie tych powtórzeń z dodawaniem oczek musisz wykonać 14 > 14x4=56 oczek. 138+56=194 oczka. Pozdrawiamy!
29.07.2023 - 09:29
![]() Wendy wrote:
Wendy wrote:
Is this pattern listed on Ravelry? I was unable to find it there. Thank you so much! Wendy
08.07.2023 - 23:01DROPS Design answered:
Dear Wendy, maybe some of our patterns are not in Ravelry. Happy knitting!
10.07.2023 - 17:32
![]() Mary wrote:
Mary wrote:
Is increase tip #1, right side after marker, correct? Pick up from behind and knit through back loop???? Thanks
17.03.2023 - 03:34DROPS Design answered:
Dear Mary, Increase tip 1 is worked from the right side of piece, and yes, before the marker means on the right hand side of the marker and after the marker means on the left hand side of the marker. Happy knitting!
17.03.2023 - 08:55
![]() Christinetra Traen wrote:
Christinetra Traen wrote:
Een top truitje, zal uit proberen. Hartelijk dank
30.09.2022 - 21:59
![]() Nicole wrote:
Nicole wrote:
Bonjour. pour le rehaussement, au rg suivant on doit tricoter sur la maille où nous avons serré et tourné? Ex exemple : pour tricoter 45m je suis obligée de tricoter là où j’ai tourné à la 30 eme maille ? Ce n’est pas la même technique que pour les Germain short rows ? Merci beaucoup pour votre aide.
03.09.2022 - 11:55DROPS Design answered:
Bonjour Nicole, dans cette technique, vous tricotez effectivement la 1ère maille au début du rang suivant, mais vous pouvez également utiliser une autre technique pour les rangs raccourcis si vous le préférez. Bon tricot!
05.09.2022 - 08:53
![]() Malin Høgestøl wrote:
Malin Høgestøl wrote:
Er det mulig å strikke denne oppskriften med garn fra garngruppe A? Hvordan gjør man da dette enklest mulig?
17.07.2022 - 22:06DROPS Design answered:
Hei Malin, Hvis du strikker plagget med garn fra garngruppe A, blir det tynnere. Det er ikke noe lett måte å bytte fra garngruppe B til A. Du må strikke en prøvelapp og justere antall masker og rad (flere masker og rad på 10 x 10 cm) for å få riktige mål. God fornøyelse!
18.07.2022 - 06:53
![]() Leen Fret wrote:
Leen Fret wrote:
Hebben jullie ook patronen voor de breimachine of patronen die gewoon van beneden naar boven gemaakt worden.
07.06.2022 - 15:25DROPS Design answered:
Dag Leen,
We hebben helaas geen patronen voor de breimachine, maar wel patronen van beneden naar boven. Bij het zoeken naar patronen kun je het filter hierop instellen onder 'Constructie'
10.06.2022 - 22:00
![]() Debby Van Der Ven wrote:
Debby Van Der Ven wrote:
Klopt de uitleg bij minderen 1 wel want er staat bij voor de markering dat je achter moet ophalen en in de voorste lus moet breien en bij na de markering staat er achter ophalen en in achterste lus breien moet dit laatste niet zijn voor ophalen en in de achterste lus breien . ????
06.06.2022 - 16:27DROPS Design answered:
Dag Debby,
Het klopt zoals het er staat, dus je neemt de steek op met de linker naald vanaf de achterkant en je breit de steek recht in de achterste lus.
12.06.2022 - 21:06
|
||||||||||||||||||||||
May Tee#maytee |
||||||||||||||||||||||
 |
 |
|||||||||||||||||||||
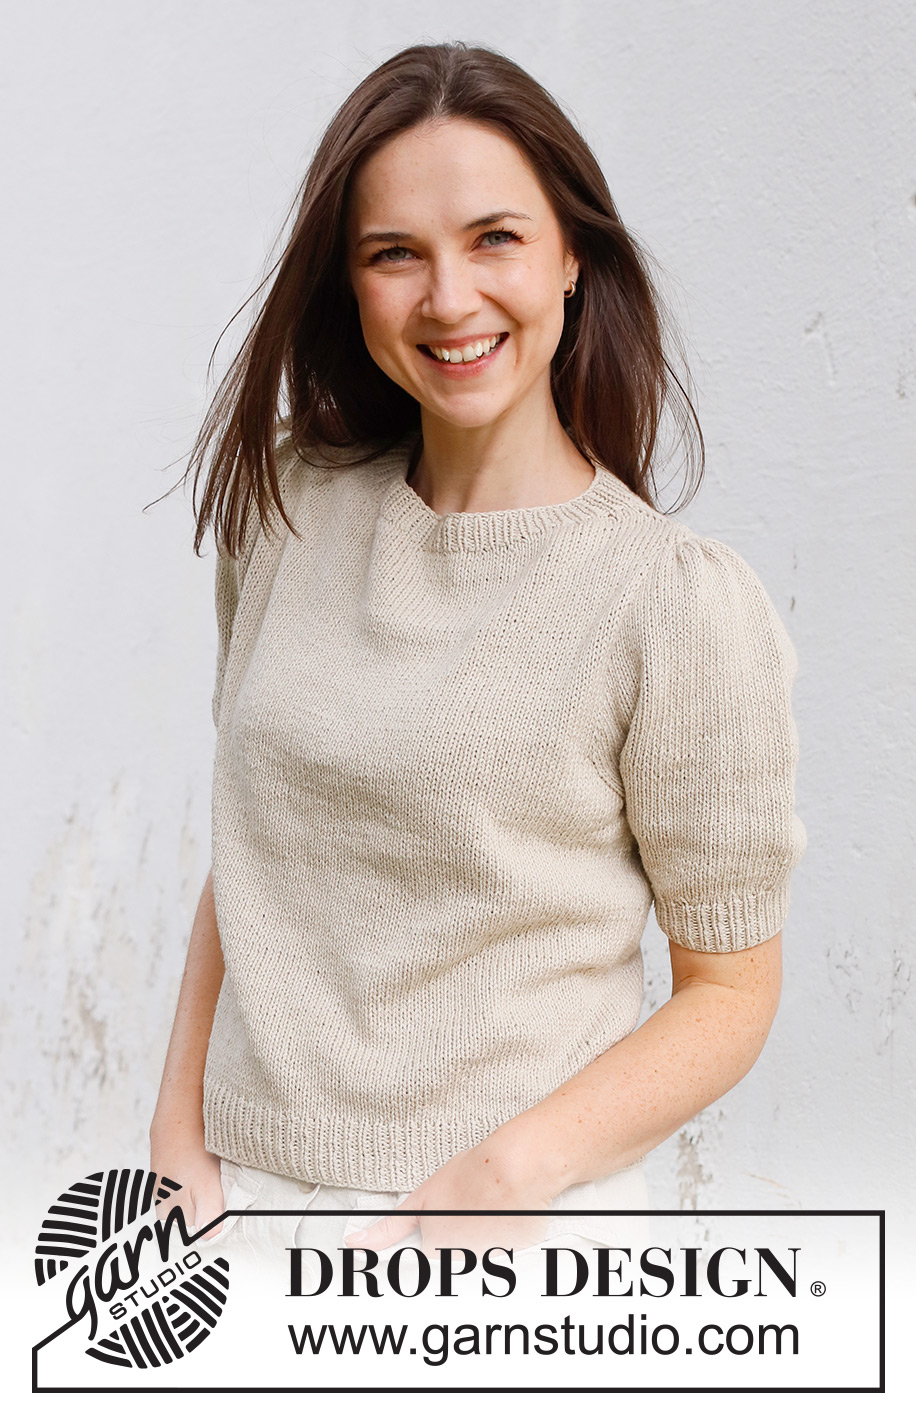
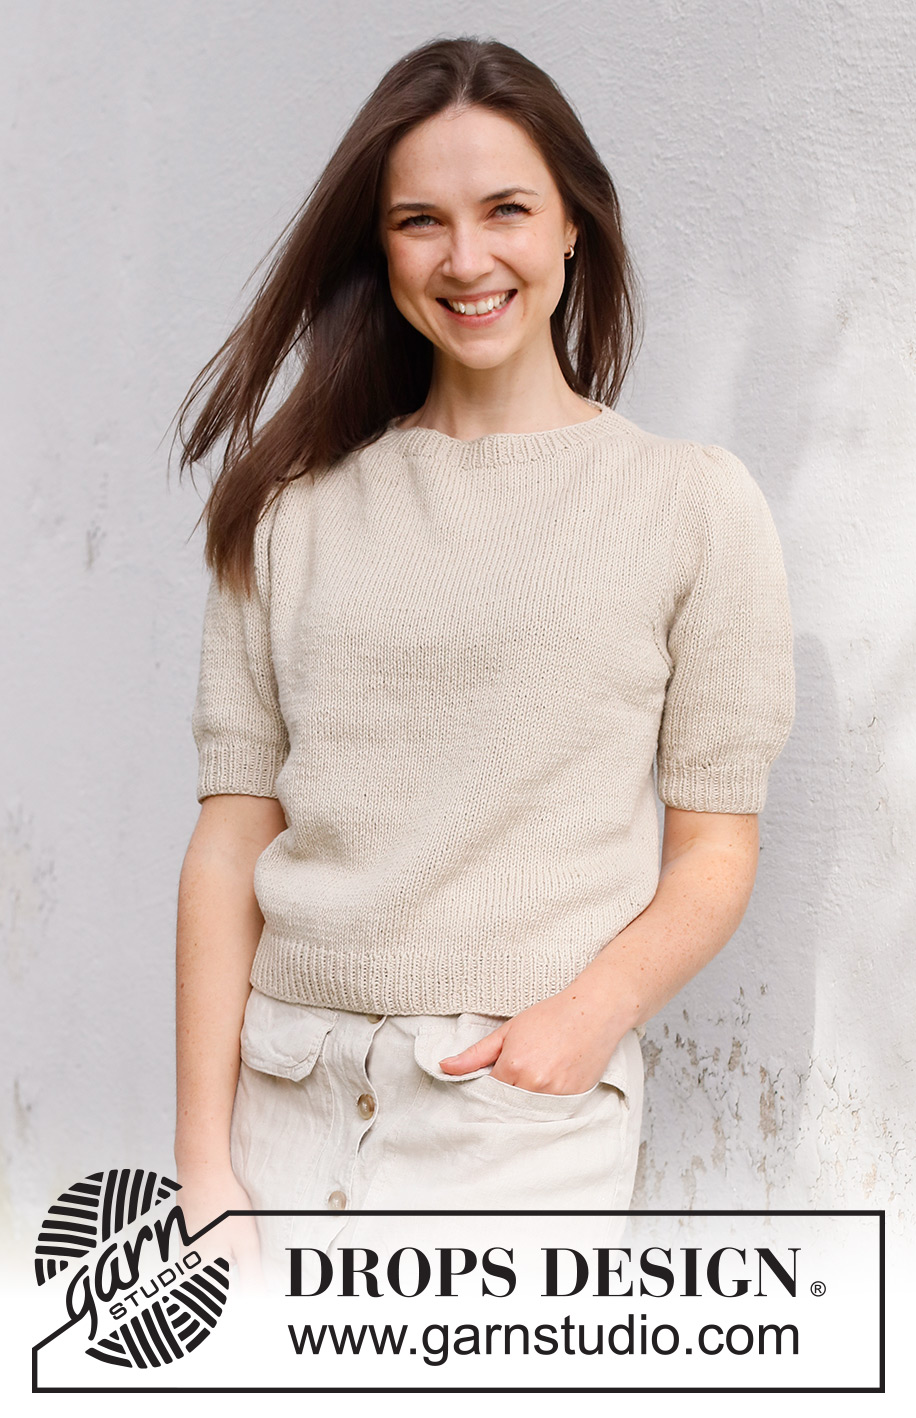
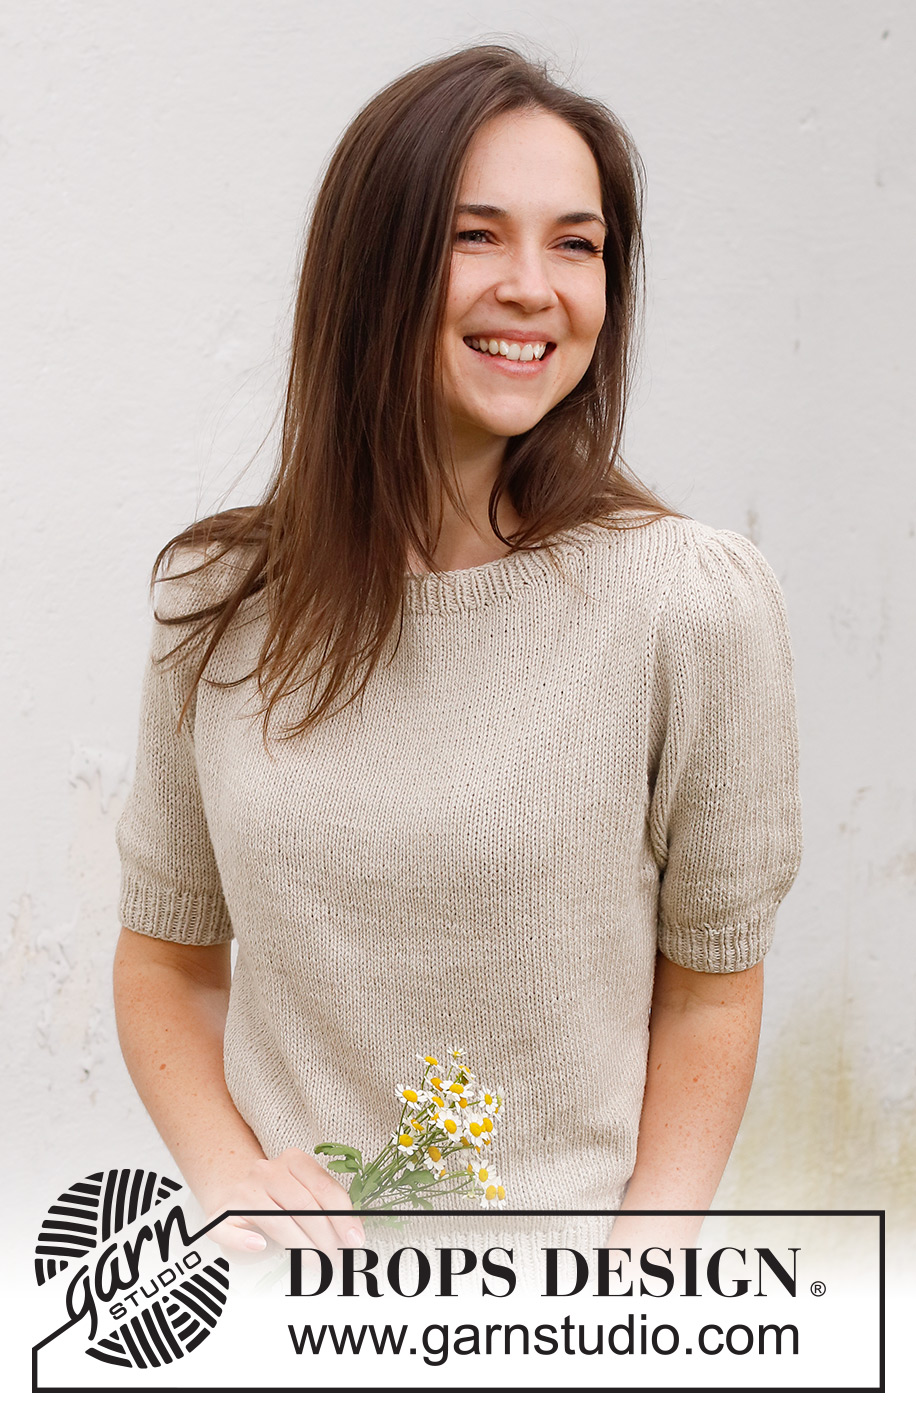
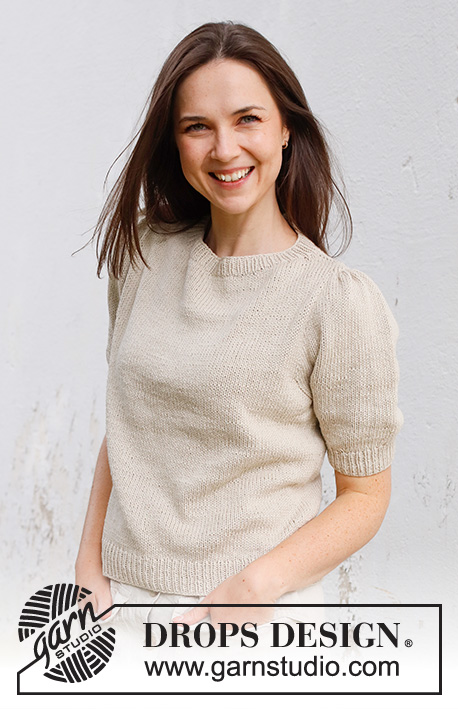
Knitted jumper with short sleeves / t-shirt in DROPS Belle. Piece is knitted top down with shoulder increase, stocking stitch and short puffed sleeves. Size: S - XXXL
DROPS 232-53 |
||||||||||||||||||||||
|
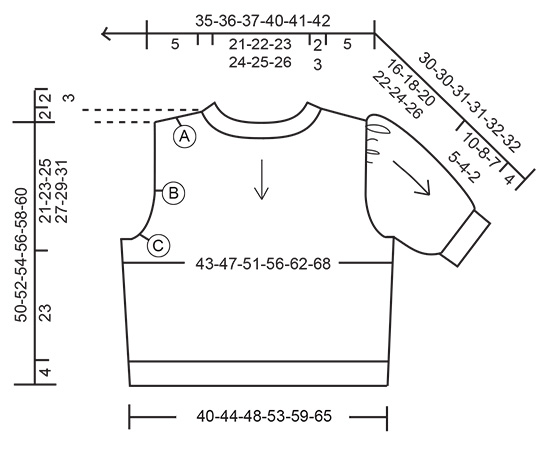
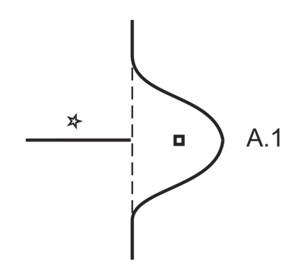
---------------------------------------------------------- EXPLANATION FOR THE PATTERN: ---------------------------------------------------------- ELEVATION (in back of neck): Begin from right side at the marker thread mid back, knit 15-15-16-16-17-18 stitches, turn, tighten yarn and purl 30-30-32-32-34-36. Turn, tighten yarn and knit 45-45-48-48-51-54, turn, tighten yarn and purl 60-60-64-64-68-72. Turn, tighten yarn and knit 75-75-80-80-85-90 (increase for the shoulders as explained in pattern here – the increased stitches are not counted), turn, tighten yarn and purl 90-90-96-96-102-108 (remember increase on shoulder). Turn, tighten yarn and knit until marker mid back. Elevation is done, and increase has been done 2 times in total on shoulder (8 stitches). Then work YOKE as explained in pattern. INCREASE TIP-1 (from right side): BEFORE MARKER: The new stitch is twisted towards the right. Use left needle to pick up yarn between 2 stitches from round below, pick up yarn from the back and knit stitch in front loop of stitch. AFTER MARKER: The new stitch is twisted towards the left. Use left needle to pick up yarn between 2 stitches from round below, pick up yarn from the front and knit stitch in back loop of stitch. INCREASE TIP-2 (from wrong side - only applies when working elevation): BEFORE MARKER: The new stitch is twisted towards the right. Use left needle to pick up yarn between 2 stitches from round below, pick up yarn from the front and purl stitch in back loop of stitch. AFTER MARKER: The new stitch is twisted towards the left. Use left needle to pick up yarn between 2 stitches from round below, pick up yarn from the back and purl stitch in front loop of stitch. DECREASE TIP: Decrease 1 stitch on each side of marker thread as follows: Work until 3 stitches remain before marker thread and knit 2 together, knit 2 (marker thread is between these 2 stitches), slip 1 stitch knitwise, knit 1, pass slipped stitch over stitch worked. ---------------------------------------------------------- START THE PIECE HERE: ---------------------------------------------------------- JUMPER - SHORT OVERVIEW OF THE PIECE: Work neck edge and yoke in the round on circular needle from mid back, top down. Now divide yoke for body and sleeves. Work the body in the round on circular needle. Work sleeves in the round on double pointed needles/a short circular needle. NECK EDGE: Cast on 106-110-114-118-122-126 stitches on circular needle size 3 mm with DROPS Belle. Knit 1 round. Then work rib (knit 1 / purl 1) for 2-2-2-3-3-3 cm. Knit 1 round while increasing 20-20-24-24-28-28 stitches evenly = 126-130-138-142-150-154 stitches. Insert 1 marker in the middle of round (mid front) - measure yoke from this marker! Work yoke as explained below. YOKE: Switch to circular needle size 4 mm. Insert a marker thread at the beginning of round (mid back). In addition insert 2 new markers in the piece as explained below - this is done without working the stitches, and each of these 2 markers are inserted in a stitches. Use these markers when increasing for shoulder. They should be in a different colour than the marker mid front. 1st marker: Begin mid back, count 31-32-34-35-37-38 stitches (½ back piece), insert 1st marker in next stitch. 2nd marker: Count 62-64-68-70-74-76 stitches from 1st marker (front piece), insert 2nd marker in next stitch. 31-32-34-35-37-38 stitches remain on back piece after 2nd marker. Move these 2 markers upwards when working, increase on each side of these markers. Now work an ELEVATION at the back of neck - read explanation above. The elevation makes the garment higher in the back of neck. Note that the shoulder increase is done at the same time as the last 3 rows in elevation is worked - read also the section SHOULDER INCREASE and INCREASE TIP-2 (when working from wrong side). If you don’t want an elevation, move on to shoulder increase. SHOULDER INCREASE: Work in stocking stitch in the round. AT THE SAME TIME on first round increase 4 stitches for shoulder as follows: Increase BEFORE and AFTER stitch with 1st and 2nd marker – read INCREASE TIP-1. Continue like this, and increase on every round 14 times in total = 182-186-194-198-206-210 stitches. REMEMBER THE KNITTING TENSION! After last increase piece measures approx. 5 cm from marker by neck mid front. Work next round as follows: Work stocking stitch until 5-5-6-6-7-7 stitches remain before 1st marker, cast off 11-11-13-13-15-15 stitches (stitch with marker + 5-5-6-6-7-7 stitches on each side of this – these stitches will make a kind of small "flap"), work in stocking stitch until 5-5-6-6-7-7 stitches remain before 2nd marker, cast off 11-11-13-13-15-15 stitches, work in stocking stitch until mid back = 160-164-168-172-176-180 stitches. Now insert 4 new markers in the piece as explained below. This is done while working- use these new markers when increasing for sleeves. Work 40-41-42-43-44-45 stitches in stocking stitch (½ back piece), insert 1st marker, cast on 36-38-40-42-46-50 new stitches on needle for sleeve, insert 2nd marker before next stitch, work 80-82-84-86-88-90 stitches in stocking stitch (front piece), insert 3rd marker, cast on 36-38-40-42-46-50 new stitches on needle for sleeve, insert 4th marker before next stitch, work 40-41-42-43-44-45 stitches in stocking stitch (½ back piece) = 232-240-248-256-268-280 stitches. Then increase for sleeves as explained below. SLEEVE INCREASE: Work in stocking stitch in the round. AT THE SAME TIME on next round increase 4 stitches for sleeves as follows: Increase AFTER 1st and 3rd marker and increase BEFORE 2nd and 4th marker – remember INCREASE TIP-1. Increase now only on sleeves and number of stitches on front piece and back piece stays the same. Work the increased stitches in stocking stitch. Increase like this every other round 18-20-21-22-23-24 times in total = 304-320-332-344-360-376 stitches. Piece now measures approx. 18-19-20-21-21-22 cm from marker by the neck. Work 1-0-0-0-0-0 cm in stocking stitch without increase - piece measures 19-19-20-21-21-22 cm from marker by the neck. Then increase for yoke as explained below. YOKE INCREASE: Work in stocking stitch. AT THE SAME TIME on next round increase 4 stitches for yoke as follows: Increase BEFORE 1st and 3rd marker and AFTER 2nd and 4th marker – remember INCREASE TIP-1. Increase stitches on front piece and back piece, and number of stitches on sleeves stays the same. Repeat increase as follows: S: Increase every 4th round 2 times in total. M: Increase every 3rd round 4 times in total. L, XL, XXL and XXXL: Increase every other round 6-6-7-7 times in total, then on every round 2-5-9-13 times in total. After last increase there are 312-336-364-388-424-456 stitches on row and piece measures approx. 21-23-25-27-29-31 cm from marker mid front. On next round divide yoke for body and sleeves as follows: Work 42-45-50-54-60-65 stitches in stocking stitch (½ back piece), slip the next 72-78-82-86-92-98 stitches on a stitch holder for sleeve, cast on 6-8-8-10-10-12 new stitches on row (in the side under sleeve), work 84-90-100-108-120-130 stitches in stocking stitch (front piece), slip the next 72-78-82-86-92-98 stitches on a stitch holder for sleeve, 6-8-8-10-10-12 new stitches on row (in the side under sleeve) and work the last 42-45-50-54-60-65 stitches in stocking stitch (= ½ back piece). Finish body and sleeves separately. BODY: = 180-196-216-236-260-284 stitches. Insert 1 marker thread in each side – in the middle of the 6-8-8-10-10-12 stitches that were cast on under each sleeve. Begin round at one of the marker threads, and work stocking stitch in the round. When piece measures 6 cm from division, decrease 1 stitch on each side of both marker threads - read DECREASE TIP. Decrease like this every 6 cm 3 times in total = 168-184-204-224-248-272 stitches. Work until piece measures 23 cm from division. Switch to circular needle size 3 mm. Work rib (knit 1/purl 1) for 4 cm. Loosely cast off. Jumper measures approx. 50-52-54-56-58-60 cm from shoulder. SLEEVES: Slip the 72-78-82-86-92-98 stitches from stitch holder in one side of piece on double pointed needles or a short circular needle size 4 mm and pick in addition up 1 stitch in each of the 6-8-8-10-10-12 new stitches cast on under sleeve = 78-86-90-96-102-110 stitches. Insert 1 marker thread mid under sleeve – in the middle of the 6-8-8-10-10-12 stitches. Move the marker thread upwards when working - it should be used for decrease. Begin round at the marker thread, and work stocking stitch in the round. When piece measures 2-2-2-1-1-1 cm, decrease 2 stitches mid under sleeve - remember DECREASE TIP. Decrease like this every 2-1-1-1-1-1 cm 4-6-5-4-3-1 times in total = 70-74-80-88-96-108 stitches. Work until sleeve measures 10-8-7-5-4-2 cm from division. Knit 1 round while decreasing 12-14-18-22-26-34 stitches evenly = 58-60-62-66-70-74 stitches. Switch to double pointed needles size 3 mm. Work rib (knit 1/purl 1) for 4 cm. Loosely cast off. Sleeve measures approx. 14-12-11-9-8-6 cm from division. Work the other sleeve the same way. ASSEMBLY: Baste a strand up and down through cast-on edge at the top on sleeve. Wrinkle the sleeve cap so that it fits in a straight line to the opening where stitches were cast off on shoulder - NOTE: Stitches cast off on shoulder will form a small "flap" - this flap should lie under the sleeve cap and give extra support for the puff. Sew sleeve cap to opening in a straight line - see A.1 (figure shows shoulder and flap seen from above). Repeat in the other side. |
||||||||||||||||||||||
Diagram explanations |
||||||||||||||||||||||
|
||||||||||||||||||||||
 |
||||||||||||||||||||||
 |
||||||||||||||||||||||
Have you finished this pattern?Tag your pictures with #dropspattern #maytee or submit them to the #dropsfan gallery. Do you need help with this pattern?You'll find 31 tutorial videos, a Comments/Questions area and more by visiting the pattern on garnstudio.com. © 1982-2026 DROPS Design A/S. We reserve all rights. This document, including all its sub-sections, has copyrights. Read more about what you can do with our patterns at the bottom of each pattern on our site. |
||||||||||||||||||||||


With over 40 years in knitting and crochet design, DROPS Design offers one of the most extensive collections of free patterns on the internet - translated to 17 languages. As of today we count 324 catalogues and 12290 patterns translated into English (UK/cm). 12290
We work hard to bring you the best knitting and crochet have to offer, inspiration and advice as well as great quality yarns at incredible prices! Would you like to use our patterns for other than personal use? You can read what you are allowed to do in the Copyright text at the bottom of all our patterns. Happy crafting!
Post a comment to pattern DROPS 232-53
We would love to hear what you have to say about this pattern!
If you want to leave a question, please make sure you select the correct category in the form below, to speed up the answering process. Required fields are marked *.