
Popular categories
Looking for a yarn?


Comments / Questions (135)
![]() JULIA wrote:
JULIA wrote:
Al hacer las divisiones como indica en la talla s , me faltarian 10 pts.
28.04.2026 - 11:37
![]() Lenia wrote:
Lenia wrote:
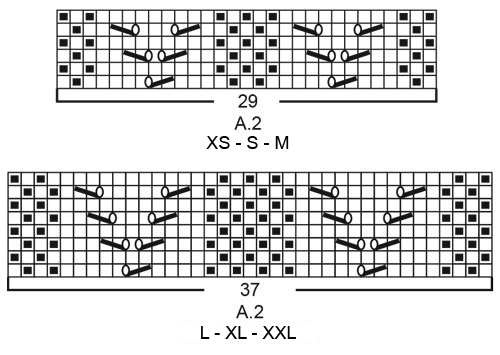
Hello, I would like to ask you, about the correction of the pattern. Which A2, is the right one, for medium size, the one with 29 stitches or the other one with 37? I read A2 for all sizes but It's not clear which one.Thank you
28.04.2026 - 07:57DROPS Design answered:
Dear Lenia, in size M follow diagram A.2 over 29 sts (for XS, S and M). Happy knitting!
28.04.2026 - 08:50
![]() Angela wrote:
Angela wrote:
Ik heb een vraag. Ik wil heel graag dit hemdje maken omdat ik het een heel mooi ontwerp vind. Ik heb een proeflapje gebreid met het garen wat ik wil gebruiken en ik heb 28 steken geteld op 10 cm. Ik brei meestal voor maat XL. Hoeveel steken heb ik dan nodig. Ik kom er zelf niet uit.
20.04.2026 - 18:54DROPS Design answered:
Dag Angela,
We hebben een artikel op de site staan waarin uitgelegd wordt hoe je garen kunt vervangen door een ander garen en hoe je dit uitrekent. Zie hier.
21.04.2026 - 09:00
![]() Chrissy wrote:
Chrissy wrote:
Hello, how do I finish the i-cord straps? Should I knit one row flat and bind off before I sew them to the back? The pattern says to pull the yarn through the five stitiches which I don't quite understand. Is this meant from right to left with the right side facing me? If I do that, how do I sew the straps. Thanks in advance.
29.03.2026 - 14:45DROPS Design answered:
Dear Chrissy, cut the yarn and use a yarn needle to pull the yarn through all stitches, from the right towards the left, tighten together and sew the end of this I-cord / small tube with small stitches. Happy knitting!
07.04.2026 - 13:01
![]() Ruth wrote:
Ruth wrote:
Hallo, wenn ich an der Seite alle 10cm jeweils zwei Maschen zunehme geht das Muster nicht auf. Ist es richtig das an der Seite jeweils das Muster unterbrochen wird wegen der Zunahme?
21.03.2026 - 07:18DROPS Design answered:
Liebe Ruth, dann stricken Sie A.1 und A.3 beidseitig von A.2 wie zuvor, dh es sind weniger Maschen am Anfang A.1 und am Ende A.3 aber die andere Maschen stricken Sie wie zuvor damit das Muster wie zuvor über die restlichen Maschen weiterfortsetzt. Viel Spaß beim Stricken!
23.03.2026 - 07:59
![]() Gry Jørstad wrote:
Gry Jørstad wrote:
Hvorfor er mønsteret på bakstykket asymetrisk? Hvorfor avsluttes det med mønster A4?
13.03.2026 - 09:12DROPS Design answered:
Hei Gry. Tenker du på x antall glattstrikkede maskene før første/siste hullmønster på A.1 og A.4 som ikke er lik? Hvilken str. strikker du? mvh DROPS Design
16.03.2026 - 11:39
![]() Ingrid wrote:
Ingrid wrote:
Good morning, I am enjoying my first time knitting a top so far. I am currently at the row 15 (I did the first increase after 5cm, row 11), right after the 14 stitches between A3 and A1. If I knit 14 stitches, the eyelet won't be offset as presented on the picture... should I knit 14 stitches or should I knit 18 (14+ the 4 increased)? Thank you so much!
14.02.2026 - 10:52
![]() Inês Barata wrote:
Inês Barata wrote:
Boa noite. A dúvida que tenho é a seguinte : quando fazemos os aumentos nas laterais ao fazer o esquema A1, passamos a fazer 8 malhas (em vez de sete), depois 9, depois 10, etc.? Ou seja, até terminarmos os aumentos o número de malhas do esquema A1 vai sempre aumentando, certo? Muito obrigada.
12.02.2026 - 21:41DROPS Design answered:
Bom dia, Tendo em conta de que o top é tricotado numa só peça, fazem-se 2 aumentos em cada um dos lados, ou seja, fazem-se 4 aumentos por carreira. Estes aumentos são feitos fora de qualquer um dos diagramas (A.1, A.2, A.3 e A.4) sendo feitos nas partes em meia que se tricotam nos lados do top, como indicado nas explicações: Quando a peça medir 5-5-5-6-6-6 cm, aumentar 1 malha de cada lado dos 2 fios marcadores – ver AUMENTOS (= aumenta-se 4 malhas). Aumentar desta maneira 4 vezes ao todo de cada lado da peça a cada 5-5-5-5½-5½-6 cm = 181-201-221-247-275-299 malhas. Bons tricôs! A equipa DROPS
13.02.2026 - 11:21
![]() Jessica wrote:
Jessica wrote:
Muy buenas ! Mi pregunta es que cuando hacemos los aumentos a cada lado de los laterales. Luego al hacer el diagrama A1 como debo hacerlo, cuento los 7 primeros puntos y comienzo el diagrama, o al aumentar debo contar 8 y continuar con el diagrama A1 y para los aumentos siguientes? Estoy tejiendo la talla M. Gracias.
09.02.2026 - 00:11
![]() Phoebe wrote:
Phoebe wrote:
Nevermind I understand now, just read the lesson about the diagram measurements.
18.10.2025 - 21:54
|
||||||||||||||||
Heart on Fire#heartonfiretop |
||||||||||||||||
 |
 |
|||||||||||||||
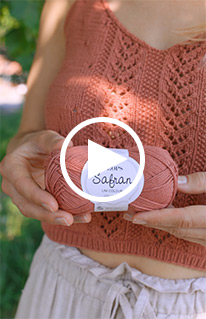
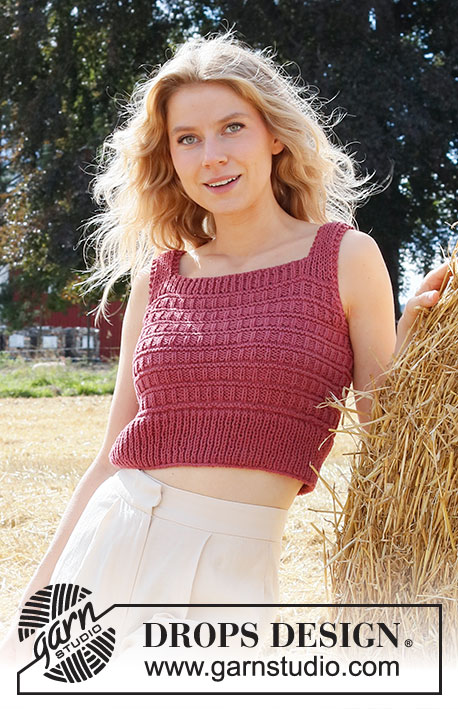
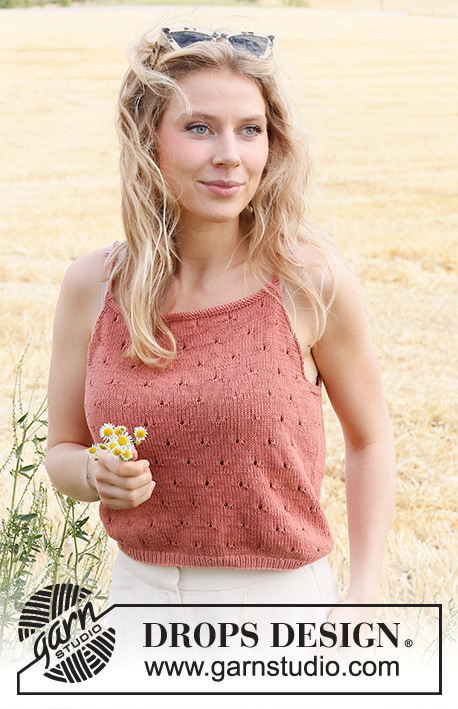
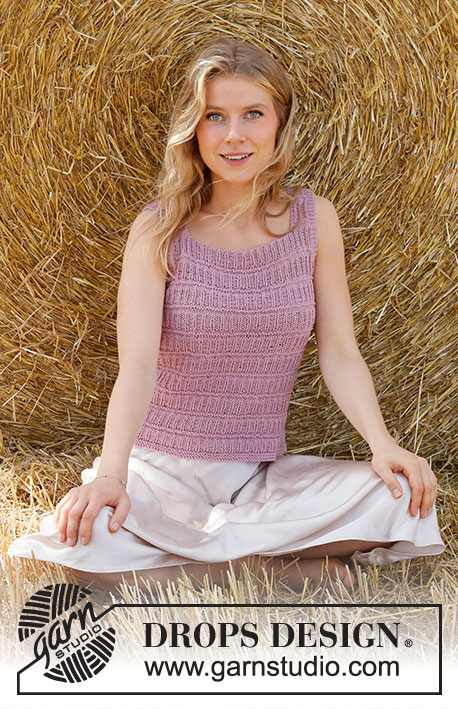
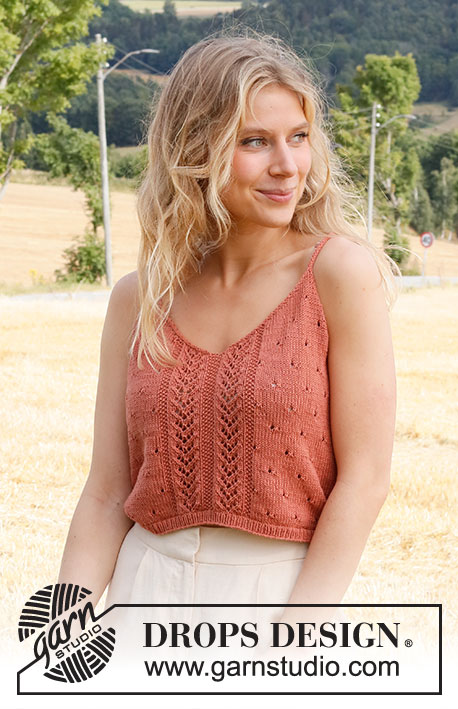
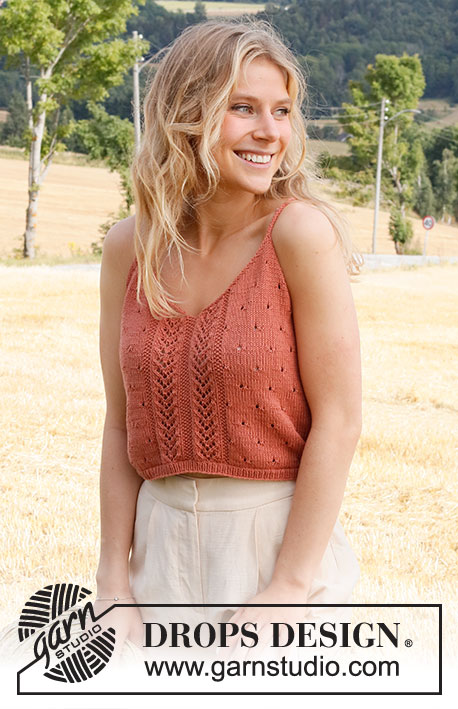
Knitted top in DROPS Safran. Piece is knitted with lace pattern and V-neck. Size: XS - XXL.
DROPS 223-27 |
||||||||||||||||
|
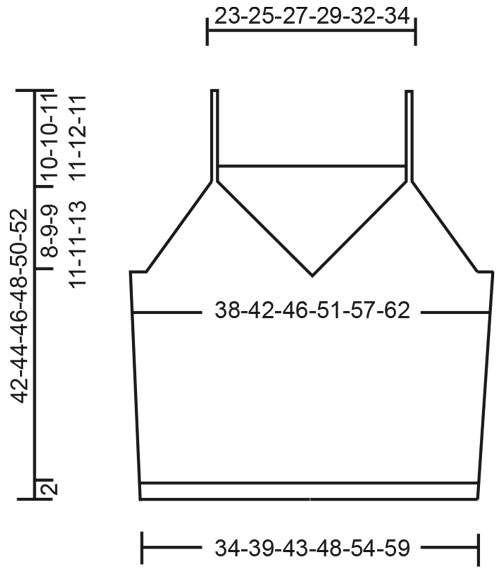
------------------------------------------------------- EXPLANATION FOR THE PATTERN: ------------------------------------------------------- GARTER STITCH (worked in the round): 1 ridge vertically = 2 rounds, i.e. knit 1 round and purl 1 round. GARTER STITCH (back and forth): Knit all rows. 1 ridge vertically = knit 2 rows. PATTERN: See diagrams A.1 to A.4. Choose diagram for your size (applies to A.2). Diagrams show all rows in pattern seen from the right side. DECREASE TIP-1 (evenly spaced): To calculate how to decrease evenly use the total number of stitches on row (e.g. 174 stitches) and divide stitches by number of decreases to be done (e.g. 10) = 17.4. In this example work alternately approx. every 16th and 17th stitch and every 17th and 18th stitch together. DECREASE TIP-2 (applies to the armholes and V-neck): Decrease inside 1 edge stitch in garter stitch. FROM RIGHT SIDE: DECREASE AS FOLLOWS AFTER 1 EDGE STITCH IN GARTER STITCH: Slip 1 stitch knitwise, knit 1, pass slipped stitch over stitch worked DECREASE AS FOLLOWS BEFORE 1 EDGE STITCH IN GARTER STITCH: Work until 2 stitches remain before edge stitch in garter stitch, knit these 2 together. FROM WRONG SIDE: DECREASE AS FOLLOWS AFTER 1 EDGE STITCH IN GARTER STITCH: Purl 2 together. DECREASE AS FOLLOWS BEFORE 1 EDGE STITCH IN GARTER STITCH: Work until 2 stitches remain before edge stitch in garter stitch, purl these 2 twisted together. INCREASE TIP (applies to sides of body): Work until 2 stitches remain before marker thread, make 1 yarn over, knit 4 (marker thread is in the middle of these 4 stitches), make 1 yarn over (= 2 stitches increased at the marker thread and 4 stitches increased on increase round in total). On next round knit yarns over twisted to avoid holes. Then work the new stitches in stocking stitch until they fit the pattern. ------------------------------------------------------- START THE PIECE HERE: ------------------------------------------------------- TOP - SHORT OVERVIEW OF THE PIECE: Work body in the round on circular needle, from the bottom and up to armholes. Then finish front piece and back piece separately. Divide the front piece mid front for V-neck, and work the two parts back and forth on circular needle separately until finished measurements, then work strap on each front piece. Work back piece back and forth on circular needle until finished measurements. Sew straps from front piece on to back piece. BODY: Cast on 174-196-216-244-272-298 stitches on circular needle size 2.5 mm with Safran. Knit 1 round. Then work rib in the round (= knit 1/purl 1) for 1½ to 2 cm. When rib is done, knit 1 round while decreasing 9-11-11-13-13-15 stitches evenly - read DECREASE TIP-1= 165-185-205-231-259-283 stitches. Switch to circular needle size 3 mm. Insert 1 marker thread at beginning of round and 1 marker thread after 83-93-103-115-129-141 stitches. 82-92-102-116-130-142 stitches remain on round for back piece. Move the marker threads upwards when working; they should be used for increase later in the sides on body. Work next round as follows: Work 7-2-7-9-6-2 stitches in stocking stitch, work A.1 over the next 20-30-30-30-40-50 stitches (= 2-3-3-3-4-5 repetitions of 10 stitches), work A.2 (= 29-29-29-37-37-37 stitches), work A.3 over the next 20-30-30-30-40-50 stitches (= 2-3-3-3-4-5 repetitions of 10 stitches), work 14-4-14-18-12-4 stitches in stocking stitch (marker thread is in the middle of these stitches), work A.1 over the next 60-80-80-90-110-130 stitches (= 6-8-8-9-11-13 repetitions of 10 stitches), work A.4 (= 8 stitches), and finish with 7-2-7-9-6-2 stitches in stocking stitch. Continue pattern like this. REMEMBER THE KNITTING TENSION! When piece measures 5-5-5-6-6-6 cm, increase 1 stitch on each side of both marker threads – read INCREASE TIP (= 4 stitches increased). Increase like this every 5-5-5-5½-5½-6 cm 4 times in total in each side = 181-201-221-247-275-299 stitches. Work until piece measures 23-24-25-25-26-27 cm - adjust so that next round is an odd numbered round in A.1 (this is important to avoid the lace pattern begin worked from wrong side when piece is divided into front and back piece). Now work in 2 ridges in GARTER STITCH - read explanation above, over the middle 8-10-12-16-20-26 stitches in each side (i.e. work 4-5-6-8-10-13 stitches in garter stitch on each side of both marker threads – work the other stitches as before). After the 2 ridges cast off for armholes and V-neck, i.e. work next round as follows: Cast off 3-4-5-7-9-12 stitches for armhole, work 42-46-50-54-59-62 stitches as before (= left front piece), cast off 1 stitch (= mid front), work 42-46-50-54-59-62 stitches as before (= right front piece), cast off 6-8-10-14-18-24 stitches for armhole, work as before over stitches on back piece until 3-4-5-7-9-12 stitches remain on round, and cast off the last 3-4-5-7-9-12 stitches for armhole. Cut the yarn and pull yarn through last stitch Finish back piece and front pieces separately. BACK PIECE: = 84-92-100-110-120-126 stitches. Begin from wrong side and continue pattern back and forth with 1 edge stitch in garter stitch in each side. AT THE SAME TIME on next row from right side begin decrease for armholes - read DECREASE TIP-2. Decrease for armholes in each side on every other row (i.e. every row from right side) 14-16-18-20-22-22 times in total in each side = 56-60-64-70-76-82 stitches. After last decrease work 1 row from wrong side as before. Switch to circular needle size 2.5 mm. Work 2 ridges back and forth over all stitches. Cast off knitting from right side. LEFT FRONT PIECE (when garment is worn): = 42-46-50-54-59-62 stitches. Begin from wrong side and continue pattern back and forth with 1 edge stitch in garter stitch in each side. AT THE SAME TIME on next row from right side begin decrease for armholes and V-neck and decrease as explained below – read DECREASE TIP-2: ARMHOLE: Decrease 1 stitch on every other row 13-14-15-17-18-20 times in total. V-NECK: Decrease 1 stitch on every row (i.e. from both right and wrong side) 24-27-30-32-36-37 times total. After all decreases for armholes and V-neck, 5 stitches remain on row for strap. Work strap as explained below. STRAP: Switch to 2 double pointed needles 2.5 mm (slip stitches on one needle and work with the other). * Move stitches to the beginning of row, tighten yarn and knit the 5 stitches from right side *, work from *-* until strap measures approx. 18-18-19-20-21-20 cm (10-10-11-11-12-11 cm of this length belongs to front piece, the rest belongs to back piece - sew strap to back piece). Cut the yarn and pull yarn through the 5 stitches, tighten together and fasten. RIGHT FRONT PIECE (when garment is worn): = 42-46-50-54-59-62 stitches. Begin from wrong side and continue pattern back and forth with 1 edge stitch in garter stitch in each side. AT THE SAME TIME on next row from right side begin decreases for V-neck and armholes and decrease as explained below – read DECREASE TIP-2: V-NECK: Decrease 1 stitch on every row (i.e. from both right and wrong side) 24-27-30-32-36-37 times total. ARMHOLE: Decrease 1 stitch on every other row 13-14-15-17-18-20 times in total. After all decreases for V-neck and armholes, 5 stitches remain on row for strap. Work strap the same way as on left front piece. ASSEMBLY: Sew straps to back piece at the edge in each side. |
||||||||||||||||
Diagram explanations |
||||||||||||||||
|
||||||||||||||||
 |
||||||||||||||||
 |
||||||||||||||||
 |
||||||||||||||||
Have you finished this pattern?Tag your pictures with #dropspattern #heartonfiretop or submit them to the #dropsfan gallery. Do you need help with this pattern?You'll find 26 tutorial videos, a Comments/Questions area and more by visiting the pattern on garnstudio.com. © 1982-2026 DROPS Design A/S. We reserve all rights. This document, including all its sub-sections, has copyrights. Read more about what you can do with our patterns at the bottom of each pattern on our site. |
||||||||||||||||


With over 40 years in knitting and crochet design, DROPS Design offers one of the most extensive collections of free patterns on the internet - translated to 17 languages. As of today we count 324 catalogues and 12290 patterns translated into English (UK/cm). 12290
We work hard to bring you the best knitting and crochet have to offer, inspiration and advice as well as great quality yarns at incredible prices! Would you like to use our patterns for other than personal use? You can read what you are allowed to do in the Copyright text at the bottom of all our patterns. Happy crafting!
Post a comment to pattern DROPS 223-27
We would love to hear what you have to say about this pattern!
If you want to leave a question, please make sure you select the correct category in the form below, to speed up the answering process. Required fields are marked *.