
Categorías populares
¿Buscas un hilo?


Comentarios / Preguntas (54)
![]() April escribió:
April escribió:
Is there a tutorial to show placement of markers? Sweater is my next project
11.03.2026 - 04:06DROPS Design respondió:
Hi April, Here is a link to our video showing you how to use stitch markers: https://www.garnstudio.com/video.php?id=67&lang=en Regards, Drops Team.
11.03.2026 - 06:42
![]() Jaslie escribió:
Jaslie escribió:
Hi I have a question after I’m on my second row of the a2 a and a3 a charts meaning I already did the first increase on that chart and I’m on the round where u work the increase twisted. Do I purl that first stich after the marker or do I do one stockinette stich and then start the chart like the previous row? Making it so that the purl stich would be on the increased stich from the previous round?
16.12.2025 - 18:20
![]() Samuel escribió:
Samuel escribió:
Hello! Is the cabling only supposed to be on the front of the sweater? If it is, could i adjust the pattern and knit cable on both front and back of the sweater, or would that affect the sizing?
11.06.2025 - 14:19DROPS Design respondió:
Dear Samuel, on this pattern the cables are only on front piece; you can probably adapt the pattern to get the cable on front piece, or look at the other jumpers for men with cables here. Happy knitting!
11.06.2025 - 16:01
![]() Josh escribió:
Josh escribió:
Hi! I am a new knitter and this is my first project. I got stuck while knitting the Yoke. It says to knit one round and then increase on the next while starting A2&3.a. In the diagram it says to increase on the first round of A.2a. Can someone please clear this up for me.
30.03.2025 - 20:04DROPS Design respondió:
Dear Josh, in the yoke, first you knit 1 round and increase stitches evenly. In the next round you insert the markers as you work the round. Now increase on each side of the markers every other round 19-20-22-24-26-30 times in total (these are raglan increases and are not dependent on the charts). After the increases have been made 3-3-2-2-1-1 times, you will start increasing in the front piece, according to charts A.2a and A.3a, on each side of the central A.1 chart. The increases in A.2a and A.3a are only for the front piec and you will continue with the increases on each side of each marker as before. Happy knitting!
30.03.2025 - 21:08
![]() Jana escribió:
Jana escribió:
Good afternoon! I am a bit confused with the charts for a2 and a3 and the wording of how they fit in with A3b and A2b? I have never worked two charts over each other when cabling so please excuse my ignorance! I am trying to figure out how I knit over each other? Thank you for your patience with me! I have started the neck and it is a beautiful design!
07.03.2025 - 00:51DROPS Design respondió:
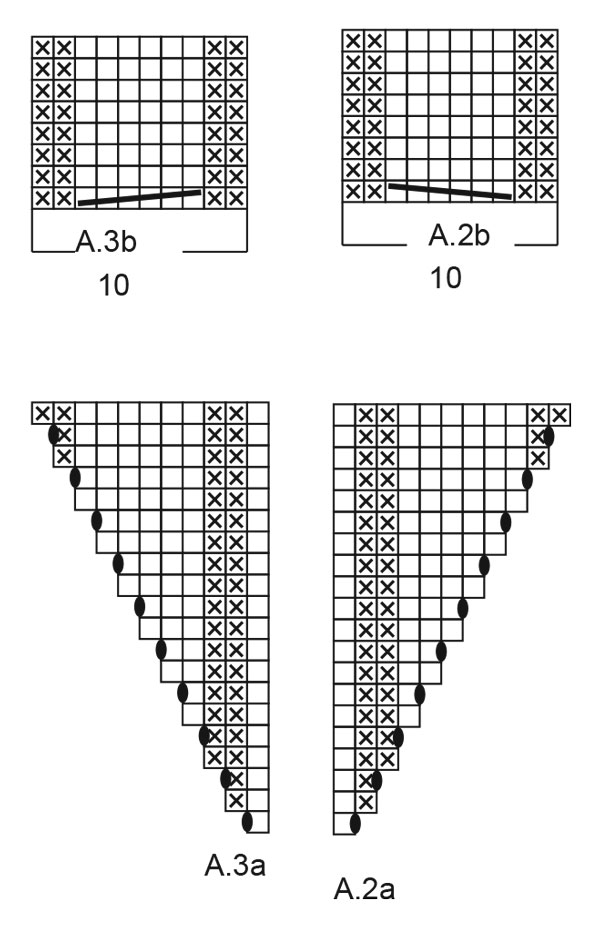
Dear Jana, when diagrams A.2a and A.3a are done, you will just have to adjust diagrams A.2b and A.3b over the stitches worked previously, ie over the P2, K6,P2 at the beg of A.2a/end of A.3a, work the P2, (cable / K6), P2 in A.2b and A.3b. Then repeat the diagrams A.2b and A.3b (this means a cable will be worked every 8th row). Happy knitting!
07.03.2025 - 09:55
![]() Michelle escribió:
Michelle escribió:
Après avoir placer les marqueurs, nous avons 17m, 14m, 10m-18m-10m = 38m , 14m, 18m, après les 24 augm j'ai 17 +24 =41 m pour le demi dos, 14 + 24×2 =62 m pour la manche, 38 +24×2 =86m pour le devant, de nouveau 62m pour les manches et 18 m+24 m= 42 m pour le demi dos. Je ne retrouve pas les même chiffres dans la suite des explications après l empiècement pourtant j'ai bien les 293m de la taille xl... Ou est le problème ? Merci
17.02.2025 - 22:50DROPS Design respondió:
Bonjour Michelle, lors de la division, la 1ère maille de la 1ère manche sera attribuée au dos, la dernière maille de la 1ère manche et la 1ère maille de la 2ème manche seront attribuées au devant et la dernière maille de la 2ème manche sera attribuée au dos, ainsi, vous aurez bien vos 41 m du dos + 1 m de la manche = 42 m au début/à la fin du tour et 62 m des manches - 2 = 60 m en attente pour les manches et 86 m du devant + 2 m = 88 m pour le devant. Bon tricot!
18.02.2025 - 10:01
![]() Raffaella escribió:
Raffaella escribió:
Hello! I'm starting the Snow Trail jumper. Is the recommended knitting tension (16 sts in 10 cm with 5.5 needles) obtained before or after blocking? Thanks in advance Raffaella
29.01.2025 - 18:55DROPS Design respondió:
Dear Raffaela, we are not used to block, but if you think there might be a difference , then you might try to first block your swatch. Happy knitting!
30.01.2025 - 09:51
![]() Hilary escribió:
Hilary escribió:
I’m struggling to get A2a & A 3a. On the diagram which edge is the marker at? Right hand side of A2a and left hand side of A3a
21.01.2025 - 19:18DROPS Design respondió:
Dear Hillary, correct, work until 2nd marker, then work 1 stitch in stocking stitch, A.2a (= 1 stitch), 7-9-10-10-11-11 stitches in stocking stitch, A.1 over 18 stitches as before, 7-9-10-10-11-11 stitches in stocking stitch, A.3a (= 1 stitch), 1 stitch in stocking stitch (3rd marker is here), Happy knitting!
22.01.2025 - 09:09
![]() Raffaella escribió:
Raffaella escribió:
Hello!I'm knitting model Snow Trail in size S. Does it make any difference if I increase by M1R and M1L instead of yarn-over? Thanks in advance!
20.01.2025 - 19:01DROPS Design respondió:
Dear Raffaella, as long as you gauge is correct (for stitches and row-count as well), and you are careful which way your increases are leaning, and remember to increase at the correct places, you can substitute the increases. Happy Knitting!
20.01.2025 - 21:16
![]() Hilary escribió:
Hilary escribió:
I’m doing the extra large size. I did the initial first round increases at the raglan markers. My next row would be no increases or do I make the A.2a & A.3a . The pattern says work increases as before until the second marker. It looks like I am not alone with this problem. Hope you can help
19.01.2025 - 18:41DROPS Design respondió:
Dear Hilary, after working the initial increases 2 times, you will continue working increases while working the cable pattern. The sleeves and back piece are still worked in stocking stitch as before; the only part that changes is the section between markers 2 and 3 (front piece). Here, you work: 1 st in stocking stitch, A.2a (= 1 stitch), 10 sts in stocking stitch, A.1 over 18 stitches, 10 sts in stocking stitch, A.3a (= 1 stitch), 1 st in stocking stitch (the increases are now in the charts). The increases in the chart are in every 2nd round (as you can see in the charts) so you will continue increasing every 2nd round as before. Happy knitting!
19.01.2025 - 20:37
|
||||||||||||||||
Snow Trail#snowtrailsweater |
||||||||||||||||
 |
 |
|||||||||||||||
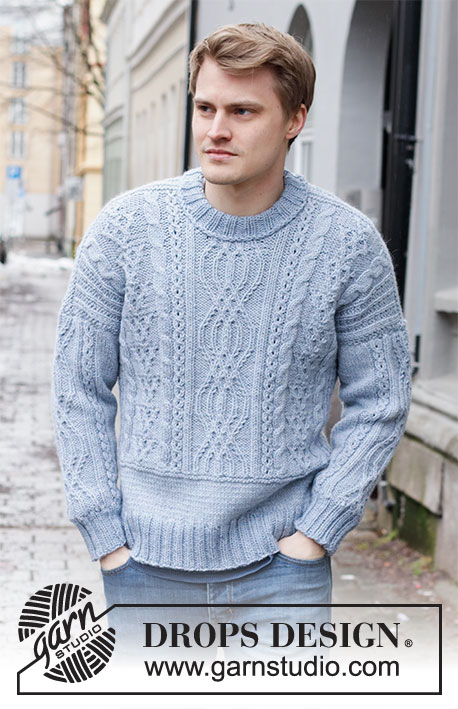
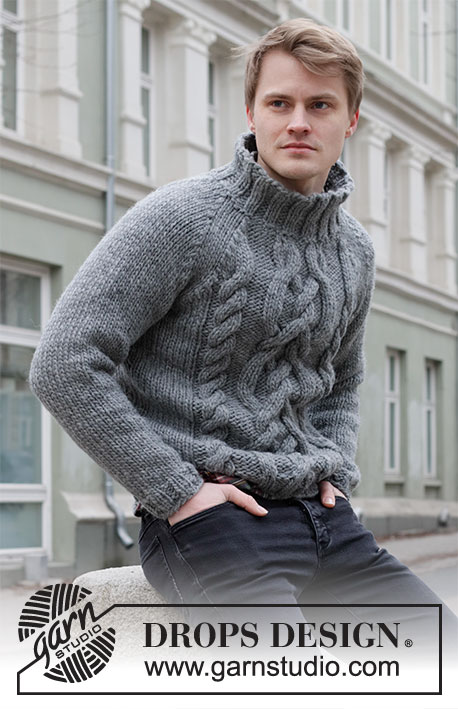
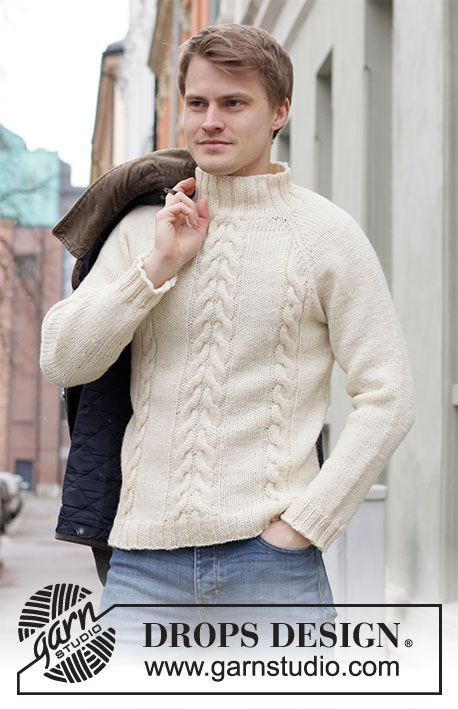
Jersey de punto para hombre con raglán en DROPS Nepal. La pieza está tejida de arriba para abajo con torsadas y punto jersey. Tallas: S – XXXL.
DROPS 219-8 |
||||||||||||||||
|
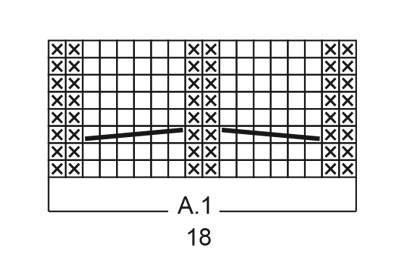
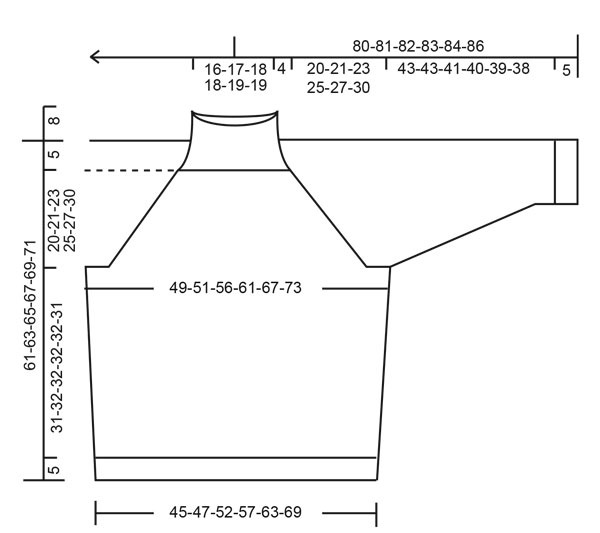
EXPLICACIONES PARA REALIZAR EL PATRÓN: ------------------------------------------------ PATRÓN: Ver diagramas A.1 a A.3. TIP PARA AUMENTAR (aplicar al raglán): Tejer hasta que reste 1 punto antes del marcador, 1 lazada (= 1 punto aumentado), tejer 2 puntos derechos, 1 lazada (= 1 punto aumentado). Aumentar así en todos los marcadores (= 8 puntos aumentados). Tejer las lazadas retorcidas en la vuelta siguiente. Tejer los puntos aumentados dentro del patrón. Es decir, en la pieza de la espalda tejerlos en punto jersey, en la pieza del frente tejer los aumentos primero en punto jersey, después en el patrón A.2a/A.3a y después en punto jersey. TIP PARA DISMINUIR (aplicar al lado del cuerpo y las mangas): Disminuir 1 punto a cada lado del hilo marcador de la manera siguiente: Tejer hasta que resten 4 puntos antes del hilo marcador y tejer 2 puntos juntos de derecho, tejer 4 puntos derechos (el hilo marcador está en el centro de estos puntos), deslizar 1 punto como de derecho, 1 derecho, pasar el punto deslizado por encima del punto tejido. TIP PARA REMATAR: Para evitar una orilla de remate apretada, se puede usar una aguja más grande. Si aún estuviese apretada, hacer 1 lazada después de aprox. cada 4º punto, rematar estas lazadas como puntos normales. ------------------------------------------------ COMENZAR LA PIEZA AQUÍ: ------------------------------------------------ JERSEY – RESUMEN DE LA PIEZA: Tejer la orilla del escote y el canesú en redondo en aguja circular a partir del centro de la espalda, de arriba para abajo. Ahora dividir el canesú para el cuerpo y las mangas. El cuerpo se teje en redondo en aguja circular, de arriba para abajo. Tejer las mangas en redondo en agujas de doble punta, de arriba para abajo. ORILLA DEL ESCOTE: Montar 80-84-88-96-96-104 puntos en aguja circular tamaño 4.5 mm con Nepal. Tejer en resorte = 2 derechos/2 reveses durante 8 cm. Las vueltas comienzan en el centro de la espalda. Cambiar a aguja circular tamaño 5.5 mm. Insertar 1 marcador al principio de la vuelta, ¡medir el canesú a partir de este marcador! CANESÚ: Tejer 1 vuelta de derecho y aumentar 5-9-13-5-13-5 puntos distribuidos equitativamente = 85-93-101-101-109-109 puntos. Tejer la vuelta siguiente de la manera siguiente (insertar marcadores entre los puntos): Tejer 13-15-17-17-19-19 puntos (= mitad pieza de la espalda), insertar el 1er marcador, 14 puntos en punto jersey (= manga), insertar el 2º marcador, 6-8-10-10-12-12 puntos en punto jersey, A.1 (= 18 puntos), 6-8-10-10-12-12 puntos en punto jersey (= pieza del frente), insertar el 3er marcador, 14 puntos en punto jersey (= manga), insertar el 4º marcador, tejer 14-16-18-18-20-20 puntos en punto jersey (= última mitad de la pieza de la espalda). Mover los marcadores hacia arriba a medida que se teje, aumentar para el raglán a cada lado de cada marcador. En la vuelta siguiente aumentar 1 punto a cada lado de cada marcador - ¡leer TIP PARA AUMENTAR! Aumentar así a cada 2 vueltas 19-20-22-24-26-30 veces en total, pero después de haber hecho los aumentos 3-3-2-2-1-1 veces, aumentar en el patrón en la pieza del frente, ¡LEER EL RESTO DE LA SECCIÓN ANTES DE CONTINUAR! Cuando se han hecho los aumentos 3-3-2-2-1-1 veces, tejer la vuelta siguiente de la manera siguiente: Tejer y aumentar como antes hasta el 2º marcador, tejer 1 punto en punto jersey, A.2a (= 1 punto), 7-9-10-10-11-11 puntos en punto jersey, A.1 sobre 18 puntos como antes, 7-9-10-10-11-11 puntos en punto jersey, A.3a (= 1 punto), 1 punto en punto jersey (el 3er marcador está aquí), tejer y aumentar el resto de la vuelta como antes. ¡RECORDAR MANTENER LA MISMA TENSIÓN DE TEJIDO DE LA MUESTRA! Cuando se han tejido A.2a y A.3a 1 vez verticalmente, aumentar como está explicado bajo TIP PARA AUMENTAR (es decir, tejer los aumentos en la pieza del frente en punto jersey) hasta haber hecho los aumentos un total de 19-20-22-24-26-30 veces, y tejer A.2b y A.3b sobre A.2a y A.3a (ajustar para hacer la torsada en la misma vuelta que A.1) = 237-253-277-293-317-349 puntos. La pieza mide aprox. 19-20-22-24-26-29 cm a partir del marcador en el centro de la espalda. Ahora tejer el patrón hasta que la pieza mida 20-21-23-25-27-30 cm a partir del marcador. Ahora dividir la pieza para las mangas y el cuerpo de la manera siguiente: Tejer los primeros 34-35-39-42-47-52 puntos (= mitad pieza de la espalda), deslizar los 48-54-58-60-62-68 puntos siguientes en un gancho auxiliar para la manga y montar 10-10-10-12-12-12 puntos bajo la manga, tejer los 72-74-82-88-98-108 puntos siguientes como antes (= pieza del frente), deslizar los 48-54-58-60-62-68 puntos siguientes en un gancho auxiliar para la manga y montar 10-10-10-12-12-12 puntos bajo la manga, tejer los últimos 35-36-40-43-48-53 puntos (= mitad pieza de la espalda). CUERPO: = 161-165-181-197-217-237 puntos. Insertar 1 hilo marcador en el centro de los 10-10-10-12-12-12 nuevos puntos bajo la manga (= en el lado del cuerpo). Mover los hilos marcadores hacia arriba a medida que se teje; serán usados cuando se disminuya en los lados más tarde. Continuar en redondo con punto jersey y el patrón como antes. Cuando la pieza mida 5 cm a partir de la división, disminuir 1 punto a cada lado de los hilos marcadores – leer TIP PARA DISMINUIR (= 4 puntos disminuidos). Disminuir así a cada 9 cm 3 veces en total = 149-153-169-185-205-225 puntos. Cuando la pieza mida 31-32-32-32-32-31 cm a partir de la división, tejer 1 vuelta de derecho y, AL MISMO TIEMPO, aumentar 11-15-11-15-11-15 puntos distribuidos equitativamente = 160-168-180-200-216-240 puntos. Cambiar a aguja circular tamaño 4.5 mm y tejer en resorte 2 derechos/2 reveses en redondo. Rematar con derecho sobre derecho y revés sobre revés cuando el resorte mida 5 cm – leer TIP PARA REMATAR. La pieza mide aprox. 36-37-37-37-37-36 cm a partir de la división. MANGAS: Deslizar los 48-54-58-60-62-68 puntos del gancho auxiliar en uno de los lados de la pieza en agujas de doble punta tamaño 5.5 mm y levantar 1 punto en cada uno de los 10-10-10-12-12-12 puntos montados bajo la manga = 58-64-68-72-74-80 puntos. Insertar 1 hilo marcador en el centro de los 10-10-10-12-12-12 nuevos puntos. Mover el hilo marcador hacia arriba a medida que se teje; será usado para disminuir bajo la manga. Tejer en punto jersey en redondo. Cuando la manga mida 3-3-4-5-5-5 cm a partir de la división, disminuir 1 punto a cada lado del hilo marcador – recordar el TIP PARA DISMINUIR (= 2 puntos disminuidos). Disminuir así a cada 3½-3-2½-2-2-1½ cm 10-12-13-15-15-18 veces en total = 38-40-42-42-44-44 puntos. Cuando la manga mida 43-43-41-40-39-38 cm a partir de la división, aumentar 2-4-2-6-4-4 puntos distribuidos equitativamente = 40-44-44-48-48-48 puntos. Cambiar a agujas de doble punta tamaño 4.5 mm y tejer en resorte 2 derechos/2 reveses en redondo. Rematar con derecho sobre derecho y revés sobre revés cuando el resorte mida 5 cm – leer TIP PARA REMATAR. Tejer la otra manga de la misma manera. |
||||||||||||||||
Explicaciones del diagrama |
||||||||||||||||
|
||||||||||||||||
 |
||||||||||||||||
 |
||||||||||||||||
 |
||||||||||||||||
¿Terminaste este patrón?Entonces, etiqueta tus fotos con #dropspattern #snowtrailsweater o envíalas a la galería #dropsfan. ¿Necesitas ayuda con este patrón?Encontrarás 27 videos tutoriales, un espacio para comentarios/preguntas y más visitando la página del patrón en garnstudio.com © 1982-2026 DROPS Design A/S. Todos los derechos reservados. Este documento, incluyendo todas sus sub-secciones, está protegido por los derechos de autor (copyright). Lee más acerca de lo que puedes hacer con nuestros patrones en la parte de abajo de cada patrón de nuestro sitio. |
||||||||||||||||


Con más de 40 años en el diseño de modelos de punto y de ganchillo, DROPS Design ofrece una de las más vastas colecciones de patrones gratuitos en el internet - traducidos en 17 idiomas. Al día de hoy, contamos con 324 catálogos y 12290 patrones - de los cuales 11675 están traducidos en español.
Nosotros trabajamos con mucho esmero para brindarte lo mejor que las labores de punto y ganchillo tienen para ofrecer,inspiración y consejos, así como hilos de magnífica calidad a precios increíbles! Te gustaría usar nuestros patrones para otro fin además del uso personal? Puedes leer acerca de lo que estás permitida a hacer en el texto de Copyright en la parte de abajo de todos nuestros patrones. Felices labores!
Escribe un comentario sobre DROPS 219-8
¡Nos encantaría saber qué piensas acerca de este patrón!
Si quieres escribir una pregunta referente al patrón, por favor asegúrate de elegir la categoría correcta en el formulario debajo, para acelerar el proceso de respuesta. Los campos obligatorios están marcados con un *.