
Categorías populares
¿Buscas un hilo?


Comentarios / Preguntas (80)
![]() Nina Davidson escribió:
Nina Davidson escribió:
Hi Please disregard yesterday’s comment/question ..... I can now see what is going on - very good!
15.07.2021 - 01:27
![]() Nina escribió:
Nina escribió:
I’m knitting the smallest size (204 stitches in the body). I’m struggling to understand where the pattern lies ..... you only do A.2 once (14 stitches). I assumed the 2 markers are placed at the sides i.e. 102 stitches each for front and back so how does doing A.2 once only fit into the pattern - front and back are different?? Please explain. I’m considering re jigging the sections to make front and back the same (leave out A.2).
14.07.2021 - 07:56
![]() Diana Seifert escribió:
Diana Seifert escribió:
Thank you very much!!!
01.06.2021 - 14:16
![]() Diana Seifert escribió:
Diana Seifert escribió:
How can I work A3, A4 and A6 ( together 20 stitches) over 28 stitches? Or how can I work A.3, A.4, A.5, A.4, A.3, A.6 over the last 14 ? Thank you sooo much.
31.05.2021 - 16:20DROPS Design respondió:
Dear Diana, it is always easier to answe if you specifya wich part you need help with (Sleeves? Front? ), and which size, the question relates to, I am just going to assume, that is the smalles size and the BODY at the beginning of the pattern. In there, you need the work A.3, THEN, A.4, and THEN repeat ,A.6 over 28 stitches (5 repeat + the first stitch). Then A.3, A.4, A.5, A.4, A.3,, and THEN repeat A.6 over the last 14 stitches (3 repeats + the first 2 stitches). Happy Knitting!
31.05.2021 - 16:40
![]() Diana Seifert escribió:
Diana Seifert escribió:
Hi, Thank you for your quick response. BODY: Then work pattern as follows - from beginning of round: A.2 over the first 14-17-23-29-35-41 stitches (finish with the first 2 stitches in A.2), A.3 (= 12 stitches), A.4 (= 8 stitches), A.5 (= 34 stitches), A.4, A.3, A.6 over the next 28-34-46-58-70-82 stitches (finish with first stitch in A.6), A.3, A.4, A.5, A.4, A.3, A.6 over the last 14-17-23-29-35-41 stitches (finish with the first 2 stitches in A.6).
31.05.2021 - 16:18
![]() Diana escribió:
Diana escribió:
Hi Thank you for this knitting pattern I have one question: I do the ice castle sweater, size s How can I knitter a3, a6, and a4 (23) ober 28 ? That makes no sense. Thank you.
30.05.2021 - 21:06DROPS Design respondió:
Dear Diana, please tell us, exactly which part of the pattern you need help with?
31.05.2021 - 02:40
![]() Glenys Gallagher escribió:
Glenys Gallagher escribió:
Can I ask when initially decreasing for the sleeve head I am decreasing 2 stitches each side for a total of 8 rows, and 1 stitch for a total of 2 rows leaving me with 80 stitches. Do I then continue to decrease 2 at each end of every row until 52cms ? The sleeve head doesn't look like it will fit in to the body wormhole, it looks far too short.
18.04.2021 - 18:41DROPS Design respondió:
Dear Glenys, when you are making the sleeve cap, you first sast off 3-3 stitches on both side of the marker (all together 6 stitches), then 2-2 stitches at the beginning of each row 8 times (that is 2 stitches cast of 4 times (= 8 stitches) on each side (all together 16 stitches), and then 1 stitch 0-0-1-2-3-4 times (depending on size), and cast off 2 stitches at the beginning of each row (thus you are casting off both side), until the piece us 52 cm long. Happy Knitting!
18.04.2021 - 22:31
![]() Glenys Gallagher escribió:
Glenys Gallagher escribió:
Is there a video that demonstrates casting off in the round. In splitting the front and the back I cast off 3 stitches at the beginning, 6sts in the middle but when I come to cast off the last 3 sts (to make the second total of 6) I have 1 stitch left on my needle ( in the middle of the 6). Thanks
25.03.2021 - 23:04DROPS Design respondió:
Hi Glenys, For this last stitch you cut the strand and pull it through the stitch. Then begin on the back piece. Happy knitting!
26.03.2021 - 07:48
![]() Marlena Otsuka escribió:
Marlena Otsuka escribió:
Hello, I have question reg. the Sleeve for size S After the 17 Increases (to 88 Stitches), what length should my piece be for Size S, 18" or 14 3/4"? Thank you, Marlena
19.03.2021 - 03:12DROPS Design respondió:
Dear Mrs Otsuka, the last increase on sleeve should be worked when piece measures approx. 17,36 inches (= approx. 44 cm). Happy knitting!
19.03.2021 - 07:40
![]() Glenys Gallagher escribió:
Glenys Gallagher escribió:
I am doing the large,size, after the first section the stitches go down to 240 but the repeats of pattern are on 259 stitches, is it offset all the way round by 19 stitches ? Thank you
15.03.2021 - 11:36DROPS Design respondió:
Dear Mrs Gallagher, work the 240 sts as follows: A.2 over the first 23 sts (repeat the 3 sts in diagram a total of 7 times and finish with the first 2 stitches), A.3 (= 12 sts), A.4 (= 8 sts), A.5 (= 34 sts ), A.4 (= 8 sts), A.3 (= 12 sts), A.6 over the next 46 (repeat the 3 sts a total of 15 times and finish with first st in A.6), A.3 (= 12 sts), A.4 (= 8 sts), A.5 (=34 sts), A.4 (= 8 sts), A.3 (= 12 sts), A.6 over the last 23 stitches (repeat the 3 sts in diagram a total of 7 times and finish with the first 2 stitches) = 23+12+8+34+8+12+46+12+8+34+8+12+23= 240 sts. Happy knitting!
15.03.2021 - 13:11
|
|||||||||||||||||||||||||
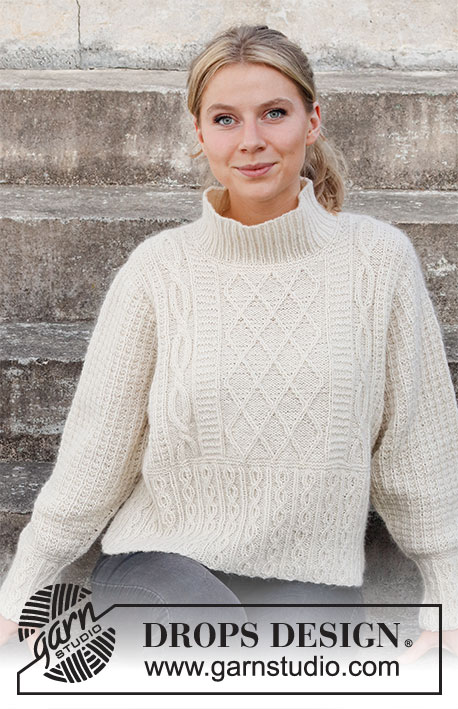
Ice Castles Sweater#icecastlessweater |
|||||||||||||||||||||||||
 |
 |
||||||||||||||||||||||||
Jersey a punto en DROPS Puna. La prenda está realizada con el patrón de textura y trenzas. Talla: S - XXXL.
DROPS 218-3 |
|||||||||||||||||||||||||
|
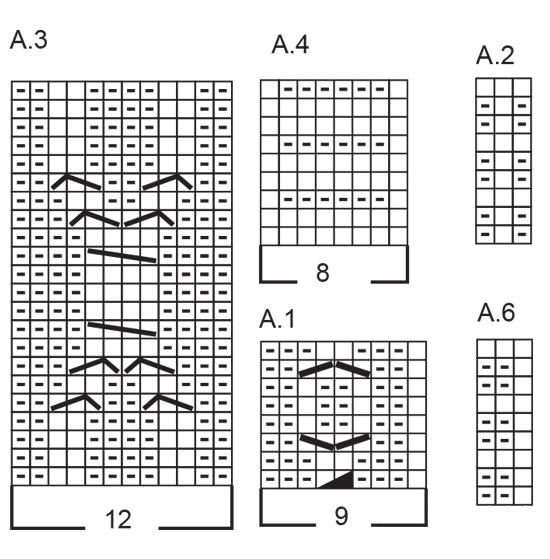
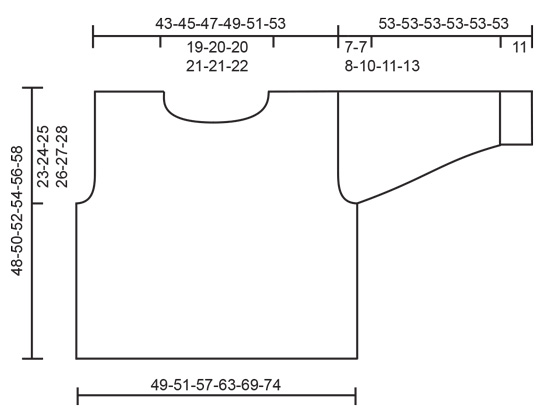
EXPLICACIONES PARA REALIZAR LA LABOR: ------------------------------------------------------- PUNTO MUSGO (de ida y vuelta): 1 pliegue en vertical = 2 vueltas, es decir, trabajar 1 vuelta de derecho y 1 vuelta de revés. PATRÓN: Ver diagramas A.1 a A.6. TIP PARA LOS AUMENTOS/ DISMINUCIONES (repartidas): Para calcular cómo aumentar/ disminuir puntos repartidos, usar el número total de puntos en la fila ( p.e 225 puntos) y dividir entre el número de aumentos/ disminuciones a trabajar (p.e 9) = 25. En este ejemplo, aumentar haciendo 1 hebra después de aprox. cada 25º punto. En la siguiente fila trabajar las hebras retorcidas para evitar que se formen agujeros. Para disminuir en este ejemplo trabajar cada 24º y 25º puntos juntos. TIP PARA LOS AUMENTOS (aplicar al centro bajo la manga): Trabajar hasta que quede 1 punto antes del marcapuntos, 1 hebra, 2 derechos ( el marcapuntos se encuentra en el medio de estos puntos), 1 hebra. Trabajar las hebras retorcidas en la siguiente vuelta para evitar que se formen agujeros - trabajar los nuevos puntos en A.2. ------------------------------------------------------- COMENZAR LA LABOR AQUÍ: ------------------------------------------------------- JERSEY - RESUMEN DE LA LABOR: La labor se trabaja en redondo con una aguja circular hasta la sisa, después dividir la labor y trabajar el delantero y la espalda por separado. Trabajar las mangas en redondo con una aguja circular corta/ agujas de doble punta antes de disminuir para la copa de la manga, y continuar la manga de ida y vuelta en la aguja. CUERPO: Montar 207-225-243-261-288-315 puntos con una aguja circular de 4 mm con Puna. Trabajar 1 vuelta de derecho, después trabajar el patrón sobre todos los puntos según A.1 (= 23-25-27-29-32-35 repeticiones de 9 puntos en la vuelta). Continuar con A.1 sobre todos los puntos hasta que la labor mida aprox. 15-16-17-18-19-20 cm, ajustar a después de una repetición completa de A.1 en vertical. Trabajar 2 pliegues en PUNTO MUSGO sobre todos los puntos – ver explicación arriba, en la última vuelta ajustar el número de puntos a 204-216-240-264-288-312. Insertar 1 marcapuntos a cada lado; uno al inicio de la vuelta y uno después de 102-108-120-132-144-156 puntos = lados. Después trabajar el patrón como sigue - desde el inicio de la vuelta: A.2 sobre los primeros 14-17-23-29-35-41 puntos (finalizar con los primeros 2 puntos en A.2), A.3 (= 12 puntos), A.4 (= 8 puntos), A.5 (= 34 puntos), A.4, A.3, A.6 sobre los siguientes 28-34-46-58-70-82 puntos (finalizar con el 1º punto en A.6), A.3, A.4, A.5, A.4, A.3, A.6 sobre los últimos 14-17-23-29-35-41 puntos (finalizar con los últimos 2 puntos en A.6). Continuar este patrón. RECORDAR MANTENER LA TENSIÓN DEL TEJIDO! Cuando la labor mida 25-26-27-28-29-30 cm, trabajar la siguiente vuelta como sigue: Cerrar los primeros 3-3-3-4-4-4 puntos en la vuelta, trabajar 96-102-114-124-136-148 puntos, cerrar 6-6-6-8-8-8 puntos, trabajar 96-102-114-124-136-148 puntos, cerrar los últimos 3-3-3-4-4-4 puntos. Cada parte se trabaja por separado de ida y vuelta en la aguja. Deslizar los primeros 96-102-114-124-136-148 puntos en un gancho auxiliar, y trabajar sobre los últimos 96-102-114-124-136-148 puntos en la espalda. ESPALDA: = 96-102-114-124-136-148 puntos. Continuar con el patrón como antes, y continuar cerrando para la sisa a cada lado cada 2ª fila como sigue: 2 puntos 1-1-2-3-4-5 veces y 1 punto 1-2-4-5-6-8 veces = 90-94-98-102-108-112 puntos. Cuando la labor mida 46-48-50-52-54-56 cm, cerrar los 38-40-40-42-42-44 puntos centrales para el cuello, y finalizar cada hombro por separado. Después cerrar 1 punto en la siguiente fila hacia el cuello = 25-26-28-29-32-33 puntos. Continuar con el patrón hasta que la labor mida 48-50-52-54-56-58 cm (= 23-24-25-26-27-28 cm desde el inicio de la sisa), cerrar. Trabajar el otro hombro de la misma manera. DELANTERO: = 96-102-114-124-136-148 puntos. Continuar con el patrón y cerrar para la sisa en los lados como en la espalda = 90-94-98-102-108-112 puntos. Cuando la labor mida 42-44-46-48-49-51 cm, deslizar los 30-32-32-34-34-36 puntos centrales a un gancho auxiliar para el cuello, y finalizar los hombros por separado. Después cerrar puntos en cada fila desde el cuello como sigue: Cerrar 2 puntos 1 vez y 1 punto 3 veces = quedan 25-26-28-29-32-33 puntos en cada hombro. Continuar con el patrón hasta que la labor mida 48-50-52-54-56-58 cm (= 23-24-25-26-27-28 cm desde el inicio de la sisa), cerrar. Trabajar el otro hombro de la misma manera. TERMINACIÓN: Coser las costuras de los hombros. MANGA: Trabajar las mangas en redondo con agujas de doble punta/ una aguja circular, de abajo arriba. Dividir la labor al disminuir para la copa de la manga y trabajar de ida y vuelta en la aguja. Montar 54-54-54-63-63-63 puntos con agujas de doble punta de 4 mm con Puna. Trabajar 1 vuelta de derecho, después trabajar el patrón sobre todos los puntos según A.1 (= 6-6-6-7-7-7 repeticiones de 9 puntos en la vuelta). Continuar con A.1 sobre todos los puntos hasta que la labor mida aprox. 11 cm, ajustar a después de una repetición completa de A.1 en vertical. Trabajar 2 pliegues en PUNTO MUSGO sobre todos los puntos - ver explicación arriba, en la última vuelta ajustar el número de puntos a 54-56-58-60-64-66. Insertar un marcapuntos en el inicio de la vuelta = centro bajo la manga. Continuar como sigue: 1 punto en punto jersey, trabajar A.2 sobre los siguientes 52-54-56-58-62-64 puntos, finalizar con 1 punto en punto jersey. Continuar este patrón, AL MISMO TIEMPO cuando la labor mida 12 cm, aumentar 1 puntos a cada lado del marcapuntos - LEER TIP PARA LOS AUMENTOS. Aumentar cada 2-1½-1½-1½-1-1 cm 17-18-20-21-23-24 veces en total = 88-92-98-102-110-114 puntos. Cuando la labor mida 46-46-45-43-42-40 cm, cerrar 3 puntos a cada lado del marcapuntos (= 6 puntos cerrados en el centro bajo la manga), después trabajar manga de ida y vuelta. Cerrar para la copa de la manga al inicio de cada fila como sigue: 2 puntos 4-4-4-5-5-6 veces, 1 punto 0-0-1-2-3-4 veces. Después cerrar 2 puntos a cada lado hasta que la labor mida 52 cm en todas las tallas, cerrar 3 puntos a cada lado, después cerrar los puntos restantes. La manga mide 53 cm en todas las tallas. Trabajar la otra manga de la misma manera. BORDE DEL ESCOTE: Comenzar por el lado derecho con Puna y una aguja circular corta de 4 mm - recoger aprox. 96 a 106 puntos (incluyendo puntos desde el gancho auxiliar y divisible entre 2). Trabajar 1 vuelta de revés, 1 vuelta de derecho, 1 vuelta de revés, 1 vuelta de derecho. Trabajar el elástico (1 derecho/1 revés) en redondo 10 cm. Cerrar los puntos con derecho sobre derecho y revés sobre revés. TERMINACIÓN: Coser las mangas. |
|||||||||||||||||||||||||
Explicaciones del diagrama |
|||||||||||||||||||||||||
|
|||||||||||||||||||||||||
 |
|||||||||||||||||||||||||
 |
|||||||||||||||||||||||||
 |
|||||||||||||||||||||||||
¿Terminaste este patrón?Entonces, etiqueta tus fotos con #dropspattern #icecastlessweater o envíalas a la galería #dropsfan. ¿Necesitas ayuda con este patrón?Encontrarás 25 videos tutoriales, un espacio para comentarios/preguntas y más visitando la página del patrón en garnstudio.com © 1982-2026 DROPS Design A/S. Todos los derechos reservados. Este documento, incluyendo todas sus sub-secciones, está protegido por los derechos de autor (copyright). Lee más acerca de lo que puedes hacer con nuestros patrones en la parte de abajo de cada patrón de nuestro sitio. |
|||||||||||||||||||||||||


Con más de 40 años en el diseño de modelos de punto y de ganchillo, DROPS Design ofrece una de las más vastas colecciones de patrones gratuitos en el internet - traducidos en 17 idiomas. Al día de hoy, contamos con 324 catálogos y 12245 patrones - de los cuales 11625 están traducidos en español.
Nosotros trabajamos con mucho esmero para brindarte lo mejor que las labores de punto y ganchillo tienen para ofrecer,inspiración y consejos, así como hilos de magnífica calidad a precios increíbles! Te gustaría usar nuestros patrones para otro fin además del uso personal? Puedes leer acerca de lo que estás permitida a hacer en el texto de Copyright en la parte de abajo de todos nuestros patrones. Felices labores!
Escribe un comentario sobre DROPS 218-3
¡Nos encantaría saber qué piensas acerca de este patrón!
Si quieres escribir una pregunta referente al patrón, por favor asegúrate de elegir la categoría correcta en el formulario debajo, para acelerar el proceso de respuesta. Los campos obligatorios están marcados con un *.