
Categorías populares
¿Buscas un hilo?


Comentarios / Preguntas (92)
![]() Kasia escribió:
Kasia escribió:
Witam, czyli na podkroje rękawów zakończyć po 10 oczek na ściągaczach francuskich a nie zamknąć?
24.09.2021 - 14:28DROPS Design respondió:
Witaj Kasiu, zamknąć te 10 o. = zakończyć, tak samo jak się kończy robótkę. Zobacz film TUTAJ. Pozdrawiam
24.09.2021 - 14:51
![]() Kasia escribió:
Kasia escribió:
Serdecznie dziękuję za rozjaśnienie instrukcji 😊 Proszę jeszcze napisać , czy robiąc oddzielnie tył i przód biorę nie nitki ? Pozdrawiam i dziękuję za szybkie odpowiedzi i cierpliwość 😉
23.09.2021 - 20:54DROPS Design respondió:
Witaj Kasiu, chodziło Ci o 2 oddzielne nitki? Tak to zrozumiałam. Nitka po wykonaniu przodu i tyłu (razem na okrągło) została odcięta, dlatego teraz bierzesz nową nitkę i dołączasz do robótki, aby wykonać pozostałą część tyłu i drugą na pozostałą część przodu. Powodzenia!!
24.09.2021 - 09:11
![]() Kasia escribió:
Kasia escribió:
Witam, odkąd liczyć pierwsze okrążenie za ściągaczami francuskimi, jeśli chodzi o zamykanie o. na podkroje rękawów? Kiedy zamykam w rozmiarze XL 10 oczek, marker nie znajduje się w ich środku, tylko pośrodku 14 o. ściągacza. Brakuje oczek, żeby zamknąć tych 5 ostatnich. Wychodzą na 5 pierwszych zamkniętych. Co robię nie tak ?
22.09.2021 - 18:51DROPS Design respondió:
Kasiu, na podkroje rękawów zamykasz 10 o. na środku tych 2 ściągaczy francuskich na bokach (po 5 oczek z każdej strony każdego markera na bokach). 2 pozostałe oczka z każdej strony ściągacza francuskiego wejdą w skład przodu i tyłu i dalej będziesz zamykać oczka na podkroje rękawów przed/za tymi 2 oczkami ściegiem francuskim (patrz poprzednia odpowiedź). Powodzenia!
22.09.2021 - 20:16
![]() Kasia escribió:
Kasia escribió:
Zamykałam na początku ? Proszę o korektę
22.09.2021 - 17:25DROPS Design respondió:
Kasiu nie rozumiem pytania/prośby. Proszę napisz dokładniej. Pozdrawiam
22.09.2021 - 17:48
![]() Kasia escribió:
Kasia escribió:
Witam, jestem na etapie zamykania oczek na podkroje rękawów za dwoma ściągaczami ściegiem francuskim i nie rozumiem wskazówki - zamknąć w odległości 2 oczek ściegiem francuskim od brzegów. Bardzo proszę o wyjaśnienie, gdzie te brzegi i o jaka odległość 2 oczek chodzi? Jeszcze proszę o pomoc co zrobić, bo zgubiłam gdzieś jedno oczko że 180 czy mogę je teraz, gdzieś dodać? Gdzie najlepiej? Pozdrawiam serdecznie
20.09.2021 - 20:13DROPS Design respondió:
Witaj Kasiu, jak zamkniesz oczka na podkroje rękawów, to przerabiasz dalej tył i przód oddzielnie. Wtedy będziesz zamykać oczka na formowanie podkrojów rękawów w odl. 2 oczek od brzegów robótki (z każdej strony). Zamykać za 2 oczkami brzegowymi ściegiem francuskim oznacza zamykać za 2 pierwszymi oczkami w rzędzie. Zamykać przed 2 oczkami brzegowymi ściegiem francuskim znaczy zamykać przed 2 ostatnimi oczkami w rzędzie (patrz ZAMYKANIE OCZEK (podkroje rękawów)). Co do zguby dodaj gdzieś z boku, żeby nie było widać. Pozdrawiamy
21.09.2021 - 10:24
![]() Kasia escribió:
Kasia escribió:
Witam, proszę o wyjaśnienie co oznacza zamykanie oczek ściegiem francuskim des bords ?
08.09.2021 - 20:34DROPS Design respondió:
Witaj Kasiu, dziękuję bardzo za twój komentarz, już koryguję tłumaczenie: 'Zamykać na podkroje rękawów w odl. 2 oczek ściegiem francuskim od brzegów'. Pozdrawiamy serdecznie!
08.09.2021 - 21:59
![]() Renée escribió:
Renée escribió:
Jag har kört fast! Jag ska börja sticka resår för framstycket men förstår inte hur jag gör det rätt. Efter att ha stickat första varvet och vänder sedan på arbetet för att fortsätta, blir det ju tvärtom - räta blir aviga osv, så det blir ju ingen resår? Hur gör jag :-(
21.08.2021 - 11:57DROPS Design respondió:
Hej Renée. Du ska sticka fram - och bakstycket runt (efter ärmhålen stickas arbetet sedan fram och tillbaka) så när du stickat första varvet fortsätter du bara runt med varv två och stickar räta över räta och aviga över aviga i 8 cm. Mvh DROPS Design
24.08.2021 - 09:48
![]() Jayne escribió:
Jayne escribió:
I've just got to where you say work fron and back separately Do I need different straight needle or continue with circular needle if this is the case do I need to put the stitches for back piece on a separate needle while I work the front Sorry im a bit confused
03.07.2021 - 18:26DROPS Design respondió:
Dear Jane, actually it is up to you. You can leave half of the stitches on the needle, and keep knitting on teh other half. If you find this uncomfortable, you can put half of the stitches on a stitch-holder, a piece of therad, or another circular needle. Happy Knitting!
04.07.2021 - 00:41
![]() Katie escribió:
Katie escribió:
For the start of the back piece, I have interpreted it as there being 8 stockinette rows, where every fourth row has a decrease tip, as well as the first RS row = 3 decreases. I am confused how this will decrease the number of stitches from 62 to 54. What have I done wrong here please?
31.05.2021 - 09:26DROPS Design respondió:
Dear Kate, the pattern tells you, that after dividing the stitches, when you do the back, decrease 8for the armhole) 1 stitch each side 4 times (assuming from the 62 stitch that you are making the smallest size), that is 8 stitch, 62-8 = 54 stitch. Happy Kntting!
31.05.2021 - 09:35
![]() Katie escribió:
Katie escribió:
Hi When I did the last three binding off I am left with one stitch knitted which is clearly affecting the armholes. What do I do with this one stitch please
27.05.2021 - 09:03DROPS Design respondió:
Dear Katie, check your number of stitches on needle and the one cast off, you shoud have 6-6-10-10-16-20 sts cast off on each side and 62-68-72-80-84-90 stitches worked between the stitches cast off. Hope this will help, happy knitting!
27.05.2021 - 09:41
|
|
Spiced Breeze#spicedbreezetop |
|
 |
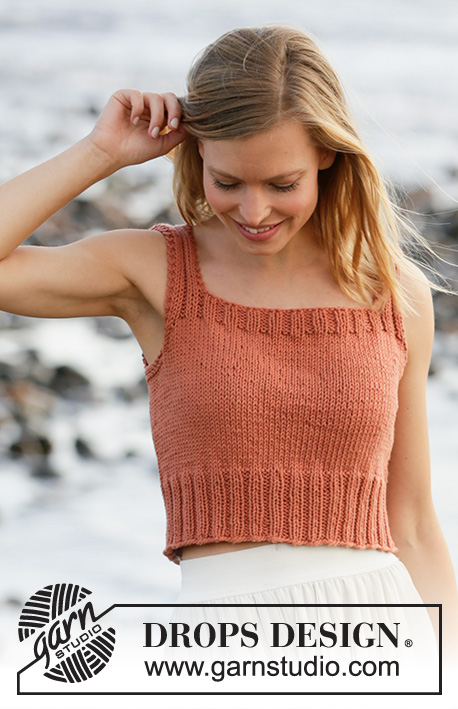 |
Top de punto en DROPS Paris. La pieza está tejida en punto jersey con orillas en resorte. Tallas: S – XXXL.
DROPS 211-15 |
|
|
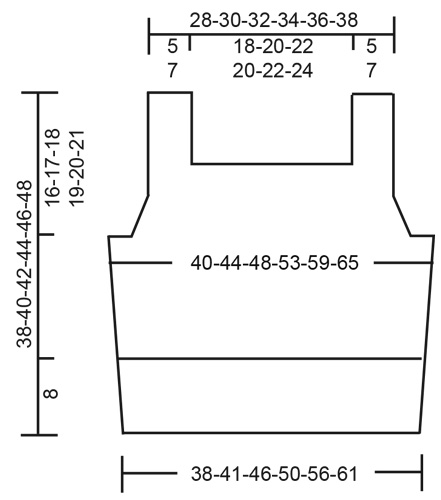
EXPLICACIONES PARA REALIZAR EL PATRÓN: ------------------------------------------------ PUNTO MUSGO (tejido en redondo): 1 surco verticalmente = 2 vueltas; es decir, tejer 1 vuelta de derecho y 1 vuelta de revés. PUNTO MUSGO (de ida y vuelta): Tejer todas las hileras de derecho. 1 surco verticalmente = tejer 2 hileras de derecho. TIP PARA DISMINUIR (aplica a las sisas): Disminuir para las sisas en el interior de 2 puntos de orillo en punto musgo. Todas las disminuciones son hechas por el lado derecho. Disminuir de la manera siguiente después de 2 puntos de orillo en punto musgo: Deslizar 1 punto como de derecho, tejer 1 punto derecho, pasar el punto deslizado por encima del punto tejido (= 1 punto disminuido). Disminuir de la manera siguiente antes de 2 puntos de orillo en punto musgo: Comenzar 2 puntos antes de los 2 puntos de orillo y tejer 2 puntos juntos de derecho (= 1 punto disminuido). ------------------------------------------------ COMENZAR LA PIEZA AQUÍ: ------------------------------------------------ TOP – RESUMEN DE LA PIEZA: La pieza se teje en redondo en aguja circular, a partir de la parte de abajo hasta las sisas. Después tejer el frente y la pieza de la espalda de ida y vuelta en aguja circular separadamente. Después coser las costuras de los hombros. CUERPO: Montar 136-148-164-180-200-220 puntos en aguja circular tamaño 4.5 mm con Paris. Tejer 1 vuelta de derecho. Después tejer el resorte en redondo (= 2 derechos/2 reveses) durante 8 cm. Insertar 1 hilo marcador al principio de la vuelta y 1 hilo marcador después de 68-74-82-90-100-110 puntos. Los hilos marcadores marcan los lados del cuerpo. Cambiar a aguja circular tamaño 5 mm y tejer en punto jersey en redondo. ¡RECORDAR MANTENER LA MISMA TENSIÓN DE TEJIDO DE LA MUESTRA! Cuando la pieza mida 21-22-23-24-25-26 cm, tejer 2 surcos en PUNTO MUSGO – leer explicación arriba, sobre los 10-10-14-14-20-24 puntos centrales a cada lado (los hilos marcadores están en el centro de estos 10-10-14-14-20-24 puntos – tejer los otros puntos en punto jersey). En la primera vuelta después de los 2 surcos, rematar para las sisas de la manera siguiente: Rematar 3-3-5-5-8-10 puntos, tejer 62-68-72-80-84-90 puntos en punto jersey, rematar 6-6-10-10-16-20 puntos (el hilo marcador está en el centro de estos 6-6-10-10-16-20 puntos), tejer 62-68-72-80-84-90 puntos en punto jersey, y rematar los 3-3-5-5-8-10 puntos restantes. Cortar el hilo. Terminar el frente y la pieza de la espalda separadamente. FRENTE: = 62-68-72-80-84-90 puntos. Comenzar por el lado revés y continuar con punto jersey de ida y vuelta y 2 puntos de orillo en punto musgo a cada lado. AL MISMO TIEMPO, en la primera hilera por el lado derecho, disminuir 1 punto a cada lado para las sisas – leer TIP PARA DISMINUIR. Disminuir así a cada 2 hileras (es decir, en cada hilera por el lado derecho) 4-5-5-7-7-8 veces en total a cada lado = restan 54-58-62-66-70-74 puntos. Después de la última disminución para las sisas, tejer 1 hilera de revés por el lado revés con 2 puntos de orillo en punto musgo a cada lado. Cambiar a aguja circular tamaño 4.5 mm y tejer la hilera siguiente por el lado derecho de la manera siguiente: 2 puntos de orillo en punto musgo, * 2 derechos, 2 reveses *, repetir de *a* hasta que resten 4 puntos, tejer 2 puntos derechos y terminar con 2 puntos de orillo en punto musgo. Continuar el resorte así durante 3 cm. En la hilera siguiente por el lado derecho, rematar para el escote de la manera siguiente: Tejer 2 puntos de orillo en punto musgo, * 2 derechos, 2 reveses *, tejer de *a* 1-1-1-2-2-2 veces en total, tejer 2 puntos derechos y 2 puntos en punto musgo, después rematar los 34-38-42-38-42-46 puntos siguientes para el escote (rematar con derecho sobre derecho y revés sobre revés), tejer 2 puntos en punto musgo, * 2 derechos, 2 reveses *, tejer de *a* 1-1-1-2-2-2 veces en total, tejer 2 puntos derechos y terminar con 2 puntos de orillo en punto musgo. Ahora hay 10-10-10-14-14-14 puntos restantes a cada lado de la pieza para los tirantes. Terminar los tirantes separadamente. TIRANTE: = 10-10-10-14-14-14 puntos. Tejer en resorte de ida y vuelta como antes con 2 puntos de orillo en punto musgo a cada lado hasta que la pieza complete mida 38-40-42-44-46-48 cm a partir de la orilla de montaje (o el largo deseado). Rematar. Tejer el otro tirante de la misma manera. ESPALDA: = 62-68-72-80-84-90 puntos. Comenzar por el lado revés y continuar con punto jersey de ida y vuelta y 2 puntos de orillo en punto musgo a cada lado. AL MISMO TIEMPO, en la primera hilera por el lado derecho, disminuir 1 punto a cada lado para las sisas – leer TIP PARA DISMINUIR. Disminuir así a cada 4ª hilera (no a cada 2 hileras como en la pieza del frente) 4-5-5-7-7-8 veces en total a cada lado = 54-58-62-66-70-74 puntos. Después de la última disminución para las sisas, tejer 1 hilera de revés por el lado revés con 2 puntos de orillo en punto musgo a cada lado. Cambiar a aguja circular tamaño 4.5 mm y tejer la hilera siguiente por el lado derecho de la manera siguiente: 2 puntos de orillo en punto musgo, * 2 derechos, 2 reveses *, repetir de *a* hasta que resten 4 puntos, tejer 2 puntos derechos y terminar con 2 puntos de orillo en punto musgo. Continuar el resorte así durante 3 cm. En la hilera siguiente por el lado derecho, rematar para el escote de la manera siguiente: Tejer 2 puntos de orillo en punto musgo, * 2 derechos, 2 reveses *, tejer de *a* 1-1-1-2-2-2 veces en total, tejer 2 puntos derechos y 2 puntos en punto musgo, después rematar los 34-38-42-38-42-46 puntos siguientes para el escote (rematar con derecho sobre derecho y revés sobre revés), tejer 2 puntos en punto musgo, * 2 derechos, 2 reveses *, tejer de *a* 1-1-1-2-2-2 veces en total, tejer 2 puntos derechos y terminar con 2 puntos de orillo en punto musgo. Ahora hay 10-10-10-14-14-14 puntos restantes a cada lado para los tirantes. Tejer los tirantes separadamente de la misma manera como en la pieza del frente. ENSAMBLAJE: Coser las costuras de los hombros. |
|
 |
|
¿Terminaste este patrón?Entonces, etiqueta tus fotos con #dropspattern #spicedbreezetop o envíalas a la galería #dropsfan. ¿Necesitas ayuda con este patrón?Encontrarás 21 videos tutoriales, un espacio para comentarios/preguntas y más visitando la página del patrón en garnstudio.com © 1982-2026 DROPS Design A/S. Todos los derechos reservados. Este documento, incluyendo todas sus sub-secciones, está protegido por los derechos de autor (copyright). Lee más acerca de lo que puedes hacer con nuestros patrones en la parte de abajo de cada patrón de nuestro sitio. |
|


Con más de 40 años en el diseño de modelos de punto y de ganchillo, DROPS Design ofrece una de las más vastas colecciones de patrones gratuitos en el internet - traducidos en 17 idiomas. Al día de hoy, contamos con 324 catálogos y 12239 patrones - de los cuales 11618 están traducidos en español.
Nosotros trabajamos con mucho esmero para brindarte lo mejor que las labores de punto y ganchillo tienen para ofrecer,inspiración y consejos, así como hilos de magnífica calidad a precios increíbles! Te gustaría usar nuestros patrones para otro fin además del uso personal? Puedes leer acerca de lo que estás permitida a hacer en el texto de Copyright en la parte de abajo de todos nuestros patrones. Felices labores!
Escribe un comentario sobre DROPS 211-15
¡Nos encantaría saber qué piensas acerca de este patrón!
Si quieres escribir una pregunta referente al patrón, por favor asegúrate de elegir la categoría correcta en el formulario debajo, para acelerar el proceso de respuesta. Los campos obligatorios están marcados con un *.