
Categorías populares
¿Buscas un hilo?


Comentarios / Preguntas (26)
![]() Karen Dainter escribió:
Karen Dainter escribió:
The filled in square is meant to be worked from the wrong side but I’m in the right side. What do I do?
23.02.2025 - 15:07DROPS Design respondió:
Dear Karen, the filled in square is only worked on wrong side rows: you can check that this symbol is only worked on even rows: row 2, row 4, row 6, e.t.c. in the charts. Since you start working the charts on a right side row (as indicated at the end of the neck) the even rows of the charts will be worked always on the wrong side. Happy knitting!
23.02.2025 - 23:26
![]() Karen Dainter escribió:
Karen Dainter escribió:
You have just stated the second row of neck. I’ve already done this. I’m on the first row of the yoke now and the issue is as stated below. Please help Thanks
23.02.2025 - 14:27DROPS Design respondió:
Dear Karen, if you had 87 stitches at the neck you would have 87 stitches now as well. In the first row of the yoke you work A.1b over A.1a (both are only 1 stitch), A.2b over A.2a (so a 3 stitch pattern over a 3 stitch pattern) and A.3b over A.3a (so a 5-stitch pattern over a 5-stitch pattern). The number of stitches doesn't change between the end of the neck and the yoke; the increases start from this round onwards. Happy knitting!
23.02.2025 - 23:25
![]() Karen escribió:
Karen escribió:
Hi 87 stitches. Just started yoke. There is one more stitch than the instructions. I have 87 as stated but the instructions actually require one less 86. Please help
12.02.2025 - 15:15
![]() Karen Dainter escribió:
Karen Dainter escribió:
Hi 87 stitches. Just started yoke. There is one more stitch than the instructions. I have 87 as stated but the instructions actually require one less 86. Please help
12.02.2025 - 15:14DROPS Design respondió:
Dear Mrs Dainter, work the 87 sts as follows: 5 sts garter stitch, A.1a (= 1 st), then work *A.2a (= 3 sts), A.3a (= 5 sts) a total of 9 times (= 8 sts x 9 )=72 sts, then work A.2a (3 sts), A.1a (1 st) and 5 sts in garter stitch = 5+1+72+3+1+5=87 sts. Happy knitting!
12.02.2025 - 16:18
![]() Karen escribió:
Karen escribió:
Both really. I’m from the UK and our instructions are very different. I’m starting the cardigan September story and am not getting very far even though I’ve knitted all my life. When you say continue this pattern after the first two rows am I to think I just repeat the second row? If I included the first row it wouldn’t look like a rib. I can see that this will take me some time. Help
06.02.2025 - 20:40DROPS Design respondió:
Dear Karen, after you have worked Row 2 with first row diagrams A.1a to A.3a continue like this means read the digrams from the left towards the right from WS: 5 front band sts in gartrer st, A.1a, A.2a, repeat (A.3a, A.2a) and finish with A.1a and 5 sts garter stitch - reading diagrams from the left towards the right from WS. Happy knitting!
07.02.2025 - 15:39
![]() Fiona escribió:
Fiona escribió:
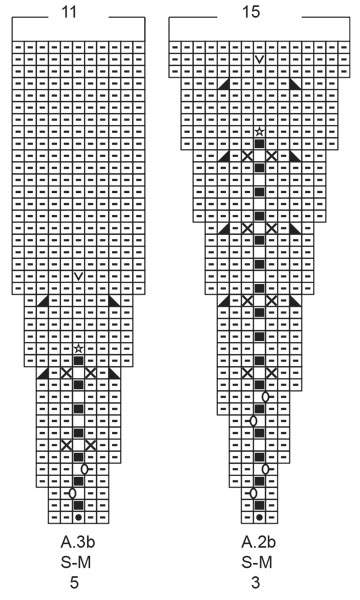
Grid A2b & A3b 1 box with 0 on the line of next stitch but there is no instruction for this. The last instruction on diagram says between 2 stitches make 1 yarn over but no matching symbol on grid A2b or A3b. What do these symbols mean, please. Thank you
19.11.2024 - 18:42DROPS Design respondió:
Dear Fiona, the 0 is matching the last symbol => yarn over to increase the number of stitches in each repeat, so that you can see on next row there is one extra stitch on the same side of middle stitch as you made this yarn over. Happy knitting!
20.11.2024 - 07:47
![]() Fiona escribió:
Fiona escribió:
Grid A2b & A3b 1 box with 0 on the line of next stitch but there is no instruction for this. The last instruction on diagram says between 2 stitches make 1 yarn over but no matching symbol on A2b or A3b. Thank you
18.11.2024 - 12:01DROPS Design respondió:
Dear Fiona, the 0 = between 2 stitches make 1 yarn over; yarn over is worked twisted on next row to avoid a hole. It's the same oval; when the 0 is not worked twisted then it's drawn as a black-filled 0 (which is not used in these charts). So you make 1 yarn over between the symbol of the square to the right and the symbol of the square to the left of the 0 (or inversed when you work from the wrong side: first the left square and then the right square). Happy knitting!
24.11.2024 - 18:18
![]() Fiona escribió:
Fiona escribió:
I am following Medium pattern Thank you
17.11.2024 - 21:15
![]() Fiona escribió:
Fiona escribió:
For row 3 "continue this pattern? what exactly do you mean ? what pattern? If you mean the grids what grid. Thank you
17.11.2024 - 21:11DROPS Design respondió:
Dear Fiona, it means that you work as established in row 2, with the garter stitches on each side and the charts. Work garter stitch over garter stitch, row 2 of A.1a over row 1 of A.1a, row 2 of A.2a over row 1 of A.2a and row 2 of A.3a over row 2 of A.3a. Happy knitting!
18.11.2024 - 00:15
![]() Fiona escribió:
Fiona escribió:
Could you explain these instructions please ,Work A.1b over A.1a, A.2b over A.2a and A.3b over A.3a. Thank you
09.11.2024 - 19:16DROPS Design respondió:
Dear Fiona, it means that, over the stitches that were worked according to chart A.1a you will now work A.1b; the stitches worked according to chart A.2a will now be worked according to chart A.2b and the stitches worked according to chart A.3a will now be worked according to chart A.3b. Happy knitting!
10.11.2024 - 19:59
|
|||||||||||||||||||||||||||||||
September Story#septemberstorycardigan |
|||||||||||||||||||||||||||||||
 |
 |
||||||||||||||||||||||||||||||
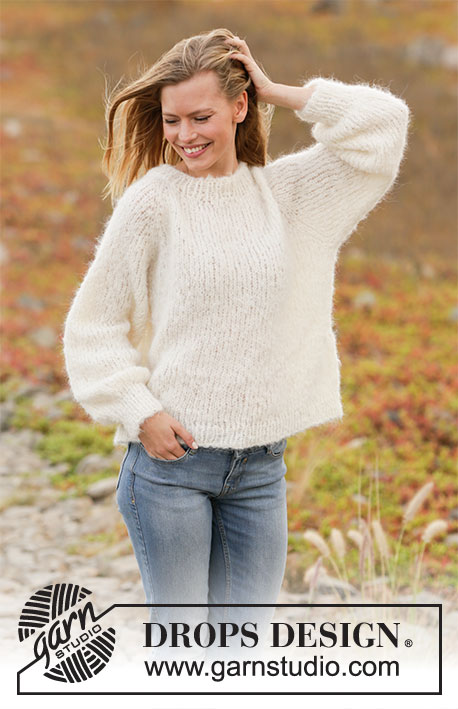
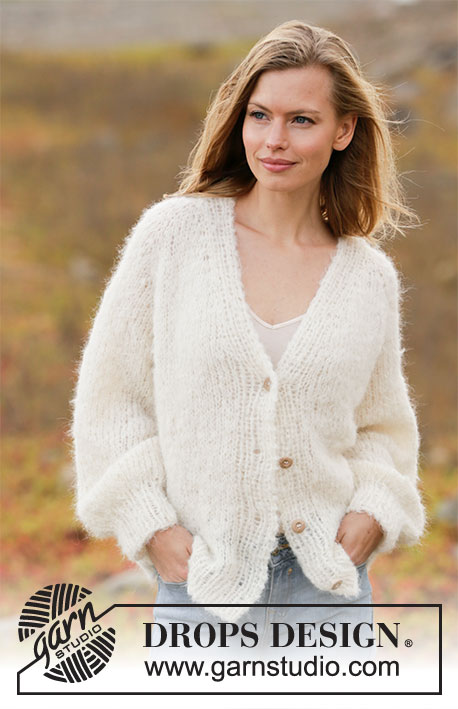
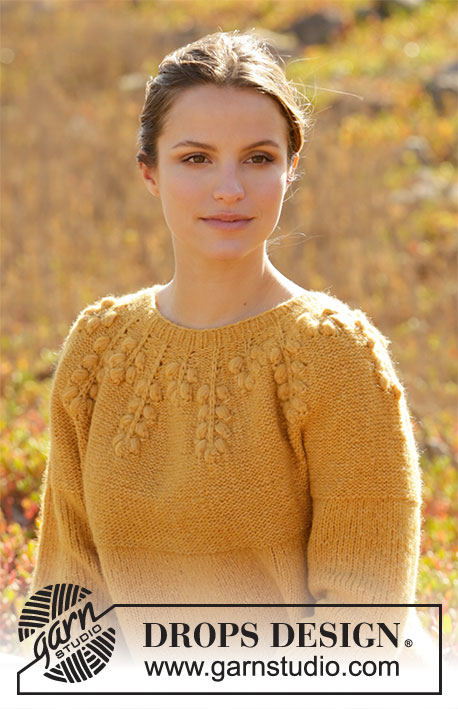
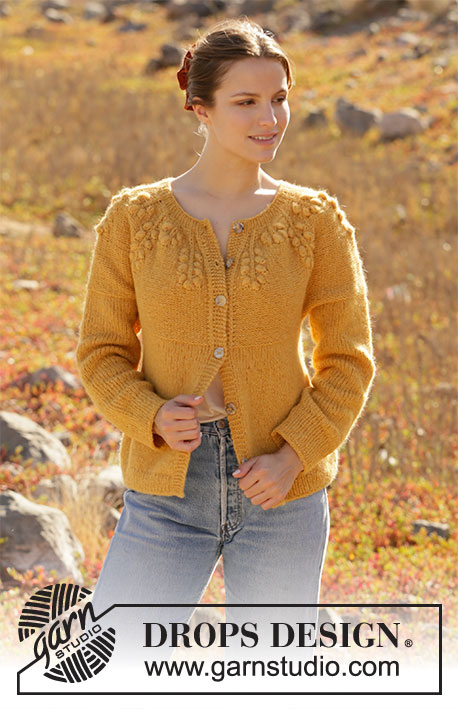
Chaqueta de punto con canesú redondo en DROPS Air. La pieza está tejida de arriba para abajo con motas. Tallas S – XXXL.
DROPS 213-26 |
|||||||||||||||||||||||||||||||
|
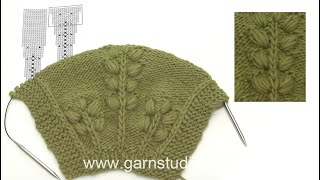
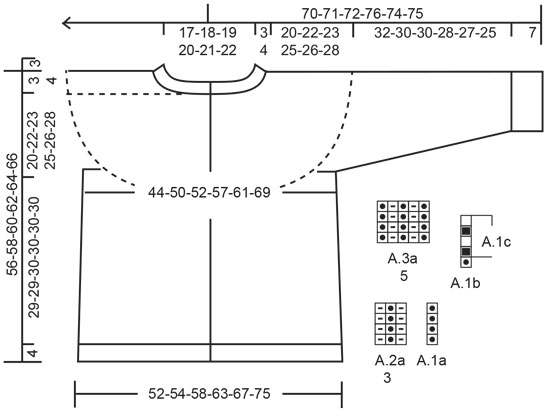
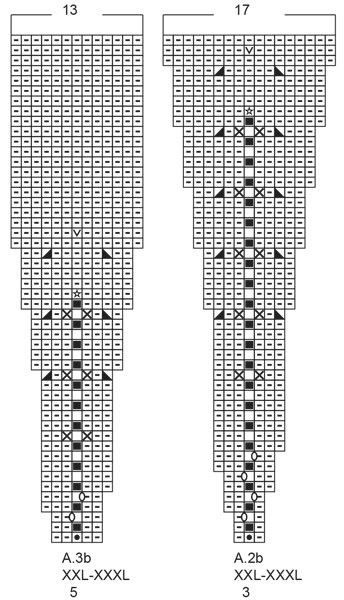
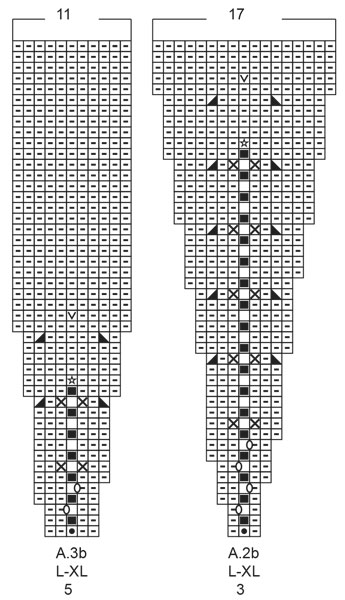
EXPLICACIONES PARA REALIZAR EL PATRÓN: ------------------------------------------------ SURCO/PUNTO MUSGO (tejido de ida y vuelta): Tejer todas las hileras de derecho. 1 surco en altura = tejer 2 hileras de derecho. PATRÓN: Ver diagramas A.1 a A.3. Elegir el diagrama para tu talla. Los diagramas muestran todas las hileras del patrón vistas por el lado derecho. TIP PARA AUMENTAR (aplica a los lados del cuerpo): Tejer hasta que resten 2 puntos antes del hilo marcador, hacer 1 lazada, tejer 4 puntos derechos (el hilo marcador está entre estos 4 puntos), hacer 1 lazada (= 2 puntos aumentados). En la hilera siguiente, tejer las lazadas retorcidas para evitar que se formen agujeros. Continuar a tejer los puntos nuevos en punto jersey. TIP PARA DISMINUIR (aplica a las mangas): Disminuir 1 punto a cada lado del hilo marcador de la manera siguiente: Tejer hasta que resten 3 puntos antes del hilo marcador, tejer 2 puntos juntos de derecho, tejer 2 puntos derechos (el hilo marcador está entre estos 2 puntos), deslizar 1 punto como de derecho, tejer 1 punto derecho y pasar el punto deslizado por encima del punto tejido (= 2 puntos disminuidos). TIP PARA REMATAR: Para evitar que la orilla de remate quede apretada, se puede rematar con una aguja de tamaño más grande. Si la orilla aún estuviese apretada, hacer 1 lazada después de aprox. cada 4º punto al mismo tiempo que se rematan los puntos y rematar las lazadas como puntos normales. OJALES: Trabajar los ojales en el borde delantero derecho (cuando se usa la prenda). Trabajar por el lado derecho cuando resten 3 puntos en la hilera de la manera siguiente: Hacer 1 lazada, tejer 2 puntos juntos de derecho y tejer el último punto de derecho. En la hilera siguiente, tejer la lazada de derecho para formar un agujero. Trabajar el primer ojal cuando la orilla del escote mida 1½-2 cm. Después trabajar los otros 5-5-6-6-7-7 ojales con aprox. 8½-8½-8-8-7-7½ cm entre cada uno. ------------------------------------------------ COMENZAR LA PIEZA AQUÍ: ------------------------------------------------ CHAQUETA – RESUMEN DE LA PIEZA: La pieza se teje de ida y vuelta con aguja circular a partir del centro del frente y de arriba para abajo. Las mangas se tejen en redondo con agujas de doble punta, de arriba para abajo. ORILLA DEL ESCOTE: Montar 79-87-87-95-95-103 puntos (incluyendo 5 puntos del borde delantero a cada lado) con aguja circular tamaño 4.5 mm y Air. HILERA 1 (= lado revés): Tejer 5 puntos del borde delantero en PUNTO MUSGO – leer descripción arriba, 69-77-77-85-85-93 puntos reveses y tejer 5 puntos del borde delantero en punto musgo. HILERA 2 (= lado derecho): Tejer 5 puntos del borde delantero en punto musgo, A.1a (= 1 punto), * A.2a (= 3 puntos), A.3a (= 5 puntos) *, tejer de *a* hasta que resten 9 puntos (= 8-9-9-10-10-11 veces a lo ancho), A.2a sobre 3 puntos, A.1a sobre 1 punto y terminar con 5 puntos del borde delantero en punto musgo. Continuar este patrón. Acordarse de los OJALES en el borde delantero derecho – leer descripción arriba. Cuando la pieza mida 3-3-3-3-4-4 cm, ajustar de modo que la hilera siguiente sea por el lado derecho, cambiar a aguja circular tamaño 5.5 mm. Insertar 1 marcador después del borde delantero, al principio de la hilera; ¡el canesú será medido a partir de este marcador! CANESÚ: Tejer A.1b sobre A.1a, A.2b sobre A.2a y A.3b sobre A.3a. Los bordes delanteros se tejen en punto musgo hasta completar las medidas. Cuando se ha tejido A.1 1 vez en altura, repetir A.1c. ¡RECORDAR MANTENER LA MISMA TENSIÓN DE TEJIDO DE LA MUESTRA! Cuando se han completado A.2b y A.3b 1 vez en altura, hay 235-261-281-309-329-359 puntos en la aguja. Tejer de derecho por el lado revés y de revés por el lado derecho, con 5 puntos del borde delantero en punto musgo a cada lado hasta que la pieza mida 20-22-23-25-26-28 cm a partir del marcador. El canesú es ahora dividido para el cuerpo y las mangas de la manera siguiente: Tejer 37-42-44-48-51-57 puntos derechos, colocar los 48-52-58-64-68-70 puntos siguientes en 1 hilo para la manga, montar 6 puntos nuevos en la aguja (= en el lado bajo la manga), tejer 65-73-77-85-91-105 puntos derechos (= pieza de la espalda), colocar los 48-52-58-64-68-70 puntos siguientes en 1 hilo para la manga, montar 6 puntos nuevos en la aguja (= en el lado bajo la manga) y tejer los restantes 37-42-44-48-51-57 puntos derechos. Terminar el cuerpo y las mangas separadamente. ¡LA PIEZA ES AHORA MEDIDA A PARTIR DE AQUÍ! CUERPO: = 151-169-177-193-205-231 puntos. Insertar 1 hilo marcador a 40-45-47-51-54-60 puntos a partir de cada lado (= lados del cuerpo). Hay 71-79-83-91-97-111 puntos entre los hilos en la pieza de la espalda. Dejar que los hilos sigan la labor a medida que se teje; serán usados cuando se aumente en los lados. Tejer punto jersey con 5 puntos del borde delantero en punto musgo a cada lado de la pieza. Cuando la pieza mida 3 cm a partir de la división, aumentar 1 punto a cada lado de los dos hilos marcadores – leer TIP PARA AUMENTAR (= 4 puntos aumentados). Aumentar así a cada 4 cm un total de 6-4-5-5-5-5 veces = 175-185-197-213-225-251 puntos. Cuando la pieza mida 29-29-30-30-30-30 cm a partir de la división, cambiar a aguja circular tamaño 4.5 mm y tejer en resorte de la manera siguiente por el lado derecho: 5 puntos del borde delantero en punto musgo, * 1 derecho, 1 revés *, tejer de *a* hasta que resten 6 puntos, tejer 1 punto derecho y 5 puntos del borde delantero en punto musgo. Cuando el resorte mida 4 cm, rematar de derecho por el lado derecho – leer TIP PARA REMATAR. MANGAS: Colocar los 48-52-58-64-68-70 puntos del hilo en uno de los lados de la pieza en aguja circular corta tamaño 5.5 mm y levantar 1 punto en cada uno de los 6 puntos montados bajo la manga = 54-58-64-70-74-76 puntos. Insertar un hilo marcador en el centro de los 6 puntos bajo la manga. Dejar que el hilo siga la labor a medida que se teje; será usado cuando se disminuya bajo la manga. Comenzar en el hilo marcador y tejer de derecho en redondo. Cuando la manga mida 3 cm a partir de la división, disminuir 2 puntos en el centro bajo la manga – leer TIP PARA DISMINUIR. Disminuir así a cada 6-3-2½-2-1½-1½ cm un total de 5-7-9-11-12-12 veces = 44-44-46-48-50-52 puntos. Continuar tejiendo hasta que la manga mida 32-30-30-28-27-25 cm a partir de la división (falta por tejer aprox. 7 cm para completar las medidas; probarse la chaqueta y tejer hasta obtener el largo deseado). Cambiar a agujas de doble punta tamaño 4.5 mm y tejer en resorte (= 1 derecho/1 revés). Rematar cuando el resorte mida 7 cm. La manga mide aprox. 39-37-37-35-34-32 cm a partir de la división. Tejer la otra manga de la misma manera. ENSAMBLAJE: Coser los botones en el borde delantero izquierdo. |
|||||||||||||||||||||||||||||||
Explicaciones del diagrama |
|||||||||||||||||||||||||||||||
|
|||||||||||||||||||||||||||||||
 |
|||||||||||||||||||||||||||||||
 |
|||||||||||||||||||||||||||||||
 |
|||||||||||||||||||||||||||||||
 |
|||||||||||||||||||||||||||||||
¿Terminaste este patrón?Entonces, etiqueta tus fotos con #dropspattern #septemberstorycardigan o envíalas a la galería #dropsfan. ¿Necesitas ayuda con este patrón?Encontrarás 28 videos tutoriales, un espacio para comentarios/preguntas y más visitando la página del patrón en garnstudio.com © 1982-2026 DROPS Design A/S. Todos los derechos reservados. Este documento, incluyendo todas sus sub-secciones, está protegido por los derechos de autor (copyright). Lee más acerca de lo que puedes hacer con nuestros patrones en la parte de abajo de cada patrón de nuestro sitio. |
|||||||||||||||||||||||||||||||


Con más de 40 años en el diseño de modelos de punto y de ganchillo, DROPS Design ofrece una de las más vastas colecciones de patrones gratuitos en el internet - traducidos en 17 idiomas. Al día de hoy, contamos con 324 catálogos y 12290 patrones - de los cuales 11674 están traducidos en español.
Nosotros trabajamos con mucho esmero para brindarte lo mejor que las labores de punto y ganchillo tienen para ofrecer,inspiración y consejos, así como hilos de magnífica calidad a precios increíbles! Te gustaría usar nuestros patrones para otro fin además del uso personal? Puedes leer acerca de lo que estás permitida a hacer en el texto de Copyright en la parte de abajo de todos nuestros patrones. Felices labores!
Escribe un comentario sobre DROPS 213-26
¡Nos encantaría saber qué piensas acerca de este patrón!
Si quieres escribir una pregunta referente al patrón, por favor asegúrate de elegir la categoría correcta en el formulario debajo, para acelerar el proceso de respuesta. Los campos obligatorios están marcados con un *.