
Categorías populares
¿Buscas un hilo?


Comentarios / Preguntas (13)
![]() Alessandra escribió:
Alessandra escribió:
Buongiorno, mi servirebbe aiuto per la 4º riga del collo. Devo procedere in questo modo: Rovescio, yarn over, passo una maglia, rovescio, rovescio? In questo caso come lavoro lo yarn over della riga precedente? Nella didascalia dice di lavorarlo ritorto… Non devo fare un dritto, giusto? Perché in quel caso non potrei poi fare i due rovesci dello schema. Spero di essermi spiegata. Grazie!☺️
26.01.2025 - 22:15DROPS Design respondió:
Buonasera Alessandra, deve lavorarlo a ritorto come indicato. Buon lavoro!
13.02.2025 - 23:21
![]() Simone escribió:
Simone escribió:
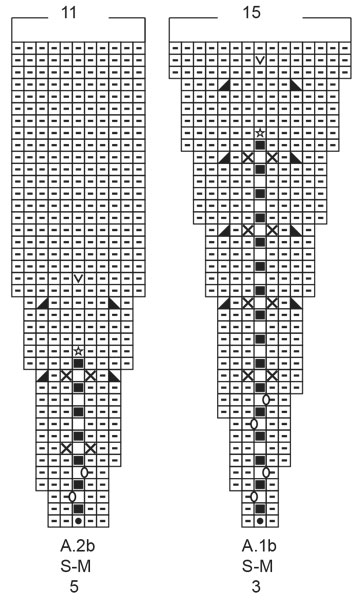
Hello, knitting another of your wonderful patterns.. September story but already I am stuck, Could you please explain the start of the yoke - Work A.1b over A.1a and A.2b over A.2a I don't understand how to proceed ? Work A/1b then A.1a then A.2b then A.2a or something else ? Many thanks again for your guidance
26.03.2023 - 21:54DROPS Design respondió:
Hi Simone, The stitches you have worked in A.1a will now be worked according to diagram A.1b and the same applies to the stitches in A.2a, now worked according to diagram A.2b (no longer work A.1a or A.2a). Happy knitting!
27.03.2023 - 06:54
![]() Megan escribió:
Megan escribió:
Third row of A.1b and A.2b: after knitting yarn over and slip stitch together, making one yarn over, am I supposed to purl three times before knitting the next yarn over and slip stitch together? But there are only two stitches from the previous row for me to purl? Thank you,
01.10.2022 - 19:47DROPS Design respondió:
Dear Megan, A.1b and A.2b are worked next to each other and repeated the whole row. Between the yarn over in A.1b and the yarn over in A.2b there are 3 purl stitches (1 from A.1b and 2 from A.2b). Happy knitting!
03.10.2022 - 00:57
![]() Megan escribió:
Megan escribió:
Thank you for your answering. If I yarn over once, slip a stitch to the right needle, I will have one more stitch for this row than what is shown in the diagram. Should I purl the next two stitches together then?
28.09.2022 - 16:37DROPS Design respondió:
Dear Mega, the yarn over worked over the slipped stitch doesn't count as 1 stitch, both yarn overs + slipped stitch will count as 1 stitch in English rib; on the next round, you will knit the yarn over + the slipped stitch together as 1 stitch in English rib. This video shows how to work a pattern with such stitches, it might help you. Happy knitting!
29.09.2022 - 08:17
![]() Megan escribió:
Megan escribió:
This is a follow up question to my previous question about “make 1 yarn over and slip the stitch onto the right needle as if to purl (= English rib stitch)” in second row of A.1b and A.2b. In the answer to this question, “slip 1 stitch onto the right needle as if to purl, purl 1 and repeat,” what does “slip one stitch” mean? Does it mean a yarn over?
27.09.2022 - 16:24DROPS Design respondió:
Hi Megan, Slipping a stitch means transferring it from the left needle to the right without working it. Slipping as if to purl means you insert the right needle from right to left when transferring it. Happy knitting!
28.09.2022 - 07:10
![]() Megan escribió:
Megan escribió:
“make 1 yarn over and slip the stitch onto the right needle as if to purl (= English rib stitch)” in second row of A.1b and A.2b, do you slip the stitch on the left needle onto the right needle and purl the next two stitches together? Thank you.
27.09.2022 - 06:54DROPS Design respondió:
Hi Megan, In A.1b row 2 you purl 1, slip 1 stitch onto the right needle as if to purl, purl 1 and repeat. In A.2b you purl 2, slip 1 stitch onto the right needle as if to purl, purl 2 and repeat. Happy knitting!
27.09.2022 - 07:25
![]() Megan escribió:
Megan escribió:
If I use long tail cast on method, which creates both a cast-on and the first row, do I still need to knit one round? "Insert 1 marker at the beginning of the round mid back" What does "mid back" mean? Does it mean this marker will be in the middle of the back? Thank you.
22.09.2022 - 05:43DROPS Design respondió:
Dear Megan, this knit row is worked before starting ribbing edge, just decide if you want it or rather start with rib. And correct, the rounds start /the marker is on the middle of back piece. Happy knitting!
22.09.2022 - 09:59
![]() Mary Culbertson escribió:
Mary Culbertson escribió:
I am stuck on how to proceed with yoke. Have been studying videos and charts and am confused. This is my first sweater other than simple baby sweaters. I love the look but haven't worked with charts.
02.01.2022 - 03:01DROPS Design respondió:
Dear Mary, can you please tell us, exactly what confuses you? So we might be able to help you better. Thank you. Happy Stitching!
03.01.2022 - 02:05
![]() Kim Stellinga escribió:
Kim Stellinga escribió:
Ik heb de trui gebreid (s) in drops Alaska. Hij is mooi, maar wanneer de pas 20 cm meet ga je over in tricotsteek. Dit maakt dat de overgang ribbel/tricot halverwege de borst valt. Dit vind ik niet zo mooi omdat die rand best dik is. Het zou mooier zijn als je na 25 cm de overgang maakt. Dan valt hij onder de borst. Bij jullie model is zo te zien de overgang ook niet na 20 cm gebreid, want bij haar valt het ook onder de borst. Dit zou naar mijn idee moeten worden aangepast in het patroon.
13.10.2021 - 23:49
![]() Christel Poeter escribió:
Christel Poeter escribió:
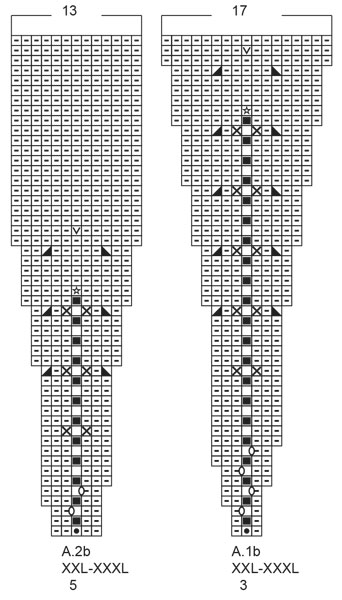
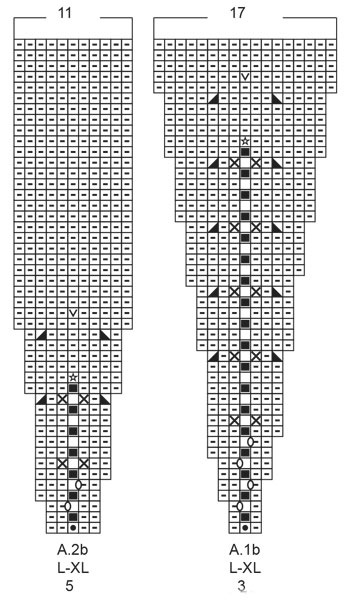
Die Anleitung will ich in Groesse M stricken Halsausschnitt 1 Reihe re. stricken u.dann 1a u.2a über alle Maschen strichen das verstehe ich nicht 1a sind 3 Ma. u.2a 5Ma. nur rechte u. linke Ma.?Danke für die Hilfe
08.05.2020 - 22:36DROPS Design respondió:
Liebe Frau Poeter, so sollen Sie stricken: *die 3 Maschen von A.1a, die 5 Maschen von A.2a*, diese 8 Maschen wiederholen Sie bis zur Ende der Runde, insgesamt 10 Mal = über alle 80 Maschen. Hier lesen Sie mehr über Diagramme. Viel Spaß beim stricken!
11.05.2020 - 08:37
|
|||||||||||||||||||||||||||||||
September Story Sweater#septemberstorysweater |
|||||||||||||||||||||||||||||||
 |
 |
||||||||||||||||||||||||||||||
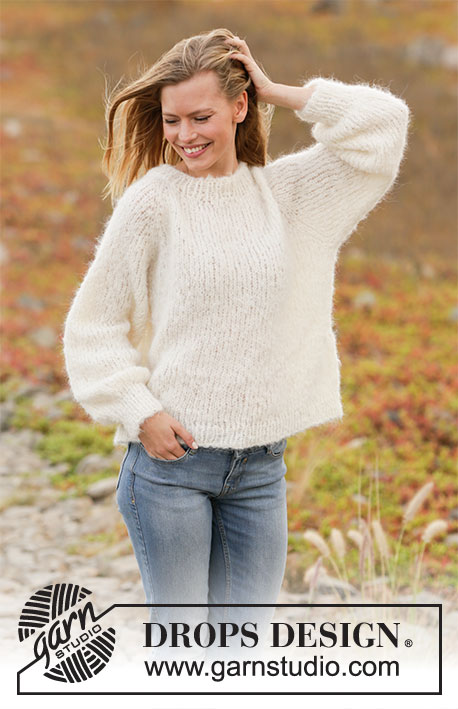
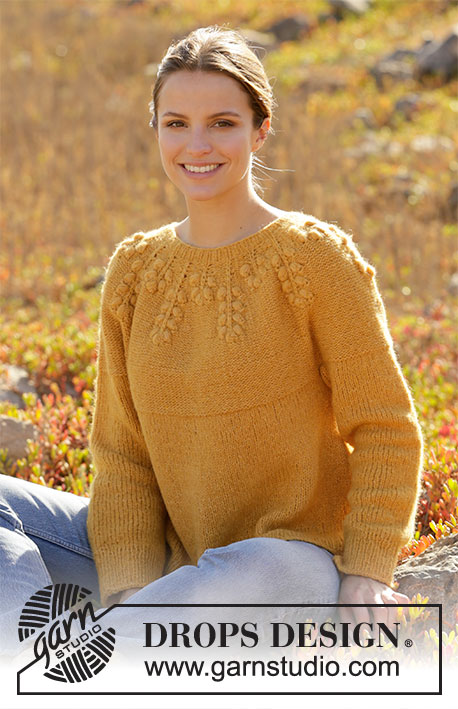
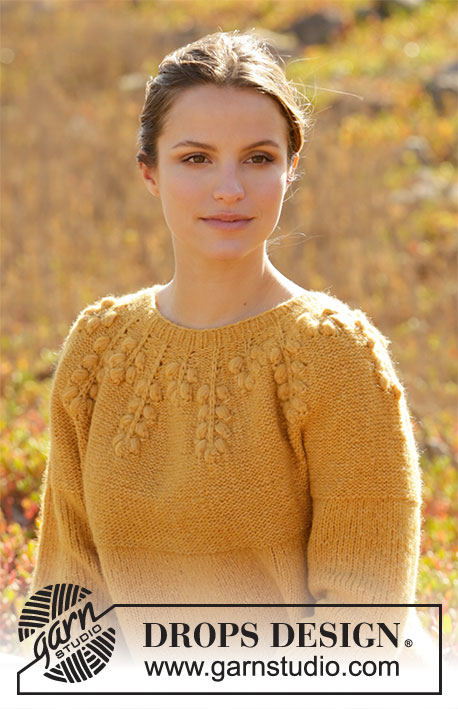
Jersey de punto con canesú redondo en DROPS Air. La pieza está tejida de arriba para abajo con motas. Tallas S – XXXL.
DROPS 213-25 |
|||||||||||||||||||||||||||||||
|
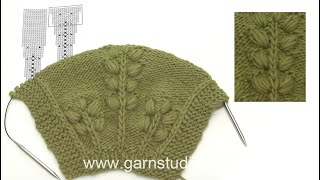
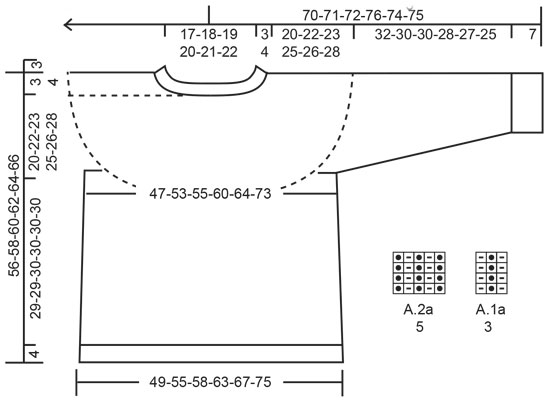
EXPLICACIONES PARA REALIZAR EL PATRÓN: ------------------------------------------------ PATRÓN: Ver diagramas A.1 y A.2. Elegir el diagrama para tu talla. TIP PARA AUMENTAR (aplica a los lados del cuerpo): Tejer hasta que resten 2 puntos antes del hilo marcador, hacer 1 lazada, tejer 4 puntos derechos (el hilo marcador está entre estos 4 puntos), hacer 1 lazada (= 2 puntos aumentados). En la vuelta siguiente, tejer las lazadas retorcidas para evitar que se formen agujeros. Continuar a tejer los puntos nuevos de derecho. TIP PARA DISMINUIR (aplica a las mangas): Disminuir 1 punto a cada lado del hilo marcador de la manera siguiente: Tejer hasta que resten 3 puntos antes del hilo marcador, tejer 2 puntos juntos de derecho, tejer 2 puntos derechos (el hilo marcador está entre estos 2 puntos), deslizar 1 punto como de derecho, tejer 1 punto derecho y pasar el punto deslizado por encima del punto tejido (= 2 puntos disminuidos). TIP PARA REMATAR: Para evitar que la orilla de remate quede apretada, se puede rematar con una aguja de tamaño más grande. Si la orilla aún estuviese apretada, hacer 1 lazada después de aprox. cada 4º punto al mismo tiempo que se rematan los puntos y rematar las lazadas como puntos normales. ------------------------------------------------ COMENZAR LA PIEZA AQUÍ: ------------------------------------------------ JERSEY – RESUMEN DE LA PIEZA: La pieza se teje en redondo con aguja circular, de arriba para abajo a partir del centro de la espalda. Las mangas se tejen en redondo con agujas de doble punta, de arriba para abajo. ORILLA DEL ESCOTE: Montar 72-80-80-88-88-96 puntos con aguja circular tamaño 4.5 mm y Air. Tejer 1 vuelta de derecho. Después tejer * A.1a (= 3 puntos), A.2a (= 5 puntos) *, tejer de *a* sobre todos los puntos (= 9-10-10-11-11-12 veces a lo ancho) Cuando la pieza mida 3-3-3-3-4-4 cm, cambiar a aguja circular tamaño 5.5 mm. Insertar 1 marcador al principio de la vuelta en el centro de la espalda, ¡el canesú será medido a partir de este marcador! CANESÚ: Tejer A.1b sobre A.1a y A.2b sobre A.2a. ¡ACORDARSE DE MANTENER LA MISMA TENSIÓN DE TEJIDO DE LA MUESTRA! Cuando se han completado A.1b y A.2b 1 vez en altura, hay 234-260-280-308-330-360 puntos en la aguja. Tejer de revés hasta que la pieza mida 20-22-23-25-26-28 cm a partir del marcador. El canesú es ahora dividido para el cuerpo y las mangas de la manera siguiente: Tejer 34-39-41-45-48-55 puntos derechos, colocar los 48-52-58-64-68-70 puntos siguientes en 1 hilo para la manga, montar 6 puntos nuevos en la aguja (= en el lado bajo la manga), tejer 69-78-82-90-97-110 puntos derechos (= pieza del frente), colocar los 48-52-58-64-68-70 puntos siguientes en 1 hilo para la manga, montar 6 puntos nuevos en la aguja (= en el lado bajo la manga) y tejer los restantes 35-39-41-45-49-55 puntos derechos. Terminar el cuerpo y las mangas separadamente. ¡LA PIEZA ES AHORA MEDIDA A PARTIR DE AQUÍ! CUERPO: = 150-168-176-192-206-232 puntos. Insertar 1 hilo marcador en el centro de los 6 puntos montados bajo cada manga. Hay 75-84-88-96-103-116 puntos tanto en la pieza de la espalda como en la pieza del frente. Dejar que los hilos sigan la labor a medida que se teje, serán usados cuando se disminuya en los lados. Tejer de derecho en redondo. Cuando la pieza mida 6 cm a partir de la división, aumentar 1 punto a cada lado de los dos hilos marcadores – leer TIP PARA AUMENTAR (= 4 puntos aumentados). Repetir estos aumentos cuando la pieza mida 16 cm = 158-176-184-200-214-240 puntos. Cuando la pieza mida 29-29-30-30-30-30 cm a partir de la división, cambiar a aguja circular tamaño 4.5 mm y tejer en resorte (= 1 derecho, 1 revés). Rematar de derecho cuando el resorte mida 4 cm – leer TIP PARA REMATAR. MANGAS: Colocar los 48-52-58-64-68-70 puntos del hilo en uno de los lados de la pieza en aguja circular corta tamaño 5.5 mm y levantar 1 punto en cada uno de los 6 puntos montados bajo la manga = 54-58-64-70-74-76 puntos. Insertar un hilo marcador en el centro de los 6 puntos bajo la manga. Dejar que el hilo siga la labor a medida que se teje; será usado cuando se disminuya bajo la manga. Comenzar en el hilo marcador y tejer de derecho en redondo. Cuando la manga mida 3 cm a partir de la división, disminuir 2 puntos en el centro bajo la manga – leer TIP PARA DISMINUIR. Disminuir así a cada 6-3-2½-2-1½-1½ cm un total de 5-7-9-11-12-12 veces = 44-44-46-48-50-52 puntos. Continuar tejiendo hasta que la manga mida 32-30-30-28-27-25 cm a partir de la división (falta por tejer aprox. 7 cm para completar las medidas; probarse la chaqueta y tejer hasta obtener el largo deseado). Cambiar a agujas de doble punta tamaño 4.5 mm y tejer en resorte (= 1 derecho, 1 revés). Rematar cuando el resorte mida 7 cm. La manga mide aprox. 39-37-37-35-34-32 cm a partir de la división. Tejer la otra manga de la misma manera. |
|||||||||||||||||||||||||||||||
Explicaciones del diagrama |
|||||||||||||||||||||||||||||||
|
|||||||||||||||||||||||||||||||
 |
|||||||||||||||||||||||||||||||
 |
|||||||||||||||||||||||||||||||
 |
|||||||||||||||||||||||||||||||
 |
|||||||||||||||||||||||||||||||
¿Terminaste este patrón?Entonces, etiqueta tus fotos con #dropspattern #septemberstorysweater o envíalas a la galería #dropsfan. ¿Necesitas ayuda con este patrón?Encontrarás 26 videos tutoriales, un espacio para comentarios/preguntas y más visitando la página del patrón en garnstudio.com © 1982-2026 DROPS Design A/S. Todos los derechos reservados. Este documento, incluyendo todas sus sub-secciones, está protegido por los derechos de autor (copyright). Lee más acerca de lo que puedes hacer con nuestros patrones en la parte de abajo de cada patrón de nuestro sitio. |
|||||||||||||||||||||||||||||||


Con más de 40 años en el diseño de modelos de punto y de ganchillo, DROPS Design ofrece una de las más vastas colecciones de patrones gratuitos en el internet - traducidos en 17 idiomas. Al día de hoy, contamos con 324 catálogos y 12290 patrones - de los cuales 11673 están traducidos en español.
Nosotros trabajamos con mucho esmero para brindarte lo mejor que las labores de punto y ganchillo tienen para ofrecer,inspiración y consejos, así como hilos de magnífica calidad a precios increíbles! Te gustaría usar nuestros patrones para otro fin además del uso personal? Puedes leer acerca de lo que estás permitida a hacer en el texto de Copyright en la parte de abajo de todos nuestros patrones. Felices labores!
Escribe un comentario sobre DROPS 213-25
¡Nos encantaría saber qué piensas acerca de este patrón!
Si quieres escribir una pregunta referente al patrón, por favor asegúrate de elegir la categoría correcta en el formulario debajo, para acelerar el proceso de respuesta. Los campos obligatorios están marcados con un *.