
Categorías populares
¿Buscas un hilo?


Comentarios / Preguntas (65)
![]() Leslie escribió:
Leslie escribió:
I tried to follow your response to my question but still not adding up. When you say 1 st with marker, what do you mean by that in regards to counting? Do you put the first marker in place and start counting to 28 and etc.? And why do you have 1+26+1? Why not 28?
31.10.2024 - 11:01DROPS Design respondió:
Dear Leslie, you should insert 1 marker in the stitch described as (1 stitch with marker) so that the number of stitches works, ie do not insert the markers between stitches but in the stated stitches. If you insert 1 marker in the 1st stitch and 1 marker in the 28th stitch, this means you will have 1 stitch with a marker, then 26 stitches then 1 stitch with a marker in = the 28th stitch. Happy knitting!
31.10.2024 - 15:46
![]() Leslie escribió:
Leslie escribió:
This is just not adding up when it is time to insert the 6 markers. I looked at the previous explanation for this problem but your answers do not solve the problem. I am doing size 11/12. Putting the first marker in the middle of the six stitches on the side and starting the count from that marker but the numbers do not add up right. Can you please help
31.10.2024 - 04:45DROPS Design respondió:
Dear Leslie, in larger size insert the markers as follows: 1 st with marker, count 26 sts, 1 st with marker (= in the 28th stitch), count 29 sts, 1 st with marker (in the 58th stitch), count 27 sts, 1 st with marker (= in the 86th stitch), count 27 sts, 1 st with marker (in the 114th stitch), count 29 sts, 1 st with marker (in the 144th stitch), count 24 sts to the end of the round = 1+26+1+29+1+27+1+27+1+29+1+24=168 sts. Happy knitting!
31.10.2024 - 09:55
![]() Gry Madsen escribió:
Gry Madsen escribió:
Der er en fejl i mønsteret på pind 17 i mønsteret I str.3-4 år. De to sorte p,etter i midten skal have 2 retmasker på hver side, ikke tre
25.10.2024 - 15:01
![]() Coralie escribió:
Coralie escribió:
Bonjour, Je ne comprend pas comment diminuer les manches. Faut-il attendre d'avoir tricoter 40 cm en 12 ans pour diminuer ou diminuer les 40 mailles en tout sur ces 40 cm soit une diminution de chaque côté du marqueur tous les 2 cm?
07.09.2024 - 20:34DROPS Design respondió:
Bonjour Coralie, on ne diminue le nombre de mailles des manches que juste avant les côtes, autrement dit, en taille 11/12 ans, on tricote 40 cm à partir de la division puis on diminue et on tricote les côtes pendant 4 cm. Bon tricot!
09.09.2024 - 10:07
![]() Rita escribió:
Rita escribió:
Why this pattern is among those for babies (sizes 0-2 years)? You should sort baby and children patterns, because now there are some patterns for children mixed into patterns for babies.
05.09.2024 - 20:41
![]() Eva Toft escribió:
Eva Toft escribió:
Modell sk-008-bn Det uppges inte att man ska göra minskningar på ärmen utan bara att man ska justera maskantalet när man stickat rätt längd på ärmen. Det ser inte ut så på skissen. Där blir ärmen långsamt smalare.
11.03.2024 - 12:48DROPS Design respondió:
Hej Eva. Ja, jag ser att skissen är missvisande. Ärmen är rak, inte långsamt smalare som på skissen. Mvh DROPS Design
13.03.2024 - 09:59
![]() Véronique escribió:
Véronique escribió:
Bonjour. Je ne comprends comment tricoter les 2 jetés de chaque côté du marqueur. Puis-je utiliser la technique que vous montrez dans votre vidéo « Comment utiliser un fil marqueur entre 2 mailles » pour l’augmentation de chaque côté à la place ? Cela me semble plus facile et ne fait pas de trous. Merci de votre aide. Bien cordialement.
24.01.2024 - 16:58
![]() Renee escribió:
Renee escribió:
Så fin vill göra den till en 1 åring Hur ska jag göra då?
08.12.2023 - 14:26DROPS Design respondió:
Hei Renee. Design avd. har dessverre ikke muligjeten til å omregne en allerede skrevet oppskrift enn de størrelsene som allerede er i oppskriften. Men søk på Kjoler & Tunikaer under Baby og se om du finner en lignende oppskrift. mvh DROPS Design
11.12.2023 - 08:25
![]() Gemma escribió:
Gemma escribió:
Hi. I’ve worked the yoke and am trying to figure out next steps based on other answers here. Is this correct (for size 7/8): Knit 38 to new beginning of round (first stitch of round is now the 4th of 6 cast on stitches under the right sleeve). Then inc 1 on each side of marker - does that mean inc 2 stitches next to each other? So I’d inc 2 (yo 2), knit stitches 1-26, inc 2, knit 27-52, inc 2, etc etc. TIA!
31.10.2023 - 17:40DROPS Design respondió:
Dear Gemma, you are right for the beg of the round, you will then have 4 markers: 1 in the first stitch of the round (the 3rd of the 6 new sts cast on), then 2nd marker in the 26th stitch, 3rd marker in the 52th stitch, 4th marker in the 77th stitch (other side of dress), 5th marker in the 102nd stitch and 6th marker in the 128th stitch. Now increase 1 stitch on each side of each marker (see INCREASE TIP) a total of 4 times on every 2nd cm, then increase on each side of 1st + 4th markers (sides) and 1 st after 2nd + 5th marker and 1 st before 3rd and 6th marker (8 sts increased) on every 3 cm a total of 12 times. Happy knitting!
01.11.2023 - 14:53
![]() Aline escribió:
Aline escribió:
Hallo, kan het zijn dat de minderingen voor de mouwen nog niet opgenomen zijn in het patroon? Als ik naar de tekening van de jurk kijk, zouden deze wel geminderd moeten worden maar dit lees ik niet terug in de tekst. Dank voor de reactie!
21.01.2023 - 21:22DROPS Design respondió:
Dag Aline,
Je mindert pas aan het eind van de mouw, vlak voordat je de manchet/boord breit.
22.01.2023 - 17:31
|
||||||||||||||||||||||
Woodland Fairy#woodlandfairydress |
||||||||||||||||||||||
 |
 |
|||||||||||||||||||||
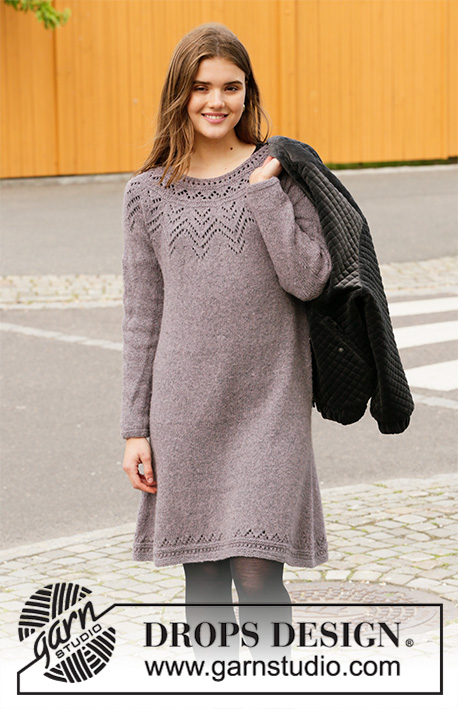
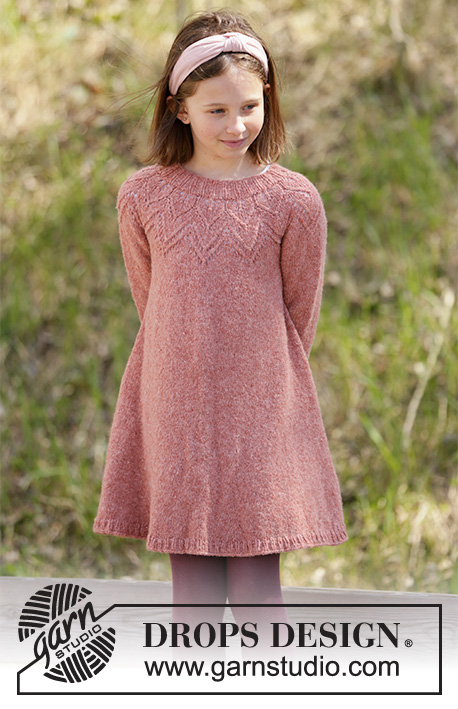
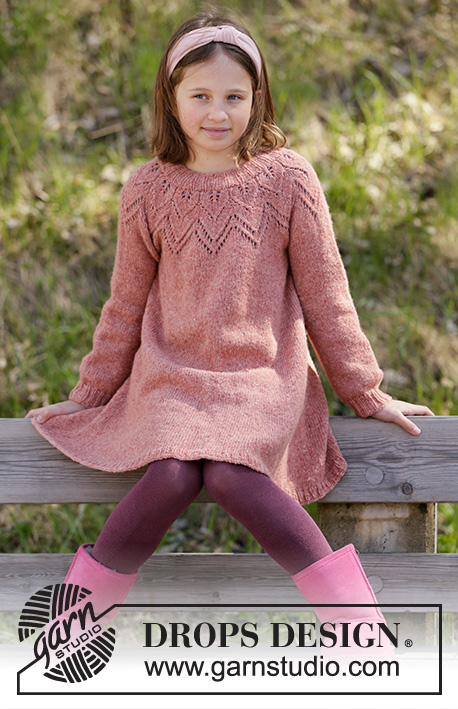
Vestido de punto para niños en DROPS Sky o DROPS Merino Extra Fine. La pieza está tejida de arriba para abajo con patrón de calados. Tallas 3-12 años.
DROPS Children 34-25 |
||||||||||||||||||||||
|
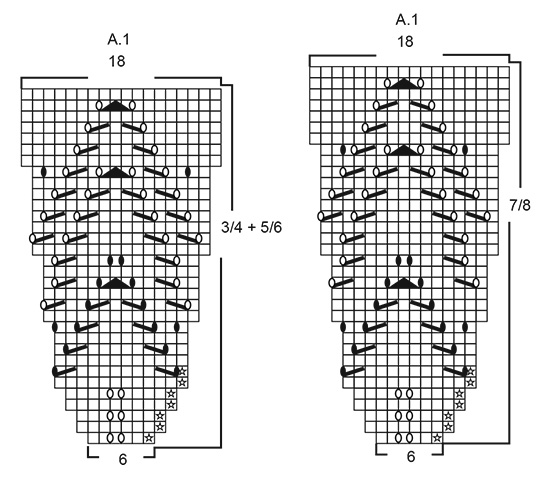
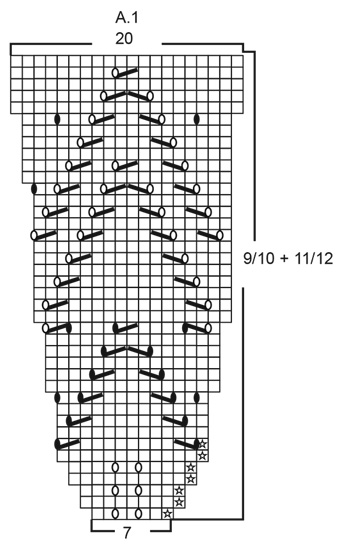
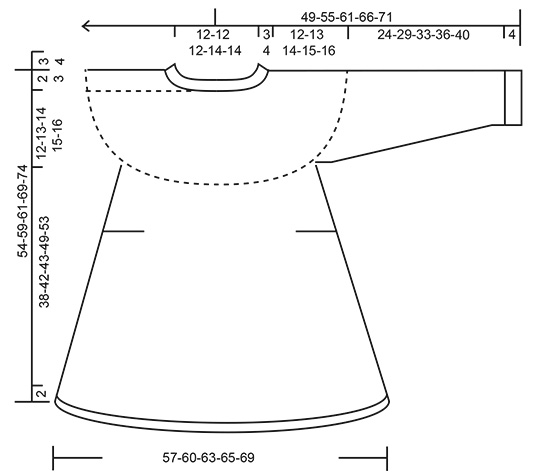
EXPLICACIONES PARA REALIZAR EL PATRÓN: ----------------------------------------------------- TIP PARA AUMENTAR: Aumentar con 1 lazada, en la vuelta siguiente tejer la lazada retorcida para evitar un agujero. PATRÓN: Ver diagrama A.1, escoger la talla correcta en el diagrama. ----------------------------------------------------- COMENZAR LA PIEZA AQUÍ: ----------------------------------------------------- VESTIDO: El canesú se teje en redondo, de arriba para abajo. Después de dividir la pieza para el cuerpo y las mangas, el cuerpo es continuado en redondo con aguja circular, y las mangas son tejidas en redondo con agujas de doble punta. CANESÚ: Montar 72-78-84-90-96 puntos con aguja circular corta tamaño 3.5 mm y Sky. Insertar 1 marcador al principio de la vuelta (= centro de la espalda). Tejer en resorte con 1 derecho/2 reveses durante 3-3-4-4-4 cm (= orilla del escote). La pieza ahora se mide a partir de aquí. Cambiar a aguja circular corta tamaño 4 mm y tejer 2 vueltas de derecho, ajustando en la primera vuelta el número de puntos a 66-72-78-84-91 puntos. Después tejer A.1 (= 11-12-13-12-13 repeticiones a lo ancho) – ¡ver el diagrama para la talla correcta! ¡ACORDARSE DE MANTENER LA MISMA TENSIÓN DE TEJIDO DE LA MUESTRA! Cambiar a una aguja circular más larga cuando se ha aumentado suficientes puntos. Después de haber completado A.1, hay 198-216-234-240-260 puntos en la aguja. En la vuelta siguiente, aumentar 14-12-10-24-20 puntos distribuidos equitativamente, tejiendo al mismo tiempo punto jersey = 212-228-244-264-280 puntos. Continuar con punto jersey hasta que la pieza mida 12-13-14-15-16 cm (sin el resorte). La vuelta siguiente se teje de la manera siguiente: Tejer 31-33-35-37-39 puntos derechos (= mitad pieza de la espalda), colocar los 44-48-52-58-62 puntos siguientes en 1 hilo para la manga (sin tejerlos), montar 6 puntos nuevos, tejer 62-66-70-74-78 puntos derechos (= pieza del frente), colocar los 44-48-52-58-62 puntos siguientes en 1 hilo para la manga (sin tejerlos), montar 6 puntos nuevos y tejer 31-33-35-37-39 puntos derechos (= mitad pieza de la espalda). CUERPO: = 136-144-152-160-168 puntos. ¡LA PIEZA AHORA SE MIDE A PARTIR DE AQUÍ! Ahora insertar 6 marcadores en la pieza de la manera siguiente: Insertar el 1er marcador en el primer punto al principio de la vuelta (= lado), insertar el 2º marcador en el 23º-25º-26º-27º-28º punto, insertar el 3er marcador en el 47º-49º-52º-55º-58º punto, insertar el 4º marcador en el 69º-73º-77º-81º-86º punto (= lado), insertar el 5º marcador en el 91º-97º-102º-107º-114º punto, insertar el 6º marcador en el 115º-121º-128º-135º-144º punto (hay 21-23-24-25-24 puntos restantes en la vuelta después del último marcador). ¡LEER TIP PARA AUMENTAR! En la vuelta siguiente, aumentar 1 punto a cada lado de cada marcador (12 puntos aumentados en la vuelta) y repetir estos aumentos a cada 1½-2-2-2-1½ cm un total de 4 veces. Después aumentar de la manera siguiente: Aumentar 1 punto a cada lado de los marcadores 1 y 4 (= lados), 1 punto después de los marcadores 2 y 5 y 1 punto antes de los marcadores 3 y 6 – LEER TIP PARA AUMENTAR (= 8 puntos aumentados por vuelta). Aumentar en las diferentes tallas de la manera siguiente: 3/4 años: Aumentar aprox. a cada 3 cm un total de 11 veces. 5/6 años: Aumentar aprox. a cada 3 cm un total de 11 veces. 7/8 años: Aumentar aprox. a cada 3 cm un total de 12 veces. 9/10 años: Aumentar aprox. a cada 3½ cm un total de 12 veces. 11/12 años: Aumentar aprox. a cada 4 cm un total de 12 veces. Ahora hay 272-280-296-304-312 puntos en la vuelta. Tejer hasta que la pieza mida 38-42-43-49-53 cm. En la vuelta siguiente, aumentar 34-35-37-38-39 puntos distribuidos equitativamente – LEER TIP PARA AUMENTAR (aumentar después de aprox. cada 8º punto) = 306-315-333-342-351 puntos. Cambiar a aguja circular tamaño 3.5 mm y tejer en resorte con 1 derecho/2 reveses durante 2 cm. Rematar flojo de derecho en la vuelta siguiente. MANGA: Colocar los puntos de uno de los hilos en agujas de doble punta tamaño 4 mm y levantar 1 punto en cada uno de los 6 puntos montados en el lado del cuerpo (insertar 1 marcador en el centro de estos puntos) = 50-54-58-64-68 puntos. ¡LA PIEZA AHORA SE MIDE A PARTIR DE AQUÍ! Tejer punto jersey en redondo. Cuando la pieza mida 24-29-33-36-40 cm a partir del marcador, ajustar el número de puntos a 42-42-48-48-48 puntos. Cambiar a agujas de doble punta tamaño 3.5 mm y tejer en resorte 1 derecho/2 reveses durante 4 cm. Rematar flojo de derecho en la vuelta siguiente. Tejer la otra manga de la misma manera. |
||||||||||||||||||||||
Explicaciones del diagrama |
||||||||||||||||||||||
|
||||||||||||||||||||||
 |
||||||||||||||||||||||
 |
||||||||||||||||||||||
 |
||||||||||||||||||||||
¿Terminaste este patrón?Entonces, etiqueta tus fotos con #dropspattern #woodlandfairydress o envíalas a la galería #dropsfan. ¿Necesitas ayuda con este patrón?Encontrarás 24 videos tutoriales, un espacio para comentarios/preguntas y más visitando la página del patrón en garnstudio.com © 1982-2026 DROPS Design A/S. Todos los derechos reservados. Este documento, incluyendo todas sus sub-secciones, está protegido por los derechos de autor (copyright). Lee más acerca de lo que puedes hacer con nuestros patrones en la parte de abajo de cada patrón de nuestro sitio. |
||||||||||||||||||||||


Con más de 40 años en el diseño de modelos de punto y de ganchillo, DROPS Design ofrece una de las más vastas colecciones de patrones gratuitos en el internet - traducidos en 17 idiomas. Al día de hoy, contamos con 324 catálogos y 12290 patrones - de los cuales 11685 están traducidos en español.
Nosotros trabajamos con mucho esmero para brindarte lo mejor que las labores de punto y ganchillo tienen para ofrecer,inspiración y consejos, así como hilos de magnífica calidad a precios increíbles! Te gustaría usar nuestros patrones para otro fin además del uso personal? Puedes leer acerca de lo que estás permitida a hacer en el texto de Copyright en la parte de abajo de todos nuestros patrones. Felices labores!
Escribe un comentario sobre DROPS Children 34-25
¡Nos encantaría saber qué piensas acerca de este patrón!
Si quieres escribir una pregunta referente al patrón, por favor asegúrate de elegir la categoría correcta en el formulario debajo, para acelerar el proceso de respuesta. Los campos obligatorios están marcados con un *.