
Categorías populares
¿Buscas un hilo?


Comentarios / Preguntas (234)
![]() Camilla Sagnak escribió:
Camilla Sagnak escribió:
Hej! Tack för fint mönster. Jag har stött på problem och har försökt titta på era instruktionsvideor men inte hittat lösningen. Hur stickar man 2 maskor vridet aviga tillsammans direkt efter ett omslag? (diagram A2 strlk L) 2 aviga tillsammans går ju bra. men när jag stickar dem "vridna" tappar jag omslaget- men det kanske är meningen?
06.12.2024 - 22:35DROPS Design respondió:
Hei Camilla. Gjør omslag på høyre pinne som vanlig, legg nå tråden mot deg (fremsiden av arbeidet). Lyft de 2 m på venstre pinne över till höger pinne sedan vrid dem och sätt tillbaka dem en och en på vänster pinne (se videoen: Minska 2 am vriden tills till 1 am) og sticka de 2 maskene vridd vrang. Da tappar du ikke omslaget :) mvh DROPS Design
10.12.2024 - 09:48
![]() Lis Kronhorst escribió:
Lis Kronhorst escribió:
Hej. Efter deling af bærestykke og ærmer, skal jeg til kroppen, hvor der til denne skal bruges mønster A4, A5 og A6 (strikker str M) Dette mønster (ruder) bliver ikke lige så store som på bærestykket, så jeg forstår ikke. Kan I hjælpe? Med venlig hilsen Lis Kronhorst I
23.11.2024 - 21:13DROPS Design respondió:
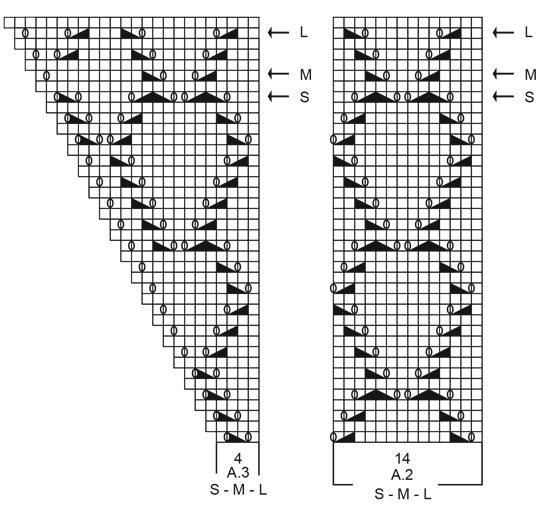
Hej Lis, jo rapporten går over 14 masker, nøjagtig som i A.2 og A.1 :)
27.11.2024 - 12:08
![]() Sandra escribió:
Sandra escribió:
Hallo, werden denn alle Umschläge in der nächsten Runde rechts abgestrickt oder die Zunahmen verschränkt, wie in der Anleitung angegeben. Aber wie sehe ich, welche Umschläge es dann betrifft? Danke und viele Grüße
17.11.2024 - 13:59
![]() Andreea escribió:
Andreea escribió:
I’m having a hard time following the pattern. I’ve passed the stage where I separated the sleeve stitches and added the 4 underarm stitches for size S. I am now following diagram A.5 but it’s not lining up. The instructions say to start with 1stitches and the follow A.5 diagram but the pattern is offset. I don't understand how to do it. I knite 1 after te 2 stitches for underarms,or this 2 stitches ar included in the patern.Please help. Thank you.
07.11.2024 - 08:33DROPS Design respondió:
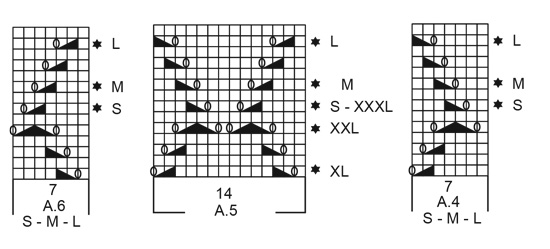
Dear Andrea, from mid under sleeve you should start with *K1, then A.4 then repeat A.5 a total of 3 times, then work A.6 and finish with k2* for first side and repeat from *-* to the end of the round. This means there are 3 sts in stocking stitch mid under each sleeve, and pattern should continue from yoke. Happy knitting!
07.11.2024 - 12:48
![]() Bodil Møller Jensen escribió:
Bodil Møller Jensen escribió:
Jeg synes, det er lidt svært at blive klog på, hvornår man skal tage ud i raglan. Der står, at det fremgår af diagrammet, og jeg kan jo også sagtens se, at maskeantallet øges, men er det det ene omslag, eller hvordan skal det forstås? Og hvordan vil man have raglanudtagninger ne?
10.07.2024 - 11:18DROPS Design respondió:
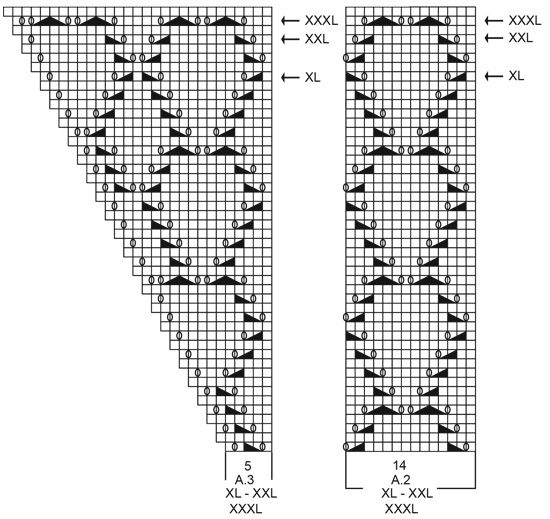
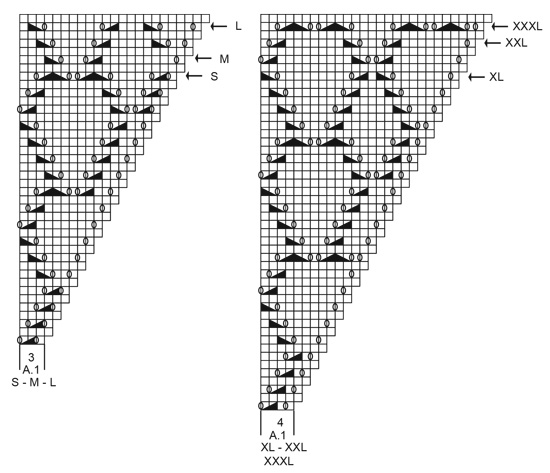
Hei Bodil. Når du har satt de 4 merketrådene i arbeidet har du oversikt hvor det skal økes til raglan. Du øker til raglan i diagram A.1 og A.3 og disse diagrammene strikker på hver side av merketrådenen. Kastene du ser i diagrammene er både til hullmønser og raglanøkninger. Se i diagramteksten hvordan kastene skal strikkes. mvh DROPS Design
10.07.2024 - 13:25
![]() Sylvie escribió:
Sylvie escribió:
Bonjour . Merci pour votre retour mais je n'ai pas compris si pour les diagrammes A4-A5-A6 après le dernier tour (6e) je dois continuer le diagramme en partant du 1e tour ou si le motif est terminé après le dernier tour (tour n° 6). Merci pour votre aide
28.05.2024 - 10:47DROPS Design respondió:
Bonjour Sylvie, quand vous avez tricoté les 6 derniers rangs du diagramme, reprenez-les au 1er rang et répétez les 14 rangs des diagrammes. Bon tricot!
28.05.2024 - 15:20
![]() Sylvie escribió:
Sylvie escribió:
Bonjour. Je suis entrain de faire le modèle en taille M. Je suis au niveau des diagrammes A4-A5-A6 où il fut commencer aux étoiles selon la taille. Je vais donc faire 6 rangs pour arriver en haut du diagramme. Ensuite dois je reprendre au 1e rang du diagramme ? Merci pour votre aide
27.05.2024 - 20:17DROPS Design respondió:
Bonjour Sylvie, le de dernier rang de l'empiècement tricoté sur toutes les mailles est le tour avec la flèche, vous divisez les mailles au tour suivant = il reste 4 tours à tricoter dans le point ajouré; commencez ensuite les diagrammes suivants au tour avec l'étoile pour bien continuer le point ajouré; tricotez en jersey les mailles de chaque côté (car le point ajouré ne tombe pas juste sur les côtés en raison du nombre de mailles),en taille M, vous aurez 5 mailles jersey de chaque côté (dont 2 au début du tour et 3 à la fin du tour). Bon tricot!
28.05.2024 - 07:52
![]() Emi escribió:
Emi escribió:
Bonjour, je ne comprends pas : en commençant le tour au fil marqueur de l un des côtés et par le tour avec l étoile..... Le fil marqueur est placé au milieu des mailles montées sous la manche, les mailles montées sont sur l aiguille de droite et sur l aiguille de gauche se trouve le début du tricot. Pour le xl je fais le a5 et je commence par 1 maille m puis un jeté... ??? Mais du coup je ne commence pas au fil marqueur ???
27.03.2024 - 23:41DROPS Design respondió:
Bonjour Emi, pour que le motif tombe juste, vous allez commencer au milieu des 6 mailles montées sous la manche d'un côté de l'ouvrage et vous tricotez 5 fois A.5 et vous terminez par 1 maille endroit, puis vous tricotez de nouveau 5 fois A.5 et terminez par 1 maille endroit, les motifs doivent continuer ceux de l'empiècement, vous avez en plus 1 maille endroit sous chaque manche (autrement dit, vous n'avez pas les 10 motifs de A.( tout le tour, mais bien 5 x 14 m + 1 m endroit pour le devant/le dos. Bon tricot!
02.04.2024 - 12:50
![]() Agneta Edlund escribió:
Agneta Edlund escribió:
Hejsan, stickar efter storlek S o tycker att det saknas förklaring på diagrammet. Mönster A2 o rad 5, den trekantiga triangeln? Hur stickas den?
24.03.2024 - 09:01DROPS Design respondió:
Hej Agneta. Då stickar du först den 4:e symbolen i teckenförklaringen och sedan den 3:e symbolen. Mvh DROPS Design
27.03.2024 - 14:18
![]() Stacey escribió:
Stacey escribió:
I’m not sure how many stitch’s are between markers for the xl (a1) size on the set up for sleeves front and back. I’m struggling a bit to understand the instructions. Thanks for the help
22.03.2024 - 04:50DROPS Design respondió:
Dear Stacey, work the very first round as follow * insert a marker thread here, A.1 over the first 4 sts, A.2 over the next 14 stitches, A.3 over the next 5 sts (=4+14+5= 23 sts for back/ front piece), insert a marker thread here, A.1 over the next 4 sts, A.3 over the next 5 sts (= 4+5= 9 sts for sleeve) *, work from *-* 1 more time on the round (- 23+9+23+9=64 sts). Happy knitting!
22.03.2024 - 07:52
|
|||||||||||||||||||
Summer Shells#summershellssweater |
|||||||||||||||||||
 |
 |
||||||||||||||||||
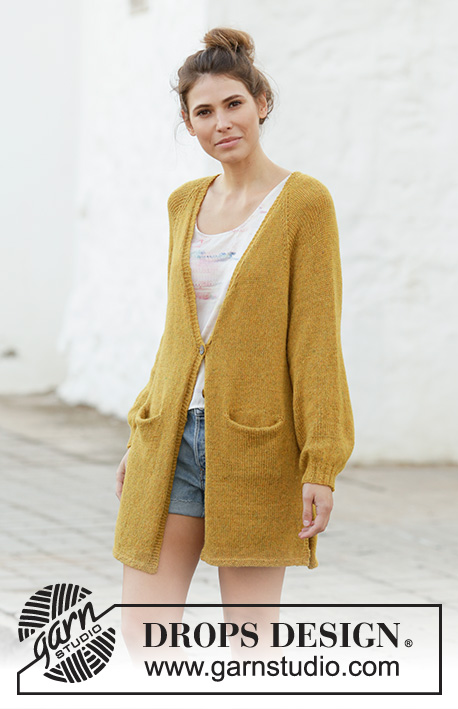
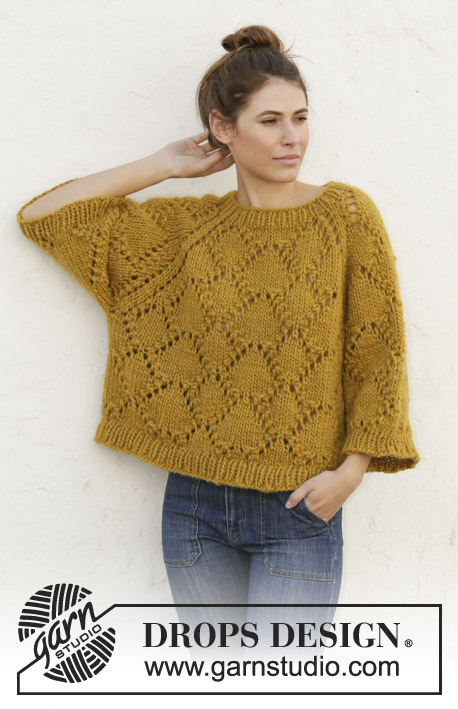
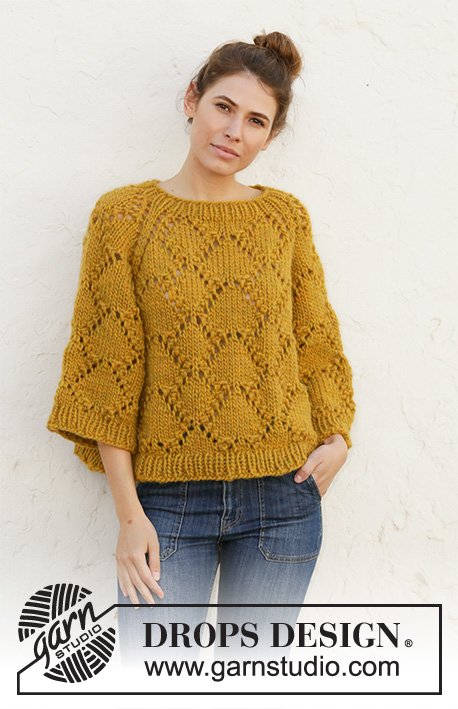
Jersey de punto con raglán con 1 hilo de DROPS Snow o 2 hilos de Air. La prenda está realizada de arriba abajo con patrón de calados. Tallas S – XXXL.
DROPS 200-5 |
|||||||||||||||||||
|
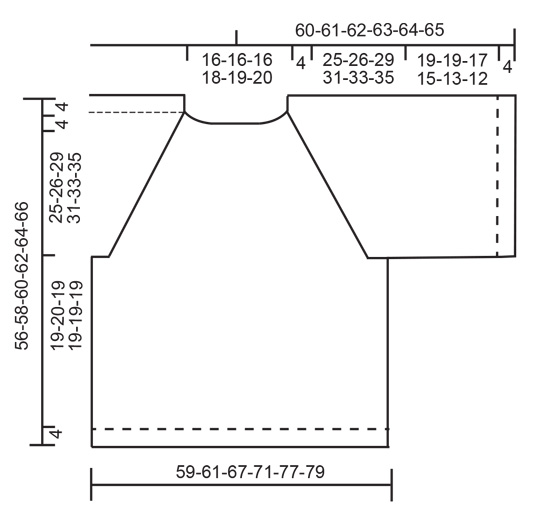
EXPLICACIONES PARA REALIZAR LA LABOR: ------------------------------------------------------- PATRÓN: Ver los diagramas A.1-A.6 (A.4 y A.6 se aplican a las tallas S,M y L). Elegir el diagrama correspondiente a la talla. TIP PARA LAS DISMINUCIONES (repartidos): Para calcular cómo disminuir de manera repartida, contar el número total de puntos en la aguja (p.e. 58 puntos) y dividirlo por el número de disminuciones a trabajar (p.e 2) = 29. En este ejemplo, trabajar juntos de derecho cada 28º y 29º punto. TIP PARA LOS AUMENTOS (repartidos): Para calcular cómo aumentar de manera repartida, contar el número total de puntos en la aguja (p.e 118 puntos) y dividirlo por el número de aumentos a trabajar (p.e 24) = 4,9. En este ejemplo, aumentar trabajando 1 hebra después de aprox cada 5º punto. En la siguiente fila, trabajar las hebras de derecho retorcido para evitar que se formen agujeros. ------------------------------------------------------- COMENZAR LA LABOR AQUÍ: ------------------------------------------------------- JERSEY - RESUMEN DE LA LABOR: La labor se trabaja en redondo con aguja circular de arriba abajo. Las mangas se trabajan en redondo con aguja circular corta. JERSEY: ESCOTE: Montar 56-58-60-64-64-68 puntos con aguja circular de 8 mm y 1 hilo de Snow o 2 hilos de Air. Trabajar 1 vuelta de derecho. Después trabajar 4 cm en punto elástico (1 derecho, 1 revés). CANESÚ: Cambiar a aguja circular de 9 mm. Trabajar 1 vuelta de derecho y al mismo tiempo disminuir 0-2-4-0-0-4 puntos repartidos – leer TIP PARA LAS DISMINUCIONES = 56-56-56-64-64-64 puntos. Ahora trabajar el patrón – elegir el diagrama correspondiente a la talla, como sigue: *insertar un marcapuntos aquí, A.1 sobre los primeros 3-3-3-4-4-4 puntos, A.2 sobre los siguientes 14 puntos, A.3 sobre los siguientes 4-4-4-5-5-5 puntos (= espalda/ delantero), insertar un marcapuntos aquí, A.1 sobre los siguientes 3-3-3-4-4-4 puntos, A.3 sobre los siguientes 4-4-4-5-5-5 puntos (= manga)*, trabajar de * a * 1 vez más en la vuelta. Ahora hay 4 marcapuntos en la labor. Los marcapuntos marcan las transiciones entre cuerpo y la mangas y avanzan con la labor hacia arriba . Continuar con el patrón en redondo. Aumentar a cada lado de los diagramas para el raglán (los aumentos están incluidos dentro de los diagramas. RECUERDE MANTENER LA MISMA TENSIÓN DEL TEJIDO! Cuando se ha llegado hasta la vuelta marcada con la flecha en el diagrama (ver la flecha correspondiente a la talla), hay 192-200-216-232-248-256 puntos en la vuelta. La labor mide aprox 29-30-33-35-37-39 cm desde el borde de montaje hasta el centro del delantero. La siguiente vuelta se trabaja como sigue: Trabajar los primeros 55-57-61-65-69-71 puntos (= espalda), pasar los siguientes 41-43-47-51-55-57 puntos a un gancho auxiliar (= manga), montar 4-4-6-6-8-8 puntos nuevos en la aguja (= en el lado bajo la manga), trabajar los siguientes 55-57-61-65-69-71 puntos (= delantero), pasar los siguientes 41-43-47-51-55-57 puntos a un gancho auxiliar (= manga), montar 4-4-6-6-8-8 puntos nuevos bajo la manga. AHORA MEDIR LA LABOR DESDE AQUÍ! CUERPO: = 118-122-134-142-154-158 puntos. Insertar un marcapuntos a cada lado, en el centro de los 4-4-6-6-8-8 puntos nuevos montados bajo la manga (= 2-2-3-3-4-4 puntos nuevos a cada lado del marcapuntos). Comenzar la vuelta en el marcapuntos en un lado de la labor y trabajar el patrón, comenzando en la vuelta marcada con la estrella en el diagrama correspondiente a la talla elegida, como sigue: Tallas S, M y L: * Trabajar 1-2-5 derechos, A.4 sobre los siguientes 7 puntos, A.5 sobre los siguientes 42 puntos (= 3 repeticiones de 14 puntos), A.6 sobre los siguientes 7 puntos, 2-3-6 derechos*, trabajar de *a* 1 vez más en la vuelta. Tallas XL, XXL y XXXL: * 0-3-4 puntos, A.5 sobre los siguientes 70 puntos (= 5 repeticiones de 14 puntos), 1-4-5 derechos *, trabajar de * a * 1 vez más en la vuelta. Continuar en redondo de esta manera hasta que la labor mida aprox. 19-20-19-19-19-19 cm - ajustar para finalizar después de la vuelta 5 o 13 de A.5. Trabajar 1 vuelta de derecho en la que se aumenten 24-24-26-28-30-32 puntos repartidos - leer TIP PARA LOS AUMENTOS = 142-146-160-170-184-190 puntos. Cambiar a aguja circular de 8 mm. Trabajar el elástico (1 derecho, 1 revés) en redondo 4 cm. Rematar con derecho sobre derecho y revés sobre revés. Asegurarse de que el borde de remate no quede tenso. Usar agujas de mayor tamaño si fuese necesario. El jersey mide aprox. 56-58-60-62-64-66 cm desde el hombro hasta abajo. MANGAS: Pasar los 41-43-47-51-55-57 puntos desde el gancho auxiliar a un lado de la labor de vuelta a la aguja circular corta de 9 mm y recoger 1 punto en cada uno de los 4-4-6-6-8-8 puntos montados bajo la manga = 45-47-53-57-63-65 puntos. Insertar 1 marcapuntos en medio de los 4-4-6-6-8-8 puntos montados bajo la manga (= 2-2-3-3-4-4 puntos nuevos a cada lado del marcapuntos). Comenzar la vuelta en el marcapuntos y trabajar el patrón, comenzando en la vuelta marcada con una estrella para la talla correspondiente en el diagrama(s) como sigue: Tallas S, M y L: 1-2-5 derechos, A.4 sobre los siguientes 7 puntos, A.5 sobre los siguientes 28 puntos (= 2 repeticiones de 14 puntos), A.6 sobre los siguientes 7 puntos, 2-3-6 derechos. Tallas XL, XXL y XXXL: 0-3-4 derechos, A.5 sobre los siguientes 56 puntos (= 4 repeticiones de 14 puntos), 1-4-5 derechos. Continuar en redondo de esta manera hasta que la labor mida aprox. 19-19-17-15-13-12 cm – ajustar para finalizar después de la vuelta 5 o 13 de A.5. Trabajar 1 vuelta de derecho en la que se aumenten 9-9-11-11-13-13 puntos repartidos = 54-56-64-68-76-78 puntos. Cambiar a aguja circular de 8 mm. Trabajar el elástico (1 derecho, 1 revés) en redondo 4 cm. Rematar con derecho sobre derecho y revés sobre revés. Asegurarse de que el borde de remate no quede tenso. Usar agujas de mayor tamaño si fuese necesario. La manga mide aprox. 23-23-21-19-17-16 cm. Trabajar la otra manga de la misma manera. |
|||||||||||||||||||
Explicaciones del diagrama |
|||||||||||||||||||
|
|||||||||||||||||||
 |
|||||||||||||||||||
 |
|||||||||||||||||||
 |
|||||||||||||||||||
 |
|||||||||||||||||||
 |
|||||||||||||||||||
¿Terminaste este patrón?Entonces, etiqueta tus fotos con #dropspattern #summershellssweater o envíalas a la galería #dropsfan. ¿Necesitas ayuda con este patrón?Encontrarás 26 videos tutoriales, un espacio para comentarios/preguntas y más visitando la página del patrón en garnstudio.com © 1982-2026 DROPS Design A/S. Todos los derechos reservados. Este documento, incluyendo todas sus sub-secciones, está protegido por los derechos de autor (copyright). Lee más acerca de lo que puedes hacer con nuestros patrones en la parte de abajo de cada patrón de nuestro sitio. |
|||||||||||||||||||


Con más de 40 años en el diseño de modelos de punto y de ganchillo, DROPS Design ofrece una de las más vastas colecciones de patrones gratuitos en el internet - traducidos en 17 idiomas. Al día de hoy, contamos con 324 catálogos y 12290 patrones - de los cuales 11675 están traducidos en español.
Nosotros trabajamos con mucho esmero para brindarte lo mejor que las labores de punto y ganchillo tienen para ofrecer,inspiración y consejos, así como hilos de magnífica calidad a precios increíbles! Te gustaría usar nuestros patrones para otro fin además del uso personal? Puedes leer acerca de lo que estás permitida a hacer en el texto de Copyright en la parte de abajo de todos nuestros patrones. Felices labores!
Escribe un comentario sobre DROPS 200-5
¡Nos encantaría saber qué piensas acerca de este patrón!
Si quieres escribir una pregunta referente al patrón, por favor asegúrate de elegir la categoría correcta en el formulario debajo, para acelerar el proceso de respuesta. Los campos obligatorios están marcados con un *.