
Categorías populares
¿Buscas un hilo?


Comentarios / Preguntas (76)
![]() Joanna escribió:
Joanna escribió:
Hello, I have reached row 17 of A5C. The instructions say to " work 1 double crochet.... then to work 1 double crochet in each of the next 2 double crochets" but there are only 2 double crochets from the previous row, and the diagram shows that all 3 double crochets should be in the first double crochet from row 16 only? Please can you confirm how to do this stich?
03.08.2025 - 02:17DROPS Design respondió:
Dear Joanna, in round 16, A.4 ended with 1 double crochet. So in row 17 you will work over this double crochet + the first 2 double crochet in round 17 to work this symbol. Happy crochetting!
03.08.2025 - 23:59
![]() Joanna escribió:
Joanna escribió:
Hello again. On row 9 of A3B, it has 13 stiches on one side of A3A, whereas A3C has 12. For the next row, A4 requires rounds of 12. What do I do with that extra stitch in A3B?
11.02.2025 - 22:40DROPS Design respondió:
Dear Joanna, you work A.5B over the start of A.3B, then repeat A.4 over the remaining A.3B, A.2 and A.3C stitches and A.5C over the edge of A.3C. So you don't need to adjust the number of stitches for A.4, since you have 1 stitch in A.5b, 2 stitches in A.5C and the rest is worked in A.4. Happy crochetting!
16.02.2025 - 22:38
![]() Joanna escribió:
Joanna escribió:
For the section beginning A.2/A.3 it begins with A.3A which is 3 ch for a middle space. How do I work this into the previous round where the middle space is 2 double crochet, 3 ch, 2 double crochet? The diagram for A3 only appears to show 1 double crochet, 3 ch, 1 double crochet from the previous round.
10.01.2025 - 03:50DROPS Design respondió:
DearJoanna, start the round with 3 chains then work A.3A, you can then consider these 3 chains are worked extra or that they are replacing the last stitch in A.3C at the end of the round. Happy crocheting!
10.01.2025 - 09:47
![]() Joanna escribió:
Joanna escribió:
OK, I think I am understanding most of that. I know how to make the increase but what I still don't understand is where I crochet the increases (I am making the small pattern). When you say "1 extra double crochet on each side" or "along each side", what does "each side" mean? Would that be A1B and A1F from the previous row?
19.12.2024 - 02:40DROPS Design respondió:
Dear Joanna, correct, you have to increase along these sides, ie between the tip on mid front and on mid back. Happy crocheting!
20.12.2024 - 07:31
![]() Joanna escribió:
Joanna escribió:
I need help on the ROUND WITH DOUBLE CROCHETS. It says "increase 1-1 double crochet along each of the sides between mid front /mid back" but then also says NOTE: Do not increase on each side of the each shoulder onwards, but only mid front and mid back. Please advise on where exactly the increases come in as these instructions are very confusing.
14.12.2024 - 21:53DROPS Design respondió:
Dear Joanna, it says "Do not increase onwards". So this time you increase 1 stitch along each side (so on each shoulder), but from now on we will only increase in the middle. Happy crochetting!
15.12.2024 - 23:14
![]() Joanna escribió:
Joanna escribió:
Hello, on the ROUND WITH DOUBLE CROCHETS, where exactly do the increases come in? It says "2 double crochets, 3 chains, 2 double crochets around middle space". Does this include an increase, so 2 double crochets in the same stitch, 3 chains, 2 double crochets in same stitch? That would only make 4 additional stitches for the entire piece, but the number of stitches increases by 10?
09.12.2024 - 02:32DROPS Design respondió:
Dear Joanna, the (2 double crochets, 3 chains, 2 double crochets)around the middle space is forming a fan, but you have more increases stated later: "adjust AT THE SAME TIME number of double crochets to decrease/increase as follows". You will increase or decrease (depending on the size worked) on the sides of the piece. To increase or decrease, see the respective tip at the top of the pattern. Since you are working double crochets on this round, simply work 2 double crochets in the same stitch when you need to increase. So you have 4 new double crochets in each middle space (back and front) + 1 extra double crochet on each side = 10 double crochets increased. Happy crochetting!
15.12.2024 - 15:40
![]() Joanna escribió:
Joanna escribió:
Yes, thank you, that is what I have been doing. However, on row 2, A1E, this ends with a treble (double in US), and the next instruction is go to A1D which begins with a treble. So does that mean that the 2 trebles are next to each other (the last one from A1E and the first one from A1D?) Similarly, on row 3, A1E ends with a chain 1, skip 1 stitch, and the A1D starts with a chain 1. So are those 2 chains next to each other?
25.11.2024 - 02:53
![]() Joanna escribió:
Joanna escribió:
Hello, on the 2nd round of A1, it says to work A.1E x 7, and then A1D . However A1E on row 2 ends with a double crochet, and A1D begins with a double crochet. So should there be 2 double crochets next to each other? Similarly on row 3, A1E ends with 1 chain, and A1D begins with a chain so there are now 2 chains together. Should the pattern read "repeat A1C 7 times in total, A1D shoulder increase?
24.11.2024 - 01:56DROPS Design respondió:
Dear Joanna, you work A.1C, A.1D, A.1E, A.1D. The second row is worked as follows: for A.1C - 1 treble crochet, chain 1, skip 1 stitch. For A.1D - you have the shoulder stitch with a marker. Work 1 treble crochet in the 1st chain stitch from the previous round, chain 1, (1 treble crochet, chain 1, 1 treble crochet) in the 2º chain stitch from the previous round, chain 1, 1 treble crochet in the 3rd chain stitch from the previous round. Then A.1E is worked as: chain 1, skip 1 treble crochet, 1 treble crochet in the next stitch. And A.1D is repeated as before. Happy crochetting!
24.11.2024 - 23:28
![]() Joanna escribió:
Joanna escribió:
CROCHET INFO: The first treble crochet at the beginning of round are replaced with 3 chain stitches. Finish round with 1 slip stitch in 3rd chain stitch at beginning of round, then work slip stitches until middle space. Please can you advise what "slip stitches until middle space" means?
16.11.2024 - 04:48DROPS Design respondió:
Dear Joanna, it means to continue working slip stitches until you reach the middle of the first chain space in the round. Happy crochetting!
17.11.2024 - 22:58
![]() Nilsson escribió:
Nilsson escribió:
Hej! Jag är rätt ny till den här typen av diagram, även fast jag kollat på era hjälpvideos och läst på mig förstår jag fortfarande inte haha Så jag börjar på A.1A, fortsätter till A.1C, men förstår inte om jag ska upprepa A.1C tills jag kommit till första markeringen (A.1D)? Det stämmer inte med hur det är på modellen? Önskar ni hade skrivit ut diagrammet istället 😂😂
31.05.2024 - 18:44DROPS Design respondió:
Hei Nilson. Jo, du fortsetter med A.1C (gjenta A.1C totalt 12-13-13 ganger). Så hekler du A.1D i neste stav (merke 2). Husk ponchoen hekles overfra og ned, slik at da stemmer diagrammet med bildet. mvh DROPS Design
03.06.2024 - 13:46
|
||||||||||||||||||||||||||||||||||||||||||||||
Cressida#cressidaponcho |
||||||||||||||||||||||||||||||||||||||||||||||
 |
 |
|||||||||||||||||||||||||||||||||||||||||||||
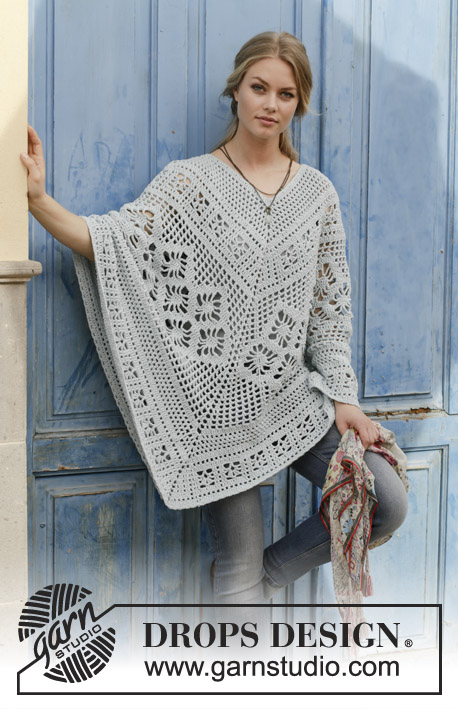
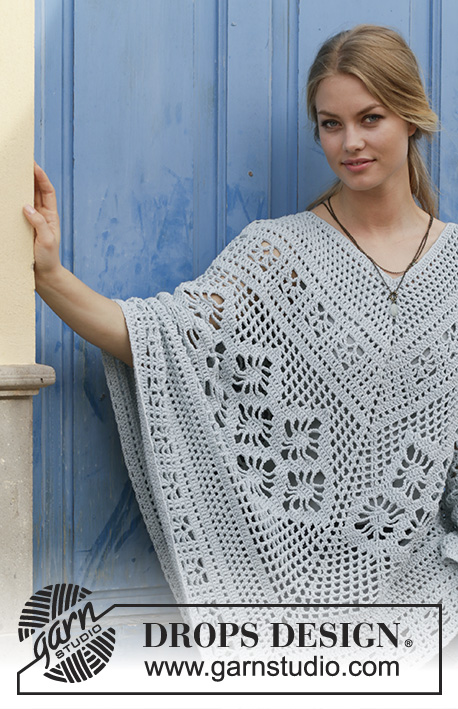
Poncho a ganchillo con patrón de calados, trabajado de arriba abajo. Talla: S - XXXL La prenda está realizada en DROPS Paris.
DROPS 188-27 |
||||||||||||||||||||||||||||||||||||||||||||||
|
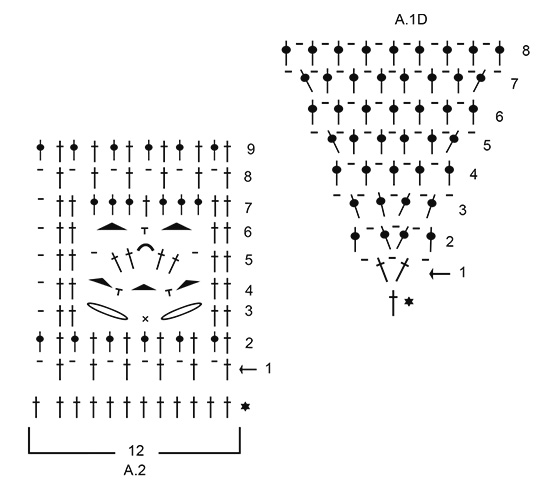
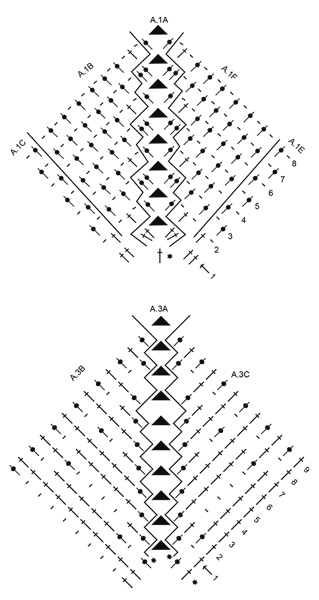
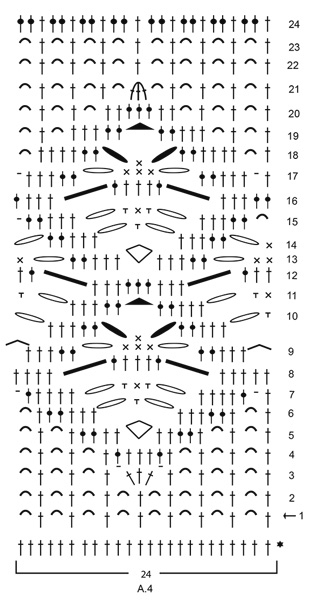
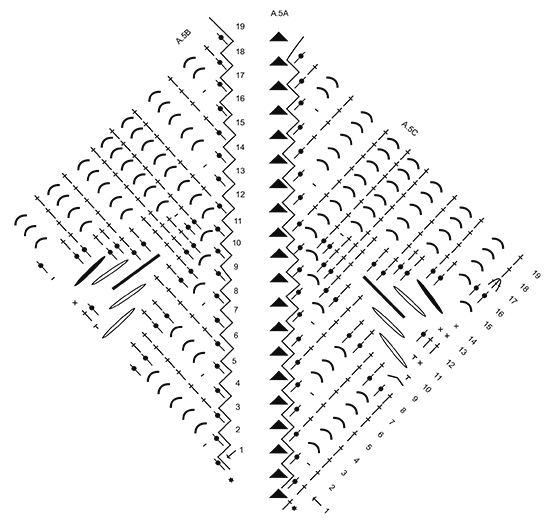
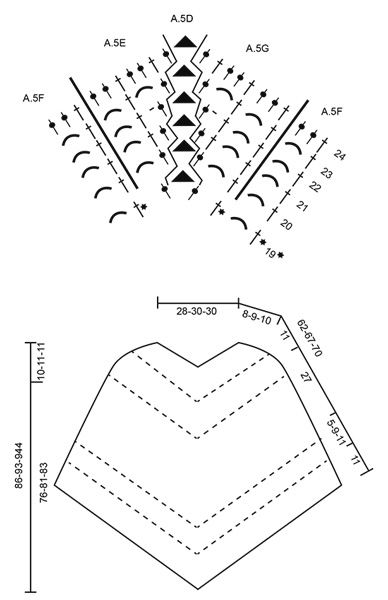
INFORMACIÓN PARA REALIZAR EL PATRÓN: PATRÓN: Ver los diagramas A.1 a A.5. INFORMACIÓN PARA TRABAJAR EL GANCHILLO: Sustituir el primer punto alto al inicio de la de la vuelta por 3 puntos de cadeneta. Finalizar la vuelta con 1 punto enano en el 3er punto de cadeneta del inicio de la vuelta, después trabajar punto enano hasta el arco central. TIP PARA LAS DISMINUCIONES - TRABAJAR 2 PUNTOS ALTOS DOBLES JUNTOS: Trabajar un punto alto doble alrededor del arco de cadeneta inferior pero sin hacer la última lazada (= 2 puntos en el ganchillo), saltar 1 punto bajo y trabajar 1 punto alto doble alrededor del siguiente arco pero en la última lazada pasar el hilo por todos los bucles del ganchillo. TIP PARA LOS AUMENTOS: Aumentar 1 punto alto trabajando 2 puntos altos en el mismo punto. ---------------------------------------------------------- PONCHO: El poncho se trabaja en redondo, de arriba a abajo. Primero aumentar en el centro del delantero, el centro de la espalda y a cada lado de cada hombro, después aumentar solo en el centro del delantero y el centro de la espalda. Trabajar 156-166-166 puntos de cadeneta en un ganchillo de 4.5 mm con Paris y formar un anillo con 1 punto enano en el 1er punto de cadeneta. Trabajar 3 puntos de cadeneta - leer INFO PARA TRABAJAR A GANCHILLO! Después trabajar 1 punto alto en cada uno de los siguientes 5-3-3 puntos de cadeneta, * saltar 1 punto de cadeneta, trabajar 1 punto alto en cada uno de los siguientes 5 puntos de cadeneta*, trabajar de * a * 25-27-27 veces en total = 130-138-138 puntos altos + 3 puntos de cadeneta al inicio de la vuelta. RECORDAR MANTENER LA TENSIÓN DE LA LABOR! Ahora insertar 6 marcapuntos al inicio de la vuelta como sigue (sin trabajar): Insertar 1 marcapuntos en el 1er punto alto de la vuelta (es decir, en el punto alto después de los 3 puntos de cadeneta = centro de la espalda), saltar 24-26-26 puntos altos, insertar 1 marcapuntos en el siguiente punto alto (= hombro), saltar 14 puntos altos, insertar 1 marcapuntos en el siguiente punto alto (= hombro), saltar 24-26-26 puntos altos, insertar 1 marcapuntos en el siguiente punto alto (= centro del delantero), saltar 24-26-26 puntos altos, insertar 1 marcapuntos en el siguiente punto alto (= hombro), saltar 14 puntos altos, insertar 1 marcapuntos en el siguiente punto alto (= hombro), hay ahora 24-26-26 puntos altos entre el último marcapuntos y el inicio de la vuelta. TRABAJAR A.1 COMO SIGUE: Trabajar la 1ª vuelta como sigue: Trabajar *A.1A en el primer/ siguiente punto alto con el marcapuntos (= centro del delantero/ centro de la espalda), repetir A.1 C 12-13-13 veces en total, A.1D en el siguiente punto alto con marcapuntos (= aumentos del hombro), repetir A.1E un total de 7 veces, A.1D en el siguiente punto alto con marcapuntos (= aumentos del hombro), repetir A.1E un total de 12-13-13 veces*, trabajar de * a * un total de 2 veces. Trabajar la 2ª vuelta como sigue: Trabajar *A.1A (= centro del delantero/ centro de la espalda), A.1B, repetir A.1C un total de 12-13-13 veces, A.1D (= aumentos del hombro), repetir A.1E un total de 7 veces, A.1D (= aumentos de los hombros), A.1E un total de 12-13-13 veces, A.1F*, trabajar de *a * un total de 2 veces. Continuar hasta la 6ª-7ª-8ª vuelta en el diagrama A.1 (incluida). Ahora hay 108-128-132 puntos entre los arcos de cadeneta en el centro del delantero y el centro de la espalda (=216-256-264 puntos + 2 arcos centrales en la vuelta). La labor mide aprox. 8-9-10 cm en la dirección de trabajo (medir hacia abajo desde el hombro, desde el borde de montaje). VUELTA DE PUNTOS ALTOS: Trabajar 1 vuelta con punto altos, trabajar (2 puntos altos, 3 puntos de cadeneta, 2 puntos altos) alrededor del arco central, y ajustar AL MISMO TIEMPO el número de puntos altos a disminuir/ aumentar como sigue: S/M – XXL/XXXL: Aumentar 1-1 punto alto a lo largo de cada uno de los lados entre el centro del delantero/ el centro de la espalda (= 2-2 puntos altos en total) - leer TIP PARA LOS AUMENTOS. L/XL: Disminuir 7 puntos altos a lo largo de cada uno de los lados entre el centro del delantero/ centro de la espalda (= 14 puntos altos en total) – leer TIP PARA LAS DISMINUCIONES Ahora hay 113-125-137 puntos entre el arco de cadenetas en el centro del delantero y el del centro de la espalda (= 226-250-274 puntos + 2 arcos centrales en la vuelta). ¡ATENCIÓN! No aumentar a cada lado de cada hombro en adelante, sólo en el centro del delantero y el centro de la espalda del poncho! TRABAJAR A.2/A.3 COMO SIGUE: Trabajar *A.3A (= arco central), A.3B sobre 3 puntos altos, A.2 (= 12 puntos) un total de 9-10-11 veces en el ancho, A.3C sobre los siguientes 2 puntos altos*, trabajar de * a * un total de 2 veces. En la 9ª vuelta aumentar 12-24-36 puntos altos repartidos a cada lado de A.3A (es decir aumentar 24-48-72 puntos altos en la vuelta) = 145-169-193 puntos altos (= 290-338-386 puntos altos + 2 arcos centrales en la vuelta) – leer TIP PARA LOS AUMENTOS La labor mide aprox 19-20-21 cm en la dirección del tejido desde el borde de montaje. TRABAJAR A.4/A.5 COMO SIGUE: Trabajar *A.5A (= arco central), A.5B, A.4 (= 24 puntos) un total de 6-7-8 veces en el ancho, A.5C sobre el siguientes punto alto*, trabajar de * a * un total de 2 veces. Después de completar A.5 en vertical hay 19 vueltas trabajadas, continuar en la vuelta 20 como sigue: Trabajar *A.5D, A.5E sobre 1 punto alto, A.5F un total de 7 veces en el ancho, A.4 (= 24 puntos) 6-7-8 veces en total en el ancho, A.5F un total de 7 veces en el ancho, A.5G*, trabajar de * a * un total de 2 veces. Después de completar A.4/A.5 hay 211-235-259 puntos altos entre el arco de cadenetas del centro del delantero y el del centro de la espalda (= 422-470-518 puntos altos en total + 2 arcos centrales en la vuelta). La labor mide aprox 46-47-48 cm en la dirección del tejido desde el borde de montaje. TRABAJAR LA 2ª Y 3ª VUELTA DE A.1 COMO SIGUE: Comenzar alrededor de un arco central y empezar con la vuelta 3 del diagrama. Trabajar *A.1A (= arco central), repetir A.1C hasta el siguiente arco central (trabajar el último punto sólo sobre 1 punto de la 1ª vuelta*, trabajar de * a * un total de 2 veces. Repetir las vueltas 2 y 3 hasta trabajar un total de 4-8-10 vueltas. La labor mide aprox 51-56-59 cm en el dirección del tejido desde el borde de montaje. VUELTA DE PUNTOS ALTOS: Trabajar 1 vuelta de puntos altos y AL MISMO TIEMPO disminuir 7-5-5 puntos altos repartidos a lo largo de cada lado entre el centro del delantero/centro de la espalda (= 14-10-10 puntos altos en total) como sigue: Trabajar *(2 puntos altos, 3 puntos de cadeneta, 2 puntos altos) alrededor del arco central, después trabajar 1 punto alto en cada punto alto y 1 punto alto alrededor de cada punto de cadeneta hasta el siguiente arco central*, trabajar de * a * un total de 2 veces = 209-245-269 puntos altos entre el arco central del delantero y el de la espalda (= 418-490-538 puntos altos + 2 arcos centrales en la vuelta). Cortar el hilo. TRABAJAR A.2/A.3 COMO SIGUE: Trabajar *A.3A (= arco central), A.3B sobre 3 puntos altos, A.2 (= 12 puntos) un total de 17-20-22 veces en el ancho, A.3C sobre los siguientes 2 puntos altos*, trabajar de * a * un total de 2 veces. Después de completar A.2 /A.3, hay 229-265-289 puntos altos entre los arcos del centro del delantero y del centro de la espalda (= 458-530-578 puntos altos + 2 arcos centrales en la vuelta). La labor mide aprox 62-67-70 cm en la dirección del tejido desde el borde de montaje. i BORDE: Para finalizar trabajar un remate alrededor de todo el poncho como sigue: 1 punto enano en el 1er punto, *3 puntos de cadeneta, saltar 2 puntos, 1 punto bajo en el siguiente punto*, trabajar de * a * toda la vuelta y finalizar con 1 punto enano en el punto enano del inicio de la vuelta. Asegurar el hilo. |
||||||||||||||||||||||||||||||||||||||||||||||
Explicaciones del diagrama |
||||||||||||||||||||||||||||||||||||||||||||||
|
||||||||||||||||||||||||||||||||||||||||||||||
 |
||||||||||||||||||||||||||||||||||||||||||||||
 |
||||||||||||||||||||||||||||||||||||||||||||||
 |
||||||||||||||||||||||||||||||||||||||||||||||
 |
||||||||||||||||||||||||||||||||||||||||||||||
 |
||||||||||||||||||||||||||||||||||||||||||||||
¿Terminaste este patrón?Entonces, etiqueta tus fotos con #dropspattern #cressidaponcho o envíalas a la galería #dropsfan. ¿Necesitas ayuda con este patrón?Encontrarás 11 videos tutoriales, un espacio para comentarios/preguntas y más visitando la página del patrón en garnstudio.com © 1982-2026 DROPS Design A/S. Todos los derechos reservados. Este documento, incluyendo todas sus sub-secciones, está protegido por los derechos de autor (copyright). Lee más acerca de lo que puedes hacer con nuestros patrones en la parte de abajo de cada patrón de nuestro sitio. |
||||||||||||||||||||||||||||||||||||||||||||||


Con más de 40 años en el diseño de modelos de punto y de ganchillo, DROPS Design ofrece una de las más vastas colecciones de patrones gratuitos en el internet - traducidos en 17 idiomas. Al día de hoy, contamos con 324 catálogos y 12290 patrones - de los cuales 11675 están traducidos en español.
Nosotros trabajamos con mucho esmero para brindarte lo mejor que las labores de punto y ganchillo tienen para ofrecer,inspiración y consejos, así como hilos de magnífica calidad a precios increíbles! Te gustaría usar nuestros patrones para otro fin además del uso personal? Puedes leer acerca de lo que estás permitida a hacer en el texto de Copyright en la parte de abajo de todos nuestros patrones. Felices labores!
Escribe un comentario sobre DROPS 188-27
¡Nos encantaría saber qué piensas acerca de este patrón!
Si quieres escribir una pregunta referente al patrón, por favor asegúrate de elegir la categoría correcta en el formulario debajo, para acelerar el proceso de respuesta. Los campos obligatorios están marcados con un *.