
Categorías populares
¿Buscas un hilo?


Comentarios / Preguntas (54)
![]() Andrea Surek escribió:
Andrea Surek escribió:
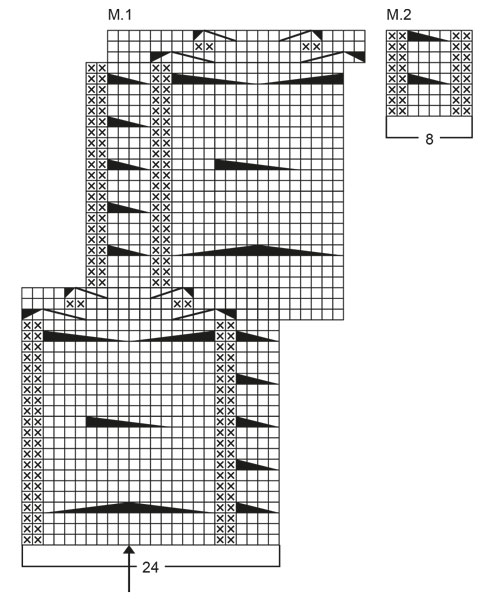
Ich hab bitte eine Frage zum Ärmel: Wenn ich beim Ärmel 8 Maschen M2 stricke und dann 72 Maschen M1, wo genau muss ich die Zunahmen machen? Ich hab schon einige Male aufgeribbelt weil sich das nicht ausgeht lg Andrea
18.09.2025 - 15:37DROPS Design respondió:
Hi, Andrea, you increase on both sides of M.2 under the sleeve. Happy knitting!
31.10.2025 - 10:16
![]() Glesni escribió:
Glesni escribió:
To clarify is pattern 2 repeated up the sleeve without being displaced? Any chance of a photo showing this please
08.09.2025 - 16:38DROPS Design respondió:
Hello, If you are knitting size M/L the increases are knitted in Pattern 1 which means Pattern 2 will not be displaced. Happy Knitting!
23.10.2025 - 10:24
![]() Glesni escribió:
Glesni escribió:
To clarify is pattern 2 repeated up the sleeve without being displaced? Any chance of a photo showing this please
08.09.2025 - 12:41
![]() Glesni escribió:
Glesni escribió:
Is there a continuous cable under arm?
07.09.2025 - 20:32DROPS Design respondió:
Hi Glesni, The cables which begin at the cuff will be continued up the sleeve. However, as you increase under the sleeve, you will get new cables starting as you continue onwards. Regards, Drops Team.
08.09.2025 - 06:46
![]() Glesni escribió:
Glesni escribió:
Could you please explain sleeve Do I start row with 8 stitches from M2?XXOOOOXX It says 4 st each side of marker so is that XXOO then 72 st ( M1 ) then OOXX?
09.08.2025 - 15:22DROPS Design respondió:
Dear Glesni, You start with the first 4 stitches at one side of the marker and end the row with 4 stitches on the other side of the marker. Since we want the chart to be centered over these stitches, you can start working stitch 5,6,7 and 8 (read from right to left in the chart) over the initial stitches and finish the row with stitches 1 ,2 ,3 and 4. Happy knitting!
10.08.2025 - 14:16
![]() Doris escribió:
Doris escribió:
Seit ein paar Tagen kann ich die Schemazeichnung für das Muster nicht mehr sehen
29.05.2025 - 09:32DROPS Design respondió:
Liebe Doris, versuchen Sie mal die Cookies / den Cache zu leeren, und vielleicht auch mit einem anderen Browser, sollte das nicht helfen, schreiben Sie uns hier bitte welche Browser/Gerät Sie benutzen. Danke im voraus.
30.05.2025 - 08:47
![]() Jutta escribió:
Jutta escribió:
Eine Frage zu den Ärmeln. Da steht "8 M. M2 und 72 M. M2 stricken.", aber die Ärmel sind eindeutig in M1 gestrickt. Ist es vielleicht so, dass ich bei 80 Maschen 3xM1 (72 Maschen) und 1xM2 (8M) stricke, so dass sich M2 praktisch wiederholt (einmal von M1, einmal von M2)? Und wo wird zugenommen? Kann das jemand anschaulich erklären? Danke.
17.05.2025 - 01:03DROPS Design respondió:
Liebe Jutta, die Runden beginnen mit M.2 (Zopf unter dem Ärmel) dann wird M.1 über die nächsten 72 M wiederholt. Die Zunahmen werden beidseitig von M.2 gestrickt (vor M.2 am Ende der Runde + nach M.2 am Anfang der Runde); die neuen Maschen werden in M.1 gestrickt damit das Muster M.1 sich verbreitert. Viel Spaß beim Stricken!
19.05.2025 - 07:36
![]() Jutta escribió:
Jutta escribió:
I think you misunderstood my question. It concerned the width of the jumper, not the length. The jumper is currently coming out too narrow. Can it be stretched with blocking or will it always "bounce back" to its natural width? If it can be stretched width-ways, by how much? Thank you.
14.03.2025 - 10:56DROPS Design respondió:
Dear Jutta, oh sorry, should your tension in garter stitch be right, then you should get the correct measurements in width as compensation for cables is already included in the number of stitches. Maybe you can still work a swatch and check how far you can stretch it in width - avoiding at the same time to extend cables/pattern in width. Try to avoid tighten piece when working cables if your tension in stocking stitch was right. Your DROPS store might have any further tips for you, do not hesitate to contact them. Happy knitting!
14.03.2025 - 16:07
![]() Jutta escribió:
Jutta escribió:
I am aiming for 45cm width for the body, but when "relaxed", the garment measures only 39cm. Will the garment expand after blocking? If so, how much bigger can I make it without a problem? And how does the yarn behave in the wash? Some cottons go rather baggy. Thank you.
13.03.2025 - 18:47DROPS Design respondió:
Dear Jutta, it is not supposed to be longer when worn, but you can fist try to work a swatch with one of the diagram and then check how far it was longer afterwards so that you can adjust then length. Happy knitting!
14.03.2025 - 07:30
![]() BLANCHARD FRANCOISE escribió:
BLANCHARD FRANCOISE escribió:
Bonjour concernant le devant: je ne comprends pas bien pour l'encolure: répartir 16 diminutions sur les 38 mailles centrale , c'est moi qui doit choisir la répartition des mailles à diminuer ? ensuite :au rang suivant rabattre pour l'encolure les 24 mailles centrale ça ok( idem pour le dos) à vous lire cdlt FB
31.01.2025 - 17:30DROPS Design respondió:
Bonjour Mme Blanchard, on doit diminuer ici à intervalles réguliers (plus d'infos ici) pour éviter que l'encolure ne soit trop large car il faut davantage de mailles pour les torsades que pour le jersey et on va ainsi éviter de déformer l'encolure. Tricotez simplement les mailles endroit des torsades ensemble 2 par 2 à 16 reprises et à intervalles réguliers pour diminuer 16 mailles. Bon tricot!
03.02.2025 - 07:32
|
||||||||||||||||||||||||||||
Cable Magic#cablemagicsweater |
||||||||||||||||||||||||||||
 |
 |
|||||||||||||||||||||||||||
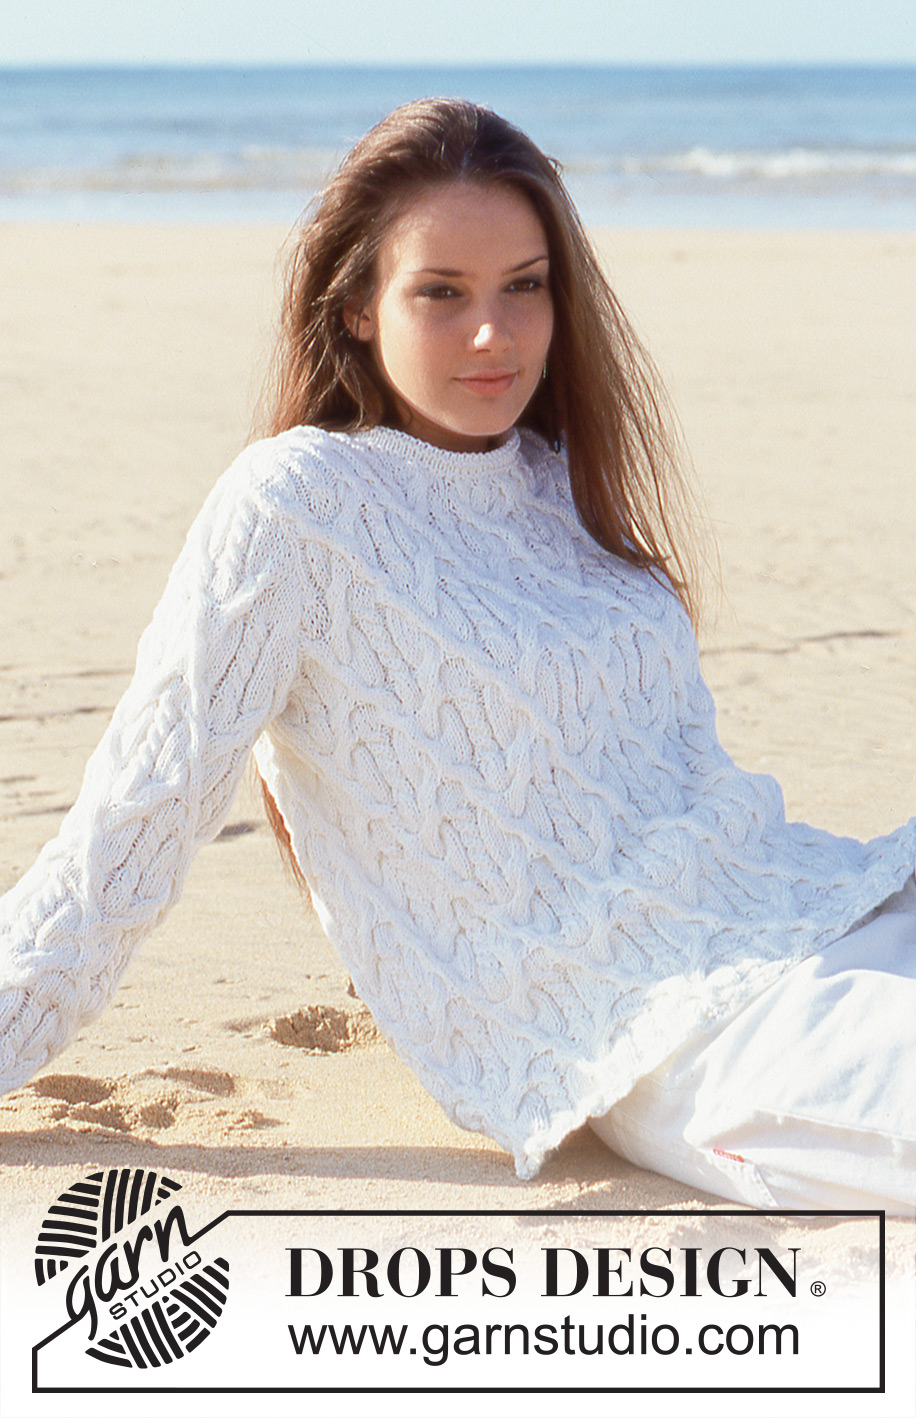
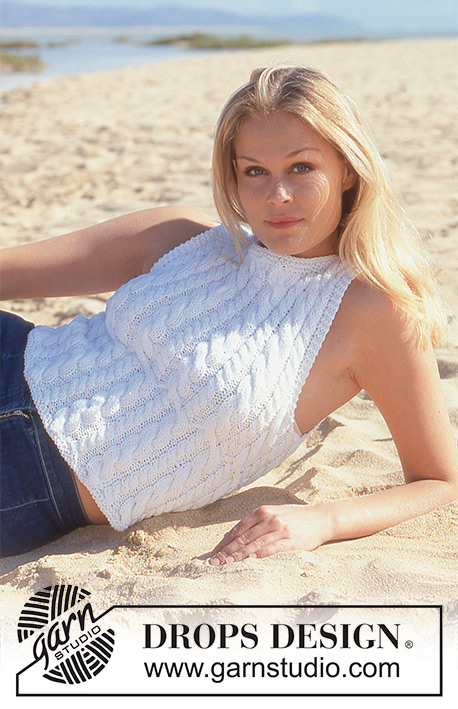
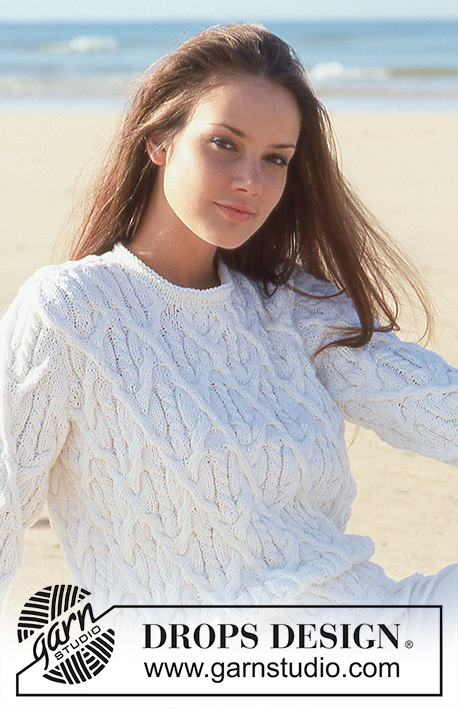
Pulóver DROPS con torsadas, en “Bomull-Lin”.
DROPS 64-11 |
||||||||||||||||||||||||||||
|
Muestra: 20 pts x 26 hileras con ag tamaño 4.5 mm en pt jersey = 10 x 10 cm. Patrón: Ver diagramas (1 diagrama = 1 repetición). Los diagramas muestran el patrón visto por el lado derecho. La flecha indica el pt central («midt m») del patrón. Nota! En M.1, los 6 pts a la derecha deben ser desviados primero cuando los 6 pts son desviados a la izquierda. Cuerpo: Montar 180-210-240 pts en ag circular tamaño 3.5 mm. Unir y tejer 2 hileras en pt musgo, aumentando 108-126-144 pts distribuidos equitativamente en la última hilera de la manera siguiente: * 1 d, aumentar 1 pt en los 2 pts siguientes, 1 d, aumentar 1 pt en el pt siguiente *, repetir de *a* = 288-336-384 pts. Cambiar a ag circular tamaño 4.5 mm y tejer M.1 sobre todos los pts. Colocar un marcapuntos al centro del frente y al centro de la espalda – ver la flecha en el diagrama. Cuando la labor mida 39-41-44 cm, rematar 8 pts de cada lado (4 pts de cada lado de los marcapuntos laterales) para las sisas. El frente y la espalda cada uno = 136-160-184 pts. Terminar el frente y la espalda separadamente. Frente: = 136-160-184 pts. Rematar para las sisas de cada lado a cada 2 hileras: 4 pts 0-1-1 vez, 3 pts 0-2-4 veces, 2 pts 1-2-4 veces, 1 pt 3-3-5 veces = 126-126-126 pts. Mantener 1 pt de orillo en pt musgo de cada lado hasta el fin y continuar en el patrón. Cuando la labor mida 50-53-56 cm, disminuir 16-16-16 pts distribuidos equitativamente sobre los 38-38-38 pts centrales. En la hilera siguiente, rematar los 24-24-24 pts centrales para el escote. Después rematar en cada orilla del escote a cada 2 hileras: 2 pts 4 veces, 1 pt 3 veces = 32-32-32 pts restantes en cada hombro. Cuando la labor mida 58-61-64 cm, disminuir 10-10-10 pts distribuidos equitativamente en cada hombro = 22-22-22 pts. En la hilera siguiente, rematar todos los pts. Espalda: = 136-160-184 pts. Rematar para las sisas como se hizo para el frente = 126-126-126 pts. Mantener 1 pt de orillo en pt musgo de cada lado hasta el fin y continuar en el patrón hasta que la labor mida 56-59-62 cm. Disminuir 20-20-20 pts distribuidos equitativamente sobre los 54-54-54 pts centrales. En la hilera siguiente, rematar los 34-34-34 pts centrales. Después rematar 2 pts en cada orilla del escote a cada 2 hileras 2 veces = 32-32-32 pts restantes en cada hombro. Cuando la labor mida 58-61-64 cm, disminuir 10-10-10 pts distribuidos equitativamente en cada hombro = 22-22-22 pts. En la hilera siguiente, rematar todos los pts. Manga: Montar 50-50-50 pts en ag de doble punta tamaño 3.5 mm; unir y colocar un marcapuntos en la unión. Tejer 2 hileras en pt musgo, aumentando 30-30-30 pts distribuidos equitativamente en la última hilera = 80-80-80 pts. Cambiar a ag de doble punta tamaño 4.5 mm y establecer el patrón de la manera siguiente: M.2 sobre 8 pts (4 pts de cada lado del marcapuntos), y M.1 sobre los 72 pts restantes. Continuar en el patrón como está establecido. Cuando la labor mida 6 cm, aumentar 1 pt de cada lado de M.2, 12-12-12 veces: Talla XS: a cada 9 hileras Talla S/M y L: alternadamente a cada 8 y 9 hileras = 104-104-104 pts. Tejer los pts aumentados en M.1 a medida que avanzas en la labor. Cuando la labor mida 49-46-45 cm, rematar 4 pts de cada lado del marcapuntos (los 8 pts de M.2). Después rematar para el copete de la manga de cada lado de la pieza a cada 2 hileras: 4 pts 2-0-0 veces, 3 pts 1-2-1 veces, 2 pts 1-8-13 veces, 3 pts 1-2-2 veces, 4 pts 3-1-0 veces. Disminuir 8 pts distribuidos equitativamente sobre los pts restantes. En la hilera siguiente, rematar todos los pts. Ensamblaje: Hacer la costura de los hombros. Levantar aprox 90 a 100 pts alrededor del escote en las ag de doble punta tamaño 3.5 mm y unir. Tejer 1 hilera de revés (hilera por el lado derecho), después 4 hileras en pt jersey, 1 hilera de revés, y después tejer 5 hileras en pt jersey que van a servir como “entretela”. Rematar flojo, doblar la “entretela” en dos para el lado revés y coser. Montar las mangas en el interior de los pts de orillo del cuerpo. |
||||||||||||||||||||||||||||
Explicaciones del diagrama |
||||||||||||||||||||||||||||
|
||||||||||||||||||||||||||||
 |
||||||||||||||||||||||||||||
 |
||||||||||||||||||||||||||||
¿Terminaste este patrón?Entonces, etiqueta tus fotos con #dropspattern #cablemagicsweater o envíalas a la galería #dropsfan. ¿Necesitas ayuda con este patrón?Encontrarás 20 videos tutoriales, un espacio para comentarios/preguntas y más visitando la página del patrón en garnstudio.com © 1982-2026 DROPS Design A/S. Todos los derechos reservados. Este documento, incluyendo todas sus sub-secciones, está protegido por los derechos de autor (copyright). Lee más acerca de lo que puedes hacer con nuestros patrones en la parte de abajo de cada patrón de nuestro sitio. |
||||||||||||||||||||||||||||


Con más de 40 años en el diseño de modelos de punto y de ganchillo, DROPS Design ofrece una de las más vastas colecciones de patrones gratuitos en el internet - traducidos en 17 idiomas. Al día de hoy, contamos con 324 catálogos y 12290 patrones - de los cuales 11682 están traducidos en español.
Nosotros trabajamos con mucho esmero para brindarte lo mejor que las labores de punto y ganchillo tienen para ofrecer,inspiración y consejos, así como hilos de magnífica calidad a precios increíbles! Te gustaría usar nuestros patrones para otro fin además del uso personal? Puedes leer acerca de lo que estás permitida a hacer en el texto de Copyright en la parte de abajo de todos nuestros patrones. Felices labores!
Escribe un comentario sobre DROPS 64-11
¡Nos encantaría saber qué piensas acerca de este patrón!
Si quieres escribir una pregunta referente al patrón, por favor asegúrate de elegir la categoría correcta en el formulario debajo, para acelerar el proceso de respuesta. Los campos obligatorios están marcados con un *.