
Categorías populares
¿Buscas un hilo?


Comentarios / Preguntas (23)
![]() Leeanne escribió:
Leeanne escribió:
Addtnl. info for my last comments: I was confused by the first sentence in the short rows instructions stating to do 6 rows over all stitches. I thought that was part of the directions and the piece started with 6 rows before starting the short row repeat cycle but that is incorrect. This sentence is just telling you that there are 6 rows included in the short row instruction cycle that are not, in fact, short rows – 6 full rows and 2 short rows (not in that order) are listed in the row cycle.
06.09.2025 - 15:15
![]() Leeanne escribió:
Leeanne escribió:
(Cont. from previous two comments) next row starts with R3 and finishes with L3 and last row starts with L4 and finishes with R4. Then you start the cycle again with the first short row. So yes, the short row cycle is short row, full row, short row, full row, full row, full row, full row, full row as the pattern states (1 SR followed by 1 full row followed by 1 SR followed by 5 full rows). There are no edges in which you are not doing a picot edge instruction which allows for an even 8 row cycle
06.09.2025 - 15:08
![]() Leeanne escribió:
Leeanne escribió:
(continued from my previous comment) work the L2 row to the first marker and turn to work back to the “beginning” of the left side row, ending with L3, turn and start a new row with L4, working all the way across, ending with R4, (all the remaining rows in the cycle go all the way across – no more short rows) next row begins with R1 and goes all the way across to the last 4 stitches, ending in L1, turn and start with L2 and go all the way across to finish with R2, (cont. in next comment)
06.09.2025 - 15:03
![]() Leeanne escribió:
Leeanne escribió:
For anyone that needs it, here is the cycle of rows, combining picot edge with short rows instructions (it helps to draw this out on paper): start with right side 1 (R1) and work a short row (to first marker only, not all the way across), turn and work back to the beginning and knit the last four with R2, turn to start next row beginning with R3 and knit all the way across, ending this row with L1, then start the second short row with L2, (continued in next comment)
06.09.2025 - 14:58
![]() Leeanne escribió:
Leeanne escribió:
I figured it out! It is definitely not too complicated but they could have written this pattern differently so it wouldn’t take weeks or trial and error to figure out how to work the short rows in with the picot edge. Maybe we were just making it too complicated. I don’t have enough room to write the pattern in this comment so I’ll start a new one. It is easier to draw your lines and mark each end with the picot line number but I’ll try to write it here in my next comment.
06.09.2025 - 14:55
![]() Leeanne escribió:
Leeanne escribió:
I think I get it! I will test it in the morning and comment again trying to explain it for others if I have it right. My last two comments are wrong for sure. It helps to draw the rows as a picture on paper and mark the ends with the line number.
06.09.2025 - 05:10
![]() Leeanne escribió:
Leeanne escribió:
Revising my last comment: I now have it written as: short row, R1 &L1 on the same row, short row, R2 & L2, short row, R3 & L3, short row, R4 & L4. But this adds up to 8 rows on the sides and only 4 rows in the middle, not 6. Also not sure why the short rows directions refers to the middle stitches as being 70 (for the second size) when it’s only 30 (if excluding 25 on each end) or 72 (if excluding only the outermost 4 on each end).
06.09.2025 - 04:26
![]() Leanne escribió:
Leanne escribió:
The directions for the short rows are difficult to figure out. I’ve been working at this for a few weeks with my MIL, have restarted my project 7 times and we still don’t have it right. So we are alternating between right and left rows 1, 2, etc. when doing full rows? We are not doing any picot edge instructions when doing short rows, correct? To incoorporate the short rows, does it go: left row 1, right row 1, short row, left row 2, right row 2, short row, etc. through all four edge rows?
06.09.2025 - 02:40
![]() Leeanne escribió:
Leeanne escribió:
In addition to my last comment, I’m also confused because it says for garter stitch to knit two rows. The main directions says start with the right Picot edge, then knit the directions for garter stitch for the rest of the row, except for the last four and then knit the directions for the left edge on the last four. How do you knit two rows for the garter stitch directions in between doing the right and left edges?
14.07.2025 - 19:22DROPS Design respondió:
Dear Leeanne, the garter stitch structure is 2 knit rows. So whenever most of the stitches in the row are knitted, both from the right side and the wrong side, the resulting texture will be garter stitch. In the picot edges we are already using garter stitch, since all other stitches except for the 4 stitches on each side for the picot are knitted from the right side and the wrong side. So you just need to work as indicated; the edges will have the picot texture while the remaining stitches are knitted. Happy knitting!
19.07.2025 - 17:47
![]() Leeanne escribió:
Leeanne escribió:
A video of the actual pattern, please! This is so confusing. I’ve now learned how to do picot edges and short rows, but I can’t understand how to do both at the same time. How do you know which row of the picot edge you’re on if you’ve turned around and gone the other direction halfway through a row? And then when you start the next row do you count as if half the row is row 5 and half is row 6 or just continue with the next direction for that edge in sequence, ignoring row numbers?
14.07.2025 - 19:18DROPS Design respondió:
Dear Leeanne, please remember to mark your comments as questions so that we can see them and answer sooner. When you are combining the short rows and the picot edges, count only the rows where you reach the edges; those rows where you turn before reaching the edges are not taken into account for the picot edges on that side. Happy knitting!
19.07.2025 - 17:48
|
|
Berry Kiss#berrykissvest |
|
 |
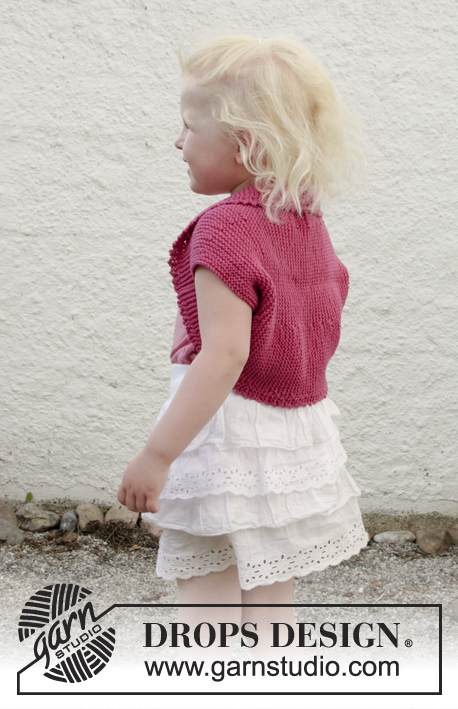 |
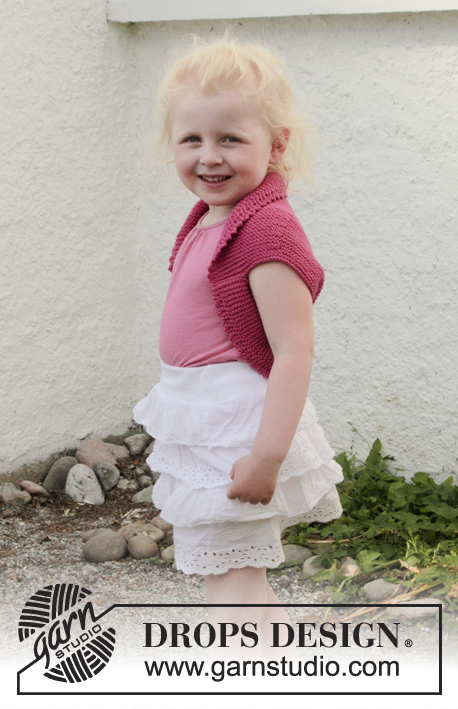
Bolero de punto con hileras cortas, orillas de picot y punto musgo en DROPS Cotton Merino. Tallas niños 3 – 12 años.
DROPS Children 28-7 |
|
|
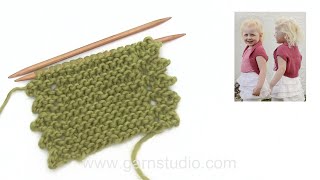
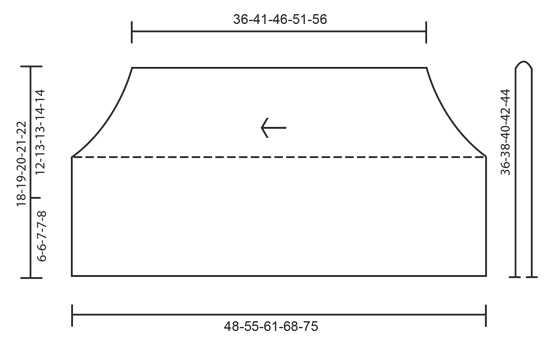
PUNTO MUSGO (tejido de ida y vuelta): 1 surco = tejer 2 hileras de derecho. ORILLA DE PICOT (de ida y vuelta en la aguja): LADO DERECHO: HILERA 1 (= lado derecho): Tejer de derecho. HILERA 2 (= lado revés): Tejer de derecho hasta que resten 4 puntos, estos se tejen de la manera siguiente: tejer 2 puntos juntos de derecho, 1 lazada, en cada uno de los 2 últimos puntos tejer 2 puntos = 2 nuevos puntos en la aguja. HILERA 3 (= lado derecho): Deslizar el 1er punto como de derecho, 1 derecho, pasar el punto deslizado por encima, 1 derecho y pasar el último punto en la aguja derecha por encima del primer punto, hemos disminuido 2 puntos – después tejer el resto de la hilera de derecho. HILERA 4 (= lado revés): Tejer de derecho. Repetir las hileras 1 a 4. LADO IZQUIERDO: HILERA 1 (= lado derecho): Tejer de derecho hasta que resten 4 puntos, estos se tejen de la manera siguiente: tejer 2 puntos juntos de derecho, 1 lazada, en cada uno de los 2 últimos puntos tejer 2 puntos = 2 nuevos puntos en la aguja. HILERA 2 (= lado revés): Deslizar el 1er punto como de derecho, 1 derecho, pasar el punto deslizado por encima, 1 derecho y pasar el último punto en la aguja derecha por encima del primer punto, hemos disminuido 2 puntos – después tejer el resto de la hilera de derecho. HILERA 3 (= lado derecho): Tejer de derecho. HILERA 4 (= lado revés): Tejer de derecho. Repetir las hileras 1 a 4. HILERAS CORTAS: Tejer 6 hileras sobre todos los puntos, * tejer 24-25-26-27-28 puntos (hasta el primer marcapuntos), virar, apretar el hilo y tejer hasta el fin de la hilera. Tejer 1 hilera sobre todos los puntos, virar, tejer 24-25-26-27-28 puntos (hasta el primer marcapuntos), virar, apretar el hilo y tejer hasta el fin de la hilera. Tejer 5 hileras sobre todos los puntos *, repetir de *a*. Es decir, tejer 6 hileras en punto musgo (= 3 surcos) sobre los 66-70-72-80-86 puntos centrales y 8 hileras en punto musgo (= 4 surcos) sobre los puntos a cada lado en cada repetición. ----------------------------------------------------- BOLERO: La pieza se teje lateralmente, de ida y vuelta con aguja circular de una sisa a la otra. Después doblar el bolero en dos y hacer la costura de los lados. Montar 76-80-84-88-92 puntos con Cotton Merino y aguja circular tamaño 4 mm. Insertar 1 marcapuntos en la pieza a 24-25-26-27-28 puntos a partir de cada lado (= 28-30-32-34-36 puntos entre los marcapuntos). Tejer de la manera siguiente – por el lado derecho: ORILLA DE PICOT LADO DERECHO, PUNTO MUSGO – ver descripción arriba, sobre los 68-72-76-80-84 puntos siguientes, ORILLA DE PICOT LADO IZQUIERDO sobre los 4 puntos siguientes. RECORDARSE DE MANTENER LA MISMA TENSIÓN DE TEJIDO DE LA MUESTRA! Continuar con punto musgo y orilla de picot sobre los 4 puntos más externos a cada lado y, AL MISMO TIEMPO, tejer HILERAS CORTAS – ver descripción arriba! Cuando la pieza mida aprox 36-41-46-51-56 cm (medida donde es más corta) rematar flojo. ENSAMBLAJE: Doblar el bolero en dos – el esquema muestra la pieza cuando se ha doblado. Coser los 6-6-7-7-8 cm inferiores entre sí, orilla con orilla, a cada lado (= sisa de 12-13-13-14-14 cm). |
|
 |
|
¿Terminaste este patrón?Entonces, etiqueta tus fotos con #dropspattern #berrykissvest o envíalas a la galería #dropsfan. ¿Necesitas ayuda con este patrón?Encontrarás 18 videos tutoriales, un espacio para comentarios/preguntas y más visitando la página del patrón en garnstudio.com © 1982-2026 DROPS Design A/S. Todos los derechos reservados. Este documento, incluyendo todas sus sub-secciones, está protegido por los derechos de autor (copyright). Lee más acerca de lo que puedes hacer con nuestros patrones en la parte de abajo de cada patrón de nuestro sitio. |
|


Con más de 40 años en el diseño de modelos de punto y de ganchillo, DROPS Design ofrece una de las más vastas colecciones de patrones gratuitos en el internet - traducidos en 17 idiomas. Al día de hoy, contamos con 324 catálogos y 12290 patrones - de los cuales 11675 están traducidos en español.
Nosotros trabajamos con mucho esmero para brindarte lo mejor que las labores de punto y ganchillo tienen para ofrecer,inspiración y consejos, así como hilos de magnífica calidad a precios increíbles! Te gustaría usar nuestros patrones para otro fin además del uso personal? Puedes leer acerca de lo que estás permitida a hacer en el texto de Copyright en la parte de abajo de todos nuestros patrones. Felices labores!
Escribe un comentario sobre DROPS Children 28-7
¡Nos encantaría saber qué piensas acerca de este patrón!
Si quieres escribir una pregunta referente al patrón, por favor asegúrate de elegir la categoría correcta en el formulario debajo, para acelerar el proceso de respuesta. Los campos obligatorios están marcados con un *.