
Categorías populares
¿Buscas un hilo?


Comentarios / Preguntas (17)
![]() Sue escribió:
Sue escribió:
I have finally got around to trying this pattern and am a bit confused. Am I correct in thinking that what you say is the back is actually the front and vice versa. Because it seems that all the neckline shaping is on the back?
15.10.2025 - 16:01DROPS Design respondió:
Hi Sue, The back piece has shaping on the neckline but less so than on the front piece. And the pieces are correctly labelled. Regards, Drops Team.
16.10.2025 - 06:44
![]() Sue escribió:
Sue escribió:
I don't understand what the sentence below means. I am using needles not circular needles. Work as follows (1st row = WS): 2 edge st in GARTER ST - see explanation above - in stocking st (i.e. P on 1st row) until 2 sts remain, 2 edge sts in garter st. Does it mean the first row is purl until you get to the end and the last 2 stitches are knit. Is edge stitch a different stitch. Why don't you just say knit and purl?
13.11.2024 - 17:32DROPS Design respondió:
Hi Sue, The 2 edge stitches at the beginning and end of the row are knitted on all rows (garter stitch). The stitches in between are worked in stocking stitch (purled from the wrong side, knitted from the right side). Happy knitting!
14.11.2024 - 07:06
![]() Sue Feather escribió:
Sue Feather escribió:
I was originally going to try knitting Skipping stones but found the top down method really confusing. So looked at this one. I have already bought 9 balls of the Drops Andes yarn. I have done the tension test and it is only 8cm wide with 8cm and 11 stitches and 7cm deep with 15 rows. Usually my tension is exact - what am I doing wrong?
21.10.2024 - 18:26DROPS Design respondió:
Dear Mrs Feather, you can try with needles another material, it might help, or you can also try to block your swatch to check if you get correct measurements after blocking or then try with larger needles, remember correct tension will let you get the correct finished measurements matching chart for your size. Happy knitting!
22.10.2024 - 09:00
![]() Béatrice Lassalle escribió:
Béatrice Lassalle escribió:
Bonjour Pour le montage, je ne comprends pas bien : vous dites : "monter les manches. Faire la couture sous les manches....." Je dois monter les manches alors qu'elles ne sont pas fermées ? Ensuite, je les ferme en commençant par les poignets ? Je fais comme en couture pour "monter les manches" ? je mets le devant et le dos à plat ? Merci de votre réponse qui j'espère m'aidera.
19.01.2022 - 14:03DROPS Design respondió:
Bonjour Mme Lasalle, faites les coutures dans l'ordre qui vous paraît le plus simple - cette vidéo par exemple montre comment coudre une manche (tricotée en rond, donc déjà assemblée par exemple) le long des emmanchures. Pour coudre les manches, vous pouvez effectivement commencer à partir des poignets; si vos manches sont déjà montées le long des emmanchures, prolongez la couture le long du côté jusqu'à la fente du bas. Bon assemblage!
19.01.2022 - 17:09
![]() Vinciane escribió:
Vinciane escribió:
Bonjour, je ne comprends pas pourquoi il faut tricoter avec des aiguilles circulaires alors qu'on ne tricote pas en rond... quelqu'un peut-il m'éclairer ? Merci.
04.11.2020 - 21:20DROPS Design respondió:
Bonjour Vinciane, bien volontiers: on utilise des aiguilles circulaires pour avoir suffisamment de place pour y loger toutes les mailles, vous pouvez utiliser dans ces cas là des aiguilles droites, mais pensez à toujours bien vérifier votre tension, car les mailles seront plus serrées - vous trouverez plus d'infos ici. Bon tricot!
05.11.2020 - 11:12
![]() Michelle escribió:
Michelle escribió:
I love this! I have never knitted a sweater. Can this be made without the side slits? If yes, what adjustments would need to be made? Is this a good pattern for my first sweater? Thank you!
04.11.2020 - 17:27DROPS Design respondió:
Hi Michelle! The pattern is easy, give it a try:) This can be made without the side slits, sew underarm seam and side seam, to the end (without 14 cm vent). Happy knitting!
04.11.2020 - 18:46
![]() Gabrielle escribió:
Gabrielle escribió:
I prefer patterns that are worked back and forth (not in the round). How can I search for / find these patterns? Would it be possible to have a separate category for patterns worked back and forth?
24.04.2018 - 10:25DROPS Design respondió:
Dear Gabrielle, there is no search for patterns worked back and forth, this one eg is worked back and forth in several parts sewn tog at the end. And you'll find here how to adapt a pattern into straight needles. Happy knitting!
24.04.2018 - 14:24
![]() Pia Neergaard escribió:
Pia Neergaard escribió:
Spørgsmål har noget garn der har 70% alpaca 20 % uld og 10 % acrylic og vil gerne strikke denne opskrift , garnet hedder bbb alpaka 70
16.04.2018 - 22:26DROPS Design respondió:
Hei Pia. For å finne ut om garnet kan byttes i det du har må du sjekke strikkefastheten. Denne oppskriften strikkes med garn fra garngruppe E, evt 2 tråder med garngruppe C, og strikkefasthet 11 m x 15 p glstrikk på 10 x 10 cm. Du kan lese mer om garngruppene våre her: link Innholdet i garnet kan påvirke plaggets egenskaper (hvordan det kjennes ut, hvordan det vaskes osv), så det blir opp til deg. God fornøyelse
17.04.2018 - 10:12
![]() Els-Marie Edelfeldt escribió:
Els-Marie Edelfeldt escribió:
Stickar tröja mönster 171/19 "Juniper"... när ärmen beskrivs står det: Öka vart 6:e varv 5 ggr (min stl. M) OCH vart 4:e varv 7 går. Hur skall jag tolka det????? Växlar jag eller tar jag det efter varandra? Otydlig beskrivning tycker jag....Mvh Els-Marie
23.11.2017 - 13:49DROPS Design respondió:
Du ska först öka 5 gånger på vart 6:e varv och därefter öka 7 gånger på vart 4:e varv.
23.11.2017 - 14:25
![]() Trisha Cochrane escribió:
Trisha Cochrane escribió:
Hi there - I have just started knitting the Juniper with Drops Andes wool. But the bottom edge is already rolling up - and since there is no ribbing I am not clear how it will stay straight as in the photo? Could you help? Thank you :)
24.02.2017 - 09:05DROPS Design respondió:
Dear Mrs Cochrane, you can block the jumper before wearing it. Happy knitting!
24.02.2017 - 09:54
|
|
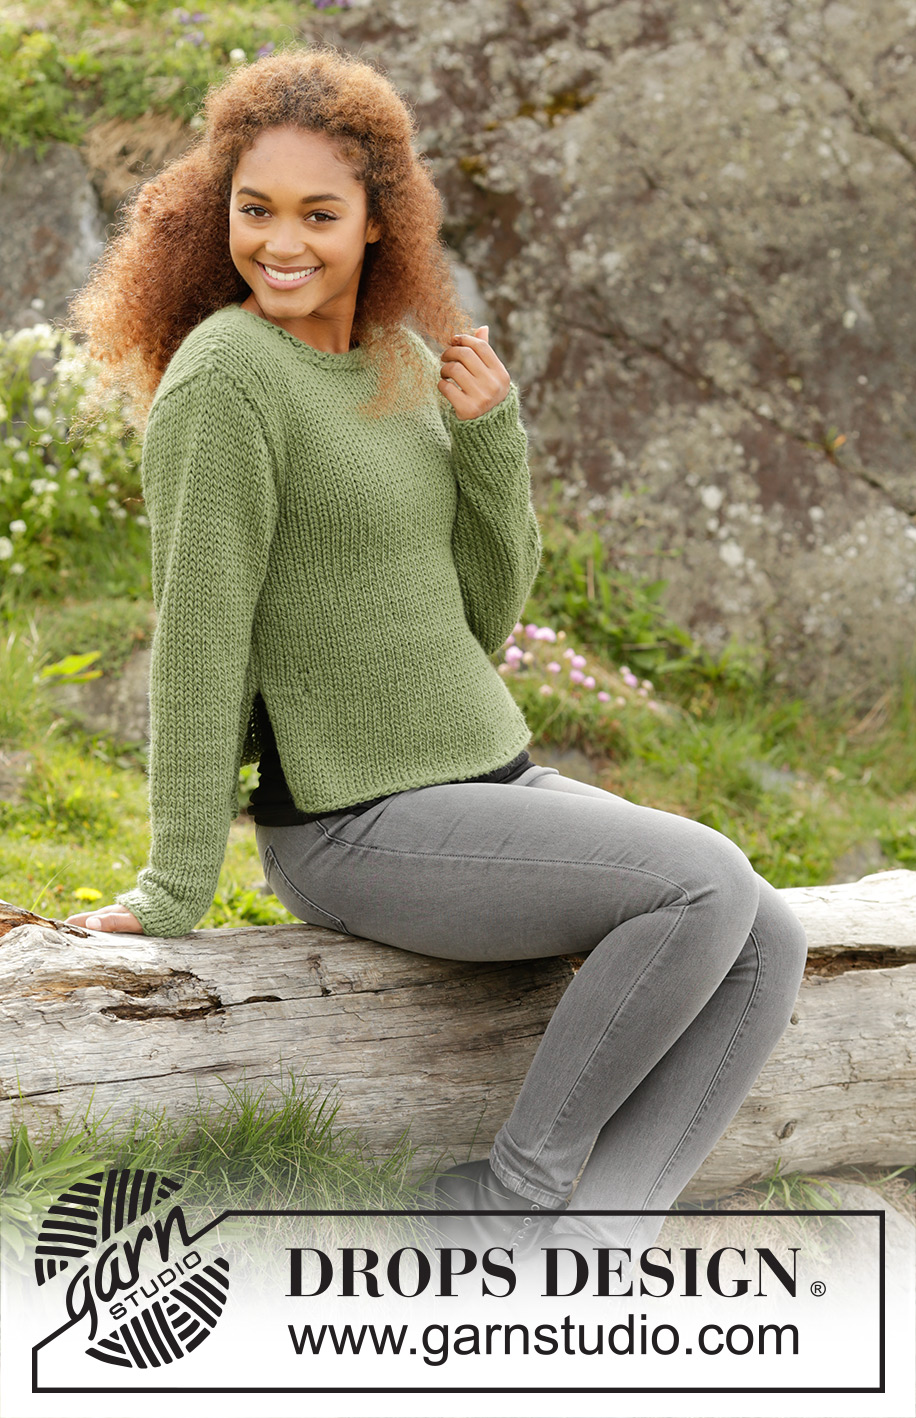
Juniper#junipersweater |
|
|
|
|
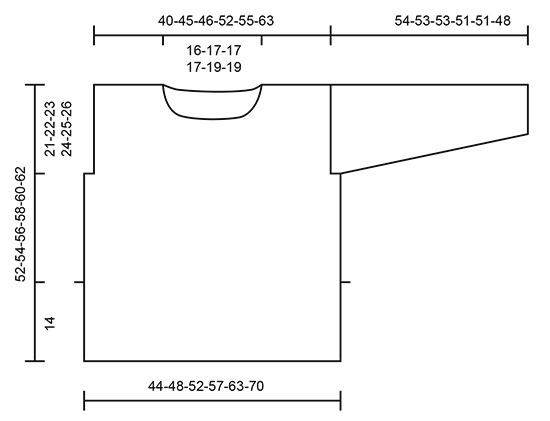
Jersey de punto DROPS con aberturas a los lados borde vuelto en ”Andes”. Talla: S - XXXL.
DROPS 171-19 |
|
|
PUNTO MUSGO (en redondo): 1 pliegue = 2 vtas. * 1 vta de derecho y 1 vta de revés*, repetir de * a * PUNTO MUSGO (de ida y vta en ag): Trabajar todas las filas de derecho. 1 pliegue = 2 filas. TIP PARA LOS AUMENTOS: Aum 1 pt trabajando 1 HEB (lazada). En la sig fila trabajar la HEB de derecho retorcido para evitar que se formen agujeros. ----------------------------------------------------------------------- ESPALDA: Se trabaja de ida y vta con ag circular. Mont 48-53-57-63-69-77 pts con ag circular tamaño 8 mm y Andes. Trabajar como sigue (1ª fila = LR): 2 pts del borde en PT MUSGO - ver explicaciones arriba - trabajar en pt jersey (es decir trabajar de revés la primera fila) hasta que queden 2 pts, trabajar estos 2 pts del borde en pt musgo. Continuar de ida y vta de la misma manera hasta que la labor mida 14 cm. Al final de las sig 2 filas mont 1 pt nuevo a cada lado = 50-55-59-65-71-79 pts. Ahora continuar en pt jersey y 1 pt orillo en pt musgo a cada lado. RECUERDE MANTENER LA MISMA TENSIÓN DEL TEJIDO. Cuando la labor mida 31-32-33-34-35-36 cm, cerrar 2-2-3-3-4-4 pts a cada lado para la sisa = 46-51-53-59-63-71 pts. Cuando la labor mida 50-52-54-56-58-60 cm, cerrar los 16-17-17-17-19-19 pts centrales para el escote y finalizar cada hombro por separado. Continuar cerrando 1 pt en la sig fila para el escote = 14-16-17-20-21-25 pts para el hombro. Rematar cuando la labor mida 52-54-56-58-60-62 cm. Trabajar el otro hombro de la misma manera. DELANTERO: Mont los pts y trabajar como la espalda. Cuando la labor mida 45-46-48-49-51-52 cm, desl los 8-9-9-9-11-11 pts centrales a un gancho aux para el escote y finalizar cada hombro por separado. Continuar cerrando para el escote en cada fila desde el escote como sigue: Cerrar 2 pts 2 vcs y 1 pt 1 vez = 14-16-17-20-21-25 pts restantes para el hombro. Rematar cuando la labor mida 52-54-56-58-60-62 cm. Trabajar el otro hombro de la misma manera. MANGA: Se trabaja de ida y vta con ag circular. Mont 26-27-28-30-31-32 pts (incl 1pt orillo a cada lado) con ag circular tamaño 8 mm y con Andes. Trabajar como sigue (1ª fila = LR): 1 pt orillo en pt musgo, trabajar en pt jersey (es decir trabajar de revés la fila 1) hasta que quede 1 pt, 1 pt orillo en pt musgo. Cuando la labor mida 10-10-10-12-12-9 cm, aum 1 pt a cada lado de la labor - LEER TIP PARA LOS AUMENTOS. Aum de esta manera cada 6ª fila 11-5-5-5-2-3 vcs, después cada 4ª fila 0-7-7-7-10-14 vcs (= un total de 11-12-12-12-13-14 vcs) = 48-51-52-54-57-60 pts. Rematar cuando la labor mida 54-53-53-51-51-48 cm (medidas más cortas para las tallas más grandes debido a una mayor anchura de hombros) Trabajar la otra manga de la misma manera. TERMINACIÓN: Hacer la costura de los hombros. Montar las mangas al cuerpo. Hacer la costura de los lados y las mangas, comenzar en el puño y trabajar hacia abajo hasta los pts montados en el lado del cuerpo (= 14 cm de abertura lateral). Coser dentro del pt orillo en pt musgo de cada lado. Repetir en el otro lado. CENEFA DEL ESCOTE: Se trabaja en redondo con ag circular. Recoger por el LD aprox 50-60 pts (incl los pts en el gancho aux) con ag circular tamaño 7 mm y con Andes. Trabajar 2 pliegues. Rematar. |
|
 |
|
¿Terminaste este patrón?Entonces, etiqueta tus fotos con #dropspattern #junipersweater o envíalas a la galería #dropsfan. ¿Necesitas ayuda con este patrón?Encontrarás 25 videos tutoriales, un espacio para comentarios/preguntas y más visitando la página del patrón en garnstudio.com © 1982-2026 DROPS Design A/S. Todos los derechos reservados. Este documento, incluyendo todas sus sub-secciones, está protegido por los derechos de autor (copyright). Lee más acerca de lo que puedes hacer con nuestros patrones en la parte de abajo de cada patrón de nuestro sitio. |


Con más de 40 años en el diseño de modelos de punto y de ganchillo, DROPS Design ofrece una de las más vastas colecciones de patrones gratuitos en el internet - traducidos en 17 idiomas. Al día de hoy, contamos con 324 catálogos y 12290 patrones - de los cuales 11685 están traducidos en español.
Nosotros trabajamos con mucho esmero para brindarte lo mejor que las labores de punto y ganchillo tienen para ofrecer,inspiración y consejos, así como hilos de magnífica calidad a precios increíbles! Te gustaría usar nuestros patrones para otro fin además del uso personal? Puedes leer acerca de lo que estás permitida a hacer en el texto de Copyright en la parte de abajo de todos nuestros patrones. Felices labores!
Escribe un comentario sobre DROPS 171-19
¡Nos encantaría saber qué piensas acerca de este patrón!
Si quieres escribir una pregunta referente al patrón, por favor asegúrate de elegir la categoría correcta en el formulario debajo, para acelerar el proceso de respuesta. Los campos obligatorios están marcados con un *.