
Categorías populares
¿Buscas un hilo?


Comentarios / Preguntas (51)
![]() Nancy Brooks escribió:
Nancy Brooks escribió:
I am just starting the pattern and unless I am misreading, when knitting with circular needles end to end, the second row of rib needs to be K3 P2 etc.
25.12.2021 - 23:59
![]() Anneke M escribió:
Anneke M escribió:
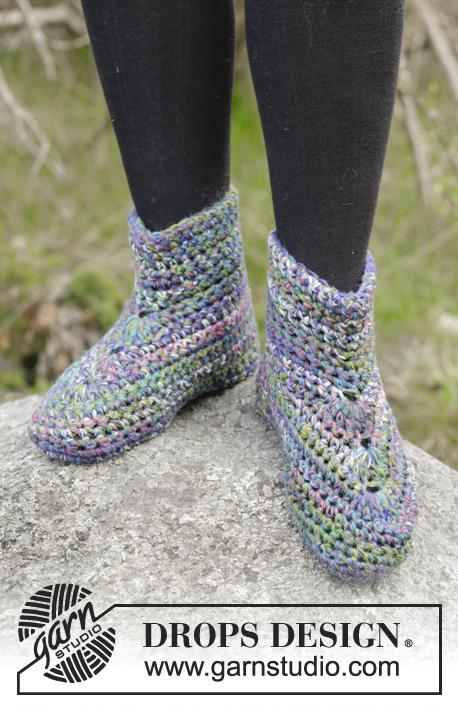
This is an excellent pattern for using up odds and ends or yarn. You may end up with two different slippers, but your feet are still warm, and there will be no yarn going to waste.
12.10.2021 - 13:01
![]() Araceli Flores escribió:
Araceli Flores escribió:
Puedo tener este patrón en español?
12.07.2021 - 06:18
![]() Tina Rytz Jørgensen escribió:
Tina Rytz Jørgensen escribió:
Opskrift: Fortsæt i retstrik til færdig mål. I mindste størrelse er færdig mål 22 cm, er det så først herefter at man begynder at sætte mærketråd og strikke masker sammen, så den reelt kommer til at måle 22+5 cm?
15.04.2021 - 16:04DROPS Design respondió:
Hej Tina. Fotens längd kommer vara 22 cm totalt i minsta storleken. Mvh DROPS Design
21.04.2021 - 07:46
![]() Ute Hessing escribió:
Ute Hessing escribió:
Leider komme ich mit den Abnahmen nicht klar:“ GLEICHZEITIG, wenn die Arb eine Länge von 4-4-5 cm hat, neben 1 Rand-M beidseitig je 2 M re zusstr, diese Abnahme an den Seiten in jeder 2. R wdh (= insgesamt 4 M abgenommen in jeder 2. R). Bei einer Länge von 5-5-6 cm die M gleichmäßig auf 2 Nadeln verteilen (= für die Naht unter dem Fuß), die Arb doppelt legen und die M im Maschenstich zusnähen. “ werden auf jeder Seite 2 vom Rand Maschen zus.gestrickt oder 4
13.03.2021 - 14:09DROPS Design respondió:
Liebe Frau Hessing, es werden zuerst 2 Maschen abgenommen (= beidseitig von der Markierung), aber nach 4-4-5 cm nehmen Sie auch 2 Maschen bzw 1 am Anfang + 1 am Ende der Reihe (= jetzt nehmen Sie insgesamt 4 Maschen ab) ab. Nach 5-5-6 cm verteilen Sie die Maschen auf 2 Nadeln für die Naht unter dem Fuß. Viel Spaß beim stricken!
15.03.2021 - 09:44
![]() Ann Fowler escribió:
Ann Fowler escribió:
Thank you so much for your prompt reply! Does that mean when I "continue in rib with edge stitch each side over the middle 12 stitches" the edge stitches are part of the 12 stitches I knit? Thank you again.
12.02.2021 - 13:06
![]() Ann Fowler escribió:
Ann Fowler escribió:
Hi, I would like to make a pair of these slippers. Please tell me what an edge stitch is and how I go about making/working it into the pattern. Many thanks and kind regards. Ann
12.02.2021 - 11:32DROPS Design respondió:
Dear Ann, the edge stitch is the outermost stitches in a row. If a piece is going to be sewn, we add a stitch for seam-allowance, otherwise it is just there, to have the pieve a definite edge. The edge stitch most often is knitted as a garter stitch, that is knitted in each row. I hope this helps. Happy Knitting!
12.02.2021 - 11:51
![]() Hilde escribió:
Hilde escribió:
Tøffel: Lurer på hvordan jeg strikker pinne nr 3? Første maske rett- 2 rett-2 vrang?
21.01.2021 - 19:30DROPS Design respondió:
Hei Hilde, Du tar rad 2 i revers og med rett til vrang og vrang til rett: Rad 2 - 1 vrang, 2 rett, gjenta (2 vrang, 2 rett) til slutten av raden og avslutte med 1 vrang. God fornøyelse!
22.01.2021 - 08:05
![]() Vibeke Lundberg escribió:
Vibeke Lundberg escribió:
Jeg forstår ikke hvorfor I sætter garnforbruget så højt. Har strikket et par i størrelse 40 og kun brugt 4 nøgler i alt, altså halvdelen af hvad der står i opskriften. Det gør så også sokkerne dobbelt så dyre. Med venlig hilsen Vibeke Lundberg
21.01.2021 - 18:36
![]() Linda escribió:
Linda escribió:
Hello. Thank you for this nice pattern. I am making the 7-1/2/8-1/2 (foot length 9-1/2) size pattern. I have completed the slippers and am ready to begin sewing the bottom. I notice the foot part of the slipper looks small. When the slipper is laid flat it only measures about 8" across at the bottom where the garter stitch begins. --Is this correct?--- Thank you for your help.
19.12.2020 - 22:10DROPS Design respondió:
Dear Linda, the slipper should be stretched to fit the foot and should then fit nicely. See for example this video for another similar slipper pattern (video is only showing foot part). Happy knitting!
21.12.2020 - 07:38
|
|
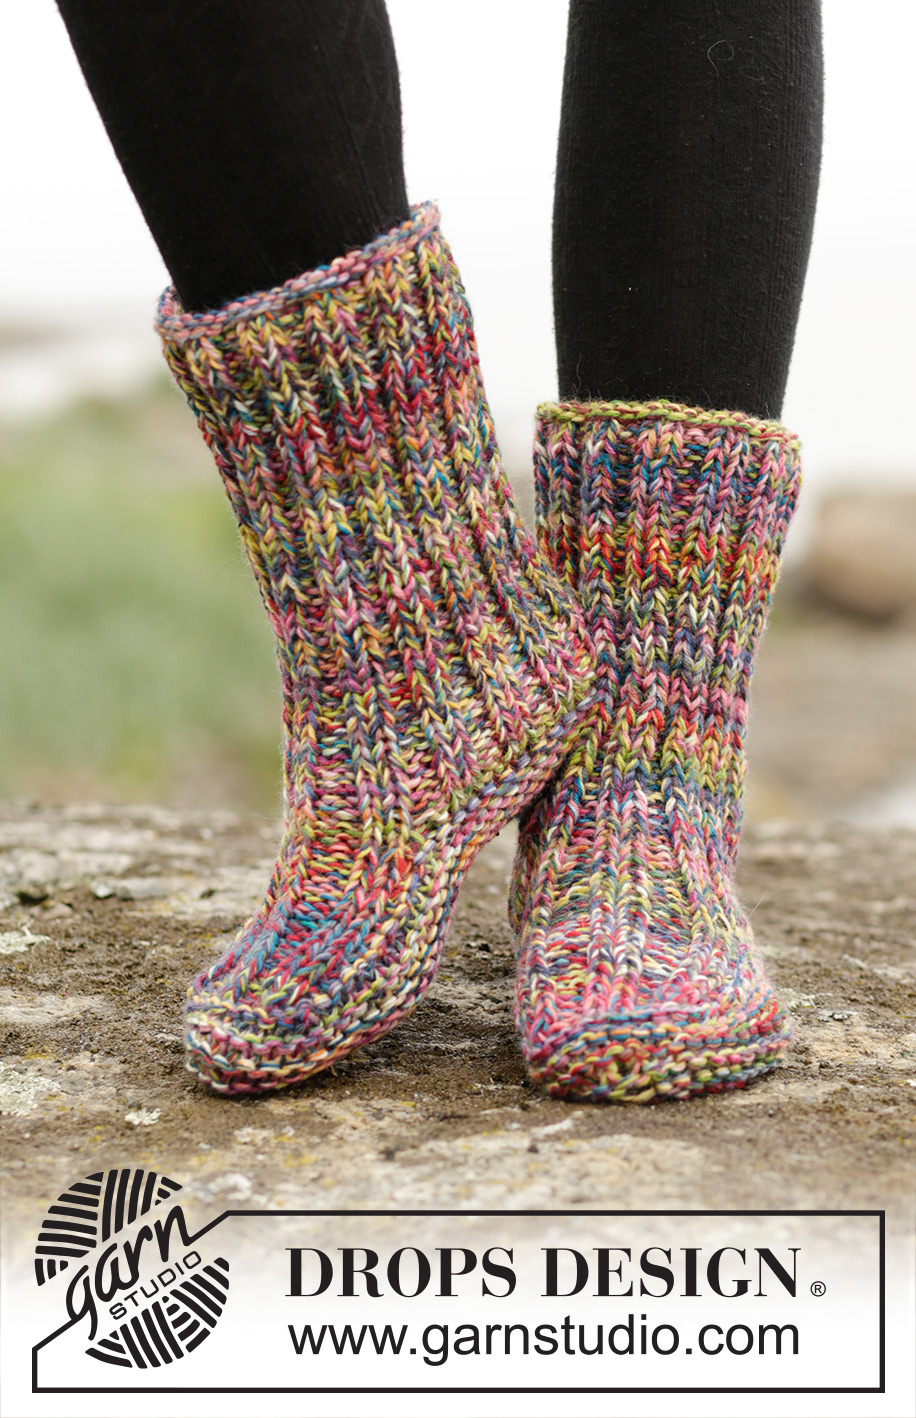
Ribbed Confetti#ribbedconfettisocks |
|
|
|
|
Pantuflas de punto DROPS en punto musgo con resorte, en 4 hilos “Fabel”. Números: 35-42.
DROPS 172-17 |
|
|
PT MUSGO (de ida y vuelta): Tejer todas las hileras de derecho. 1 surco = 2 hileras tejidas de derecho. ------------------------------------------------------ PANTUFLA: Tejida de ida y vuelta en ag circular a partir del centro de la parte de atrás. Montar 40-48-52 pts en ag circular tamaño 6 mm con 1 hilo de cada color (= 4 hilos). Tejer 1 hilera de revés por el LR, después tejer en resorte de la manera siguiente – por el LD: 1 d, * 2 r, 2 d *, repetir de *a* hasta que resten 3 pts y terminar con 2 r y 1 d. RECORDARSE DE MANTENER LA MISMA TENSIÓN DE TEJIDO DE LA MUESTRA! Continuar en resorte de esta manera por 20-22-24 cm – ajustar para que la hilera siguiente sea tejida por el LR. PIE: Tejer los primeros 15-19-19 pts en PT MUSGO – ver explicación arriba, AL MISMO TIEMPO, disminuir 1-5-4 pts distribuidos equitativamente sobre estos pts y deslizar estos 14-14-15 pts en un gancho auxiliar, aumentar 1 pt, continuar con resorte sobre los 10-10-14 pts siguientes, aumentar 1 pt, tejer los últimos 15-19-19 pts en pt musgo, AL MISMO TIEMPO, disminuir 1-5-4 pts distribuidos equitativamente sobre estos pts, y deslizar estos 14-14-15 pts en un gancho auxiliar, cortar el hilo. Continuar con resorte (con 1 pt de orillo a cada lado) sobre los 12-12-16 pts centrales. Cuando la parte central mida 7-8½-10 cm, rematar 1 pt de orillo a cada lado por el LR = 10-10-14 pts, deslizar los pts en 1 gancho auxiliar. Cortar el hilo. Tejer la hilera siguiente de la manera siguiente (por el LD): Tejer los pts de los ganchos auxiliares, AL MISMO TIEMPO, levantar 12-14-16 pts a cada lado de la pieza superior en el interior de 1 pt de orillo = 62-66-76 pts. AHORA MEDIR LA PIEZA A PARTIR DE AQUÍ! Continuar en pt musgo de ida y vuelta hasta finalizar las medidas. Insertar 1 marcapuntos a nivel del frente, en el lado de la punta del pie. Cuando la pieza mida 2 cm, tejer 2 pjd a cada lado del marcapuntos. Repetir las disminuciones aquí a cada 2 hileras – AL MISMO TIEMPO, cuando la pieza mida 4-4-5 cm, tejer 2 pjd en el interior de 1 pt de orillo a cada lado de la pieza, repetir las disminuciones en los lados a cada 2 hileras (= 4 pts disminuidos en total a cada 2 hileras). Cuando la pieza mida 5-5-6 cm, distribuir los pts en 2 ag (= centro de la planta del pie), plegar en dos y unir con una costura a lo largo con puntadas de grafting/costura invisible. Tejer otra pantufla de la misma manera. ENSAMBLAJE: Unir la pantufla con una costura al centro de la parte de atrás y en dirección hacia arriba a lo largo de la pierna – coser en la hebra delantera de los pts más externos. |
|
¿Terminaste este patrón?Entonces, etiqueta tus fotos con #dropspattern #ribbedconfettisocks o envíalas a la galería #dropsfan. ¿Necesitas ayuda con este patrón?Encontrarás 18 videos tutoriales, un espacio para comentarios/preguntas y más visitando la página del patrón en garnstudio.com © 1982-2026 DROPS Design A/S. Todos los derechos reservados. Este documento, incluyendo todas sus sub-secciones, está protegido por los derechos de autor (copyright). Lee más acerca de lo que puedes hacer con nuestros patrones en la parte de abajo de cada patrón de nuestro sitio. |


Con más de 40 años en el diseño de modelos de punto y de ganchillo, DROPS Design ofrece una de las más vastas colecciones de patrones gratuitos en el internet - traducidos en 17 idiomas. Al día de hoy, contamos con 324 catálogos y 12290 patrones - de los cuales 11675 están traducidos en español.
Nosotros trabajamos con mucho esmero para brindarte lo mejor que las labores de punto y ganchillo tienen para ofrecer,inspiración y consejos, así como hilos de magnífica calidad a precios increíbles! Te gustaría usar nuestros patrones para otro fin además del uso personal? Puedes leer acerca de lo que estás permitida a hacer en el texto de Copyright en la parte de abajo de todos nuestros patrones. Felices labores!
Escribe un comentario sobre DROPS 172-17
¡Nos encantaría saber qué piensas acerca de este patrón!
Si quieres escribir una pregunta referente al patrón, por favor asegúrate de elegir la categoría correcta en el formulario debajo, para acelerar el proceso de respuesta. Los campos obligatorios están marcados con un *.