
Categorías populares
¿Buscas un hilo?


Comentarios / Preguntas (23)
![]() Evelien escribió:
Evelien escribió:
Als ik de 1e steken van het patroon brei zoals vermeld kom ik op 10 steken uit in plaats van 12, hoe kan dat? Wat doe ik niet goed ?
05.11.2025 - 17:51DROPS Design respondió:
Dag Evelien,
Helaas begrijp ik niet wat je bedoelt. Welke maat ben je aan het maken en waar in het patroon ben je precies? De telpatronen voor de pas beginnen met 12 steken breed.
05.11.2025 - 19:40
![]() Charity escribió:
Charity escribió:
Inc 16-16-24-24-30-30 sts evenly on next to last round What exactly does evenly mean? I will be casting on 104 stitches so where do I make the increases?
08.07.2023 - 17:03DROPS Design respondió:
Dear Charity, you increase on the ridges. Each ridge is composed of 2 rows in garter stitch which, when worked in the round, are 1 knit round and 1 purl round. You increase on the knit round of the second ridge. As for the increases, you have 104 stitches and need to increase 16 stitches for your size. 104/16= 6.5, so you will increase after every 6th or 7th stitch alternately. Happy knitting!
10.07.2023 - 17:01
![]() Tina escribió:
Tina escribió:
Hi, I thought this would make a great dress instead of a tunic, by simply making it longer? Then I compared this pattern with Vanilla Summer (Drops 159 -6) which IS a DRESS, and the length for both pieces are the same! Also the amount of Paris yarn is exactly the same. Why is this one considered a tunic please? On the model it does look like a tunic, but I'm confused because the measurements are the same as the Vanilla dress, which looks like a dress on the model!
07.04.2022 - 16:49DROPS Design respondió:
Dear Tina, the term tunic is sometimes used to describe a short dress. This is why the measurements are similar but they are called differently; in the end both of them are dresses. To work a longer garment, you could simply work straight or work a few increases on the sides if you want it slightly wider at the bottom, before working the bottom edge. Happy knitting!
07.04.2022 - 21:15
![]() Magdalena escribió:
Magdalena escribió:
Witam nie bardzo wiem jak mam rozumieć pewna część wzoru Chodzi mi dokładnie o dół tylowia Nie wiem jak wyliczyc ,kiedy mam zacząć to rozcięcie Proszę o pomoc
01.04.2022 - 16:30DROPS Design respondió:
Witaj Magdaleno, troszkę przeformułowałam to zdania: „Na wys. 43-45-44-46-46-48 cm od markera do mierzenia (tzn. tego umieszczonego na wysokości, gdzie były zdejmowane oczka na rękawy na druty pomocnicze), kończyć tył i przód osobno w tę i z powrotem (tzn. podzielić robótkę w miejscu markerów na bokach, na pęknięcia na dole sukienki)”. Mam nadzieję, że teraz łatwiej będzie zrozumieć. Pozdrawiamy!
04.04.2022 - 15:06
![]() Kate Frego escribió:
Kate Frego escribió:
What are the relevant body measurements for S-M-L-XL in Sunrise Glow 170-14? (Inches please)
28.02.2021 - 01:01DROPS Design respondió:
Dear Kate, you can find the measurements of the finished piece on the schematic drawing at the bottom of the page. Happy Knitting!
28.02.2021 - 11:06
![]() Debora escribió:
Debora escribió:
Buongiorno, vorrei fare questa tunica con filato Drops Muskat, più sottile, anzichè il Paris. Vesto una taglia M, avete un suggerimento che mi permetta di adattare il filato più sottile alla spiegazione? Il campione con Muskat è di 21 maglie in 10 cm.Grazie mille
29.04.2019 - 14:13DROPS Design respondió:
Buongiorno Debora, purtroppo non possiamo fornire un aiuto così personalizzato, ma presso il suo rivenditore DROPS di fiducia potrà trovare tutta l'assistenza di cui ha bisogno. Buon lavoro!
29.04.2019 - 15:00
![]() Lise escribió:
Lise escribió:
Je suis de taille LARGE. Dans votre tuto des tailles, vous donnez un exemple de taille large, ce qui donne des hanches de 108 cm et poitrine 96. Parfait pour moi. Dans le modèle W-584 ci-dessus la taille large donne 128 cm pour les hanches et 104 cm pour la poitrine ! Je ne comprends pas un tel écart... svp m’éclaIrer, je ne sais plus quelle taille choisir... merci.
03.04.2019 - 15:06DROPS Design respondió:
Bonjour Lise, la coupe de chaque modèle peut différer en étant plus ou moins près du corps, en taille L on a ici 52 cm x 2 = 104 cm de tour de poitrine, et la base du top (qui mesure 78 cm de hauteur totale) est de 69 cm x 2 = 138 cm. Mesurez un modèle similaire que vous avez et dont vous aimez la forme pour trouver la taille idéale. Bon tricot!
03.04.2019 - 16:15
![]() Nicola Summers escribió:
Nicola Summers escribió:
With regard to the sleeves and body, instead of casting on 8 stitches to the sleeve and then sewing up the hole between the sleeve and body at the end would it be OK to pick up 8 stitches from the cast off edge on the body piece instead? I\'m fairly new to knitting tops and have always ended up with holes when sewing up seams.
22.11.2018 - 10:09DROPS Design respondió:
Dear Mrs Summers, you can also pick up 1 stitch in each of the 8 sts cast on on body over sleeve instead of casting on new sts. This video is showing how to close the opening under arm (in that case the 8 sts cast on on body and the 8 sts cast on on sleeve). Happy knitting!
22.11.2018 - 11:09
![]() Tone Thorsen escribió:
Tone Thorsen escribió:
Att Sunrice Glow. Øketips -2 må vel gi m i n d R e masker? Ikke flere som dere forklarer
28.01.2018 - 13:04DROPS Design respondió:
Hei Tone. Nei, øketips-2 gir en forklaring på at det økes med kast 4 ganger pr omgang det skal økes. ØKETIPS-2: Strikk til det gjenstår 2 m før merke, 1 kast (= 1 ØKT MASKE), 4 m rett (merke sitter midt mellom m), 1 kast (=1 ØKT MASKE TIL). På neste omgang strikkes de 4 kastene vridd rett for å unngå hull. God Fornøyelse!
30.01.2018 - 10:50
![]() Diana Hart escribió:
Diana Hart escribió:
I am not quite understanding the hem pattern , does it mean for the small size the first and last 4 stitches are garter stitch then next and next to last 4 are stocking stitch and the stitches in between are A2? If I wanted to do this garment without the split, would I need to adjust stitches to a multiple of 11 and then just work A2 all round? Thank you for your help. Keep the patterns coming they are the best.
30.08.2017 - 13:39DROPS Design respondió:
Dear Mrs Hart, that's right, when working then back and forth for vents on sides, you are working with 4 sts in garter st at the beg and at the end of row. If you don't want any vents, you can then adjust the number of sts as you suggest and work A.11 all the round. Happy knitting!
30.08.2017 - 14:58
|
||||||||||||||||||||||
Sunrise Glow#sunriseglowtunic |
||||||||||||||||||||||
|
|
||||||||||||||||||||||
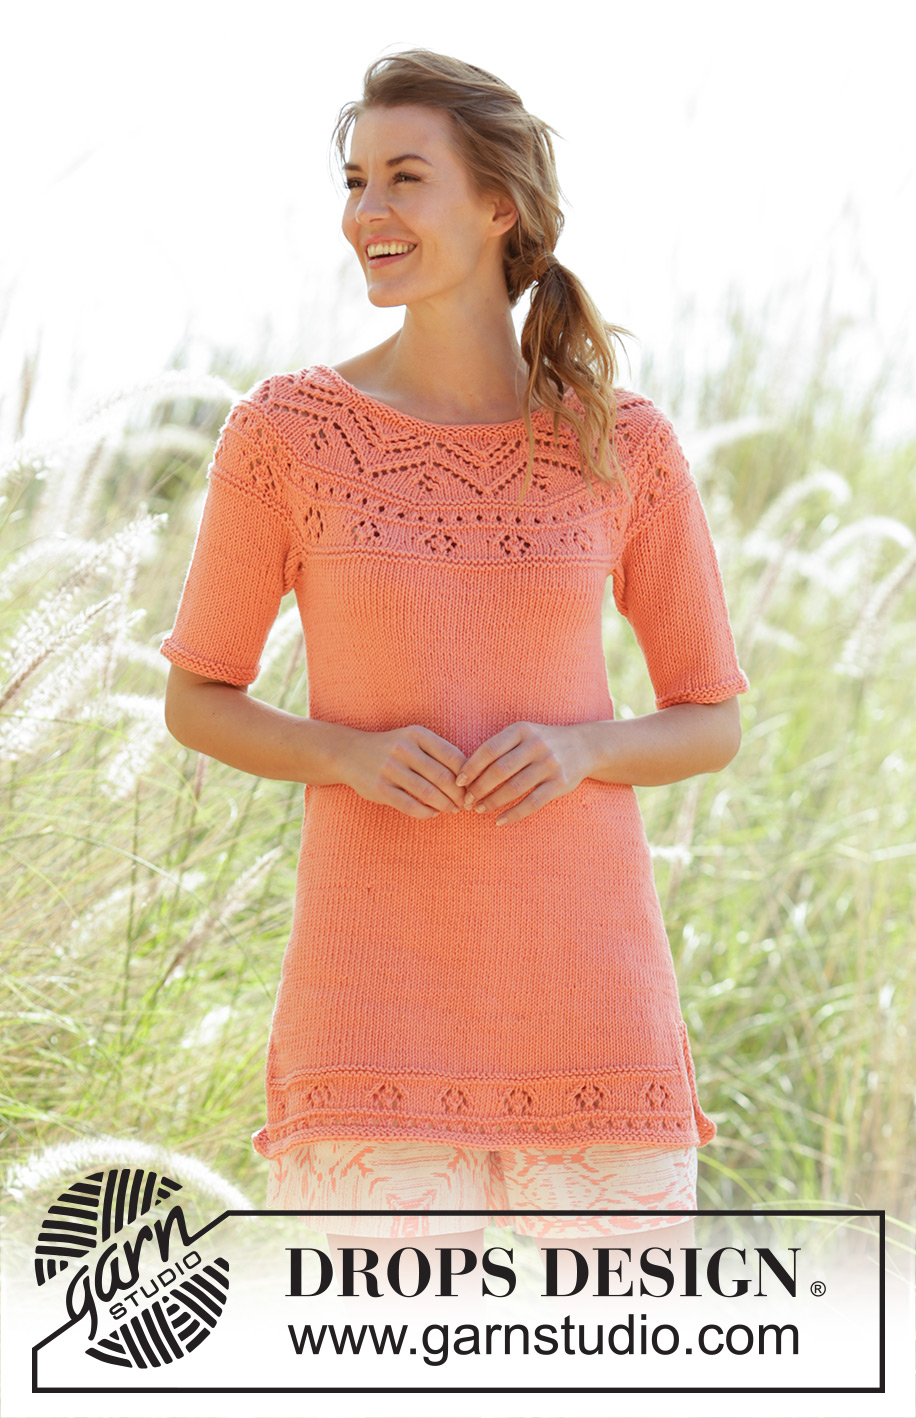
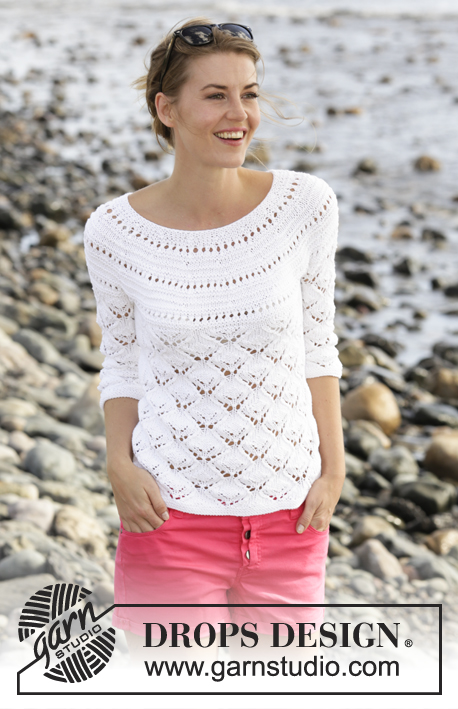
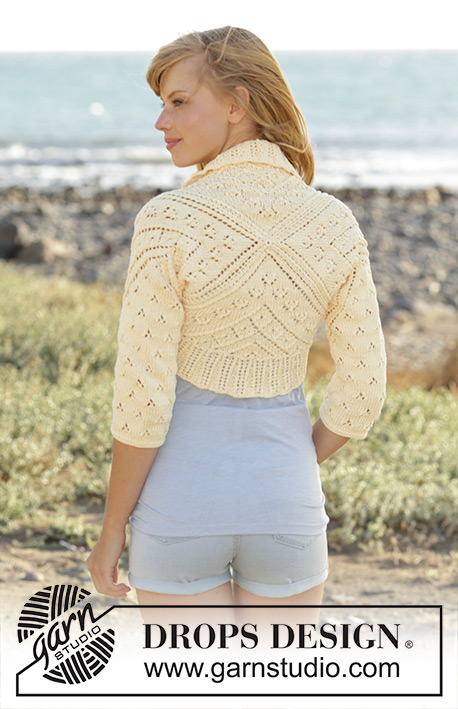
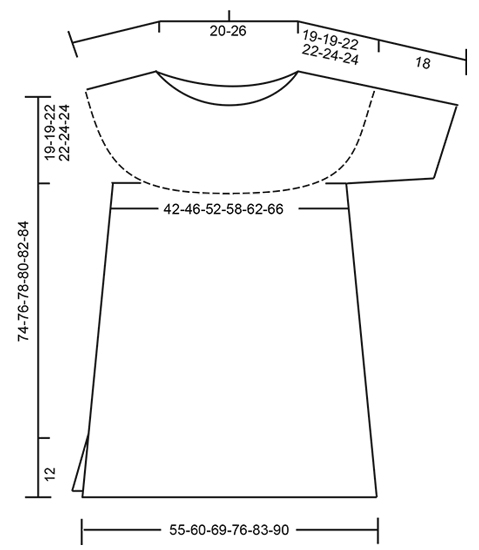
Túnica de punto DROPS con patrón de calados, aberturas laterales y canesú redondo en ”Paris”. Tejida de arriba abajo. Talla: S - XXXL.
DROPS 170-14 |
||||||||||||||||||||||
|
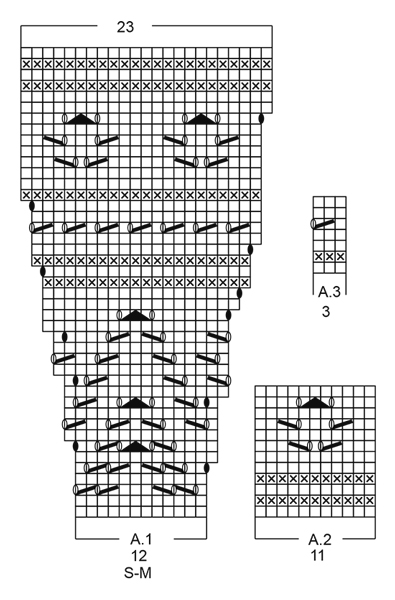
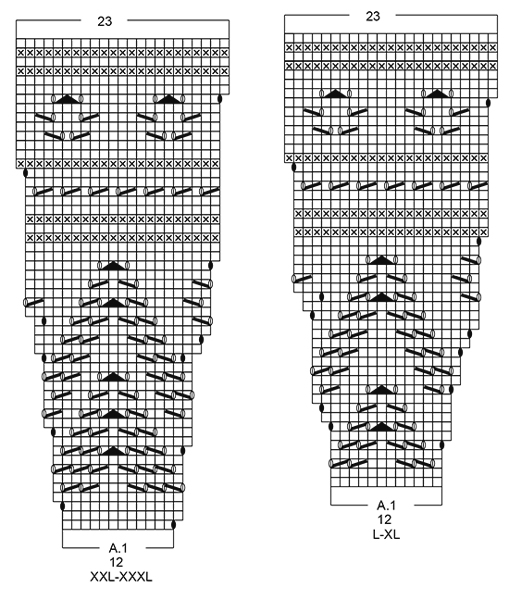
PATRÓN: Ver los diagramas A.1-A.3. Los diagramas muestran todas las filas del patrón visto por el LD. PUNTO MUSGO (en redondo): 1 pliegue = 2 vtas. *1 vta de derecho y 1 vta de revés*, repetir de * a *. PUNTO MUSGO (de ida y vta): Trabajar todas las filas de derecho. 1 pliegue = 2 filas de derecho. TIP PARA LOS AUMENTOS-1: Aum 1 pt trabajando 1 HEB (lazada), en la sig vta trabajar la HEB como pt retorcido para evitar que se formen agujeros. TIP PARA LOS AUMENTOS-2: Trabajar hasta que queden 2 pt antes del MP (marcapuntos), 1 HEB, 4 d. (el MP queda entre estos pts), 1 HEB. En la sig vta trabajar la HEB como pt retorcido para evitar que se formen agujeros. TIP PARA LAS DISMINUCIONES: Dism como sigue antes del MP: Trabajar hasta que queden 3 pts antes del MP, 2 pjd, 1 d. Dism como sigue después del MP: 1 d., desl 1 pt como de derecho, 1 d., pasar el pt desl por encima. ----------------------------------------------------------------------- CANESÚ: Se trabaja de arriba abajo en redondo con ag circular. Mont 92-104-108-120-126-138 pts con ag circular tamaño 4 mm con Paris. Trabajar 2 pliegues en PT MUSGO - ver explicaciones arriba y aum 16-16-24-24-30-30 pts repartidos en la anteúltima vta (= vta de derecho) - LEER TIP PARA AUMENTOS-1 = 108-120-132-144-156-168 pts. Cambiar a ag circular tamaño 5 mm. Trabajar A.1 (= 12 pts) un total de 9-10-11-12-13-14 vcs en el ancho. RECUERDE MANTENER LA MISMA TENSIÓN DEL TEJIDO. Cuando se ha completado A.1 una vez en vertical hay 207-230-253-276-299-322 pts en ag. La labor mide aprox 19-19-22-22-24-24 cm. Trabajar 1 vta de derecho y aum 1-0-1-0-1-0 pts repartidos = 208-230-254-276-300-322 pts. Trabajar la sig vta como sigue: 32-36-41-45-49-53 pts de derecho (= mitad de la espalda), pasar los sig 40-44-46-48-52-56 pts a un gancho aux para la manga, mont 8 pts nuevos bajo la manga (insertar 1 MP en el centro de estos 8 pts), 64-71-81-90-98-105 pts de derecho (= delantero), pasar los sig 40-44-46-48-52-56 pts a un gancho aux para la manga, mont 8 pts nuevos bajo la manga (insertar 1 MP en el centro de estos 8 pts), 32-36-41-45-49-53 pts de derecho = 144-158-178-196-212-226 pts. CUERPO: Ahora trabajar la labor en pt jersey. Insertar 1 MP en la labor, AHORA MEDIR LA LABOR DESDE AQUÍ. Cuando la labor mida 3 cm aum 1 pt a cada lado de cada MP de los lados (= 4 pts aum) - LEER TIP PARA LOS AUMENTOS-2, repetir los aum cada 4-4-3-2½-2-2 cm 9-9-12-14-16-18 vcs más = 184-198-230-256-280-302 pts. Cuando la labor mida 43-45-44-46-46-48 cm, trabajar el delantero y la espalda de ida y vta, finalizados por separado (es decir, dividir la labor en los MP). ESPALDA: = 92-99-115-128-140-151 pts. Trabajar en pt jersey con 4 pts en pt musgo a cada lado. Cuando la labor mida 47-49-48-50-50-52 cm desde el MP - ajustar para que la sig. fila se trabaje por el LR, aum 1-1-0-0-0-0 pts = 93-100-115-128-140-151 pts. Trabajar la sig fila como sigue por el LD: 4 pts en pt musgo, trabajar 4-2-4-5-0-0 pts como el primer pt de A.2, repetir A.2 (= 11 pts) hasta que queden 8-6-8-9-4-4 pts (= 7-8-9-10-12-13 vcs en el ancho), trabajar 4-2-4-5-0-0 pts como el último pt de A.2, finalizar con 4 pts en pt musgo. Cuando se ha completado A.2 una vez en vertical, trabajar la sig fila como sigue por el LD: 4 pts en pt musgo, repetir A.3 (= 3 pts) hasta que queden 5 pts, AL MISMO TIEMPO aum 0-2-2-1-1-2 pts repartidos en la primera fila, trabajar el primer pt de A.3, finalizar con 4 pts en pt musgo = 93-102-117-129-141-153 pts. Cuando se ha completado A.3 una vez en vertical, cambiar a ag circular tamaño 4 mm. Trabajar 2 pliegues en PT MUSGO de ida y vta - ver las explicaciones arriba. Rematar. DELANTERO: Se trabaja como la espalda. MANGA: Trabajar las mangas en redondo con ag de doble punta. Desl los 40-44-46-48-52-56 pts desde el gancho aux de vta a la ag de doble punta de tamaño 5 mm. Mont 8 pts nuevos bajo la manga, insertar un MP en el centro de estos 8 pts = 48-52-54-56-60-64 pts. Insertar 1 MP en la labor, AHORA MEDIR LA LABOR DESDE AQUÍ. Trabajar en pt jersey. Cuando la labor mida 4 cm, dism 1 pt a cada lado del MP (= 2 pts dism) - LEER TIP PARA LAS DISMINUCIONES. Repetir las dism cuando la labor mida 10 cm = 44-48-50-52-56-60 pts. Cuando la labor mida 17 cm, cambiar a ag de doble punta de tamaño 4 mm. Trabajar 2 pliegues. Rematar. Trabajar otra manga de la misma manera. TERMINACIÓN: Coser las aberturas bajo las mangas. |
||||||||||||||||||||||
Explicaciones del diagrama |
||||||||||||||||||||||
|
||||||||||||||||||||||
 |
||||||||||||||||||||||
 |
||||||||||||||||||||||
 |
||||||||||||||||||||||
¿Terminaste este patrón?Entonces, etiqueta tus fotos con #dropspattern #sunriseglowtunic o envíalas a la galería #dropsfan. ¿Necesitas ayuda con este patrón?Encontrarás 25 videos tutoriales, un espacio para comentarios/preguntas y más visitando la página del patrón en garnstudio.com © 1982-2026 DROPS Design A/S. Todos los derechos reservados. Este documento, incluyendo todas sus sub-secciones, está protegido por los derechos de autor (copyright). Lee más acerca de lo que puedes hacer con nuestros patrones en la parte de abajo de cada patrón de nuestro sitio. |
||||||||||||||||||||||


Con más de 40 años en el diseño de modelos de punto y de ganchillo, DROPS Design ofrece una de las más vastas colecciones de patrones gratuitos en el internet - traducidos en 17 idiomas. Al día de hoy, contamos con 324 catálogos y 12290 patrones - de los cuales 11673 están traducidos en español.
Nosotros trabajamos con mucho esmero para brindarte lo mejor que las labores de punto y ganchillo tienen para ofrecer,inspiración y consejos, así como hilos de magnífica calidad a precios increíbles! Te gustaría usar nuestros patrones para otro fin además del uso personal? Puedes leer acerca de lo que estás permitida a hacer en el texto de Copyright en la parte de abajo de todos nuestros patrones. Felices labores!
Escribe un comentario sobre DROPS 170-14
¡Nos encantaría saber qué piensas acerca de este patrón!
Si quieres escribir una pregunta referente al patrón, por favor asegúrate de elegir la categoría correcta en el formulario debajo, para acelerar el proceso de respuesta. Los campos obligatorios están marcados con un *.