
Categorías populares
¿Buscas un hilo?


Comentarios / Preguntas (43)
![]() Lisa escribió:
Lisa escribió:
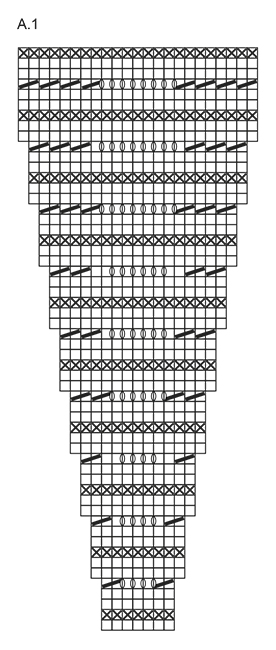
Trying to start 'making waves' dress and doing the gauge. The pattern is in the round, but I'm doing A1 as the swatch? The #s don't seem to work. This is the wave pattern that you're supposed to do for the gauge?
01.12.2025 - 17:19DROPS Design respondió:
Dear Lisa, yes the tension is given here in wave pattern, you can just work for ex 2 repeats of the last 6 rows A.1 and measure 24 sts in width. Happy knitting!
02.12.2025 - 09:13
![]() Maria escribió:
Maria escribió:
Hello. I'm knitting A.3 of this model (Making Waves) and I have a couple of questions. 1) At the end of decreases/YOs row, after the last three K2tog there are two single stitches on the needle. Is this correct? 2) The following row (after decreases/YOs) has a step (stitch) at the beginning and another one at the end of the repeated pattern. Does this mean that the beginning of the row marker has to be moved 1 stitch to the right? Thank you so much for your help.
06.05.2025 - 15:34DROPS Design respondió:
Dear Maria, you work A.3 to increase stitches, first rows are worked over 23 sts and you increase 2 sts on 3rd row working *(K2 tog x 3), K2, (YO,K1)x8, K1, (K2 tog)x3*, ( = 3+2+16+1+3=25 sts). Repeat around a total of 8-10-12 times in total (adding markers can help you keeping tracking number of stitches). When A.3 is done you should have 200-250-300 sts. Happy knitting!
06.05.2025 - 16:00
![]() MJ escribió:
MJ escribió:
Hello, Under the arm where 8 new stitches are added on each side, how does one set of wave pattern fit in? Since it's 23 stitch repeat? What do I do on the 3rd row on A2 when you do the "knit 2 together" and "YO"? Thank you. MJ
26.04.2025 - 02:51DROPS Design respondió:
Dear MJ, the 8 sts won't fit the pattern; you will work them similarly to the pattern at the start and, later on, you will decrease these stitches and work the rest in the pattern. So you only need to work by knitting or purling the stitches according to whether that row is purled or knitted. The chart is worked only over the other stitches and you won't need to work the wave/lace pattern over the 8 new stitches on each side. Happy knitting!
27.04.2025 - 12:31
![]() MJ escribió:
MJ escribió:
Hello, Under the arm where 8 new stitches are added on each side, how does one set of wave pattern fit in? Since it's 23 stitch repeat? Thank you. MJ
26.04.2025 - 02:47DROPS Design respondió:
Dear MJ, the 8 sts won't fit the pattern; you will work them similarly to the pattern at the start and, later on, you will decrease these stitches and work the rest in the pattern. So you only need to work by knitting or purling the stitches according to whether that row is purled or knitted. The chart is worked only over the other stitches and you won't need to work the wave/lace pattern over the 8 new stitches on each side. Happy knitting!
27.04.2025 - 12:31
![]() Paula escribió:
Paula escribió:
Danke für eure schönen Anleitungen. Ich habe schon zwei Modelle gehäkelt und finde sie sehr gelungen. Eine Frage zu diesem Modell: Die Farben in der Anleitung passen nicht ganz zu denen auf dem Foto bzw. gibt es die Farben gar nicht zu kaufen. (z.B. Beige, das auf dem Foto eher grau aussieht) Habt ihr Empfehlungen, welche Farbkombinationen auch gut passen würden? Ich finde diese Pastelltöne sehr harmonisch. Wodurch könnte man sie ersetzen? Herzliche Grüße
23.01.2025 - 21:37DROPS Design respondió:
Liebe Paula, danke für Ihre Rückmeldung. Für weitere Farben-Idéer wenden Sie sich an Ihrem DROPS Laden (auch per Telefon oder per E-Mail), dort kann man Ihnen die besten passenden Farben empfehlen - Viel Spaß beim Stricken!
24.01.2025 - 09:48
![]() Maria escribió:
Maria escribió:
Dzień dobry, czy te 8 oczek dodanych na pachę przerobić na prawo? Czy w tym miejscu kontunuujemy wzór fal?
28.07.2024 - 11:05DROPS Design respondió:
Witaj Mario, te 8 oczek przerabiasz najpierw na prawo ponad okrążeniem na prawo ściegu fantazyjnego i przer. na lewo ponad okrążeniem na lewo ściegu fantazyjnego. Następnie zamykasz 2 oczka ponad tymi 8 oczkami 4 razy jak w opisie (8 nabranych o. zostanie zamkniętych) i dalej już przerabiasz schemat A.2 przez całe okrążenie. Pozdrawiamy!
28.07.2024 - 15:48
![]() Francesca Pellencin escribió:
Francesca Pellencin escribió:
Je souhaite tricoter cette robe, mais en forme trapèze complètement sans réduction à la taille, je ne comprends pas très bien d'après le diagramme comment faire pour ne pas diminuer de mailles à la taille et ré-augmenter ensuite, ce que je veux faire c'est augmenter régulièrement. Pouvez-vous m'indiquer ce qui dans le diagramme correspond à la réduction de largeur pour la taille afin que je puisse l'éviter.
03.06.2024 - 00:36DROPS Design respondió:
Bonjour Mme Pellencin, les diminutions pour la taille sont à faire dans A.2 en commençant à 3 cm après la division; vous pouvez donc probablement ajuster vos augmentations à partir de la hauteur souhaitée après la division, en suivant les diagrammes à partir de A.3 pour les augmentations et à partir de la hauteur qui vous convient. Bon tricot!
03.06.2024 - 08:19
![]() Marielouise Hallsten escribió:
Marielouise Hallsten escribió:
Ska man sticka mönster över dom 8 maskorna man lagt upp under armen? Jag får det inte att stämma hur än jag gör
31.05.2024 - 13:03DROPS Design respondió:
Hei Marielouise. Nei, du fortsetter med A.2 over maskene i bølgemønster, men over de 8 nye maskene i hver side strikkes det rett når det strikkes rett i mønsteret og vrang når det strikkes vrang i mønsteret. Når arbeidet måler 3 cm skal det felles under hvert erme og når alle fellingene er ferdig er de 8 nye maskene borte og det strikkes kun A.2 over alle maskene. mvh DROPS Design
03.06.2024 - 12:00
![]() Katalin Alexa Király Broholm escribió:
Katalin Alexa Király Broholm escribió:
Tak for en fin opskrift:-) Under ‘Ryg og forstykke’ står der: “Når arb måler 3 cm …” så her måles tydeligvis fra den nye kant under ærmerne. Længere nede står der: “Når arb måler 38-40-42 cm …” Er det fortsat målt fra kanten under ærmet, eller er det målt fra halsudskæringen? Tak fra Katalin
20.05.2024 - 21:55DROPS Design respondió:
Hej Katalin, det er fra starten, vi skal skrive det tydeligere i opskriften - tak for info :)
23.05.2024 - 14:28
![]() Corina Flake escribió:
Corina Flake escribió:
I am wondering about the instructions "When piece measures 3 cm / 1'', dec 2 st in middle of the 8 new sts in each side (= 4 sts dec), repeat dec every 4 cm / 1½'' 3 more times so that all of the new 8 sts has been dec." By the 3rd repeat decrease I am left with 1 stitch and only 1 decrease possible. Is there something I am missing or is this correct - should I be left with those extra stitches? How does it factor into the wave pattern?
18.05.2024 - 05:03DROPS Design respondió:
Dear Corina, you should have 8 sts in each side, so 16 in total. You decrease 2 in each side, so you should have 6 sts in each side and 12 in total. The next time you decrease 2 in each side again, so you have 4 in each side and 8 in total. Repeat once more; 2 sts in each side and 4 in total. The last time you decrease the 2 remaining sts in each side, so you should have decreased all of the 8 sts in each side and 16 sts in total. Happy knitting!
20.05.2024 - 00:06
|
|||||||||||||
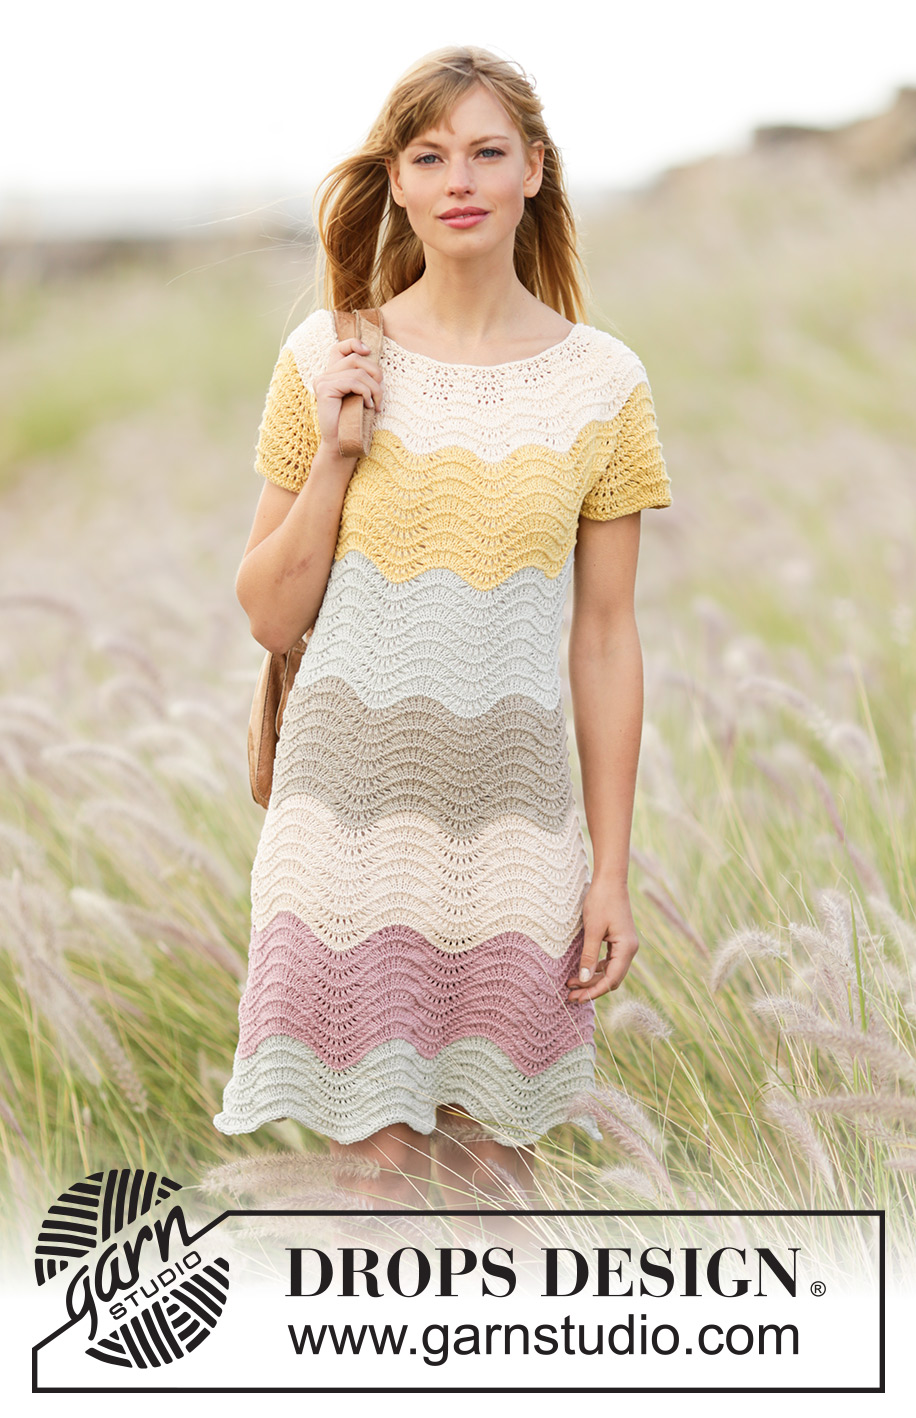
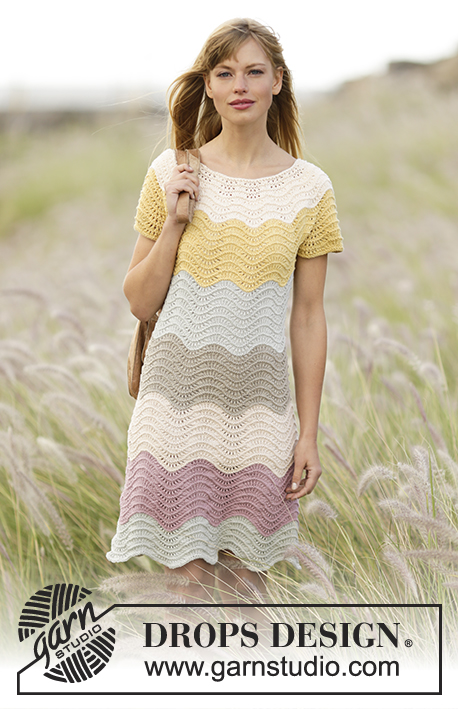
Making Waves#makingwavesdress |
|||||||||||||
 |
 |
||||||||||||
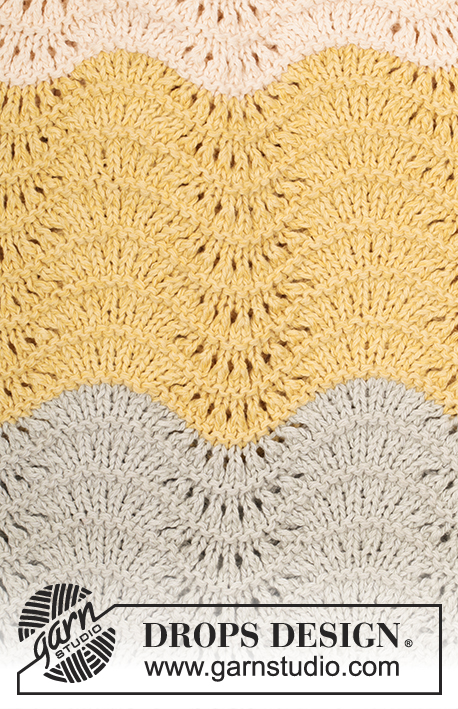
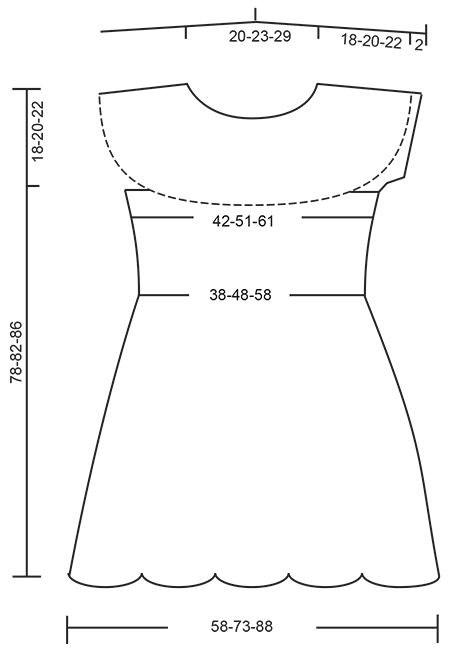
Vestido de punto DROPS con franjas y patrón de ondas, tejido de arriba para abajo, en “Belle”. Talla: S – XXXL.
DROPS 169-12 |
|||||||||||||
|
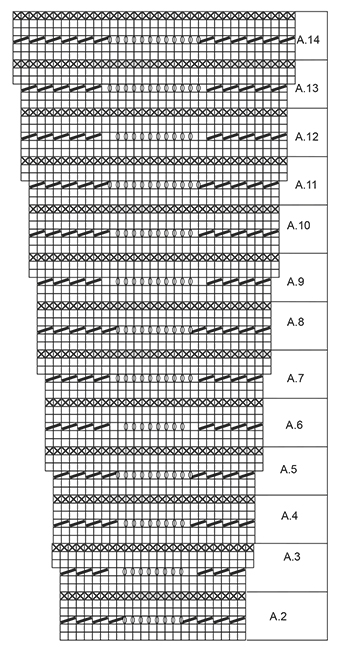
PATRÓN: Ver diagramas A.1 a A.14. FRANJAS: Tejer de la manera siguiente: Cambiar de color después de una vta tejida de revés. Montaje hasta 10 cm: blanco hueso 10 cm hasta 21-22-22 cm: diente de león 21-22-22 cm hasta 32-34-35 cm: plata 32-34-35 cm hasta 43-46-48 cm: beige 43-46-48 cm hasta 54-58-61 cm: beige claro 54-58-61 cm hasta 66-70-74 cm: malva 66-70-74 cm hasta 78-82-86 cm: plata ------------------------------------------------------ VESTIDO: Tejido en redondo en ag circular, de arriba para abajo. Montar 98-112-140 pts en una ag circular corta tamaño 4 mm con blanco hueso. Tejer de acuerdo a A.1 (= 14-16-20 repeticiones a lo ancho) y tejer FRANJAS – ver explicación arriba. RECORDARSE DE MANTENER LA MISMA TENSIÓN DE TEJIDO DE LA MUESTRA! Cuando A.1 ha sido tejido una vez verticalmente, hay 322-368-46- pts en la ag. Cambiar a una ag circular larga cuando sea necesario. Continuar con A.2 hasta que la pieza mida 18-20-22 cm. Después tejer de la manera siguiente: Tejer 92-115-138 pts (= pieza de la espalda), deslizar los 69-69-92 pts siguientes en un gancho auxiliar (= manga), montar 8 nuevos pts, tejer los 92-115-138 pts siguientes (= pieza del frente), deslizar los 69-69-92 pts siguientes en un gancho auxiliar (= manga), montar 8 nuevos pts. CUERPO: = 200-246-292 pts. Continuar con A.2 sobre los pts en patrón de ondas, sobre los 8 nuevos pts de cada lado tejer de derecho cuando se teje de derecho en el patrón y tejer de revés cuando se teje de revés en el patrón. Cuando la pieza mida 3 cm, disminuir 2 pts en el centro de los 8 nuevos pts de cada lado (= 4 pts disminuidos), repetir las disminuciones a cada 4 cm 3 veces más para que todos los 8 nuevos pts sean disminuidos = 184-230-276 pts. Continuar con A.2 sobre todos los pts (= 8-10-12 repeticiones a lo ancho). Cuando la pieza mida 38-40-42 cm a partir del hombro, tejer A.3 1 vez verticalmente = 200-250-300 pts. Tejer A.4 2 veces verticalmente. Tejer A.5 1 vez verticalmente = 216-270-324 pts. Tejer A.6 2 veces verticalmente. Después tejer A.7 1 vez verticalmente = 232-290-348 pts. Tejer A.8 2 veces verticalmente. Después tejer A.9 1 vez verticalmente = 248-310-372 pts. Tejer A.10 2 veces verticalmente. Después tejer A.11 1 vez verticalmente = 264-330-396 pts. Tejer A.12 2 veces verticalmente. Después tejer A.13 1 vez verticalmente = 280-350-420 pts. Tejer A.14 3 veces verticalmente, o hasta que la pieza mida 78-82-86 cm a partir del hombro. Rematar flojo. ORILLA DE LAS MANGAS: Deslizar los pts del gancho auxiliar en las ag de doble punta tamaño 4 mm, levantar 1 pt en cada uno de los 8 pts bajo la manga = 77-77-100 pts. Continuar con diente de león, tejer A.2 sobre los pts en patrón de ondas, sobre los 8 nuevos pts de cada lado tejer de derecho cuando se teje de derecho en el patrón y tejer de revés cuando se teje de revés en el patrón. Tejer 2 repeticiones de A.2, por cada vez que se tejen los agujeros y las HEBs (lazadas) en A.2, disminuir 2 pts en el centro de los 8 nuevos pts al centro bajo la manga = 73-73-96 pts. Rematar. Tejer la orilla de la otra manga de la misma manera. |
|||||||||||||
Explicaciones del diagrama |
|||||||||||||
|
|||||||||||||
 |
|||||||||||||
 |
|||||||||||||
 |
|||||||||||||
¿Terminaste este patrón?Entonces, etiqueta tus fotos con #dropspattern #makingwavesdress o envíalas a la galería #dropsfan. ¿Necesitas ayuda con este patrón?Encontrarás 21 videos tutoriales, un espacio para comentarios/preguntas y más visitando la página del patrón en garnstudio.com © 1982-2026 DROPS Design A/S. Todos los derechos reservados. Este documento, incluyendo todas sus sub-secciones, está protegido por los derechos de autor (copyright). Lee más acerca de lo que puedes hacer con nuestros patrones en la parte de abajo de cada patrón de nuestro sitio. |
|||||||||||||


Con más de 40 años en el diseño de modelos de punto y de ganchillo, DROPS Design ofrece una de las más vastas colecciones de patrones gratuitos en el internet - traducidos en 17 idiomas. Al día de hoy, contamos con 324 catálogos y 12290 patrones - de los cuales 11675 están traducidos en español.
Nosotros trabajamos con mucho esmero para brindarte lo mejor que las labores de punto y ganchillo tienen para ofrecer,inspiración y consejos, así como hilos de magnífica calidad a precios increíbles! Te gustaría usar nuestros patrones para otro fin además del uso personal? Puedes leer acerca de lo que estás permitida a hacer en el texto de Copyright en la parte de abajo de todos nuestros patrones. Felices labores!
Escribe un comentario sobre DROPS 169-12
¡Nos encantaría saber qué piensas acerca de este patrón!
Si quieres escribir una pregunta referente al patrón, por favor asegúrate de elegir la categoría correcta en el formulario debajo, para acelerar el proceso de respuesta. Los campos obligatorios están marcados con un *.