
Categorías populares
¿Buscas un hilo?


Comentarios / Preguntas (56)
![]() Patrizia escribió:
Patrizia escribió:
Buonasera, non riesco a capire perché da 160 maglie si passa a lavorare su 80m + 2 cat. Dopo aver finito lo schema A2 mi potete spiegare meglio cosa devo fare per realizzare gli scaldi? Grazie mille. Patrizia
29.06.2023 - 00:47
![]() Aziza escribió:
Aziza escribió:
Hi, I finished A1 than went to A2 which completed the big round design on the last picture..how many times do I do A2..it says 7 repitions?.do i keep doing all the rows of A2 than go back to A1 starting at row 5?..this pattern not clear.. thank you
04.06.2023 - 10:30DROPS Design respondió:
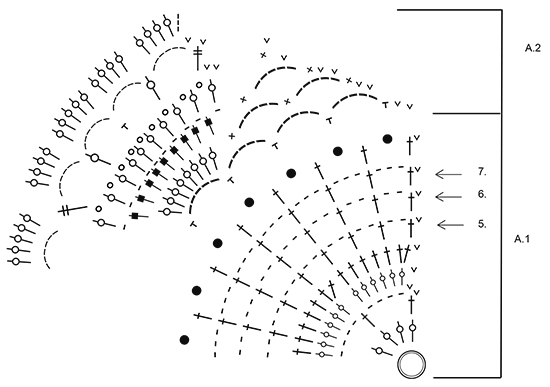
Dear Aziza, you have 7 repeats of A.2 on the round. That is, to work over all of the stitches of A.1 in the previous round, you need to repeat the first round of A.2 7 times in the same round. Continue working the chart. When you finish working A.2 once, work A.1 again, now starting on the 5th round of the chart (marked with an arrow). Happy crocheting!
04.06.2023 - 17:39
![]() Susan Richardson escribió:
Susan Richardson escribió:
Hello! Me again! Thanks for earlier reply, now clear regarding slip stitches at beginning of rounds. I am now nearly at :Work 7th Round 1-3-5 times, AT THE SAME TIME inc 2 tr evenly on every row, i.e. two times on every row. Is there a best place to put these increases? I assume NOT in the arm hole areas, as this would alter the stitches for the arms? Or it may not! This pattern is challenging me, but with your help I will finish it ! Thank you.
26.02.2023 - 14:35DROPS Design respondió:
Dear Susan, as long as they are not adjacent/next to each other you can work the increases anywhere in the row, even in the armhole areas. Happy crocheting!
26.02.2023 - 23:55
![]() Susan Richardson escribió:
Susan Richardson escribió:
Thanks for answering my 1st question. I have now started this pattern & it is the first time I have used a diagram pattern. I can work out the stitches needed from the key, but am struggling with working out which stitches in the diagram are in which row at the beginning of the rows, mainly slip stitches in A2. Did row 3 of A2 OK, but when I started row 5 found I had got row 4 wrong 1 extra picot put in. Can you give me written instructions for rows 4 and 5, is start row 4 sl st, dc,sl st,tr?
22.02.2023 - 19:32DROPS Design respondió:
Dear Mrs Richardson, the slip stitches at the beginning of A.2 helps at the beg of round to start on correct place - at the beg of row 4 start with 1 slip st in first ch-space, *1 dc around ch-space, then (1 tr, 1 picot) x 9, 1 tr = 9 picots (10 tr with 1 picot between each), then repeat from * all the round - you should have 7 repeats of A.2 in total. Finish 4th round with 1 slip st in the first dc, then sl st to the first picot (= 3 sl sts), and start with 1 tr (= 4ch) + 6 chains, etc... Happy crocheting!
23.02.2023 - 13:30
![]() Susan Richardson escribió:
Susan Richardson escribió:
I am using Bomull lin for this pattern. Checked & believe it is an equivalent weight yarn. I am crocheting tension squares to check tension. 1st square made with 5.5 mm hook gives measurement of 9cm wide x 13 cm high, 13tr x 8 rows. 2nd square with 5 mm hook gives measurement of 8cm wide x 12cm high , 13tr x 8 rows. So neither correct. I am unsure what to do. I f I use smaller hook, I will end up with an even narrower width, & maybe reach 11 cm height. My tension is not giving a Square!
18.02.2023 - 17:44DROPS Design respondió:
Dear Susan, in these cases, it's more important the width (with the right amount of stitches) than the height (the amount of rows), since you could always work a few less rows, but it's more difficult to adjust the number of stitches. Therefore, you can work with a 5.5mm hook or even try if the width will match with a 6mm hook. Then, you will need to adjust the amount of rows to work (making rules of 3 of the length indicated for your size in a specific point in the pattern and the rows you have worked and have yet to work). Happy crocheting!
19.02.2023 - 19:27
![]() Denise escribió:
Denise escribió:
Looking at the picture, it looks like the last 2 rounds of A2 were not completed. According to the picture, the last round completed was the picot between dc around chain space. Am I correct?
23.09.2021 - 06:12DROPS Design respondió:
Hi Denise, All the rounds in A.2 are completed. Happy crocheting!
28.09.2021 - 14:48
![]() Patricia P escribió:
Patricia P escribió:
Hello, What size is this pattern making? How do you adjust to make S or XXXL? Does the hook size determine the size of the finished jacket? Thank you!
10.04.2019 - 20:15DROPS Design respondió:
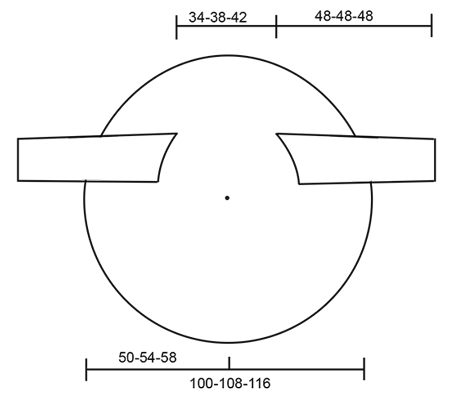
Dear Patricia, for the finished size, please refer to the scematics at the bottom of the pattern. And yes, the sice of the hook does change the size of the finished item (the crocheted fabric will be thighter and the piece will be smaller with a smaller hook, and it will be looser and bigger with a bigger hook). Happy Crafting!
11.04.2019 - 08:57
![]() Julia Kaufmann escribió:
Julia Kaufmann escribió:
Hallo! Ich würde diese Kreisjacke gerne mit einem Farbwechsel-Bobbel häkeln. Sind da 750 m Lauflänge (3-fädig, 150 g) ausreichend? Danke.
17.07.2018 - 07:59DROPS Design respondió:
Liebe Frau Kaufmann, wir bitten um Verständnis, dass wir nicht Produkte unserer Konkurrenz empfehlen können und dass der Kauf des Materials uns hilft, weiterhin kostenlose Anleitungen zur Verfügung stellen zu können.
17.07.2018 - 09:28
![]() Gilda escribió:
Gilda escribió:
Salve, vorrei un chiarimento sul punto, dopo gli scalfi, non ho capito bene cosa si intende in verticale; mi viene da pensare che devo lavorare fin sopra gli scalfi, ma non lavorare il collo; qualcuno può aiutarmi per favore?
26.04.2018 - 13:59DROPS Design respondió:
Buongiorno Gilda. Abbiamo corretto il testo. Deve ripetere il giro 7 il numero di volte indicato per la sua taglia. Buon lavoro!
26.04.2018 - 14:10
![]() Chou-coulate escribió:
Chou-coulate escribió:
Bonjour, Je viens de terminer le dernier rang de A2 et je ne comprends pas lorsqu'il est écrit " au dernier tour de A.2 diminuer 1 B = 160 B". Je dois effectuer des diminutions avant d'entamer la partie disant de reprendre A1 au 5eme rang ?
19.01.2018 - 16:17DROPS Design respondió:
Bonjour Chou-coulate, au dernier rang de A.2, vous avez 23 brides dans chaque A.2 x 7 A.2 = 161 brides, diminuez 1 m (crochetez par ex 4 brides au lieu de 5 autour d'un arceau) pour que vous ayez bien 160 brides à la fin de A.2. Bon crochet!
22.01.2018 - 08:44
|
||||||||||||||||||||||||||||||||||
Evening Tide#eveningtidejacket |
||||||||||||||||||||||||||||||||||
 |
 |
|||||||||||||||||||||||||||||||||
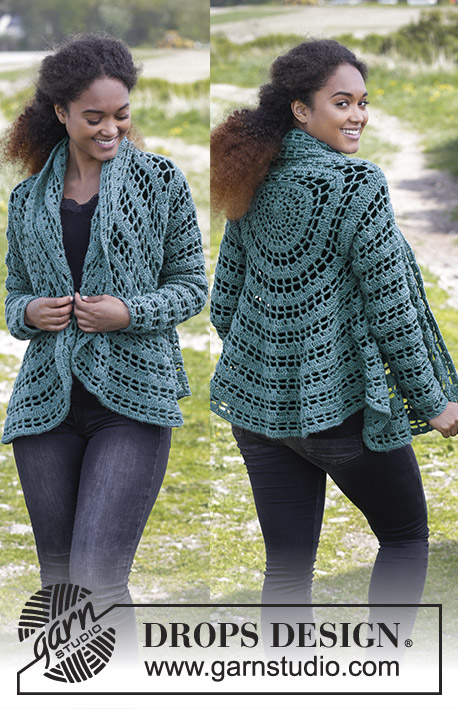
Chaqueta a ganchillo DROPS tejida en un círculo con "Big Delight". Talla S-XXXL
DROPS 168-27 |
||||||||||||||||||||||||||||||||||
|
CÍRCULO MÁGICO: Para evitar que se forme un agujero en el centro se trabaja con esta técnica: sostener el extremo del hilo y enrollarlo una vez alrededor del dedo índice para formar un bucle. Sostener el bucle con el pulgar izquierdo y el dedo medio, colocar el hilo sobre el dedo índice izquierdo. Insertar la ag a través del bucle, hacer una HEB (lazada) y extraer el hilo a través del bucle, hacer 1 HEB en el ganchillo y pasar la HEB por el pt en el ganchillo = 1 p.b., trabajar 3 p.de cad, ahora trabajar 15 p.a. dentro del círculo, finalizar con 1 p.e. en el 3er p.de cad = 16 p.a. Continuar como se explica en el patrón -AL MISMO TIEMPO tirar el extremo del hilo hasta que desaparezca el agujero. PATRÓN: Ver los diagramas A.1 y A.2 INFORMACIÓN PARA REALIZAR EL TRABAJO: Sustituir el primer p.a. del inicio de la vta por 3 p.de cad. Finalizar la vta con 1 p.e. en el 3er p.de cad del inicio de la vta Sustituir el primer p.a.d. del inicio de la vta por 4 p.de cad. Finalizar la vta con 1 p.e. en el 4º p.de cad del inicio de la vta. ----------------------------------------------------------------------- CHAQUETA TRABAJADA EN UN CÍRCULO: Trabajar un CÍRCULO MÁGICO - ver las explicaciones arriba, con ag de ganchillo tamaño 5.5 mm y Big Delight. Ahora trabajar según A.1 - ATENCIÓN: La primera vta de A.1 está explicada en el círculo mágico, trabajar 4 repeticiones de A.1 en el ancho. El p.e. al inicio de A.1 solo se trabaja al inicio de la vta. LEER INFORMACIÓN PARA REALIZAR EL TRABAJO. RECUERDE MANTENER LA MISMA TENSIÓN DEL TEJIDO. Cuando se ha completado A.1, continuar según A.2, trabajar 7 repeticiones de A.2 en el ancho, en la última vta de A.2 dism 1 p.a. = 160 p.a. Continuar trabajando según A.1, ahora comenzar en la vta 5 - ver la flecha del diagrama. Trabajar 1-2-3 vtas como la vta 5 del diagrama (= 80 p.a. + 2 p.de cad), ahora trabajar las sisa como sigue: Trabajar *1 p.a.+2 p.de cad en el primer p.a.*, repetir de * a * sobre los primeros 20 p.a., trabajar 22-24-26 p.de cad, saltar 10-11-12 p.a. (= 1ª sisa), trabajar * 1 p.a.+2 p.de cad. en el sig. p.a.*, repetir de * a * sobre los sig 40-38-36 p.a., trabajar 22-24-26 p.de cad, saltar 10-11-12 p.a. (= 2ª sisa), finalizar con 1 p.e. al inicio de la vta. Ahora trabajar la vta 6 del diagrama como sigue: Trabajar 1 p.a.+2 p.de cad en cada p.a. hasta la 1ª sisa, * trabajar 1 p.a. + 2 p.de cad dentro del arco*, repetir de * a * 10-11-12 vcs más, continuar con 1 p.a. + 2 p.de cad hasta la 2ª sisa, *trabajar 1 p.a. + 2 p.de cad dentro del arco*. repetir de * a * 10-11-12 vcs más = 82 p.a. con 2 p.de cad entre cada uno. Ahora repetir la vta 7 un total de 8-7-6 vcs hacia arriba. Trabajar la 7ª vta 1-3-5 vcs más y AL MISMO TIEMPO aum 2 p.a. repartidos en cada vta, es decir, 2 vcs en cada vta trabajar como sigue: 1 p.a. + 3 p.de cad + 1 p.a. + 3 p.de cad en 1 p.a. = 84-88-92 p.a. con 3 p.de cad entre cada uno. La labor mide aprox 80-88-96 cm de diámetro (= 40-44-48 cm desde el centro). Trabajar la última vta de A.1, después trabajar según A.2 (= 21-22-23 repeticiones en el ancho). Asegurar el hilo. MANGAS: Trabajar en redondo desde la sisa hacia abajo. Trabajar 1 p.a. + 2 p.de cad en cada p.a. saltado y 1 p.a. + 2 p.de cad en el borde inferior de cada p.a. del otro lado de la sisa = 21-23-25 p.a. con 2 p.de cad entre cada uno. Insertar un MP (marcapuntos) en el centro bajo la manga. Continuar con 1 p.a. + 2 p.de cad en cada p.a. Cuando la labor mida 4 cm, dism 1 p.a.+ 2 p.de cad en el centro bajo la manga como sigue: Trabajar el último p.a. antes del MP pero sin hacer la última lazada, trabajar el sig p.a. (sin trabajar los 2 p.de cad entre ellos), en la última lazada pasar el hilo por los 3 bucles en el ganchillo (= 1 p.a. + 2 p.de cad dism). Dism cada 5 cm 7 vcs más, dism antes y después de MP de modo alterno = 13-15-17 p.a. con 2 p.de cad entre cada uno. Continuar hasta que la labor mida 48 cm para todas las tallas, asegurar el hilo. trabajar otra manga de la misma manera. |
||||||||||||||||||||||||||||||||||
Explicaciones del diagrama |
||||||||||||||||||||||||||||||||||
|
||||||||||||||||||||||||||||||||||
 |
||||||||||||||||||||||||||||||||||
 |
||||||||||||||||||||||||||||||||||
¿Terminaste este patrón?Entonces, etiqueta tus fotos con #dropspattern #eveningtidejacket o envíalas a la galería #dropsfan. ¿Necesitas ayuda con este patrón?Encontrarás 8 videos tutoriales, un espacio para comentarios/preguntas y más visitando la página del patrón en garnstudio.com © 1982-2026 DROPS Design A/S. Todos los derechos reservados. Este documento, incluyendo todas sus sub-secciones, está protegido por los derechos de autor (copyright). Lee más acerca de lo que puedes hacer con nuestros patrones en la parte de abajo de cada patrón de nuestro sitio. |
||||||||||||||||||||||||||||||||||


Con más de 40 años en el diseño de modelos de punto y de ganchillo, DROPS Design ofrece una de las más vastas colecciones de patrones gratuitos en el internet - traducidos en 17 idiomas. Al día de hoy, contamos con 324 catálogos y 12290 patrones - de los cuales 11685 están traducidos en español.
Nosotros trabajamos con mucho esmero para brindarte lo mejor que las labores de punto y ganchillo tienen para ofrecer,inspiración y consejos, así como hilos de magnífica calidad a precios increíbles! Te gustaría usar nuestros patrones para otro fin además del uso personal? Puedes leer acerca de lo que estás permitida a hacer en el texto de Copyright en la parte de abajo de todos nuestros patrones. Felices labores!
Escribe un comentario sobre DROPS 168-27
¡Nos encantaría saber qué piensas acerca de este patrón!
Si quieres escribir una pregunta referente al patrón, por favor asegúrate de elegir la categoría correcta en el formulario debajo, para acelerar el proceso de respuesta. Los campos obligatorios están marcados con un *.