
Categorías populares
¿Buscas un hilo?


Comentarios / Preguntas (56)
![]() Patti escribió:
Patti escribió:
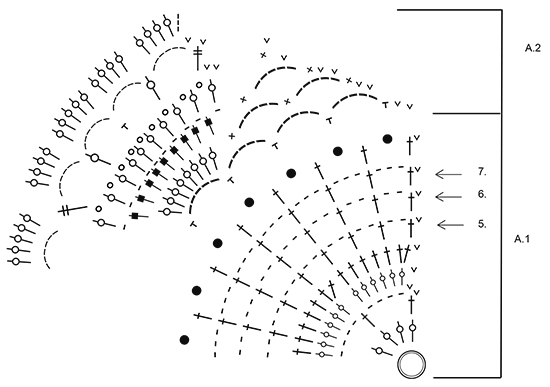
“then work according to A.2 (= 21-22-23 repetitions in width). Fasten off.” Do I finish the entire A2 finishing up to the last row “dc around ch-space row”?
07.01.2025 - 09:57DROPS Design respondió:
Dear Patti, yes work A.2 entirely in height, ie including last round. Happy crocheting!
07.01.2025 - 13:35
![]() Patti escribió:
Patti escribió:
“then work according to A.2 (= 21-22-23 repetitions in width). Fasten off.” Do I finish the entire A2 finishing up to the last row “dc around ch-space row”?
07.01.2025 - 09:56
![]() Patti Urso escribió:
Patti Urso escribió:
For arms Work * 1 dc + 2 ch in first dc * in 20 dc. Then 26 ch, skip 10-11-12 dc (=1st armhole), Then 1 dc + 2 ch in 36 dc, then 26 ch, and skip 12 dc (=2nd armhole) The hole is too small for 2x size. Any suggestions ? The gage is 13 dc x 8 rows = 4'' x 4'' (10 x 10 cm). 5.5 mm hook. Yarn group C
22.12.2024 - 01:36DROPS Design respondió:
Dear Patti, your chain stitches may be a bit tight; try to work them slightly loosely so that the armhole is as big as they can be. Ensure that 1 chain stitch is as long as the width of a dc. So 26 chain stitches should be double the length of the skipped dc stitches. You can add more chain stitches, but ensuring that the pattern can still be maintained (so a set number of stitches depending on those required for the charts. Happy crochetting!
22.12.2024 - 23:48
![]() Patti Urso escribió:
Patti Urso escribió:
What is tr in picot and how do you crochet this stitch?
10.12.2024 - 10:36DROPS Design respondió:
Dear Patti, tr in picot means that you work 1 treble crochet but in the picot stitch of the previous round, which is either the black or the white dot. Happy crochetting!
15.12.2024 - 14:13
![]() Patti Urso escribió:
Patti Urso escribió:
Still working on this pattern. Now I am here “Work last round in A.1, then work according to A.2 (= 21-22-23 repetitions in width). Fasten off.” I have completed A2 second row. I have counted 30 shells (8 double crochet ) but the pattern says 23 repetition. My question is how many shells should I have for the largest size. I am thinking I should have 23 shells since there are 23 repetitions in this row
10.12.2024 - 10:11DROPS Design respondió:
Dear Patti, you should have 23 shells, one in each repeat of A.2. You have the arches on one side and the shell on the other side of the A.2 repeat. So you should have 23 8 double crochet groups. Happy crochetting!
15.12.2024 - 20:28
![]() Patti Urso escribió:
Patti Urso escribió:
For this part how do you recommend increasing the two stitches per row evenly. “Work 7th round 1-3-5 more times, AT THE SAME TIME inc 2 dc evenly on every row, i.e. two times on every round work as follows: 1 dc + 3 ch + 1 dc + 3 ch in 1 dc = 84-88-92 dc with 3 ch between each.”
22.11.2024 - 05:36DROPS Design respondió:
Dear Mrs Urso, on 7th round you work (1 dc in the dc below, 3 chains) and repeat from (to) around; to increase, you will work (1 dc in the dc below, 3 chains, 1 dc in the same dc, 3 chains) = you ave increased 1 chain space. Repeat evenly 2 or 4 more times in the 2 larger sizes. Happy crocheting!
22.11.2024 - 10:01
![]() Patti escribió:
Patti escribió:
Thank you. This explanation is very helpful.
11.11.2024 - 02:10
![]() Patti escribió:
Patti escribió:
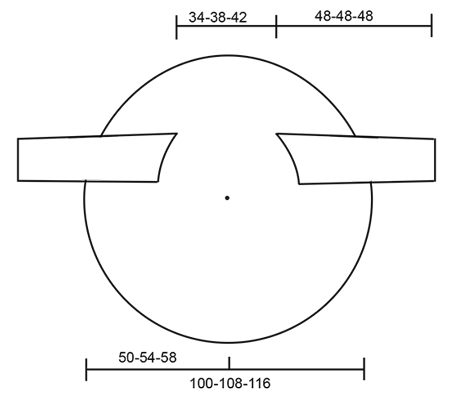
The drawing shows the circle flat. Should the circle jacket be flat too?
09.11.2024 - 09:38DROPS Design respondió:
Dear Patti, yes, it should be flat. Happy knitting!
10.11.2024 - 19:21
![]() Patti escribió:
Patti escribió:
Is 6 round for the largest size?
09.11.2024 - 09:36DROPS Design respondió:
Dear Patti, you work Rounds 1 to 8 of A.1 once. Then, you work all rounds of A.2 once. Now work round 5 of A.1 once again and repeat this round 3 times in total for the large size. Work round 6 of A.1 once more, adjusting for the armholes as indicated in the text. Then work round 7 of A.1 and repeat it 6 times in total without increases and 5 times with increases (because you need more increases for the largest version, so you will work less rounds without them but more with them). Then work the last round in A.1 once and work all rounds of A.2 once more. Happy knitting!
10.11.2024 - 19:19
![]() Patti escribió:
Patti escribió:
Explain this. Then repeat 7th round 8-7-6 times upwards.
05.11.2024 - 08:38DROPS Design respondió:
Hi Patti, you have to repeat 7-th round of A.1 diagram in the next 8, 7 or 6 rounds (the number is depending on your size). Hapy crocheting!
05.11.2024 - 09:41
|
||||||||||||||||||||||||||||||||||
Evening Tide#eveningtidejacket |
||||||||||||||||||||||||||||||||||
 |
 |
|||||||||||||||||||||||||||||||||
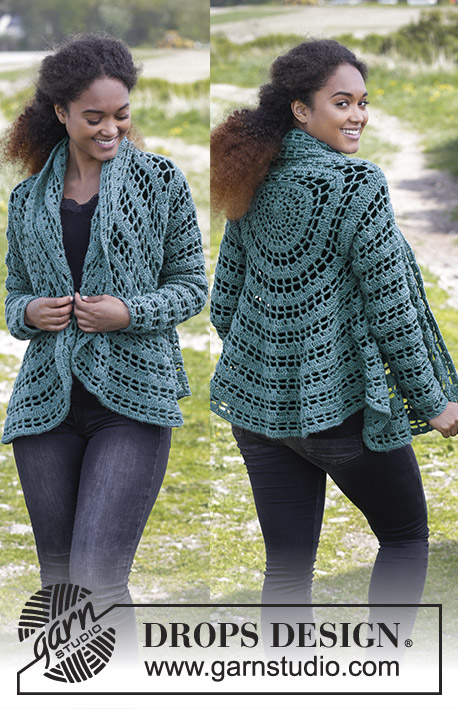
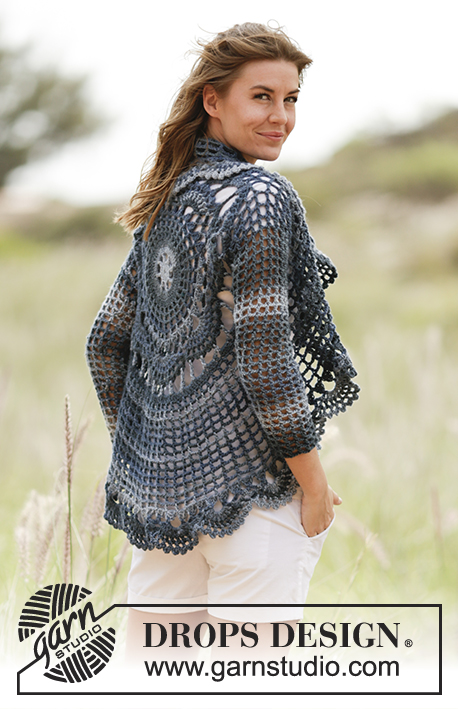
Chaqueta a ganchillo DROPS tejida en un círculo con "Big Delight". Talla S-XXXL
DROPS 168-27 |
||||||||||||||||||||||||||||||||||
|
CÍRCULO MÁGICO: Para evitar que se forme un agujero en el centro se trabaja con esta técnica: sostener el extremo del hilo y enrollarlo una vez alrededor del dedo índice para formar un bucle. Sostener el bucle con el pulgar izquierdo y el dedo medio, colocar el hilo sobre el dedo índice izquierdo. Insertar la ag a través del bucle, hacer una HEB (lazada) y extraer el hilo a través del bucle, hacer 1 HEB en el ganchillo y pasar la HEB por el pt en el ganchillo = 1 p.b., trabajar 3 p.de cad, ahora trabajar 15 p.a. dentro del círculo, finalizar con 1 p.e. en el 3er p.de cad = 16 p.a. Continuar como se explica en el patrón -AL MISMO TIEMPO tirar el extremo del hilo hasta que desaparezca el agujero. PATRÓN: Ver los diagramas A.1 y A.2 INFORMACIÓN PARA REALIZAR EL TRABAJO: Sustituir el primer p.a. del inicio de la vta por 3 p.de cad. Finalizar la vta con 1 p.e. en el 3er p.de cad del inicio de la vta Sustituir el primer p.a.d. del inicio de la vta por 4 p.de cad. Finalizar la vta con 1 p.e. en el 4º p.de cad del inicio de la vta. ----------------------------------------------------------------------- CHAQUETA TRABAJADA EN UN CÍRCULO: Trabajar un CÍRCULO MÁGICO - ver las explicaciones arriba, con ag de ganchillo tamaño 5.5 mm y Big Delight. Ahora trabajar según A.1 - ATENCIÓN: La primera vta de A.1 está explicada en el círculo mágico, trabajar 4 repeticiones de A.1 en el ancho. El p.e. al inicio de A.1 solo se trabaja al inicio de la vta. LEER INFORMACIÓN PARA REALIZAR EL TRABAJO. RECUERDE MANTENER LA MISMA TENSIÓN DEL TEJIDO. Cuando se ha completado A.1, continuar según A.2, trabajar 7 repeticiones de A.2 en el ancho, en la última vta de A.2 dism 1 p.a. = 160 p.a. Continuar trabajando según A.1, ahora comenzar en la vta 5 - ver la flecha del diagrama. Trabajar 1-2-3 vtas como la vta 5 del diagrama (= 80 p.a. + 2 p.de cad), ahora trabajar las sisa como sigue: Trabajar *1 p.a.+2 p.de cad en el primer p.a.*, repetir de * a * sobre los primeros 20 p.a., trabajar 22-24-26 p.de cad, saltar 10-11-12 p.a. (= 1ª sisa), trabajar * 1 p.a.+2 p.de cad. en el sig. p.a.*, repetir de * a * sobre los sig 40-38-36 p.a., trabajar 22-24-26 p.de cad, saltar 10-11-12 p.a. (= 2ª sisa), finalizar con 1 p.e. al inicio de la vta. Ahora trabajar la vta 6 del diagrama como sigue: Trabajar 1 p.a.+2 p.de cad en cada p.a. hasta la 1ª sisa, * trabajar 1 p.a. + 2 p.de cad dentro del arco*, repetir de * a * 10-11-12 vcs más, continuar con 1 p.a. + 2 p.de cad hasta la 2ª sisa, *trabajar 1 p.a. + 2 p.de cad dentro del arco*. repetir de * a * 10-11-12 vcs más = 82 p.a. con 2 p.de cad entre cada uno. Ahora repetir la vta 7 un total de 8-7-6 vcs hacia arriba. Trabajar la 7ª vta 1-3-5 vcs más y AL MISMO TIEMPO aum 2 p.a. repartidos en cada vta, es decir, 2 vcs en cada vta trabajar como sigue: 1 p.a. + 3 p.de cad + 1 p.a. + 3 p.de cad en 1 p.a. = 84-88-92 p.a. con 3 p.de cad entre cada uno. La labor mide aprox 80-88-96 cm de diámetro (= 40-44-48 cm desde el centro). Trabajar la última vta de A.1, después trabajar según A.2 (= 21-22-23 repeticiones en el ancho). Asegurar el hilo. MANGAS: Trabajar en redondo desde la sisa hacia abajo. Trabajar 1 p.a. + 2 p.de cad en cada p.a. saltado y 1 p.a. + 2 p.de cad en el borde inferior de cada p.a. del otro lado de la sisa = 21-23-25 p.a. con 2 p.de cad entre cada uno. Insertar un MP (marcapuntos) en el centro bajo la manga. Continuar con 1 p.a. + 2 p.de cad en cada p.a. Cuando la labor mida 4 cm, dism 1 p.a.+ 2 p.de cad en el centro bajo la manga como sigue: Trabajar el último p.a. antes del MP pero sin hacer la última lazada, trabajar el sig p.a. (sin trabajar los 2 p.de cad entre ellos), en la última lazada pasar el hilo por los 3 bucles en el ganchillo (= 1 p.a. + 2 p.de cad dism). Dism cada 5 cm 7 vcs más, dism antes y después de MP de modo alterno = 13-15-17 p.a. con 2 p.de cad entre cada uno. Continuar hasta que la labor mida 48 cm para todas las tallas, asegurar el hilo. trabajar otra manga de la misma manera. |
||||||||||||||||||||||||||||||||||
Explicaciones del diagrama |
||||||||||||||||||||||||||||||||||
|
||||||||||||||||||||||||||||||||||
 |
||||||||||||||||||||||||||||||||||
 |
||||||||||||||||||||||||||||||||||
¿Terminaste este patrón?Entonces, etiqueta tus fotos con #dropspattern #eveningtidejacket o envíalas a la galería #dropsfan. ¿Necesitas ayuda con este patrón?Encontrarás 8 videos tutoriales, un espacio para comentarios/preguntas y más visitando la página del patrón en garnstudio.com © 1982-2026 DROPS Design A/S. Todos los derechos reservados. Este documento, incluyendo todas sus sub-secciones, está protegido por los derechos de autor (copyright). Lee más acerca de lo que puedes hacer con nuestros patrones en la parte de abajo de cada patrón de nuestro sitio. |
||||||||||||||||||||||||||||||||||


Con más de 40 años en el diseño de modelos de punto y de ganchillo, DROPS Design ofrece una de las más vastas colecciones de patrones gratuitos en el internet - traducidos en 17 idiomas. Al día de hoy, contamos con 324 catálogos y 12290 patrones - de los cuales 11685 están traducidos en español.
Nosotros trabajamos con mucho esmero para brindarte lo mejor que las labores de punto y ganchillo tienen para ofrecer,inspiración y consejos, así como hilos de magnífica calidad a precios increíbles! Te gustaría usar nuestros patrones para otro fin además del uso personal? Puedes leer acerca de lo que estás permitida a hacer en el texto de Copyright en la parte de abajo de todos nuestros patrones. Felices labores!
Escribe un comentario sobre DROPS 168-27
¡Nos encantaría saber qué piensas acerca de este patrón!
Si quieres escribir una pregunta referente al patrón, por favor asegúrate de elegir la categoría correcta en el formulario debajo, para acelerar el proceso de respuesta. Los campos obligatorios están marcados con un *.