
Categorías populares
¿Buscas un hilo?


Comentarios / Preguntas (44)
![]() Nina CH escribió:
Nina CH escribió:
Hello, This is my first project and I am sorry if my questions are silly. I tried to research first but found no help. 1. When knitting Yoke, do I use stocking stitch (one round K, next round P)? 2. I really don't understand increases. What does "K2 in next stitch" mean? I understood it as knit 2 stitches in one but then it's a decrease! I read a similar question below but don't understand. Appreciate your help!
24.03.2025 - 12:30DROPS Design respondió:
Hi Nina, The jumper is worked in the round to begin with, which means, for the stocking stitch, you knit all rounds. When you work back and forth later, for the split in each side, you knit from the right side and purl from the wrong side. Knit 2 in one stitch means you first knit 1 stitch in the front loop, then knit 1 stitch in the back loop of the same stitch so that 1 stitch becomes 2 (an increase). Happy knitting!
25.03.2025 - 06:48
![]() Kristine Bergsland escribió:
Kristine Bergsland escribió:
Hei, skulle gjerne sett flere bilder av denne modellen. Fra bakside, og et bedre bilde av hvordan den ser ut nederst. Vh. Kristine
25.02.2024 - 10:09
![]() Nora escribió:
Nora escribió:
Nora wrote a correction:: Oh no! I was doubling the 2 Xtra stitches for the body ineases, at each side of each PLACE MARKER instead of 4 inside the each body sections and 2 on each side of each sleeve section = 12 total.! That is why the raglan line did not line up !! :( I will have to unravel and only double the 2 stitches inside the body panes and only double one on the slee e sides.!!! Thank you for your patience. I just dont want to give up yet.
18.10.2023 - 22:15
![]() Nora escribió:
Nora escribió:
Oh no! I was doubling the 2 Xtra stitches for the body ineases, at each side of each!!! That is why the raglan line did not line up !! :( I will have to unravel and only double the 2 stitches inside the body panes only!!!
17.10.2023 - 20:55
![]() Nora escribió:
Nora escribió:
Thank you for your answer about the raglan increases! It helped :) Now, about the body increases. So there are 2 increases (1 on each side of the sleeve markers, totaling 8 stitches added for a certain number of rows per size. Then, it changes time only 2 increases on each side of the markers for a total of 4 increases, for a certain number of rows, correct?
16.10.2023 - 17:21DROPS Design respondió:
Dear Nora, correct the increases are done on a different rhythm on body and on sleeves, but you will increase either 2 sts or 1 stitch on body and only 2 st on each sleeve, so when increasing 2 sts on body you will increase 12 sts (2 sts at the beg of front/back piece + 2 sts at the end of front/back piece + 1 st at the beg of sleeves + 1 st at the end of sleeves). Then you will increase only 1 stitch at the beg + 1 st at th end of front/back piece (and still 1 st on each side of sleeve). Happy knitting!
17.10.2023 - 09:15
![]() Nora escribió:
Nora escribió:
I don't understand the body increases: Before 1st and 3rd marker: Work until 3 sts remain before marker, K 2 in next st, 1 YO, K 2. After 2nd and 4th marker: K 2, 1 YO, K 2 in next st. K2 in next stitch means that you k and k through the back loop? And add a nee stitch in addition to yhe YO?
14.10.2023 - 06:43DROPS Design respondió:
Dear Nora, yes, you knit 1 stitch in the front loop and 1 stitch in the back loop. And yes, you will have 2 new stitches for every marker (As shown in the RAGLAN BODY tip, you inc 2 sts on each marker). Happy knitting!
16.10.2023 - 00:28
![]() Jasmine L Copeland escribió:
Jasmine L Copeland escribió:
Hi it is unclear to me when to do inc 1 or inc 2 for the raglan body. I am knitting a small
18.03.2023 - 12:05DROPS Design respondió:
Dear Jasmine, the first 8 times (rounds) that you increase on the body, you will increase 2 stitches, before the 1st and 3rd markers and after the 2nd and 4th markers (as indicated in RAGLAN BODY). After having worked these increases 8 times, the next time you increase on the body you will increase only 1 stitch at each marker. You will continue with this increase 7 times in total (so 6 more times). Happy knitting!
19.03.2023 - 20:25
![]() Pat Lampron escribió:
Pat Lampron escribió:
Now I get it !!! Sorry, really dumb when it comes to math (and I’m knitting???) anyway it finally clicked after reading your explanation several times and the instructions a few dozen!!! One less sweater I have to rip out... thanks so much!!!
15.10.2020 - 18:31
![]() Pat Lampron escribió:
Pat Lampron escribió:
In answer to your question I’m working on a large and then will be making a medium...
15.10.2020 - 11:25DROPS Design respondió:
Dear Mrs Lampron, in size L you cast on 85 sts and increase 21 sts evenly = 106 sts - you then increase for raglan: 2 sts on each sleeve a total of 17 times = 2 x17x2 sleeves = 68 sts inc. Then on body: 4 sts x 12 x 2 (front/back) = 96 sts + 2 sts x 5 x 2 (front/back) = 20 sts = 106+68+96+20=290 sts. Hope this will help you!
15.10.2020 - 11:58
![]() Pat Lampron escribió:
Pat Lampron escribió:
I’m working on this pattern and numbers don’t seem to be adding up in regard to the increases - still working on the beginning before putting sleeve stitches on a holder. If I do the increases the number of times listed, the front and backs definitely don’t add up. Can you look at this and give me some clarification?
14.10.2020 - 21:37DROPS Design respondió:
Dear Mrs Lampron, sure we can explain you, just tell us which size you are working on.
15.10.2020 - 09:04
|
|
Weekend Getaway#weekendgetawaysweater |
|
|
|
|
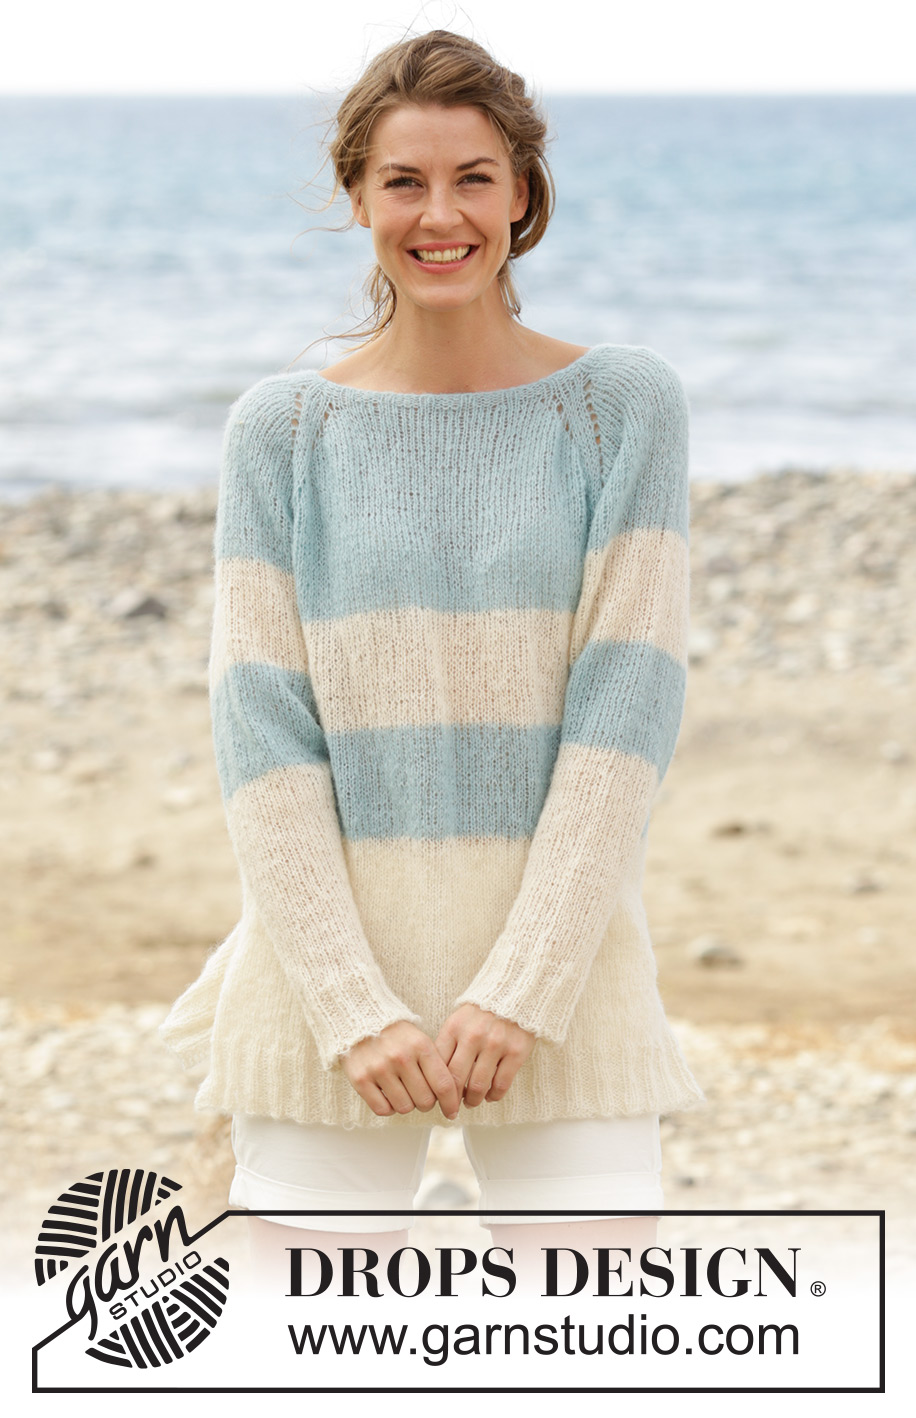
Pulóver de punto DROPS con raglán, aberturas en los lados y franjas, tejido de arriba para abajo, en “Brushed Alpaca Silk”. Talla: S-XXXL.
DROPS 169-7 |
|
|
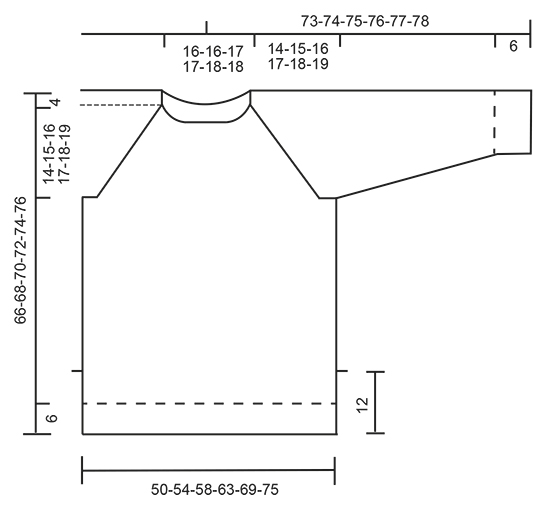
PT MUSGO (en redondo): 1 surco = 2 vtas. * 1 vta de derecho y 1 vta de revés *, repetir de *a*. PT MUSGO (de ida y vuelta): Tejer todas las hileras de derecho. 1 surco = 2 hileras tejidas de derecho. FRANJAS: Tejer franjas de la manera siguiente en el cuerpo y en las mangas: Tejer 9-9-10-10-11-11 cm con blanco hueso. Tejer 9-9-10-10-11-11 cm con verde mar claro. Después tejer con blanco hueso hasta finalizar las medidas. RAGLÁN CUERPO: NOTA: Tejer todas las HEBs (lazadas) de derecho en la vta siguiente para crear agujeros! Aumentar 2 pts de la manera siguiente: Antes del 1er y del 3er marcapuntos: Tejer hasta que resten 3 pts antes del marcapuntos, tejer 2 d en el pt siguiente, 1 HEB, tejer 2 d. Después del 2º y del 4º marcapuntos: Tejer 2 d, 1 HEB, tejer 2 d en el pt siguiente. Después aumentar 1 pt de la manera siguiente: Antes del 1er y del 3er marcapuntos: Tejer hasta que resten 2 pts antes del marcapuntos, 1 HEB, tejer 2 d. Después del 2º y del 4º marcapuntos: Tejer 2 d, 1 HEB. RAGLÁN MANGA: Aumentar 1 pt después del 1er y del 3er marcapuntos de la manera siguiente: Tejer 2 d, 1 HEB. Aumentar 1 pt antes del 2º y del 4º marcapuntos de la manera siguiente: Tejer hasta que resten 2 pts antes del marcapuntos, 1 HEB, tejer 2 d. En la vta siguiente, tejer la HEB de derecho para crear un agujero! TIP PARA DISMINUIR: Disminuir de la manera siguiente antes del marcapuntos: Tejer hasta que resten 3 pts antes del marcapuntos, tejer 2 pjd, 1 d. Disminuir de la manera siguiente después del marcapuntos: 1 d, deslizar 1 pt como de derecho, 1 d, pasar el pt desl por encima. ------------------------------------------------------ PULÓVER: Tejido en pt jersey en redondo, de arriba para abajo hasta las aberturas del cuerpo. Después dividir la pieza para el frente y la pieza de la espalda y continuar de ida y vuelta hasta finalizar las medidas. NOTA: Principio de las vtas = centro de la espalda. PECHERA: Montar 80-80-85-85-90-90 pts en ag circular tamaño 4.5 mm con verde mar claro. Tejer 1 vta de derecho. Después tejer 4 vtas en resorte (= 2 d/3 r). Cambiar a ag circular tamaño 5 mm, tejer 1 vta en pt jersey y, al mismo tiempo, aumentar 18-20-21-25-24-30 pts distribuidos equitativamente = 98-100-106-110-114-120 pts. Ahora insertar 4 marcapuntos en la pieza de la manera siguiente: Tejer los primeros 15-16-16-16-17-18 pts (= mitad pieza de la espalda), insertar el 1er marcapuntos, tejer los 18-18-20-22-22-24 pts siguientes (= manga), insertar el 2º marcapuntos, tejer los 31-32-33-33-35-36 pts siguientes (= pieza del frente), insertar el 3er marcapuntos, tejer los 18-18-20-22-22-24 pts siguientes (= manga), insertar el 4º marcapuntos, tejer los 16-16-17-17-18-18 pts restantes (= mitad pieza de la espalda). En la vta siguiente, comenzar los aumentos para el raglán. NOTA: Aumentar de manera diferente en las mangas y en el cuerpo – LEER RAGLÁN CUERPO y RAGLÁN MANGA! Aumentar de la manera siguiente: Tejer hasta que resten 3 pts antes del 1er marcapuntos, 2 d en el pt siguiente, 1 HEB, 4 d (el marcapuntos está en el centro de estos pts), 1 HEB, tejer hasta que resten 2 pts antes del 2º marcapuntos, 1 HEB, 4 d (el marcapuntos está en el centro de estos pts), 1 HEB, 2 d en el pt siguiente, tejer hasta que resten 3 pts antes del 3er marcapuntos, 2 d en el pt siguiente, 1 HEB, 4 d (el marcapuntos está en el centro de estos pts), 1 HEB, tejer hasta 2 pts antes del 4º marcapuntos, 1 HEB, 4 d (el marcapuntos está en el centro de estos pts), 1 HEB, 2 d en el pt siguiente, tejer los pts restantes de la vta. RECORDARSE DE MANTENER LA MISMA TENSIÓN DE TEJIDO DE LA MUESTRA! Repetir los aumentos a cada 2 vtas de la manera siguiente: En las mangas 14-15-16-17-19-20 veces más (= 15-16-17-18-20-21 veces en total), en el cuerpo 2 pts 7-9-11-14-16-20 veces más (= 8-10-12-15-17-21 veces en total) y, después, 1 pt 7-6-5-3-3-0 veces. Cuando todos los aumentos estén hechos, hay 250-268-290-314-342-372 pts en la vta y la pieza mide 14-15-16-17-18-19 cm a partir del escote al centro del frente. Ahora tejer de la manera siguiente: Tejer los primeros 38-42-45-49-54-60 pts (= mitad pieza de la espalda), deslizar los 48-50-54-58-62-66 pts siguientes en un gancho auxiliar (= manga), montar 8 pts bajo la manga, tejer los 77-84-91-99-109-120 pts siguientes (= pieza del frente), deslizar los 48-50-54-58-62-66 pts siguientes en un gancho auxiliar (= manga), montar 8 pts bajo la manga, tejer los 39-42-46-50-55-60 pts restantes en la ag (= mitad pieza de la espalda). AHORA MEDIR LA PIEZA A PARTIR DE AQUÍ! CUERPO: Ahora hay 170-184-198-214-234-256 pts en la vta. Continuar en redondo en pt jersey y tejer las FRANJAS – ver explicación arriba. Cuando la pieza mida 35-36-37-38-39-40 cm, tejer de la manera siguiente: Tejer 39-43-46-50-55-61 pts en pt jersey, tejer 6 pts en PT MUSGO – ver explicación arriba, tejer 79-86-93-101-111-122 pts en pt jersey, tejer 6 pts en pt musgo, tejer pt jersey sobre los 40-43-47-51-56-61 pts restantes. Continuar de esta manera hasta haber tejido 2 surcos sobre los 6 pts de cada lado de la pieza (= sobre las aberturas). Ahora dividir la pieza para el frente y la espalda de la manera siguiente: Tejer los primeros 42-46-49-53-58-64 pts como antes (es decir, en pt jersey con 3 pts en pt musgo en el lado), virar y tejer de retorno sobre 85-92-99-107-117-128 pts (tejer los primeros y los últimos 3 pts en pt musgo) = pieza de la espalda. Deslizar los 85-92-99-107-117-128 pts restantes en un gancho auxiliar para la pieza del frente. Continuar de ida y vuelta sobre los pts en la ag hasta que la pieza mida 42-43-44-48-46-47 cm. En la hilera siguiente por el LD, cambiar a ag circular tamaño 4.5 mm y aumentar 13-16-19-21-21-25 pts distribuidos equitativamente (pero no sobre los 3 pts más externos) = 98-108-118-128-138-153 pts. Tejer 1 hilera por el LR como antes, después tejer en resorte (2 d/3 r) con 3 pts en pt musgo de cada lado. NOTA: Comenzar y terminar con 2 d en el interior de los 3 pts en pt musgo de cada lado. Cuando el resorte mida 6 cm, rematar los pts como ellos se presenten. La pieza mide 66-68-70-72-74-76 cm en total a partir del hombro. Deslizar los pts del gancho auxiliar nuevamente en la ag y tejer como la pieza de la espalda. MANGA: Tejer la manga en pt jersey, en redondo, en ag de doble punta. Se tienen 48-50-54-58-62-66 pts para cada manga. Deslizar los pts del gancho auxiliar en las ag de doble punta tamaño 5 mm y montar 8 nuevos pts bajo la manga = 56-58-62-66-70-74 pts. Tejer en pt jersey y franjas como se hizo en el cuerpo, en redondo, AL MISMO TIEMPO, insertar un marcapuntos en el centro de los nuevos pts bajo la manga (es decir, 4 nuevos pts de cada lado del marcapuntos). AHORA MEDIR LA PIEZA A PARTIR DE AQUÍ! Cuando la pieza mida 4 cm, disminuir 1 pt de cada lado del marcapuntos – LEER TIP PARA DISMINUIR. Repetir las disminuciones aprox a cada 4-4-3-3-2½-2½ cm 10-10-12-13-14-15 veces más = 34-36-36-38-40-42 pts. Cuando la manga mida 45-45-45-45-44-44 cm (NOTA: Medidas más cortas en las tallas más grandes debido a que la pechera es más larga), cambiar a ag de doble punta tamaño 4.5 mm y aumentar 6-4-9-7-5-8 pts distribuidos equitativamente en la vta siguiente = 40-40-45-45-45-50 pts. Tejer en resorte = 2 d/3 r por 6 cm. Cuando la manga mida 51-51-51-51-50-50 cm, rematar los pts como ellos se presenten. Tejer la otra manga de la misma manera. ENSAMBLAJE: Coser las aberturas bajo las mangas. |
|
 |
|
¿Terminaste este patrón?Entonces, etiqueta tus fotos con #dropspattern #weekendgetawaysweater o envíalas a la galería #dropsfan. ¿Necesitas ayuda con este patrón?Encontrarás 27 videos tutoriales, un espacio para comentarios/preguntas y más visitando la página del patrón en garnstudio.com © 1982-2026 DROPS Design A/S. Todos los derechos reservados. Este documento, incluyendo todas sus sub-secciones, está protegido por los derechos de autor (copyright). Lee más acerca de lo que puedes hacer con nuestros patrones en la parte de abajo de cada patrón de nuestro sitio. |


Con más de 40 años en el diseño de modelos de punto y de ganchillo, DROPS Design ofrece una de las más vastas colecciones de patrones gratuitos en el internet - traducidos en 17 idiomas. Al día de hoy, contamos con 324 catálogos y 12290 patrones - de los cuales 11673 están traducidos en español.
Nosotros trabajamos con mucho esmero para brindarte lo mejor que las labores de punto y ganchillo tienen para ofrecer,inspiración y consejos, así como hilos de magnífica calidad a precios increíbles! Te gustaría usar nuestros patrones para otro fin además del uso personal? Puedes leer acerca de lo que estás permitida a hacer en el texto de Copyright en la parte de abajo de todos nuestros patrones. Felices labores!
Escribe un comentario sobre DROPS 169-7
¡Nos encantaría saber qué piensas acerca de este patrón!
Si quieres escribir una pregunta referente al patrón, por favor asegúrate de elegir la categoría correcta en el formulario debajo, para acelerar el proceso de respuesta. Los campos obligatorios están marcados con un *.