
Categorías populares
¿Buscas un hilo?


Comentarios / Preguntas (140)
![]() Christina escribió:
Christina escribió:
Il modello è molto bello, vorrei farne un vestito da bimba, taglia 132, c‘ è un modo per diminuire il numero delle maglie senza impazzire nel contare e mantenendo ovviamente il disegno in maniera proporzionata?
07.08.2019 - 22:25DROPS Design respondió:
Buongiorno Christina, può seguire la taglia più grande, o se proprio vuole adattare le misure a 132 cm, potrebbe sviluppare una taglia intermedia, anche in termini di diminuzioni, ma per un aiuto così personalizzato le consigliamo di rivolgersi al suo rivenditore DROPS di fiducia. Buon lavoro!
08.08.2019 - 09:34
![]() Catherine Cordeiro escribió:
Catherine Cordeiro escribió:
Is there a fully written pattern instead of following the charts? I have trouble following the charts as my eyes aren't so great anymore. Thank you for your help and I love your patterns.
02.08.2019 - 19:00DROPS Design respondió:
Dear Catherine, unfortunately we can't write out every chart. Please note that diagrams have to be read from bottom to top, right to left, and every square is equal to a stitch. You could try to enlarge the diagram when printing! Happy knitting!
02.08.2019 - 19:05
![]() Gösta Gustafsson escribió:
Gösta Gustafsson escribió:
Hej jag undrar hur många maskor som ska vara kvar innan man avmaskar 3 m i var sida och hur många maskor det ska vara kvar innan man avmaskar resterande? Gäller 3/4 år. Hälsningar Anki
05.04.2019 - 22:26DROPS Design respondió:
Hei Gösta. Når du strikker ermtopp er dette oppgitt i cm, og ikke i maskeantall, nettopp fordi det er cm-målet som er avgjørende for at skulderen skal bli riktig. Når arbeidet måler 23 cm feller du 6 masker = 46 masker igjen. Videre feller du 2 masker i hver side over de neste 4 cm. Med strikkefastheten på 30 rader = 10 cm blir dette 12 rader. 12 x 2 = 24 masker felt. Du har derfor ca 22 masker igjen på pinnen før du feller 3 masker i hver side. God fornøyelse
09.04.2019 - 11:00
![]() Teresa Azevedo Godinho escribió:
Teresa Azevedo Godinho escribió:
I don't want to knit the dress 👗 in the round. How must I do?
21.03.2019 - 19:43DROPS Design respondió:
Hi Teresa! Should you prefer to work back and forth instead of in the round, you may of course adjust the pattern so you work the pieces separately and then assemble them at the end. Divide the stitches for the body in 2, add 1 edge stitch in each side (for sewing) and work the front and back pieces separately. Please see the lesson: HERE. Happy knitting!
22.03.2019 - 07:41
![]() Teresa Azevedo Godinho escribió:
Teresa Azevedo Godinho escribió:
I don't want to knit the dress 👗 in the round. How must I do?
21.03.2019 - 19:42
![]() Yocheved Leifer escribió:
Yocheved Leifer escribió:
I realized that my question ❔ has a typing error. It should read how do I STITCH that?
04.03.2019 - 20:33
![]() Yocheved Leifer escribió:
Yocheved Leifer escribió:
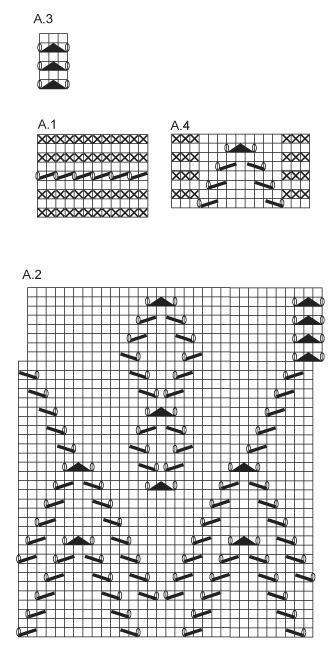
A.2 has 32 stitches across the pattern but further up, the patterns shifts right. How do I starch that?
04.03.2019 - 20:32DROPS Design respondió:
Dear Mrs Leifer, start first A.2 on the round with the last st from previous round (= 1 st before marker from beg of round, make 1 YO, move marker from beg of round here, slip the next st (= the last st on round), work together the first 2 sts in 1st A.2 and pass the st over. Continue like this, ie the last st in A.2 will be worked together with the first 2 sts in next A.2. Happy knitting!
05.03.2019 - 10:29
![]() Yocheved Leifer escribió:
Yocheved Leifer escribió:
I would like to make this in a spring summer version. Which yarn would you recommend? Also, I cannot read charts so well. Do you have detailed instructions?
25.02.2019 - 19:02DROPS Design respondió:
Dear Mrs Leifer, try our yarn converter to see all possible alternatives and contact your DROPS store for any further assistance choosing a yarn matching your wishes. We only have diagrams to this pattern. This lesson explains how to read diagrams. Happy knitting!
26.02.2019 - 10:35
![]() Lydia escribió:
Lydia escribió:
Last instrucciones están equivocadas para las mangas, espero las corrijan, está mi tejido incompleto. Gracias
12.12.2018 - 02:14
![]() Mona escribió:
Mona escribió:
Deretter strikkes A.2 (= 6-6-7-7-8 rapporter i bredden). Når A.2 er strikket 1 gang i høyden strikkes det videre slik – start 1 m før første m på omg: * A.3 (= 3 m), 29 m glstrikk *, gjenta fra *-* 6-6-7-7-8 ganger. SAMTIDIG når arb måler 15 cm felles det 1 m før hver A.3 – LES FELLTIPS (6-6-7-7-8 m felt). Betyr det at A3 overtar og en ikke skal strikke A2 lenger? eller strikkes A3 kun i starten av hver rapport og deretter A2?
24.11.2018 - 19:30DROPS Design respondió:
Hei Mona. A.2 strikkes kun 1 gang i høyden. Videre strikker du A.3 og 29 masker glattstrikk. Dette gjentar du totalt 6-6-7-7-8 ganger rundt. Om du ser på bildet kan du se at A.3 fortsetter oppover til livet (hullradene), mens A.2 er kun strikket nederst på skjørtekanten. God fornøyelse
26.11.2018 - 10:00
|
|||||||||||||||||||
Wendy Darling#wendydarlingdress |
|||||||||||||||||||
 |
 |
||||||||||||||||||
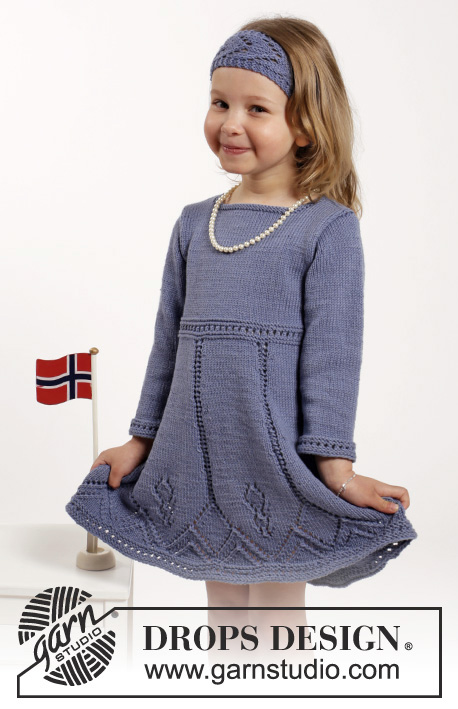
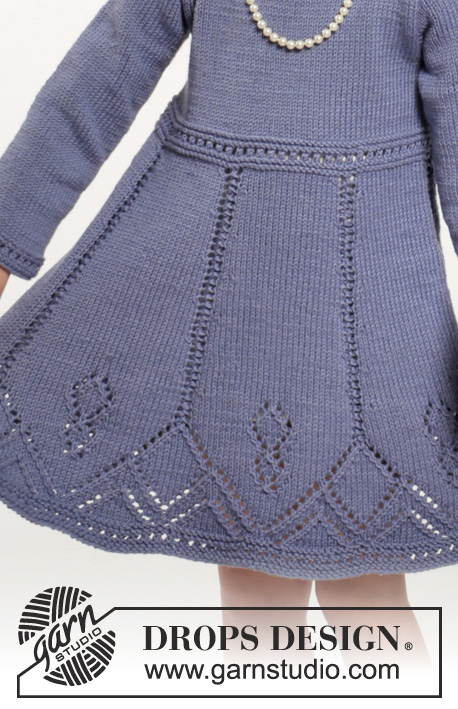
Vestido de punto y banda para la cabeza con patrón de calados en DROPS Cotton Merino. Talla niños 2-10 años
DROPS Children 26-6 |
|||||||||||||||||||
|
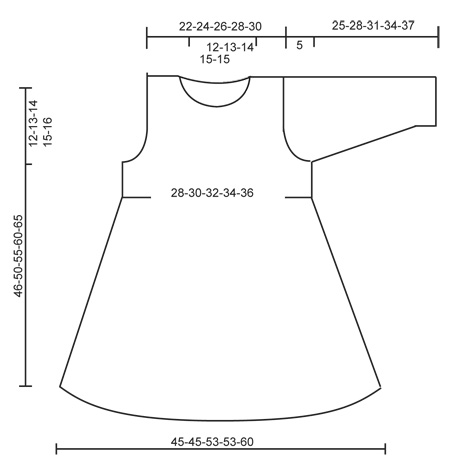
PATRÓN: Ver los diagramas A.1 a A.4. TIP PARA LAS DISMINUCIONES: Dism como sigue antes de A.3: 2. pjd. Dism como sigue después de A.3: Desl 1 pt como de derecho, 1 d., pasar el pt desl por encima. OJALES: Cerrar para los ojales en el hombro izquierdo. Cerrar trabajando juntos el 2º y 3er pt desde el centro del delantero, después hacer una HEB (lazada). Cerrar para los ojales cuando la cenefa mida 2 y 4 cm. PT MUSGO (de ida y vta en aguja): Trabajar todas las filas de derecho. 1 pliegue = 2 filas de derecho ---------------------------------------------------------- VESTIDO: Se trabaja en redondo con aguja circular, de abajo arriba. Mont 192-192-224-224-256 pts con ag circular tamaño 3.5 mm y Cotton Merino. Trabajar A.1. Después A.2 (= 6-6-7-7-8 repeticiones en el ancho). Cuando se ha trabajado A.2 una vez en vertical trabajar como sigue - comenzar 1 pt antes del primer pt de la vta: * A.3 (= 3 pts), 29 pts en pt jersey *, repetir de *a* 6-6-7-7-8 vcs. AL MISMO TIEMPO cuando la labor mida 15 cm, dism 1 pt antes de cada repetición de A.3 – LEER TIP PARA LAS DISMINUCIONES (= 6-6-7-7-8 pts dism). Repetir las dism alternando antes/después de A.3 cada 1-1½-1½-2-2 cm un total de 12-10-12-10-12 vcs = 120-132-140-154-160 pts. Continuar con pt jersey y A.3 hasta que la labor mida 27-29-32-35-37 cm. Ahora trabajar A.1 sobre todos los pts, en la primera fila deA.1 ajustar el nº de pts a 124-132-140-148-160. Insertar 2 MP (marcapuntos) en la labor; uno al inicio de la vta y uno después de 62-66-70-74-80 pts = lados. Continuar en pt jersey sobre todos los pts. Cuando la labor mida 34-37-41-45-49 cm, cerrar 6 pts a cada lado para la sisa (es decir, 3 pts a ambos lados de cada MP) y finalizar cada parte por separado. ESPALDA: = 56-60-64-68-74 pts. Continuar cerrando para la sisa a cada lado, al inicio de cada fila como sigue: 2 pts 1 vez y 1 pt 2-2-1-1-2 vcs = 48-52-58-62-66 pts. Cuando la labor mida 38-42-47-52-57 cm, pasar los primeros 22-24-27-29-31 pts (por el LD) a un gancho aux para el hombro derecho (trabajar los pts primero) y finalizar cada hombro por separado. HOMBRO IZQUIERDO: = 26-28-31-33-35 pts. Continuar en pt jersey pero trabajar los primeros 4 pts de la aguja (hacia el centro) en pt musgo. Cerrar para los OJALES - ver explicación arriba. Cuando la labor mida 44-48-53-58-63 cm, pasar los primeros 4 pts a un gancho aux (trabajar primero estos pts), después cerrar los sig 10-11-12-13-13 pts para el escote. Cerrar 1 pt en la sig fila hacia el escote = 11-12-14-15-17 pts restantes para el hombro. Rematar cuando la labor mida 46-50-55-60-65 cm. HOMBRO DERECHO: Pasar los 22-24-27-29-31 pts del gancho aux de vta a la aguja y mont 4 pts nuevos al final de la primera fila por el LD = 26-28-31-33-35 pts. Trabajar como el hombro izquierdo pero a la inversa, sin cerrar para los ojales. DELANTERO: = 56-60-64-68-74 pts. Cerrar para la sisa a los lados como en la espalda = 48-52-58-62-66 pts. Cuando la labor mida 41-45-50-55-60 cm, pasar los 18-20-22-24-24 pts centrales a un gancho aux para el escote y finalizar cada hombro por separado. Ahora cerrar en todas las filas, hacia el escote: 2 pts 1 vez y 1 pt 2 vcs = 11-12-14-15-17 pts restantes para el hombro. Rematar cuando la labor mida 46-50-55-60-65 cm. MANGA: Se trabaja en redondo con ag de doble punta. Mont 40-42-44-46-48 con ag de doble punta tamaño 3.5 mm y Cotton Merino. Trabajar A.1 sobre todos los pts, después trabajar en pt jersey. Insertar 1 MP al inicio de la vta = centro bajo la manga. Cuando la labor mida 6 cm, aum 1 pt a cada lado del MP. Aum cada 6-3½-3-3-3 cm 2-4-6-7-8 vcs más = 46-52-58-62-66 pts. Cuando la labor mida 20-23-26-29-32 cm, cerrar 6 pts en el centro bajo la manga para la copa de la manga. Ahora trabajar la manga de ida y vta y AL MISMO TIEMPO cerrar para la copa de la manga, a cada lado como sigue: 2 pts a cada lado hasta que la labor mida 24-27-30-33-36 cm y después 3 pts a cada lado una vez, rematar los pts restantes. La labor mide aprox 25-28-31-34-37 cm. TERMINACIÓN: Hacer la costura de los hombros. Montar las mangas. Situar los 4 pts nuevos montados en el hombro derecho bajo los 4 pliegues de la espalda y asegurar. BORDE DEL ESCOTE: Recoger aprox. 72 - 88 pts (incl los pts en los ganchos aux) alrededor del escote con ag circular tamaño 3.5 mm. Trabajar 2 pliegues. Rematar. ---------------------------------------------------------- BANDA: Mont 15 pts con ag tamaño 3.5 mm y Cotton Merino. Trabajar 1 pliegue en PT MUSGO - ver explicación arriba, después trabajar A.4 sobre todos los pts. Continuar con A.4 hasta que la labor mida 41-42-43-44 cm (estirar ligeramente la labor al medir), trabajar 1 pliegue, rematar. Coser el borde de montaje al de remate con grafting. |
|||||||||||||||||||
Explicaciones del diagrama |
|||||||||||||||||||
|
|||||||||||||||||||
 |
|||||||||||||||||||
 |
|||||||||||||||||||
¿Terminaste este patrón?Entonces, etiqueta tus fotos con #dropspattern #wendydarlingdress o envíalas a la galería #dropsfan. ¿Necesitas ayuda con este patrón?Encontrarás 30 videos tutoriales, un espacio para comentarios/preguntas y más visitando la página del patrón en garnstudio.com © 1982-2026 DROPS Design A/S. Todos los derechos reservados. Este documento, incluyendo todas sus sub-secciones, está protegido por los derechos de autor (copyright). Lee más acerca de lo que puedes hacer con nuestros patrones en la parte de abajo de cada patrón de nuestro sitio. |
|||||||||||||||||||


Con más de 40 años en el diseño de modelos de punto y de ganchillo, DROPS Design ofrece una de las más vastas colecciones de patrones gratuitos en el internet - traducidos en 17 idiomas. Al día de hoy, contamos con 324 catálogos y 12239 patrones - de los cuales 11619 están traducidos en español.
Nosotros trabajamos con mucho esmero para brindarte lo mejor que las labores de punto y ganchillo tienen para ofrecer,inspiración y consejos, así como hilos de magnífica calidad a precios increíbles! Te gustaría usar nuestros patrones para otro fin además del uso personal? Puedes leer acerca de lo que estás permitida a hacer en el texto de Copyright en la parte de abajo de todos nuestros patrones. Felices labores!
Escribe un comentario sobre DROPS Children 26-6
¡Nos encantaría saber qué piensas acerca de este patrón!
Si quieres escribir una pregunta referente al patrón, por favor asegúrate de elegir la categoría correcta en el formulario debajo, para acelerar el proceso de respuesta. Los campos obligatorios están marcados con un *.