
Categorías populares
¿Buscas un hilo?


Comentarios / Preguntas (141)
![]() Hannah escribió:
Hannah escribió:
When decreasing for the sleeve on the main dress how do i decrease before the marker?
11.08.2020 - 16:09DROPS Design respondió:
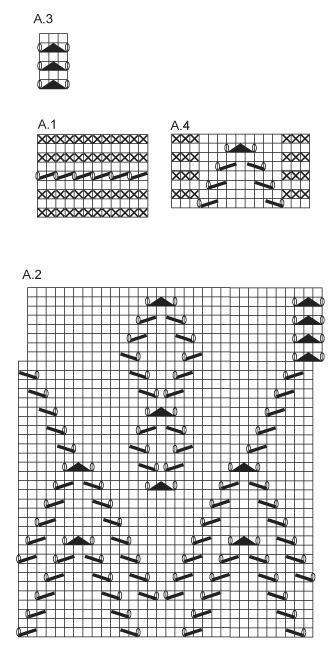
Dear Hannah, when decrease at each A.3 you will decrease as explained under DECREASE TIP, is before A.3 with K2 together - and after A.3 with slip 1 as if to K, K1, psso. Happy knitting!
11.08.2020 - 16:29
![]() Sara escribió:
Sara escribió:
I am a bit confused about the A2 pattern do I use the purl stitch on the first line since it’s the wrong side and then line 2 do all K? I tried it and it doesn’t seem right please advise. Thanks
20.07.2020 - 21:17DROPS Design respondió:
Hi Sara, A.2 is worked in the round on the dress, so round 2 is knitted. Happy crafting!
21.07.2020 - 07:26
![]() Eileen Doucette escribió:
Eileen Doucette escribió:
I'm am so confused about A.3 .I get moving marker and using last stitch of previous row. I think a video would help with this pattern where to start decreasing to show what row to form the A line. I'm frustrated and have knitted for years! please help me with this section. I do read the questions and answers that others have asked in English language. After the very first row of A.3 I end up with 191 stitches instead of 192 is this correct? Please help me. thanks Eileen
16.02.2020 - 15:21DROPS Design respondió:
Dear Eileen, A.3 is worked over 3 stitches: 1 yarn over, slip 1 st as if to K, K 2 tog, psso, (you have decreased 2 stitches) 1 yarn over = there are always 3 stitches - make sure you didn't forget a yarn over on first round. Then start to decrease, you are repeating A.3 a total of 6 times in the round and you should decrease 6 stitches on each decrease round. On first decrease round, work *A.3, dec 1 st - see DECREASE TIP, 27 sts in stocking st*, repeat from *-*; on next decrease round work: *A.3, 26 sts in stocking st, dec 1 st*, repeat from *-* around. Happy knitting!
17.02.2020 - 09:21
![]() Eileen Doucette escribió:
Eileen Doucette escribió:
Could you please help me figure out A.2 pattern. For the 2nd row of pattern, it shows to knit 13, YO sl 1 st, k2 tog. Psso st then Yo again. For size 2 then repeat pattern. 6 times? or all around the dress? Thanks, Eileen
12.02.2020 - 20:57DROPS Design respondió:
Hi Eileen, The 2nd round of A.2 is knit all stitches. Round 3, from right to left is : K2, 1 YO, slip 1 stitch, knit 1 and pass the slipped stitch over, K7, K2 together, 1 YO, K7, 1 YO, slip 1 stitch, knit 1 and pass the slipped stitch over, K7, K2 together, 1 YO, K1 and repeat this pattern to end of round. Happy knitting!
13.02.2020 - 10:34
![]() Martina Nikodemová escribió:
Martina Nikodemová escribió:
¨Dobrý den, potřebovala bych poradit, s pletením těchto krásných šatiček. Pochopila jsem, že se plete v kruhových řadách bez švu, ale nevím jak mám plést tu rubovou stranu :-(........zkoušela jsem najít na netu nějaký návod, ale nic jsem nenašla..... mohla byste mi poradit nebo někam nasměrovat děkuji Nikodemová
04.01.2020 - 20:59DROPS Design respondió:
Milá Martino, při pletení v kruhových řadách pleteme vlastně stále jen lícovou stranu. Rubové (a lícové) řady budete plést jen v místě, kde je pletenina rozdělená na jednotlivé díly - tj. v horní části hrudníku, po uzavření ok pro průramky. Hodně zdaru! Hana
05.01.2020 - 12:56
![]() Brigitte escribió:
Brigitte escribió:
Très joli modèle tricoté deux fois en 6 ans : la première fois en coton mérinos bleu jeans avec un fil glitter argent, la seconde fois en lilas et agrémenté de sequins de couleur. Ma petite-fille aime beaucoup ces 2 robes.
02.01.2020 - 16:22
![]() Merete escribió:
Merete escribió:
Jeg skjønner ikke hvordan jeg skal få til å gjøre dette. Feller jeg først på retten og så tilbake på vrangen. Jeg har 60 masker og skal sitte igjen med 52. Det er åtte masker felt. Det virker som om det er mange flere BAKSTK: = 56-60-64-68-74 m. Fortsett fellingene til ermhull i hver side på beg av hver p slik: 2 m 1 gang og 1 m 2-2-1-1-2 ganger = 48-52-58-62-66 m.
18.11.2019 - 23:23DROPS Design respondió:
Hej Merete, Vi vil gerne hjælpe dig, men vi skal vide hvilken størrelse du strikker, hvor langt du er i opskriften, og hvad du ikke får til at stemme :)
04.12.2019 - 11:41
![]() Olga Baranová escribió:
Olga Baranová escribió:
Dobrý den,z návodu na pletené šatky jsem nepochopila, zda pracovat na kruhových jehlicích dokola bez švu, nebo rub´-líc a nakonec sešít. Děkuji za odpověď Olga Baranová
14.10.2019 - 11:57DROPS Design respondió:
Dobrý den, paní Baranová, šatičky jsou pletené v kruhu dohromady, bez sešívání. Pouze je potřeba nakonec vsadit/všít rukávy, zapošít otvor v podpaží a lem u krku. Hodně zdaru! Hana
14.10.2019 - 12:46
![]() Sisko escribió:
Sisko escribió:
Tilasin langat wendy darling by drops deisin pitsimekkoon.vaidoin langan toiseen lankasuosikoissa olevaan drops cotton light, mutta nyt on ogelma kun kudottu neulos venyy kauheasti ja ei saa neulottua kuin 6cm yhdellä kerällä. lankahan ei riitä mihinkään ja mekostahan tulee painava . Lapsi jolle neulon on 5v. pienikokoinen ja hyvin hoikka . miten saan mittasuhteet oikein ja mitä olen tehnyt väärin?
10.10.2019 - 09:59DROPS Design respondió:
Hei, aina kun ohjeen lanka vaihdetaan johonkin toiseen lankaan tulee ottaa huomioon lankojen eri ominaisuudet ja juoksevuus. Cotton Merino -langassa on 110 m/kerä ja Cotton Light -langassa on 105 m/kerä, joten menekin tulisi olla melkein sama kuin ohjeessa, voit tarvita yhden kerän enemmän. Polyesteri on raskaampaa kuin villa, joten varmaan tästä syystä neule venyy. Ennen kuin aloitat neulomisen, sinun tulee myös tarkistaa neuletiheys. Mikäli tiheys eroaa ohjeen tiheydestä, sinun tulee vaihtaa ohuempiin/paksumpiin puikkoihin. Saat aina parhaimman tuloksen, kun käytät ohjeessa mainittua lankaa.
17.12.2019 - 17:09
![]() Dorthe escribió:
Dorthe escribió:
Hej. Jeg undre mig over at jeg skal starte en maske før, efter mønster A2 så kommer A3 jo ikke til at følges opad Er det en fejl i opskriften?
03.10.2019 - 10:18DROPS Design respondió:
Hej Dorthe, det har du allerede gjort over de sidste 8 pinde i A.2, så ja det stemmer at A.3 skal komme over de andre masker i A.2. God fornøjelse!
03.10.2019 - 11:41
|
|||||||||||||||||||
Wendy Darling#wendydarlingdress |
|||||||||||||||||||
 |
 |
||||||||||||||||||
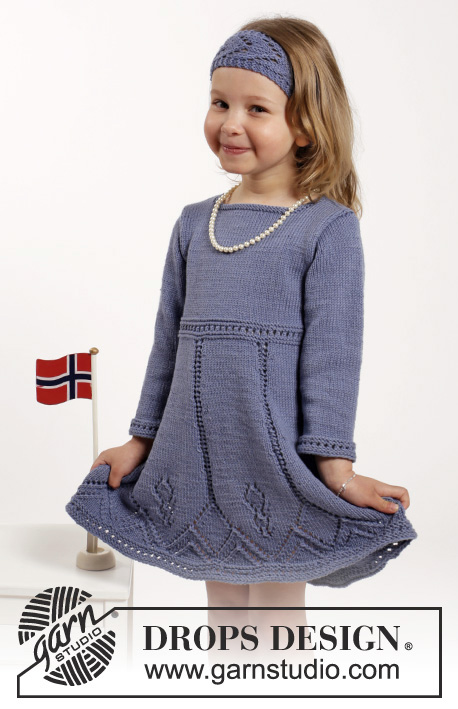
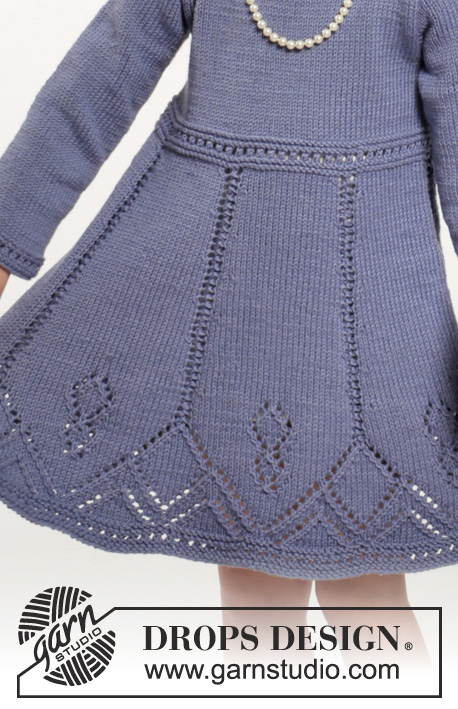
Vestido de punto y banda para la cabeza con patrón de calados en DROPS Cotton Merino. Talla niños 2-10 años
DROPS Children 26-6 |
|||||||||||||||||||
|
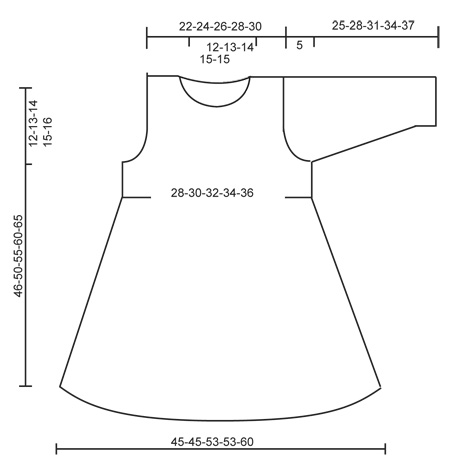
PATRÓN: Ver los diagramas A.1 a A.4. TIP PARA LAS DISMINUCIONES: Dism como sigue antes de A.3: 2. pjd. Dism como sigue después de A.3: Desl 1 pt como de derecho, 1 d., pasar el pt desl por encima. OJALES: Cerrar para los ojales en el hombro izquierdo. Cerrar trabajando juntos el 2º y 3er pt desde el centro del delantero, después hacer una HEB (lazada). Cerrar para los ojales cuando la cenefa mida 2 y 4 cm. PT MUSGO (de ida y vta en aguja): Trabajar todas las filas de derecho. 1 pliegue = 2 filas de derecho ---------------------------------------------------------- VESTIDO: Se trabaja en redondo con aguja circular, de abajo arriba. Mont 192-192-224-224-256 pts con ag circular tamaño 3.5 mm y Cotton Merino. Trabajar A.1. Después A.2 (= 6-6-7-7-8 repeticiones en el ancho). Cuando se ha trabajado A.2 una vez en vertical trabajar como sigue - comenzar 1 pt antes del primer pt de la vta: * A.3 (= 3 pts), 29 pts en pt jersey *, repetir de *a* 6-6-7-7-8 vcs. AL MISMO TIEMPO cuando la labor mida 15 cm, dism 1 pt antes de cada repetición de A.3 – LEER TIP PARA LAS DISMINUCIONES (= 6-6-7-7-8 pts dism). Repetir las dism alternando antes/después de A.3 cada 1-1½-1½-2-2 cm un total de 12-10-12-10-12 vcs = 120-132-140-154-160 pts. Continuar con pt jersey y A.3 hasta que la labor mida 27-29-32-35-37 cm. Ahora trabajar A.1 sobre todos los pts, en la primera fila deA.1 ajustar el nº de pts a 124-132-140-148-160. Insertar 2 MP (marcapuntos) en la labor; uno al inicio de la vta y uno después de 62-66-70-74-80 pts = lados. Continuar en pt jersey sobre todos los pts. Cuando la labor mida 34-37-41-45-49 cm, cerrar 6 pts a cada lado para la sisa (es decir, 3 pts a ambos lados de cada MP) y finalizar cada parte por separado. ESPALDA: = 56-60-64-68-74 pts. Continuar cerrando para la sisa a cada lado, al inicio de cada fila como sigue: 2 pts 1 vez y 1 pt 2-2-1-1-2 vcs = 48-52-58-62-66 pts. Cuando la labor mida 38-42-47-52-57 cm, pasar los primeros 22-24-27-29-31 pts (por el LD) a un gancho aux para el hombro derecho (trabajar los pts primero) y finalizar cada hombro por separado. HOMBRO IZQUIERDO: = 26-28-31-33-35 pts. Continuar en pt jersey pero trabajar los primeros 4 pts de la aguja (hacia el centro) en pt musgo. Cerrar para los OJALES - ver explicación arriba. Cuando la labor mida 44-48-53-58-63 cm, pasar los primeros 4 pts a un gancho aux (trabajar primero estos pts), después cerrar los sig 10-11-12-13-13 pts para el escote. Cerrar 1 pt en la sig fila hacia el escote = 11-12-14-15-17 pts restantes para el hombro. Rematar cuando la labor mida 46-50-55-60-65 cm. HOMBRO DERECHO: Pasar los 22-24-27-29-31 pts del gancho aux de vta a la aguja y mont 4 pts nuevos al final de la primera fila por el LD = 26-28-31-33-35 pts. Trabajar como el hombro izquierdo pero a la inversa, sin cerrar para los ojales. DELANTERO: = 56-60-64-68-74 pts. Cerrar para la sisa a los lados como en la espalda = 48-52-58-62-66 pts. Cuando la labor mida 41-45-50-55-60 cm, pasar los 18-20-22-24-24 pts centrales a un gancho aux para el escote y finalizar cada hombro por separado. Ahora cerrar en todas las filas, hacia el escote: 2 pts 1 vez y 1 pt 2 vcs = 11-12-14-15-17 pts restantes para el hombro. Rematar cuando la labor mida 46-50-55-60-65 cm. MANGA: Se trabaja en redondo con ag de doble punta. Mont 40-42-44-46-48 con ag de doble punta tamaño 3.5 mm y Cotton Merino. Trabajar A.1 sobre todos los pts, después trabajar en pt jersey. Insertar 1 MP al inicio de la vta = centro bajo la manga. Cuando la labor mida 6 cm, aum 1 pt a cada lado del MP. Aum cada 6-3½-3-3-3 cm 2-4-6-7-8 vcs más = 46-52-58-62-66 pts. Cuando la labor mida 20-23-26-29-32 cm, cerrar 6 pts en el centro bajo la manga para la copa de la manga. Ahora trabajar la manga de ida y vta y AL MISMO TIEMPO cerrar para la copa de la manga, a cada lado como sigue: 2 pts a cada lado hasta que la labor mida 24-27-30-33-36 cm y después 3 pts a cada lado una vez, rematar los pts restantes. La labor mide aprox 25-28-31-34-37 cm. TERMINACIÓN: Hacer la costura de los hombros. Montar las mangas. Situar los 4 pts nuevos montados en el hombro derecho bajo los 4 pliegues de la espalda y asegurar. BORDE DEL ESCOTE: Recoger aprox. 72 - 88 pts (incl los pts en los ganchos aux) alrededor del escote con ag circular tamaño 3.5 mm. Trabajar 2 pliegues. Rematar. ---------------------------------------------------------- BANDA: Mont 15 pts con ag tamaño 3.5 mm y Cotton Merino. Trabajar 1 pliegue en PT MUSGO - ver explicación arriba, después trabajar A.4 sobre todos los pts. Continuar con A.4 hasta que la labor mida 41-42-43-44 cm (estirar ligeramente la labor al medir), trabajar 1 pliegue, rematar. Coser el borde de montaje al de remate con grafting. |
|||||||||||||||||||
Explicaciones del diagrama |
|||||||||||||||||||
|
|||||||||||||||||||
 |
|||||||||||||||||||
 |
|||||||||||||||||||
¿Terminaste este patrón?Entonces, etiqueta tus fotos con #dropspattern #wendydarlingdress o envíalas a la galería #dropsfan. ¿Necesitas ayuda con este patrón?Encontrarás 31 videos tutoriales, un espacio para comentarios/preguntas y más visitando la página del patrón en garnstudio.com © 1982-2026 DROPS Design A/S. Todos los derechos reservados. Este documento, incluyendo todas sus sub-secciones, está protegido por los derechos de autor (copyright). Lee más acerca de lo que puedes hacer con nuestros patrones en la parte de abajo de cada patrón de nuestro sitio. |
|||||||||||||||||||


Con más de 40 años en el diseño de modelos de punto y de ganchillo, DROPS Design ofrece una de las más vastas colecciones de patrones gratuitos en el internet - traducidos en 17 idiomas. Al día de hoy, contamos con 324 catálogos y 12290 patrones - de los cuales 11675 están traducidos en español.
Nosotros trabajamos con mucho esmero para brindarte lo mejor que las labores de punto y ganchillo tienen para ofrecer,inspiración y consejos, así como hilos de magnífica calidad a precios increíbles! Te gustaría usar nuestros patrones para otro fin además del uso personal? Puedes leer acerca de lo que estás permitida a hacer en el texto de Copyright en la parte de abajo de todos nuestros patrones. Felices labores!
Escribe un comentario sobre DROPS Children 26-6
¡Nos encantaría saber qué piensas acerca de este patrón!
Si quieres escribir una pregunta referente al patrón, por favor asegúrate de elegir la categoría correcta en el formulario debajo, para acelerar el proceso de respuesta. Los campos obligatorios están marcados con un *.