
Categorías populares
¿Buscas un hilo?


Comentarios / Preguntas (141)
![]() Maria Cini escribió:
Maria Cini escribió:
Hi i'm knitting size 6-7 year old. When i mark the sides am i doing something wrong if one side has pattern A3 and the other side not? Thanks
16.10.2023 - 16:49
![]() Maria escribió:
Maria escribió:
Hi. I'm knitting size 6-7 years. When I mark the sides am i doing something wrong if one side has pattern A3 and the other side not?
16.10.2023 - 16:45DROPS Design respondió:
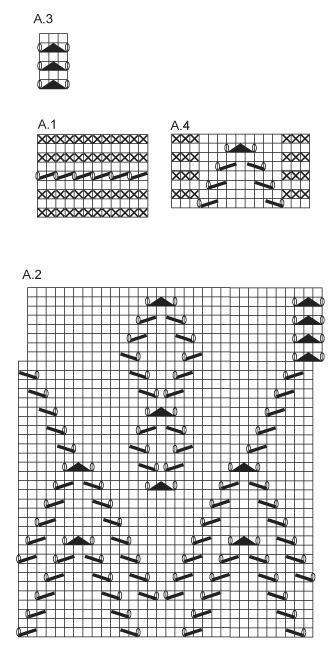
Dear Maria, A.3 is worked all the round with 29 sts stocking stitch between each A.3 so that there are 7 repeats of A.3 in the round in both size 5/6 years and 7/8 years. Can this help or do I misunderstand your question?
17.10.2023 - 09:05
![]() Dale escribió:
Dale escribió:
Would you please clarify the decrease for sleeve cap in a row by row description? Is the decrease 2 sts at each end of every row, or 1 st each end of every row? Also, how do you complete the decrease ... bind off or combine stitches? Thank you.
23.07.2023 - 14:37DROPS Design respondió:
Dear Dale, first you cast off 2 sts in each side, that is, 2 stitches at the beginning of each row, both from the right side and the wrong side. When the piece measures 24-27-30-33-36 cm cast off 3 stitches in each side as before (once on each side) and then cast off the remaining stitches. You bind off these stitches one by one, instead of decreasing them together. Happy knitting!
23.07.2023 - 20:04
![]() Brenda escribió:
Brenda escribió:
I have a question about "repeat dec alternately before every A3 every 1 cm (for size 2). I have completed only 6 decrease rows (not the 12 as the pattern instructs) and I'm going to have fewer than 120 stitches. Would you please clarify how to perform these decreases?
11.07.2023 - 23:08DROPS Design respondió:
Hi Brenda, You decrease alternately 1 stitch before A.3 (the first set of decreases) and after A.3 (the second set of decreases), with 6 stitches decreased on each decrease-round a total of 12 times = 72 stitches decreased. Starting with 192 stitches, this leaves you with 120 stitches when the decreases are finished. Happy knitting!
12.07.2023 - 07:18
![]() Bernadette Anbergen escribió:
Bernadette Anbergen escribió:
En réalité, les hauteurs dans le descriptifs sont à multiplier environ par 1,3. Je ne demande pas de réponse, mais ce serait bien de corriger les hauteurs de tricot dans le descriptif. En attendant, j'ai défait mon travail et je dois recommencer. Bien à vous
29.04.2023 - 23:48
![]() Lyn Carroll escribió:
Lyn Carroll escribió:
Could you send me pictures of where the buttons go and the "then place the 4 sts from right back piece behind the 4 sts on the left back piece and fasten with small stitches?"
04.05.2022 - 21:38DROPS Design respondió:
Dear Mrs Caroll, take the piece from the right side, back piece towards you; slip the 4 sts cast on on the right shoulder on back piece inside piece (towards back side) and sew the cast on edge of these 4 sts along the first 4 sts in garter stitch on left shoulder. Sew the buttons on the left side of back piece facing the buttonholes. Happy assemby!
05.05.2022 - 09:04
![]() IDA POLONI escribió:
IDA POLONI escribió:
Would you consider supplying this pattern for sizes 12 - 14
16.03.2022 - 03:20DROPS Design respondió:
Dear Ida, we don't make personalized patterns. If you have the same gauge as in the pattern, you could adjust the number of stitches/cm for a larger size by following the sequence of the previous sizes. Happy knitting!
20.03.2022 - 19:05
![]() Sheila Kroetsch escribió:
Sheila Kroetsch escribió:
I am confused by the Front piece instructions. "And finish each shoulder sepearately" Am I binding off starting the next row after putting the middle stitches on the stitch holder? Do I bind off 2 stiches once and 1 stich twice in all or do I repet that sequence until I have reached the appropriate number of stitches?
21.01.2022 - 21:00DROPS Design respondió:
Dear Mrs Krotsch, you will cast off for neck at the beginning of every row starting from neck (towards the sts on the thread), ie at the beginning of a WS row (left shoulder)/RS row (right shoulder) 2 sts 1 time then 1 stitch 2 times. Happy knitting!
24.01.2022 - 08:25
![]() Vandebrouck Andrée escribió:
Vandebrouck Andrée escribió:
L'enregistrement que j'ai imprimer n'pas conforme au modelle
16.12.2021 - 18:14DROPS Design respondió:
Bonjour Mme Vandebrouck, qu'entendez-vous par là, comment pouvons-nous vous aider?
17.12.2021 - 08:58
![]() Margret escribió:
Margret escribió:
Hallo, möchte gern dieses hübsche Kleid nachstricken,benötige aber dafür die Anleitung 1-2 Größen größer,ist das möglich? Freundl.Gruß Margret
10.12.2021 - 22:02DROPS Design respondió:
Liebe Margret, leider können wir jeder Anleitung nach jedem individuellen Frage anpassen und einzelne Modelle auf individuellen Wunsch hin umrechnen. Wenn sie Hilfe damit brauchen, wenden Sie sich bitte an Ihrem DROPS Laden, dort hilft man Ihnen gerne weiter, auch telefonisch oder per E-Mail. Danke im voraus für Ihr Verständnis. Viel Spaß beim stricken!
13.12.2021 - 08:51
|
|||||||||||||||||||
Wendy Darling#wendydarlingdress |
|||||||||||||||||||
 |
 |
||||||||||||||||||
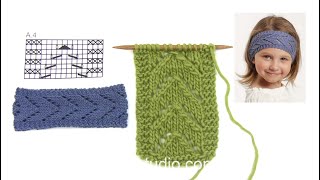
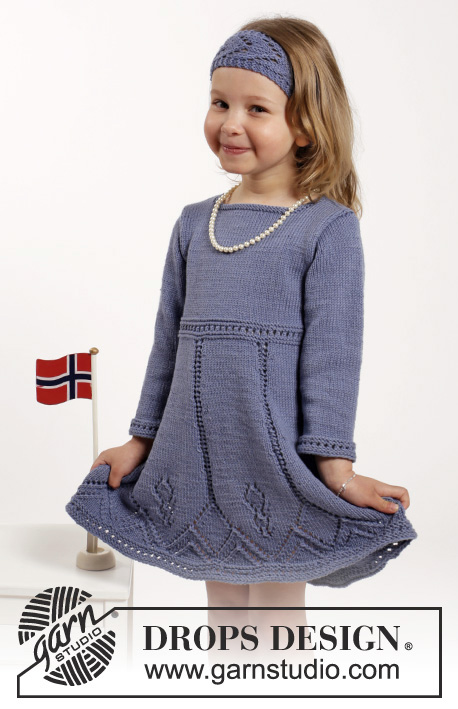
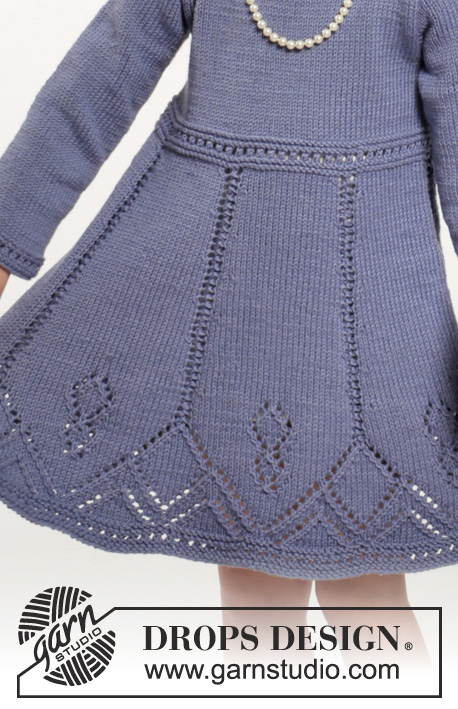
Vestido de punto y banda para la cabeza con patrón de calados en DROPS Cotton Merino. Talla niños 2-10 años
DROPS Children 26-6 |
|||||||||||||||||||
|
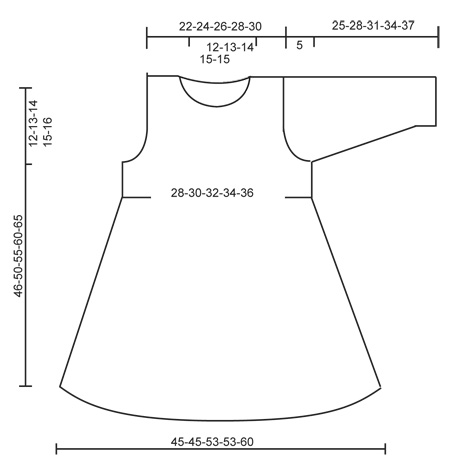
PATRÓN: Ver los diagramas A.1 a A.4. TIP PARA LAS DISMINUCIONES: Dism como sigue antes de A.3: 2. pjd. Dism como sigue después de A.3: Desl 1 pt como de derecho, 1 d., pasar el pt desl por encima. OJALES: Cerrar para los ojales en el hombro izquierdo. Cerrar trabajando juntos el 2º y 3er pt desde el centro del delantero, después hacer una HEB (lazada). Cerrar para los ojales cuando la cenefa mida 2 y 4 cm. PT MUSGO (de ida y vta en aguja): Trabajar todas las filas de derecho. 1 pliegue = 2 filas de derecho ---------------------------------------------------------- VESTIDO: Se trabaja en redondo con aguja circular, de abajo arriba. Mont 192-192-224-224-256 pts con ag circular tamaño 3.5 mm y Cotton Merino. Trabajar A.1. Después A.2 (= 6-6-7-7-8 repeticiones en el ancho). Cuando se ha trabajado A.2 una vez en vertical trabajar como sigue - comenzar 1 pt antes del primer pt de la vta: * A.3 (= 3 pts), 29 pts en pt jersey *, repetir de *a* 6-6-7-7-8 vcs. AL MISMO TIEMPO cuando la labor mida 15 cm, dism 1 pt antes de cada repetición de A.3 – LEER TIP PARA LAS DISMINUCIONES (= 6-6-7-7-8 pts dism). Repetir las dism alternando antes/después de A.3 cada 1-1½-1½-2-2 cm un total de 12-10-12-10-12 vcs = 120-132-140-154-160 pts. Continuar con pt jersey y A.3 hasta que la labor mida 27-29-32-35-37 cm. Ahora trabajar A.1 sobre todos los pts, en la primera fila deA.1 ajustar el nº de pts a 124-132-140-148-160. Insertar 2 MP (marcapuntos) en la labor; uno al inicio de la vta y uno después de 62-66-70-74-80 pts = lados. Continuar en pt jersey sobre todos los pts. Cuando la labor mida 34-37-41-45-49 cm, cerrar 6 pts a cada lado para la sisa (es decir, 3 pts a ambos lados de cada MP) y finalizar cada parte por separado. ESPALDA: = 56-60-64-68-74 pts. Continuar cerrando para la sisa a cada lado, al inicio de cada fila como sigue: 2 pts 1 vez y 1 pt 2-2-1-1-2 vcs = 48-52-58-62-66 pts. Cuando la labor mida 38-42-47-52-57 cm, pasar los primeros 22-24-27-29-31 pts (por el LD) a un gancho aux para el hombro derecho (trabajar los pts primero) y finalizar cada hombro por separado. HOMBRO IZQUIERDO: = 26-28-31-33-35 pts. Continuar en pt jersey pero trabajar los primeros 4 pts de la aguja (hacia el centro) en pt musgo. Cerrar para los OJALES - ver explicación arriba. Cuando la labor mida 44-48-53-58-63 cm, pasar los primeros 4 pts a un gancho aux (trabajar primero estos pts), después cerrar los sig 10-11-12-13-13 pts para el escote. Cerrar 1 pt en la sig fila hacia el escote = 11-12-14-15-17 pts restantes para el hombro. Rematar cuando la labor mida 46-50-55-60-65 cm. HOMBRO DERECHO: Pasar los 22-24-27-29-31 pts del gancho aux de vta a la aguja y mont 4 pts nuevos al final de la primera fila por el LD = 26-28-31-33-35 pts. Trabajar como el hombro izquierdo pero a la inversa, sin cerrar para los ojales. DELANTERO: = 56-60-64-68-74 pts. Cerrar para la sisa a los lados como en la espalda = 48-52-58-62-66 pts. Cuando la labor mida 41-45-50-55-60 cm, pasar los 18-20-22-24-24 pts centrales a un gancho aux para el escote y finalizar cada hombro por separado. Ahora cerrar en todas las filas, hacia el escote: 2 pts 1 vez y 1 pt 2 vcs = 11-12-14-15-17 pts restantes para el hombro. Rematar cuando la labor mida 46-50-55-60-65 cm. MANGA: Se trabaja en redondo con ag de doble punta. Mont 40-42-44-46-48 con ag de doble punta tamaño 3.5 mm y Cotton Merino. Trabajar A.1 sobre todos los pts, después trabajar en pt jersey. Insertar 1 MP al inicio de la vta = centro bajo la manga. Cuando la labor mida 6 cm, aum 1 pt a cada lado del MP. Aum cada 6-3½-3-3-3 cm 2-4-6-7-8 vcs más = 46-52-58-62-66 pts. Cuando la labor mida 20-23-26-29-32 cm, cerrar 6 pts en el centro bajo la manga para la copa de la manga. Ahora trabajar la manga de ida y vta y AL MISMO TIEMPO cerrar para la copa de la manga, a cada lado como sigue: 2 pts a cada lado hasta que la labor mida 24-27-30-33-36 cm y después 3 pts a cada lado una vez, rematar los pts restantes. La labor mide aprox 25-28-31-34-37 cm. TERMINACIÓN: Hacer la costura de los hombros. Montar las mangas. Situar los 4 pts nuevos montados en el hombro derecho bajo los 4 pliegues de la espalda y asegurar. BORDE DEL ESCOTE: Recoger aprox. 72 - 88 pts (incl los pts en los ganchos aux) alrededor del escote con ag circular tamaño 3.5 mm. Trabajar 2 pliegues. Rematar. ---------------------------------------------------------- BANDA: Mont 15 pts con ag tamaño 3.5 mm y Cotton Merino. Trabajar 1 pliegue en PT MUSGO - ver explicación arriba, después trabajar A.4 sobre todos los pts. Continuar con A.4 hasta que la labor mida 41-42-43-44 cm (estirar ligeramente la labor al medir), trabajar 1 pliegue, rematar. Coser el borde de montaje al de remate con grafting. |
|||||||||||||||||||
Explicaciones del diagrama |
|||||||||||||||||||
|
|||||||||||||||||||
 |
|||||||||||||||||||
 |
|||||||||||||||||||
¿Terminaste este patrón?Entonces, etiqueta tus fotos con #dropspattern #wendydarlingdress o envíalas a la galería #dropsfan. ¿Necesitas ayuda con este patrón?Encontrarás 31 videos tutoriales, un espacio para comentarios/preguntas y más visitando la página del patrón en garnstudio.com © 1982-2026 DROPS Design A/S. Todos los derechos reservados. Este documento, incluyendo todas sus sub-secciones, está protegido por los derechos de autor (copyright). Lee más acerca de lo que puedes hacer con nuestros patrones en la parte de abajo de cada patrón de nuestro sitio. |
|||||||||||||||||||


Con más de 40 años en el diseño de modelos de punto y de ganchillo, DROPS Design ofrece una de las más vastas colecciones de patrones gratuitos en el internet - traducidos en 17 idiomas. Al día de hoy, contamos con 324 catálogos y 12290 patrones - de los cuales 11675 están traducidos en español.
Nosotros trabajamos con mucho esmero para brindarte lo mejor que las labores de punto y ganchillo tienen para ofrecer,inspiración y consejos, así como hilos de magnífica calidad a precios increíbles! Te gustaría usar nuestros patrones para otro fin además del uso personal? Puedes leer acerca de lo que estás permitida a hacer en el texto de Copyright en la parte de abajo de todos nuestros patrones. Felices labores!
Escribe un comentario sobre DROPS Children 26-6
¡Nos encantaría saber qué piensas acerca de este patrón!
Si quieres escribir una pregunta referente al patrón, por favor asegúrate de elegir la categoría correcta en el formulario debajo, para acelerar el proceso de respuesta. Los campos obligatorios están marcados con un *.