
Categorías populares
¿Buscas un hilo?


Comentarios / Preguntas (69)
![]() KTY escribió:
KTY escribió:
Bonsoir, très joli modèle. Est-il possible de rallonger les manches de quelques centimètres sans avoir à recalculer? Merci pour votre réponse
23.03.2021 - 21:29DROPS Design respondió:
Bonjour Kty, probablement, vous trouverez ici d'autres hauts tricotés en fils du groupe B, avec des longueurs de manches différentes; vous pourrez vous en inspirer pour trouver la longueur/la méthode qui vous convient. Bon tricot!
24.03.2021 - 07:52
![]() Louise Ojén escribió:
Louise Ojén escribió:
Jeg er lidt over halvvejs i bærestykket med A2. Og det går nu op for mig at mønsteret er skævt. I opskriften står der at jeg skal strikke 14 m ret, A2 osv. Men hvornår starter de 14 masker ret? For starter de altid lige efter raglan mærket så vil mønstret jo ikke ende midt på...? Hvordan sikrer jeg mig at mønstret bliver på midten af forstykket, når der i opskriften står jeg skal strikke 14 masker derefter A2 osv? Vh. Louise.
05.01.2020 - 21:54
![]() Eva escribió:
Eva escribió:
Dobrý den, prosím jak na to raglánové skosení při Velikosti XL. NEMOHU SE V TOM VYZNAT. Děkuji
30.06.2019 - 13:05DROPS Design respondió:
Dobrý den, Evo, text návodu je upravený a přeformulovaný, podívejte se, prosím, na odstavec RAGLÁNOVÉ ZKOSENÍ a pak rozpis pro SEDLO - věřím, že teď bude postup srozumitelnější a jasnější. Příjemné letní pletení! Hana
01.07.2019 - 08:43
![]() Deb From Nova Scotia escribió:
Deb From Nova Scotia escribió:
I mad this sweater in Belle navy blue, hand washed with Eucalan delicate soap, blocked and let it dry. Love the yarn; drapes nicely & has a nice weight and shine to it. I like the fit of the sweater, but, like a few others, I find the neck too wide. I’m a fairly new knitter and don’t know what to do to make the neck opening smaller. What do you suggest? I’d like to make another sweater from this pattern. I’m guessing that I should cast on fewer stitches, and knit extra rows. Correct?
20.02.2019 - 02:58DROPS Design respondió:
Dear Deb From Nova Scotia, this pattern has a quite large neck as shown in the picture. We are unfortunately not able to adapt every pattern to every single request but please contact your DROPS store - even per mail or telephone - for any individual assistance. Happy knitting!
20.02.2019 - 09:36
![]() Dk escribió:
Dk escribió:
Hello, I finished the a2 and done all the 17 raglan repetitions for size small. However, instead of finding 294 stitches I only have 286. Which actually makes sense since 17 repetitions times 8 stitches is actually 136, plus the previous 150 totals 286. Is this a mistake on the pattern? Thank you !
04.11.2018 - 17:19DROPS Design respondió:
Dear Dk, you increase for the raglan a total of 18 times (= 17 more times = 18 times), so that you will have 150 sts + (8 sts inc x 18 times = 144)= 294 sts. Happy knitting!
05.11.2018 - 09:44
![]() Kathy Fae escribió:
Kathy Fae escribió:
Thank you for the help. Another question regarding A2 section. I’m making a large. I have 50 sts on that section. (Instructions were knit 49, knit 1, then place a marker) So I have 50. I’ll work raglan increase, 4 sts, knit 16, work chart, (17 sts), that’s a total of 37 sts that only leaves 13 sts until marker. The A2 design will not be centered on the chest. What am I doing wrong?
21.06.2018 - 18:19DROPS Design respondió:
Dear Mrs Fae, A.2 should be centered over the 49 sts on front piece = K16, work A.2, K14, inc for raglan = YO, K1, YO, K1fb, K1 (= st with marker), K1fb, YO, K1, YO and continue working inc at each raglan, at the end of round you will work the increase on each side of first marker (= at the end of round + at the beg of next round). Happy knitting!
22.06.2018 - 07:54
![]() Kathy Fae escribió:
Kathy Fae escribió:
I’m unsure about A2 section. I’ve placed all my raglan markers. I’m making a Large. Is this correct: Row 1, work raglan increases (4 sts), knit 16, work row 1 of chart, then continue on with knit and regular increases to end. Row 2, knit all, twisted knit ay certain YOs. Row 3, work raglan increases, then knit 16 again, then row 3 of chart. I’m uncertain because the charted area moves over two stitches due to the two raglan increases. Am I doing this right?
21.06.2018 - 09:18DROPS Design respondió:
Dear Mrs Fae, when you will work row 3 in A.2 you should line it up over the row 1 in A.2, ie over the same 17 sts as on row 1 (you can insert a marker before and after these 17 sts to mark where A.2 should be worked). The number of sts on each side of A.2 will increase due to the raglan increases. Happy knitting!
21.06.2018 - 15:24
![]() Julie escribió:
Julie escribió:
Right now i have 294 stitches when i separate the stitches for the sleeves and the front and back on my needles i will only have 162 stitches when it written that i should have 174 the extra 12 stitches is that what i'm adding to the sleeves and counts for the 174? where does a person put the stitch markers?
28.05.2018 - 02:53DROPS Design respondió:
Dear Julie, the new markers will be inserted in the middle of the new 6 sts cast on under sleeve: 81 sts (= front piece), 6 sts (= 3 sts, 1 marker, 3 sts), 81 sts (= back piece), 6 sts (= 3 sts, 1 marker, 3 sts) = 174 sts (there are now 66 sts on each side on thread/st holders). Happy knitting!
28.05.2018 - 09:48
![]() Julie escribió:
Julie escribió:
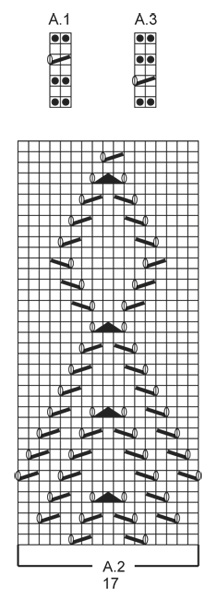
Hi I have another question the A 2 design how many stitches are between the holes? I really don’t understand the directions so any kind of help you could give would be much appreciated
18.05.2018 - 05:39DROPS Design respondió:
Dear Julie, diagram A.2 is showing the 17 sts you have to work on mid front. Start reading diagram from the bottom corner on the right side towards the left on every round. Inserting a marker at the beg and another marker at the end of A.2 to mark these 17 sts can help. Happy knitting!
18.05.2018 - 09:05
![]() Julie escribió:
Julie escribió:
Could you please explain to me on the yoke part of the pattern when i switch the needles to size 4 i increased the 16 stitches on the next round it says it wants to set 4 markers than i knitted the 45 stitches and knitted one more stitch and put the 2nd marker on this stitch is this stitch is to be the dividing stitch between front and the sleeve?jploog
17.05.2018 - 03:30DROPS Design respondió:
Dear Julie, that's right the stitch with the 2nd marker is the st on raglan line between front and sleeve, the st with 3rd marker is between sleeve and back piece, the st with 4th marker is between back piece and sleeve (first st on round is the one between sleeve and front piece). Happy knitting!
17.05.2018 - 09:02
|
|||||||||||||||||||
Serene Spring |
|||||||||||||||||||
 |
 |
||||||||||||||||||
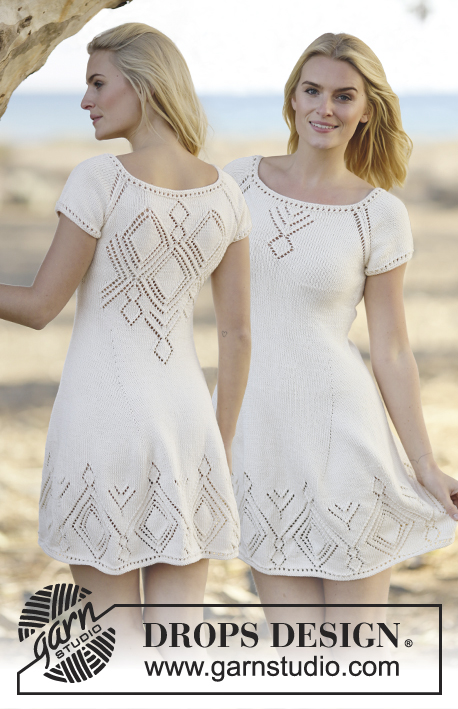
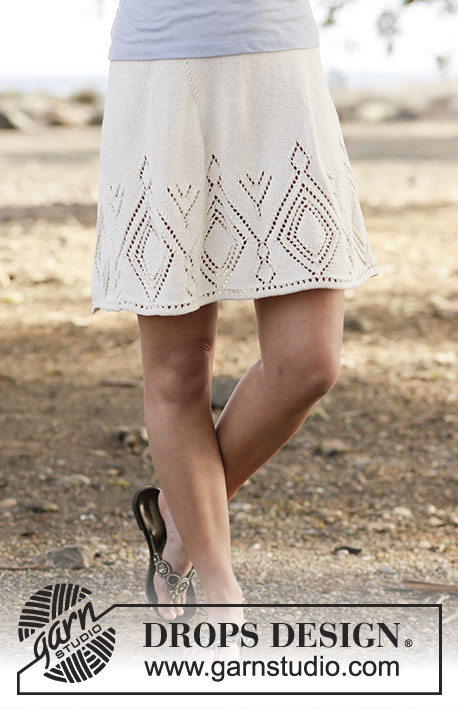
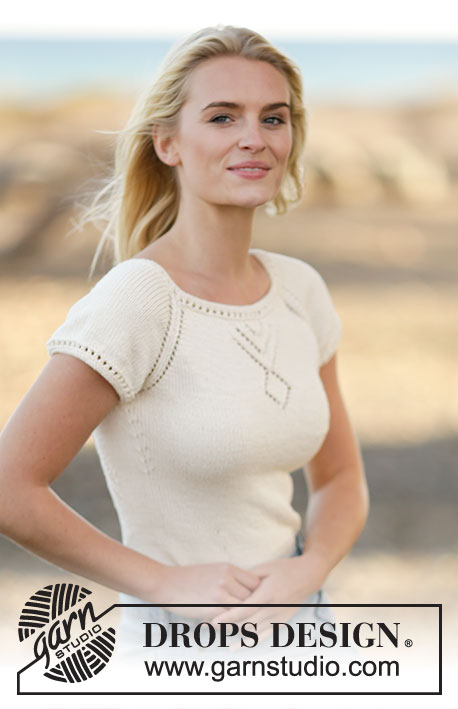
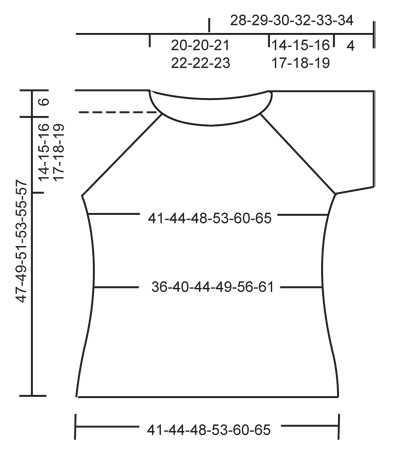
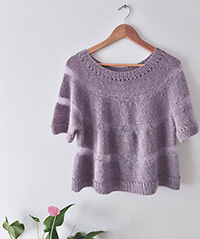
Top de punto DROPS con patrón de calados y raglán, en “Belle”. Tejido de arriba hacia abajo. Talla: S – XXXL.
DROPS Extra 0-1104 |
|||||||||||||||||||
|
PATRÓN: Ver diagramas A.1 a A.3. TIP PARA DISMINUIR: Disminuir 1 pt antes del marcapuntos de la manera sig: Tejer hasta que resten 2 pts antes del marcapuntos, deslizar 1 pt como de derecho, 1d, pasar el pt desl por encima. Disminuir 1 pt después del marcapuntos de la manera sig: Tejer 2 pjd. RAGLÁN: Aumentar de manera diferente en las diferentes tallas: TALLA S-M: Aumentar 2 pts en cada marcapuntos (= 8 pts aumentados en total) de la manera sig: Aumentar 1 pt de cada lado de cada marcapuntos (= 8 pts aumentados) de la manera sig: 1 HEB (lazada), 1 pt retorcido de derecho, 1 pt derecho, 1 pt retorcido de derecho, 1 HEB. No tejer las HEB retorcidas en la vta sig, deben crear agujeros, repetir los aumentos a cada 2 vtas 17-19 veces más. NOTA: Los aum a cada lado del 1er marcapuntos (= en el último pt de la vta) se tejen de la manera sig: al principio de la vuelta, 1 punto retorcido de derecho, 1 HEB. Al final de la vta: 1 HEB, 1 punto retorcido de derecho, 1 derecho (= pt con marcapuntos). TALLA L-XL-XXL-XXXL: Aumentar a cada 2 vtas de la manera sig: Aumentar 2 pts de cada lado de cada marcapuntos (= 16 pts aumentados en total) de la manera sig: 1 HEB, 1 pt derecho, 1 HEB, 1 pt retorcido de derecho, 1 pt derecho (= pt con el marcapuntos), 1 pt retorcido de derecho, 1 HEB, 1 pt derecho, 1 HEB (tejer la primera y la última HEB retorcidas de derecho en la vta sig, no deben crear agujeros, mas los 2 pts del centro deben crear agujeros). Repetir los aumentos a cada 2 vtas 1-1-1-3 veces más. NOTA: Los aum a cada lado del 1er marcapuntos (= en el último pt de la vta) se tejen de la manera sig: al principio de la vta, 1 punto retorcido de derecho, 1 HEB, 1 derecho, 1 HEB. Al final de la vta: 1 HEB, 1 derecho, 1 HEB, 1 punto retorcido de derecho, 1 derecho (= pt con marcapuntos). Después aumentar de la manera sig: Aumentar 1 pt de cada lado de cada marcapuntos (= 8 pts aumentados en total) de la manera sig: 1 HEB, 1 pt retorcido de derecho, 1 pt derecho (= pt con el marcapuntos), 1 pt retorcido de derecho, 1 HEB. No tejer las HEB retorcidas de derecho en la vta sig, deben crear agujeros. Repetir los aumentos a cada 2 vtas 19-20-22-21 veces más en total. TIP PARA AUMENTAR: Comenzar 1 pt antes del marcapuntos y aumentar de la manera sig: 1 HEB, 2 pts derechos (el marcapuntos está entre estos 2 pts), 1 HEB. En la vta sig, tejer las HEB retorcidas de derecho para evitar agujeros. ----------------------------------------------------- TOP: Tejido en redondo en ag circular, de arriba hacia abajo. PECHERA: Montar 134-134-140-144-144-148 pts en ag circular tamaño 3.5 mm con Belle. Tejer A.1 (= 2 pts) sobre todos los pts. Cuando A.1 ha sido tejido 1 vez verticalmente, cambiar a ag circular tamaño 4 mm. En la vta sig, tejer todos los pts de derecho y aumentar 16-20-14-22-42-46 pts distribuidos equitativamente = 150-154-154-166-186-194 pts. En la vta sig, insertar 4 marcapuntos de la manera sig: Insertar el 1er marcapuntos en el último pt de la última vta, tejer 45-47-49-55-65-71 pts derechos (= pieza del frente), 1 pt derecho e insertar el 2º marcapuntos en este pt, 28-28-26-26-26-24 pts derechos (= manga), 1 pt derecho e insertar el 3er marcapuntos en este pt, 45-47-49-55-65-71 pts derechos (= pieza de la espalda), 1 pt derecho e insertar el 4º marcapuntos en este pt, 28-28-26-26-26-24 pts derechos (= manga). ¡RECORDAR MANTENER LA MISMA TENSIÓN DE TEJIDO DE LA MUESTRA! Después tejer de la manera sig – AL MISMO TIEMPO, aumentar para el RAGLÁN – ver explicación arriba. Tejer la mitad de los aum para el raglán para el 1er marcapuntos (ver explicación arriba) tejer 14-15-16-19-24-27 pts derechos, A.2 (= 17 pts), tejer de derecho hasta que resten 1-1-2-2-2-2 pts antes del 2º marcapuntos, tejer el RAGLÁN – ver explicación arriba, tejer de derecho hasta que resten 1-1-2-2-2-2 pts antes del 3er marcapuntos, tejer el raglán, tejer de derecho hasta que resten 1-1-2-2-2-2 pts antes del 4º marcapuntos, tejer el raglán, tejer de derecho hasta que resten 1-1-2-2-2-2 pts antes del 1er marcapuntos, tejer el raglán. Tejer los pts aumentados en pt jersey. Cuando A.2 ha sido tejido 1 vez verticalmente, tejer en pt jersey sobre todos estos pts. Después de que todos los aumentos estén hechos, hay 294-314-338-358-394-426 pts en la ag. La pieza mide aprox 14-15-16-17-18-19 cm. Continuar con pt jersey y tejer de la manera sig: Tejer los primeros 81-87-95-103-117-129 pts (= pieza del frente), deslizar los 66-70-74-76-80-84 pts sig en un gancho o seguro aux para la manga, montar 6-6-6-8-8-8 pts bajo la manga (insertar un marcapuntos en el centro de los nuevos pts), tejer los 81-87-95-103-117-129 pts sig (= pieza de la espalda), deslizar los 66-70-74-76-80-84 pts sig en un gancho o seguro aux para la manga, montar 6-6-6-8-8-8 pts bajo la manga (insertar un marcapuntos en el centro de los nuevos pts) = 174-186-202-222-250-274 pts restantes en la ag. Insertar 1 marcapuntos en la pieza, AHORA MEDIR LA PIEZA A PARTIR DE AQUÍ! CUERPO: Continuar en pt jersey. Cuando la pieza mida 3 cm, disminuir 1 pt de cada lado de cada marcapuntos en los lados (= 4 pts disminuidos) – LEER TIP PARA DISMINUIR! Repetir las disminuciones a cada 2½-4-4-4-4-4 cm 5-3-3-3-3-3 veces más = 150-170-186-206-234-258 pts. Cuando la pieza mida 20 cm en toda las tallas, aumentar 1 pt de cada lado de cada marcapuntos en los lados (= 4 pts aumentados) – LEER TIP PARA AUMENTAR. Repetir los aumentos a cada 2-4-4-4-4-4 cm 5-3-3-3-3-3 veces más = 174-186-202-222-250-274 pts. Cuando la pieza mida 31-32-33-34-35-36 cm, cambiar a ag circular tamaño 3.5 mm. Tejer A.3 (= 2 pts) sobre todos los pts. Rematar. MANGA: Tejida en redondo en ag de doble punta. Deslizar los pts del gancho o seguro aux nuevamente en las ag de doble punta tamaño 4 mm y montar 6-6-6-8-8-8 pts bajo la manga = 72-76-80-84-88-92 pts. Tejer en pt jersey por 2 cm, en la vta sig disminuir 8 pts distribuidos equitativamente = 64-68-72-76-80-84 pts. Cambiar a las ag de doble punta tamaño 3.5 mm. Tejer A.3 sobre todos los pts. Rematar. Tejer la otra manga de la misma manera. ENSAMBLAJE: Coser la abertura bajo las mangas. |
|||||||||||||||||||
Explicaciones del diagrama |
|||||||||||||||||||
|
|||||||||||||||||||
 |
|||||||||||||||||||
 |
|||||||||||||||||||
¿Terminaste este patrón?Entonces, etiqueta tus fotos con #dropspattern o envíalas a la galería #dropsfan. ¿Necesitas ayuda con este patrón?Encontrarás 21 videos tutoriales, un espacio para comentarios/preguntas y más visitando la página del patrón en garnstudio.com © 1982-2026 DROPS Design A/S. Todos los derechos reservados. Este documento, incluyendo todas sus sub-secciones, está protegido por los derechos de autor (copyright). Lee más acerca de lo que puedes hacer con nuestros patrones en la parte de abajo de cada patrón de nuestro sitio. |
|||||||||||||||||||

Con más de 40 años en el diseño de modelos de punto y de ganchillo, DROPS Design ofrece una de las más vastas colecciones de patrones gratuitos en el internet - traducidos en 17 idiomas. Al día de hoy, contamos con 324 catálogos y 12210 patrones - de los cuales 11590 están traducidos en español.
Nosotros trabajamos con mucho esmero para brindarte lo mejor que las labores de punto y ganchillo tienen para ofrecer,inspiración y consejos, así como hilos de magnífica calidad a precios increíbles! Te gustaría usar nuestros patrones para otro fin además del uso personal? Puedes leer acerca de lo que estás permitida a hacer en el texto de Copyright en la parte de abajo de todos nuestros patrones. Felices labores!
Escribe un comentario sobre DROPS Extra 0-1104
¡Nos encantaría saber qué piensas acerca de este patrón!
Si quieres escribir una pregunta referente al patrón, por favor asegúrate de elegir la categoría correcta en el formulario debajo, para acelerar el proceso de respuesta. Los campos obligatorios están marcados con un *.