
Categorías populares
¿Buscas un hilo?


Comentarios / Preguntas (97)
![]() Conny Van Noord escribió:
Conny Van Noord escribió:
Ook ik kom er niet helemaal uit. Per mouw heb ik 2 x a2. Als ik de meerderingen aan beide zijden van de a2 maak, heb ik per mouw 4 meerderingen per keer (1 meerd, 19, 1 meerd. ,1r, 1 meerd, 19, 1 meerd.). Dan kom ik niet goed uit. Moeten de meerderingen misschien alleen in het midden? Zo lijkt het wel op de foto. Ik heb het nu alleen aande buitenkant gedaan, maar dan is de raglan niet het eind van de mouw. Voor ik opnieuw begin, zou ik het graag zeker weten. Alvast bedankt
24.05.2016 - 11:05DROPS Design respondió:
Hoi Conny. De A.2 zijn voor de mouw, maar je meerdert zo: brei st achterpand, meerder 1 (= deze is op het achterpand), A.2, meerder 1 (= mouw), 1 r, meerder 1 (= mouw), A.2, meerder 1 (= deze is dan op het voorpand), brei de st voor het voorpand en herhaal bij de tweede mouw.
25.05.2016 - 15:49
![]() Kathleen escribió:
Kathleen escribió:
Hallo, ich habe nun den Fehler gefunden. Bei Größe XL sollten es laut Anleitung 56 Zunahmen für beide Ärmel sein. Das geht aber nicht, da 8x8 Zunahmen plus 6x8 Zunahmen (also 4 pro Ärmel) sind insgesamt 112 Zunahmen. Bitte den Fehler schnellstmöglich korrigieren! Dankeschön.
02.05.2016 - 07:00DROPS Design respondió:
Hallo Kathleen, die Anleitung wurde von uns geprüft und sie ist korrekt. Sie haben 39 Ärmelmaschen und nehmen in in Grösse XL wie folgt zu: beidseitig 8 x in jeder 2. R und dann 6 x in jeder 4. R, also 16 (2 x 8) +12 (2 x 6)+ 39 M = die angegebenen 67 Maschen.
02.05.2016 - 10:01
![]() Kathleen escribió:
Kathleen escribió:
Nach 15 Zunahmerunden (Vorder- und Rückenteil) haben meine Ärmel bereits 67 Maschen. Ich habe bei den Ärmeln in jeder 2. Runde je 4 M zugenommen (2 für die Raglanschräge und 2 zwischen den Mustern A2). Wo liegt mein Fehler?
01.05.2016 - 18:57DROPS Design respondió:
Siehe Antwort zu Ihrem zweiten Kommentar.
02.05.2016 - 10:01
![]() Margriet escribió:
Margriet escribió:
Waar plaats ik de markeerder of is dit aan het begin en eind van voor-achterpand?
27.04.2016 - 16:44
![]() Deborah Hardie escribió:
Deborah Hardie escribió:
I cannot seem to get the required number of stitches at the end, and always seem to have too many. Front/back Increase one stitch. Is that one in the front piece and one in the back each round or one stitch per round alternating between front and back? Are the raglan increases in the final count because I would have way too much. The sleeve increase I take it starts from the one stitch between the two A2 sections so that there is an inverted V between the two A2 sections on completion.
11.04.2016 - 19:02DROPS Design respondió:
Dear Mrs Hardie, inc for raglan 2 sts on each piece (front, back and each sleeve), dec will be done differently on body (4 sts inc for body on each inc round) and on sleeve (2 sts inc on each sleeve). After all inc for raglan are done, you will then slip sts for sleeve on a st holder and finish body top down. Happy knitting!
12.04.2016 - 09:06
![]() Paulina Krecker escribió:
Paulina Krecker escribió:
Ich bin mir bei den Raglanzunahmen etwas unsicher. Die Anleitung sagt, beidseitig von A2 wird zugenommen. Ist das dann auf diese Weise richtig?: 1 Zun., (A2, 1 Zun., 1M re, 1 Zun., A2,) 1 Zun.? Hier zählt dann die erste und letzte Zunahme zu dem Vorder- bzw. Rückenteil und das in Klammern ist der Ärmel? Weiter wird in der Anleitung gesagt "An den Ärmeln: 1 M in jeder 2. Rd(...) zunehmen." Wird diese Zunahme zusätzlich zu der Raglanzunahme gemacht?
10.10.2015 - 22:37DROPS Design respondió:
Das mit den Zunahmen und der Aufteilung haben Sie richtig verstanden. Die Zunahmebeschreibung für die Ärmel ist nicht zusätzlich, sondern es handelt sich dabei um die Raglanzunahmen. Die Raglanzunahmen an den Ärmeln (also die von Ihnen in Klammern gesetzten Zunahmen) machen Sie anfangs in jeder 2. Rd, dann in jeder 4. Rd, während Sie die Raglanzunahmen an Vorder- und Rückenteil anfangs in JEDER Rd machen, dann in jeder 2. Rd, hier wird also häufiger zugenommen.
13.10.2015 - 17:34
![]() Simard escribió:
Simard escribió:
Je fait le modele 159-33 et le raglan pour la manche je mais mon marqueur lorsque j'ajoute le jete avant ou apres comme le motif de la manche a 39 mailles merci
19.09.2015 - 19:44DROPS Design respondió:
Bonjour Mme Simard, les augmentations du raglan se font avant et après chaque motif A.2, augmentez ainsi: 1 jeté, A.2, 1 jeté, les mailles de A.2 se tricotent les unes au-dessus des autres, les jetés "appartiennent" à la partie tricotée avant ou après en fonction de la position. On augmente 2 m dans chaque pièce (devant, dos, manches) entre chaque motif A.2 à chaque tour d'augmentations (= 8 augmentations par tour au total). Bon tricot!
21.09.2015 - 08:50
![]() Marie escribió:
Marie escribió:
Chère drops team Je suis en train de tricoter le modèle Esther et d'après mes calculs, il faut 32 tours pour finir toutes les augmentations pour le raglan. Dois-je donc tricoter A2 deux fois ? Amicalement Marie
15.09.2015 - 15:16DROPS Design respondió:
Bonjour Marie, vous répétez A.2 en hauteur jusqu'à ce que toutes les augmentations soient faites et que l'ouvrage mesure 17-26 cm (cf taille). Bon tricot!
15.09.2015 - 17:19Danesh escribió:
Thanks a lot for your prompt answer. I still do not know for sleeve increase, where exactly should I increase to preserve A2 model? The location of2 increase for each sleeve according to A2?
24.08.2015 - 13:24DROPS Design respondió:
Dear Mrs Danesh, inc for sleeve are done between both A.2 for sleeve, ie work back sts (1st sleeve) or front piece (2nd sleeve) (remember inc for raglan), work A.2, inc for sleeve, K1 (first row on sleeve), inc for sleeve, work A.2, ie the number of sts between A2 will increase. Happy knitting!
24.08.2015 - 14:52Danesh escribió:
Thanks a lot for the answer. Should the sleeve increase be done from the beginning of raglan increase? Where should the sleeve increase be done?
22.08.2015 - 12:06DROPS Design respondió:
Dear Mrs Danesh, you inc for raglan while working A.2 - inc are different on front/back piece and on sleeve: Inc on front/back piece: 1 st every round a total of 14-30 times (see size), then on every other round 7-9 times. Inc on sleeves: 1 st every other round a total of 2-12 times and then every 4th round a total of 6 times. After all dec are done, you should have 262-394 sts and piece should measure 17-26 cm from shoulder, work next round dividing work for body. Happy knitting!
24.08.2015 - 10:33
|
||||||||||||||||||||||
Esther#esthertop |
||||||||||||||||||||||
 |
 |
|||||||||||||||||||||
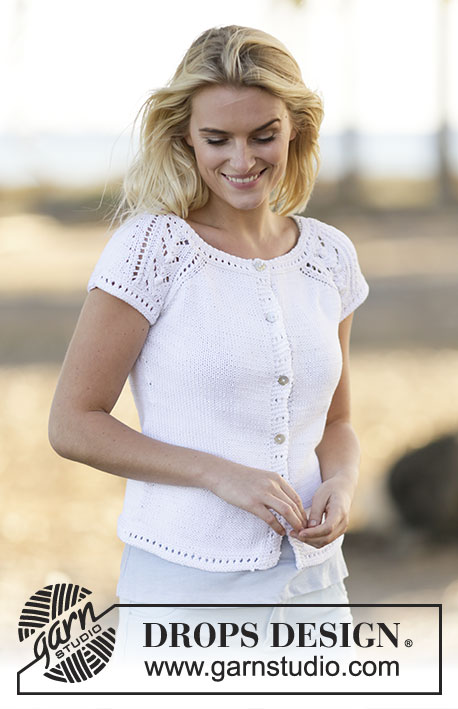
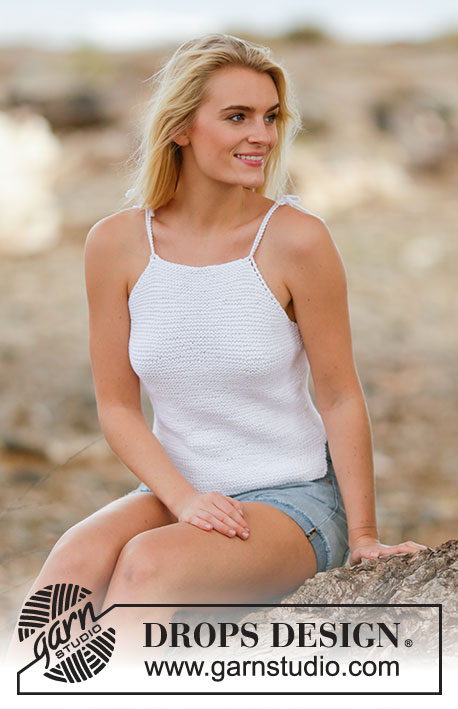
Top de punto DROPS con raglán y patrón de calados, tejido de arriba abajo con manga corta en ”Muskat”. Talla: S - XXXL.
DROPS 159-33 |
||||||||||||||||||||||
|
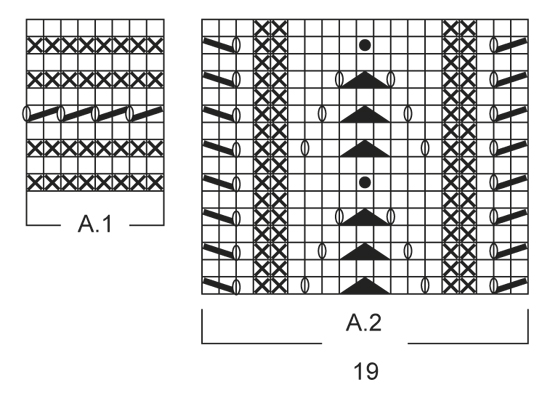
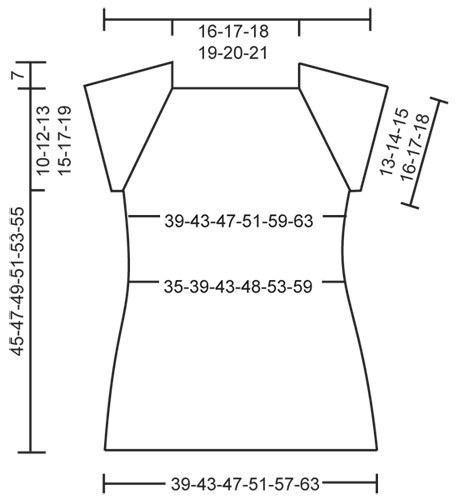
PATRÓN: Ver los diagramas A.1 y A.2. RAGLÁN: Aum para el raglán a cada lado de A.2. Aum trabajando 1 HEB (lazada), en la sig vta trabajar la HEB como pt retorcido para evitar que se formen agujeros. Los aum en el cuerpo y en las mangas son diferentes, como se explica en el patrón. TIP PARA LOS AUMENTOS: Comenzar los aum 1 pt antes del marcapuntos (MP) y aum como sigue: 1 HEB, 2 d. (el MP queda entre estos 2 pts), 1 HEB. En la sig vta trabajar la HEB de derecho retorcido para evitar que se formen agujeros. TIP PARA LAS DISMINUCIONES: Dism como sigue antes del MP: 2 pjd. Dism como sigue después del MP: Desl 1 pt como de derecho, 1 d., pasar el pt desl por encima. ----------------------------------------------------------------------- TOP: Se trabaja en redondo en ag circular, de arriba abajo. CANESÚ: ¡LEER TODA LA SECCIÓN SIGUIENTE ANTES DE CONTINUAR! Mont 146-150-154-158-162-166 pts en ag circular tamaño 3 mm con Muskat. Trabajar A.1. Cuando se ha completado A.1, cambiar a ag circular tamaño 4 mm. Trabajar la sig vta como sigue desde el centro de la espalda: Tejer 17-18-19-20-21-22 pts en pt jersey (= espalda), trabajar A.2 (= 19 pts), 1 pt en pt jersey, A.2 (= 19 pts) (= 39 pts en la manga), trabajar 34-36-38-40-42-44 pts en pt jersey (= delantero), A.2, 1 pt en pt jersey y A.2 (= 39 pts en la manga) y finalizar con 17-18-19-20-21-22 pts en pt jersey (= espalda). Continuar con el patrón de la misma manera, AL MISMO TIEMPO comenzar en la sig vta los aum para el raglán - ver explicación arriba. Aum en el delantero/espalda: 1 pt en cada vta un total de 14-16-18-20-26-30 vcs, después cada segunda vta 7-8-9-10-9-9 vcs. Aum en las mangas: 1 pt cada segunda vta un total de 2-4-6-8-10-12 vcs y después cada 4ª vta un total de 6 vcs en todas las tallas. Después de todos los aum quedan 262-286-310-334-366-394 pts en la fila y la labor mide aprox. 17-19-20-22-24-26 cm desde el hombro hacia abajo. Trabajar la sig vta como sigue: 38-42-46-50-56-61 d. (= espalda), desl los sig 55-59-63-67-71-75 pts a un gancho aux para la manga, mont 6-6-6-8-8-10 pts nuevos, insertar 1 MP en el centro de estos pts nuevos, 76-84-92-100-112-122 d. (= delantero), desl los sig 55-59-63-67-71-75 pts a un gancho aux para la manga, mont 6-6-6-8-8-10 pts nuevos, insertar 1 MP en el centro de estos pts nuevos y trabajar de derecho los 38-42-46-50-56-61 pts restantes ( = espalda) = 164-180-196-216-240-264 pts en la fila - AHORA MEDIR LA LABOR DESDE AQUÍ. CUERPO: Continuar con pt jersey. Cuando la labor mida 4 cm, dism 1 pt a cada lado de los MP de los lados - LEER TIP PARA LAS DISMINUCIONES (= 4 pts disminuidos). Repetir las dism cada 4 cm un total de 4 vcs = 148-164-180-200-224-248 pts. Cuando la labor mida 22 cm en todas las tallas, aum 1 pt a cada lado de los MP de los lados - LEER TIP PARA LOS AUMENTOS (= 4 pts aumentados). Repetir los aum cada 2.5 cm un total de 4 vcs = 164-180-196-216-240-264 pts. Cuando la labor mida 33-33-34-34-34-34 cm, cambiar a ag circular tamaño 3 mm. Trabajar el patrón según el diagrama A.1, después rematar flojo. El top mide aprox. 52-54-56-58-60-62 cm desde el hombro hacia abajo. BORDE DE LA MANGA: Se trabaja en redondo en ag de doble punta. Desl los 55-59-63-67-71-75 pts desde el gancho aux de vta a la ag de doble punta tamaño 3 mm y mont 6-6-6-8-8-10 pts nuevos bajo la manga = 61-65-69-75-79-85 pts. Trabajar el patrón en redondo según el diagrama A.1 y rematar flojo. Trabajar el otro borde de la misma manera. TERMINACIÓN: Coser la abertura bajo las mangas. |
||||||||||||||||||||||
Explicaciones del diagrama |
||||||||||||||||||||||
|
||||||||||||||||||||||
 |
||||||||||||||||||||||
 |
||||||||||||||||||||||
¿Terminaste este patrón?Entonces, etiqueta tus fotos con #dropspattern #esthertop o envíalas a la galería #dropsfan. ¿Necesitas ayuda con este patrón?Encontrarás 24 videos tutoriales, un espacio para comentarios/preguntas y más visitando la página del patrón en garnstudio.com © 1982-2026 DROPS Design A/S. Todos los derechos reservados. Este documento, incluyendo todas sus sub-secciones, está protegido por los derechos de autor (copyright). Lee más acerca de lo que puedes hacer con nuestros patrones en la parte de abajo de cada patrón de nuestro sitio. |
||||||||||||||||||||||


Con más de 40 años en el diseño de modelos de punto y de ganchillo, DROPS Design ofrece una de las más vastas colecciones de patrones gratuitos en el internet - traducidos en 17 idiomas. Al día de hoy, contamos con 324 catálogos y 12290 patrones - de los cuales 11673 están traducidos en español.
Nosotros trabajamos con mucho esmero para brindarte lo mejor que las labores de punto y ganchillo tienen para ofrecer,inspiración y consejos, así como hilos de magnífica calidad a precios increíbles! Te gustaría usar nuestros patrones para otro fin además del uso personal? Puedes leer acerca de lo que estás permitida a hacer en el texto de Copyright en la parte de abajo de todos nuestros patrones. Felices labores!
Escribe un comentario sobre DROPS 159-33
¡Nos encantaría saber qué piensas acerca de este patrón!
Si quieres escribir una pregunta referente al patrón, por favor asegúrate de elegir la categoría correcta en el formulario debajo, para acelerar el proceso de respuesta. Los campos obligatorios están marcados con un *.