
Categorías populares
¿Buscas un hilo?


Comentarios / Preguntas (97)
![]() Michèle Gillet escribió:
Michèle Gillet escribió:
Bonjour,je voudrais tricoter le modèle Esther, vous parlez de marqueurs mais à aucun moment vous ne dites ou les placer sur le tricot contrairement à d'autres modèles ou vous donnez l'information. Merci de votre reponse
27.04.2021 - 09:05DROPS Design respondió:
Bonjour Mme Gillet, lorsque vous augmentez pour le raglan, vous augmentez avant/après A.2 (cf taille, on augmente ici à un rythme différent sur le dos/le devant et les manches: vous augmenterez soit 4 m par tour (par ex. lorsque vous augmente pour le dos et le devant tous les tours mais sur les manches tous les 2 tours) soit 8 m par tour (= dos/devant et manches))- cf RAGLAN, lorsque vous augmenterez en bas du pull (DOS & DEVANT:), vous placerez un marqueur de chaque côté du top et augmenterez alors comme indiqué sous AUGMENTATIONS. Bon tricot!
27.04.2021 - 11:12
![]() Donna Lewis escribió:
Donna Lewis escribió:
What happened to the charts?, I’m midway through knitting this, and they’ve disappeared! I’m so sad right now.
01.04.2021 - 12:02DROPS Design respondió:
Hi Donna, it is ok now. Please check it again. Happy knitting!
01.04.2021 - 13:32
![]() Anna Michailidis escribió:
Anna Michailidis escribió:
I have created a layout chart to show how to do the INCREASES for Chart A.2. in the 3rd (L) size on Ravelry on my project page for Esther. My user name is amickeyknitter
13.01.2021 - 01:00
![]() Rosa Isabel Sánchez escribió:
Rosa Isabel Sánchez escribió:
Hola me podrían decir cuánto hilo necesito para hacer este patrón
12.01.2021 - 21:48DROPS Design respondió:
Hola Rosa, que talla haces?
13.01.2021 - 18:56
![]() Anna Michailidis escribió:
Anna Michailidis escribió:
Thank you!
06.01.2021 - 16:36
![]() Anna Michailidis escribió:
Anna Michailidis escribió:
Thank you for your prompt reply. So I am clear, rows I to 3 are correct as follows? A2 - Row 1 - No Increases. A2 - Row 2 - Increases as follows: k19, INC. /A.2, INC., K1, INC., A.2 / INC., K38, INC. / A.2, INC., K1, INC. A.2 / INC, K19 = 8 Increases A2 - Row 3 - Increases as follows: k19 - INC. / A.2, K1, A.2 / INC. K38, INC. / A.2, K1, A.2 / INC., K19 = 4 Increases
05.01.2021 - 22:25DROPS Design respondió:
Dear Mrs Michailidis, row 2 with 8 increases is right, but on row 3 you will have: K20 (1 inc from round 2), inc, A.2, K3 (sleeve: K1 + 2 inc), inc, K40 (38 + 2 inc from round 2), etc... hope you see what I mean. Happy knitting!
06.01.2021 - 08:01
![]() Anna Michailidis escribió:
Anna Michailidis escribió:
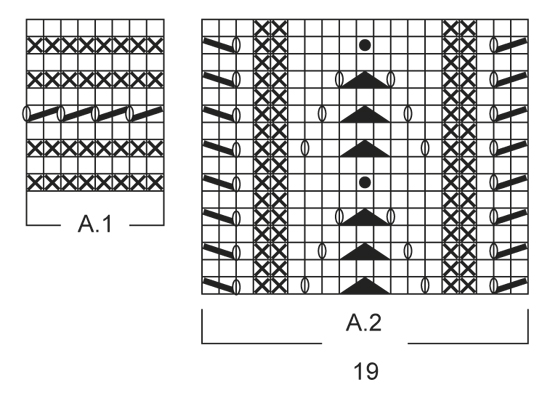
Chart A2 -154stitches (3rd size) - 1st row - correct? K18/YO/K1/*M*/ K2tog,YO/K1/P2/K1/YO/K2/Δ/K2/YO/K1/P2/K1/YO,(sl1,K1,psso)/*M* /K1/ K2tog,YO/K1/P2/K1/YO/K2/Δ/K2/YO/K1/P2/K1/YO,(sl1,K1,psso)/*M* /K1/YO/K36/YO/K1/*M* /K2tog,YO/K1/P2/K1/YO/K2/Δ/K2/YO/K1/P2/K1/YO,(sl1,K1,psso)/*M* /K1/ K2tog,YO/K1/P2/K1/YO/K2/Δ/K2/YO/K1/P2/K1/YO,(sl1,K1,psso)/*M* /K1/YO/K18
03.01.2021 - 23:20DROPS Design respondió:
Dear Mrs Michailidis, first row in A.2 is correct, but in 3rd size you will work: k19, A.2 (=19sts), K1, A.2 (=19sts), K38, A.2 (=19sts), K1, A.2 (=19sts), K19 = 154 sts. Happy knitting!
05.01.2021 - 10:02
![]() Anna Michailidis escribió:
Anna Michailidis escribió:
ESTHER - 159 / 33 Chart A2 -154stitches (3rd size) - 1st row - correct? K18/YO/K1/*M* /K2tog,YO/K1/P2/K1/YO/K2/Δ/K2/YO/K1/P2/K1/YO,(sl1,K1,psso)/*M* /K1/ K2tog,YO/K1/P2/K1/YO/K2/Δ/K2/YO/K1/P2/K1/YO,(sl1,K1,psso)/*M* /K1/YO/K36/YO/K1/*M* /K2tog,YO/K1/P2/K1/YO/K2/Δ/K2/YO/K1/P2/K1/YO,(sl1,K1,psso)/*M* /K1/ K2tog,YO/K1/P2/K1/YO/K2/Δ/K2/YO/K1/P2/K1/YO,(sl1,K1,psso)/*M* /K1/YO/K18
03.01.2021 - 23:18
![]() Stefania escribió:
Stefania escribió:
Hilfe Nach dem Marker fängt das Muster A2 mit zwei re zusammengestr. Maschen an. Für die Raglanzunahme muss gemäss Tipp vor und nach dem Marker 1 re M und 1 Umschlag gearbeitet werden. Wie verschiebt sich dann das Muster? Danke für ihre „Nachhilfstunde“
28.10.2020 - 15:29DROPS Design respondió:
Liebe Stefania, wenn Sie vor A.2 zunehmen, stricken Sie so: 1 Umschlag, dann stricken Sie A.2 (= 2 M re zusammen, 1 Umschlag, 1 M re usw...) - nach A.2 stricken Sie: also A.2 bis 1 M re, 1 Umschlag, 1 M abheben, 1 M re, die abgehobene M überziehen; dann 1 Umschlag. Die Maschenanzahl von glatt rechte Maschen zwischen 2 A.2 werden durch 2 zunehmen. Viel Spaß beim stricken!
28.10.2020 - 15:57
![]() Sue Trotter escribió:
Sue Trotter escribió:
I have set up my sleeves.... struggling to understand instructions. It says to Inc 1 stitch every round front and back but 1 stitch every other round sleeves.....yet increase tip describes a two stitch increase for the raglans. ( 1YO, K2, 1 YO) There are 2 pattern panels for each sleeve, with a stitch in the middle. Am I inc the raglan every row and increasing the centre ever other row? Or inc the body side of raglan every row & sleeve side every other row?
24.09.2020 - 23:43DROPS Design respondió:
Dear Mrs Trotter, you will increase with a yarn over at the beginning of front/back piece after A.2 and increase at the end of front/back piece before next A.2 - on sleeves you will increase at the begining of sleeve after A.2 and before next A.2. The increases will be worked sometimes only on body (= 4 increases on the round) or sometimes on body and sleeves (= 8 increases on the round). Happy knitting!
25.09.2020 - 09:18
|
||||||||||||||||||||||
Esther#esthertop |
||||||||||||||||||||||
 |
 |
|||||||||||||||||||||
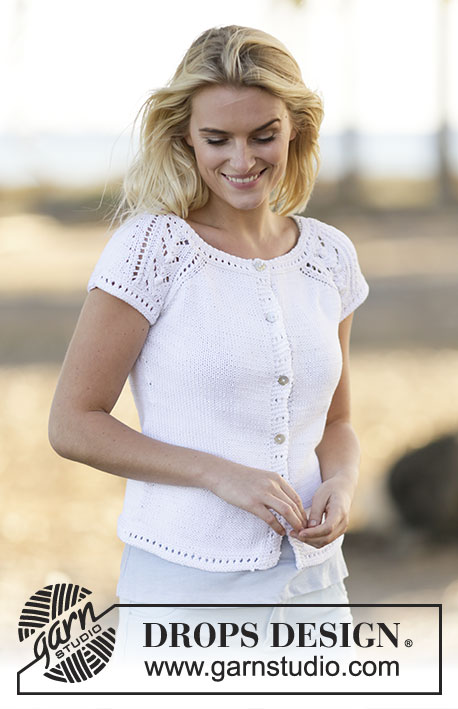
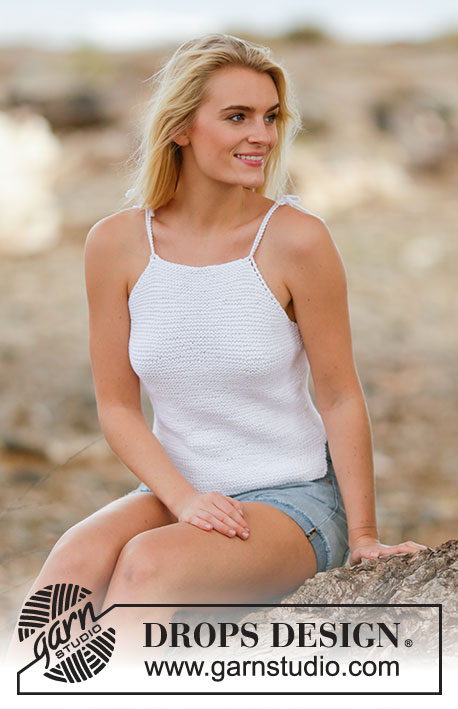
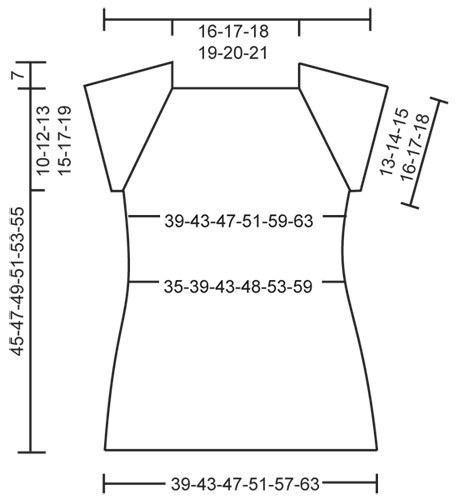
Top de punto DROPS con raglán y patrón de calados, tejido de arriba abajo con manga corta en ”Muskat”. Talla: S - XXXL.
DROPS 159-33 |
||||||||||||||||||||||
|
PATRÓN: Ver los diagramas A.1 y A.2. RAGLÁN: Aum para el raglán a cada lado de A.2. Aum trabajando 1 HEB (lazada), en la sig vta trabajar la HEB como pt retorcido para evitar que se formen agujeros. Los aum en el cuerpo y en las mangas son diferentes, como se explica en el patrón. TIP PARA LOS AUMENTOS: Comenzar los aum 1 pt antes del marcapuntos (MP) y aum como sigue: 1 HEB, 2 d. (el MP queda entre estos 2 pts), 1 HEB. En la sig vta trabajar la HEB de derecho retorcido para evitar que se formen agujeros. TIP PARA LAS DISMINUCIONES: Dism como sigue antes del MP: 2 pjd. Dism como sigue después del MP: Desl 1 pt como de derecho, 1 d., pasar el pt desl por encima. ----------------------------------------------------------------------- TOP: Se trabaja en redondo en ag circular, de arriba abajo. CANESÚ: ¡LEER TODA LA SECCIÓN SIGUIENTE ANTES DE CONTINUAR! Mont 146-150-154-158-162-166 pts en ag circular tamaño 3 mm con Muskat. Trabajar A.1. Cuando se ha completado A.1, cambiar a ag circular tamaño 4 mm. Trabajar la sig vta como sigue desde el centro de la espalda: Tejer 17-18-19-20-21-22 pts en pt jersey (= espalda), trabajar A.2 (= 19 pts), 1 pt en pt jersey, A.2 (= 19 pts) (= 39 pts en la manga), trabajar 34-36-38-40-42-44 pts en pt jersey (= delantero), A.2, 1 pt en pt jersey y A.2 (= 39 pts en la manga) y finalizar con 17-18-19-20-21-22 pts en pt jersey (= espalda). Continuar con el patrón de la misma manera, AL MISMO TIEMPO comenzar en la sig vta los aum para el raglán - ver explicación arriba. Aum en el delantero/espalda: 1 pt en cada vta un total de 14-16-18-20-26-30 vcs, después cada segunda vta 7-8-9-10-9-9 vcs. Aum en las mangas: 1 pt cada segunda vta un total de 2-4-6-8-10-12 vcs y después cada 4ª vta un total de 6 vcs en todas las tallas. Después de todos los aum quedan 262-286-310-334-366-394 pts en la fila y la labor mide aprox. 17-19-20-22-24-26 cm desde el hombro hacia abajo. Trabajar la sig vta como sigue: 38-42-46-50-56-61 d. (= espalda), desl los sig 55-59-63-67-71-75 pts a un gancho aux para la manga, mont 6-6-6-8-8-10 pts nuevos, insertar 1 MP en el centro de estos pts nuevos, 76-84-92-100-112-122 d. (= delantero), desl los sig 55-59-63-67-71-75 pts a un gancho aux para la manga, mont 6-6-6-8-8-10 pts nuevos, insertar 1 MP en el centro de estos pts nuevos y trabajar de derecho los 38-42-46-50-56-61 pts restantes ( = espalda) = 164-180-196-216-240-264 pts en la fila - AHORA MEDIR LA LABOR DESDE AQUÍ. CUERPO: Continuar con pt jersey. Cuando la labor mida 4 cm, dism 1 pt a cada lado de los MP de los lados - LEER TIP PARA LAS DISMINUCIONES (= 4 pts disminuidos). Repetir las dism cada 4 cm un total de 4 vcs = 148-164-180-200-224-248 pts. Cuando la labor mida 22 cm en todas las tallas, aum 1 pt a cada lado de los MP de los lados - LEER TIP PARA LOS AUMENTOS (= 4 pts aumentados). Repetir los aum cada 2.5 cm un total de 4 vcs = 164-180-196-216-240-264 pts. Cuando la labor mida 33-33-34-34-34-34 cm, cambiar a ag circular tamaño 3 mm. Trabajar el patrón según el diagrama A.1, después rematar flojo. El top mide aprox. 52-54-56-58-60-62 cm desde el hombro hacia abajo. BORDE DE LA MANGA: Se trabaja en redondo en ag de doble punta. Desl los 55-59-63-67-71-75 pts desde el gancho aux de vta a la ag de doble punta tamaño 3 mm y mont 6-6-6-8-8-10 pts nuevos bajo la manga = 61-65-69-75-79-85 pts. Trabajar el patrón en redondo según el diagrama A.1 y rematar flojo. Trabajar el otro borde de la misma manera. TERMINACIÓN: Coser la abertura bajo las mangas. |
||||||||||||||||||||||
Explicaciones del diagrama |
||||||||||||||||||||||
|
||||||||||||||||||||||
 |
||||||||||||||||||||||
 |
||||||||||||||||||||||
¿Terminaste este patrón?Entonces, etiqueta tus fotos con #dropspattern #esthertop o envíalas a la galería #dropsfan. ¿Necesitas ayuda con este patrón?Encontrarás 24 videos tutoriales, un espacio para comentarios/preguntas y más visitando la página del patrón en garnstudio.com © 1982-2026 DROPS Design A/S. Todos los derechos reservados. Este documento, incluyendo todas sus sub-secciones, está protegido por los derechos de autor (copyright). Lee más acerca de lo que puedes hacer con nuestros patrones en la parte de abajo de cada patrón de nuestro sitio. |
||||||||||||||||||||||


Con más de 40 años en el diseño de modelos de punto y de ganchillo, DROPS Design ofrece una de las más vastas colecciones de patrones gratuitos en el internet - traducidos en 17 idiomas. Al día de hoy, contamos con 324 catálogos y 12290 patrones - de los cuales 11673 están traducidos en español.
Nosotros trabajamos con mucho esmero para brindarte lo mejor que las labores de punto y ganchillo tienen para ofrecer,inspiración y consejos, así como hilos de magnífica calidad a precios increíbles! Te gustaría usar nuestros patrones para otro fin además del uso personal? Puedes leer acerca de lo que estás permitida a hacer en el texto de Copyright en la parte de abajo de todos nuestros patrones. Felices labores!
Escribe un comentario sobre DROPS 159-33
¡Nos encantaría saber qué piensas acerca de este patrón!
Si quieres escribir una pregunta referente al patrón, por favor asegúrate de elegir la categoría correcta en el formulario debajo, para acelerar el proceso de respuesta. Los campos obligatorios están marcados con un *.