
Categorías populares
¿Buscas un hilo?


Comentarios / Preguntas (68)
![]() Pirkko escribió:
Pirkko escribió:
I just finished the back square and I am in the part that you go to knitting 1 garter sts,k5,A2,k5,1garter.The instructions then say until finished measurement. How long is that finished measurement?
26.01.2024 - 19:29
![]() Jeeva escribió:
Jeeva escribió:
Hi, thank you so much for the pattern, as a beginner, this pattern is my first attempt at an apparel. And i got to learn many new techniques and tips. But i only had 1 problem and that was the size. I did a xxl but it looks smaller than the mentioned dimensions, not sure why. Though i made sure the stitches and tension were correctly managed. Any suggestions for improvement?
04.12.2023 - 15:51
![]() Lorraine Stephens escribió:
Lorraine Stephens escribió:
Drops 160-25 pattern to finish edge it says to pick up 20 stitches, then knit 63 stitches from holder, then pick up 40 stitches and knit next 63 stitches from holder and finally pick up 20 more stitches. I am so confused. Where do you pick up the 20,40 and 20 stitches from?
13.06.2023 - 04:30DROPS Design respondió:
See answer below :)
13.06.2023 - 08:40
![]() Lorraine New Stephens escribió:
Lorraine New Stephens escribió:
On the drops 160-25 pattern for the edge instructions it says to pick up 20 stitches then knit the 63 stitches then pick up 40 stitches and knit next 63 stitches then pick up another 20 stitches. Where do you pick up the 20, then 40 then another 20 from?
13.06.2023 - 04:22DROPS Design respondió:
Dear Mrs New Stephens, start picking up stitches straight after the seam on the sleeve (you left 9 cm left on sleeve seam - see chart), pick up 20 sts along these 9 cm, then work the 63 sts, pick up 40 sts along the 9 cm x 2 sides on top of next sleeve, pick up 63 sts along the other side of square and finish picking up 20 sts along the 9 cm on top of sleeve. Happy knitting!
13.06.2023 - 08:39
![]() Fanni escribió:
Fanni escribió:
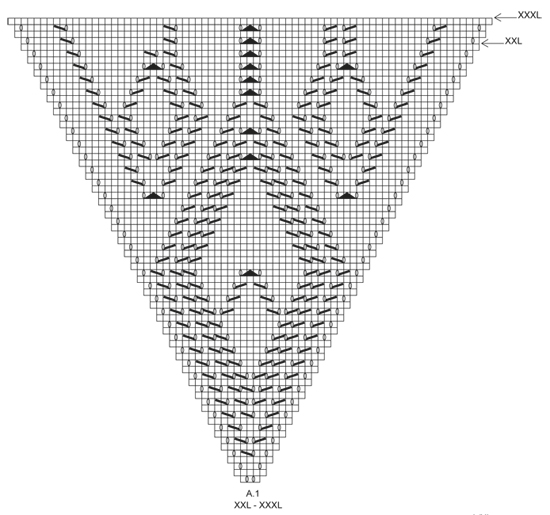
Hi, I think you have an error on the A1 diagrom for size xxl-xxxl. In the last 4 row on the left side a yarn over and a decrease is missing. Otherwise, it's a nice pattern, thank you.
24.04.2023 - 18:03
![]() Vania Monaco escribió:
Vania Monaco escribió:
Thank you for this great design and for your website full of tips. Unfortunately it appears that the schemes A3 to A6 have disappeared from this page. Could you please have a look? Thanks!
06.10.2022 - 01:26DROPS Design respondió:
Dear Mrs Monaco, you should find diagrams A.3 to A.6 just above the measurement chart (below A.1 in size S/M -LXL). Happy knitting!
06.10.2022 - 09:06
![]() Isabelle REYT escribió:
Isabelle REYT escribió:
Merci pour le retour mais cela ne répond pas à ma question. Sur le premier tour de AU, il ne faut pas augmenter entre les marqueurs. Est que quand on tricote A6, une deuxième fois est qu'il ne faut pas augmenter entre les marqueurs également ? Ce n'est pas précisé. Merci
07.09.2022 - 08:40DROPS Design respondió:
Bonjour Mme Reyt, effectivement, quand vous augmentez dans A.6 vous ne devez pas augmenter entre le 1er et le 2ème marqueur ni entre le 3ème et le 4ème marqueur - les augmentations doivent donc être réparties entre le 2ème et le 3ème marqueur et entre le 4ème et le 1er marqueur. Bon tricot!
07.09.2022 - 09:55
![]() Isabelle escribió:
Isabelle escribió:
Bonjour Concernant les dernières augmentations sur A6. Dois je aussi ne pas augmenter sur les mailles milieu dos du haut et bas ? Merci
06.09.2022 - 09:02DROPS Design respondió:
Bonjour Isabelle, les augmentations de la bordure dans A.6 se font à intervalles réguliers réparties sur tout le tour, pas uniquement à quelques endroits du tour. Découvrez ici comment répartir des augmentations régulièrement. Bon tricot!
06.09.2022 - 09:32
![]() Amal escribió:
Amal escribió:
Hi this a follow up to my previous question about the A 6 chart. Unless I misunderstood the directions for the edge border I am knitting in the round so it’s impossible to get the garter stitch ridge by knitting all the rows. Please recheck the edge directions and clarify if you can. I purled the rows 10 and 12 to get the ridge effect. Thank you
30.05.2022 - 17:38DROPS Design respondió:
Dear Amal, to work garter stitch in the round you will have to work 2 rounds (knit 1 round, purl 1 round), see video; that's what you have to work in A.6, ie knit (including lace pattern) rows 1 to 9, then Purl 1 round, K1 round and P 1 round = there are now 2 ridges in garter stitch. Can this help? Happy knitting!
31.05.2022 - 08:31
![]() Amal escribió:
Amal escribió:
Thank you for the response to my questions. I just want to ask about the A6 chart. We will be working on the right side on all the rows, shouldn’t the dark circle be purl on the right side so we get the garter stitch ridge?
30.05.2022 - 04:09DROPS Design respondió:
Hi Amal, When working garter stitch back and forth you knit from both the right and wrong side to give the ridge pattern. So at the top of A.6, rows 10-12 you knit from the wrong side, knit from the right side and knit from the wrong side to finish. Happy knitting!
30.05.2022 - 06:57
|
|||||||||||||||||||
Kamelia#kameliashoulderpiece |
|||||||||||||||||||
 |
 |
||||||||||||||||||
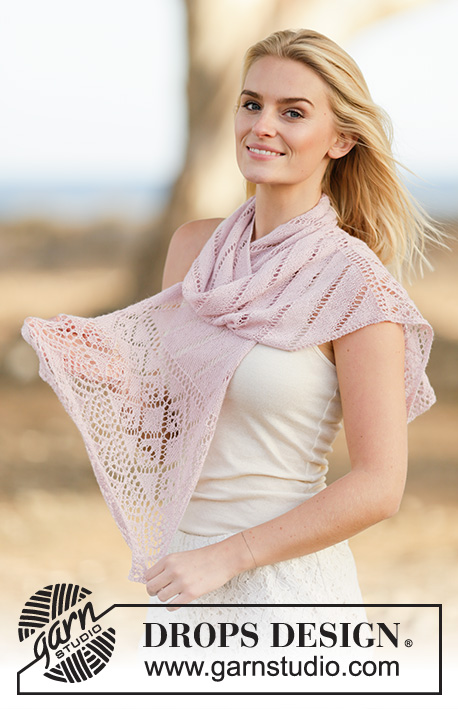
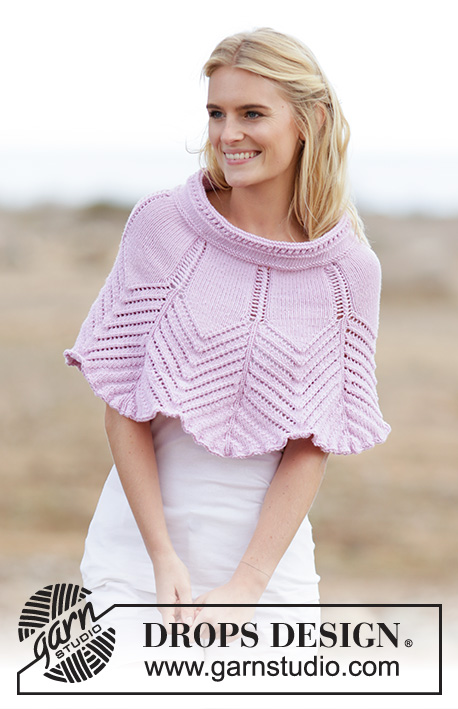
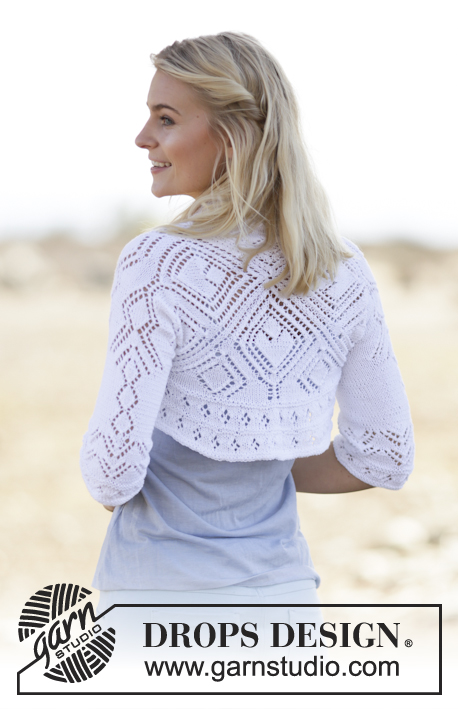
Bolero DROPS tejido en cuadrado con patrón de calados en ”Safran”. Talla: S - XXXL.
DROPS 160-25 |
|||||||||||||||||||
|
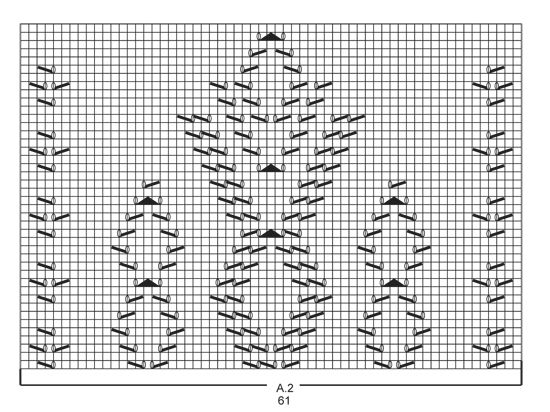
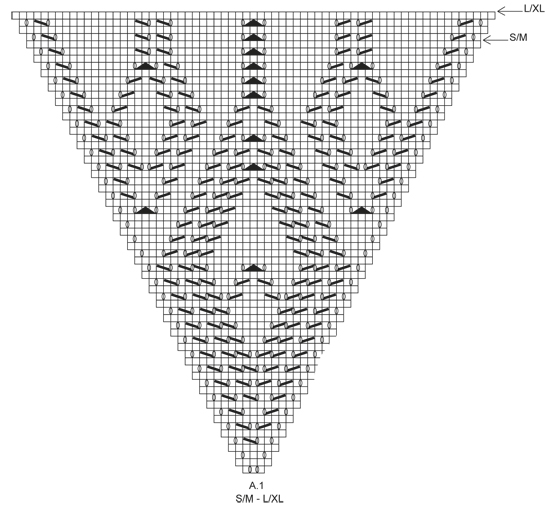
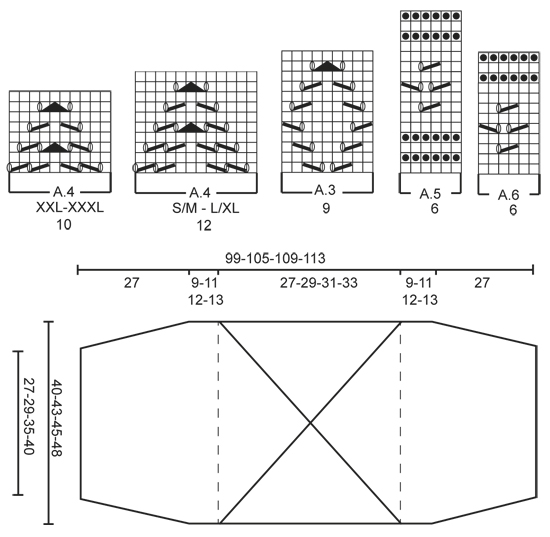
PT MUSGO (de ida y vta): Tejer todas las filas de derecho. 1 pliegue = 2 filas de derecho. TIP PARA LOS AUMENTOS: Aum 1 pt trabajando 1 HEB (lazada), en la sig fila trabajar la HEB de revés retorcido (es decir, trabajar por detrás del pt en lugar de por delante) para evitar agujeros. PATRÓN: Ver los diagramas A.1 a A.6. Los diagramas muestran todas las filas del patrón visto por el LD. ----------------------------------------------------------------------- BOLERO: Trabajar primero un cuadrado en redondo, después las mangas de ida y vta. ESPALDA: Trabajar en redondo con ag de doble punta, cambiar a ag circular cuando sea necesario. Mont 12 pts con Safran y distribuirlos en 4 agujas de doble punta tamaño 3.5 mm (= 3 pts en cada ag). Ahora insertar 4 marcapuntos (MP) en la labor como sigue: Insertar el 1er MP entre el 3er y 4º pt, el 2º MP entre el 6º y el 7º, el 3er MP entre el 9º y el 10º y el 4º MP entre el 12º y el 1º. Ahora trabajar según el diagrama A.1 (= 4 vcs) – elegir el diagrama correspondiente a su talla. Los pts con MP son pts de esquina, dejar que los MP sigan la labor al trabajar hacia fuera. ¡RECUERDE MANTENER LA MISMA TENSIÓN DE LA MUESTRA! Cuando se ha trabajado A.1 una vez en vertical (ver flecha para la talla correspondiente) se trabaja cada lado por separado = 63-67-71-75 pts a lo largo de cada lado y un total de 252-268-284-300 pts en la ag. Ahora trabajar sólo sobre los primeros 63-67-71-75 pts (= un lado, pts entre el 4º y el 1er MP), desl los otros lados a un gancho aux, trabajar sobre los pts entre el 2º y 3er MP más tarde. Ahora trabajar la labor de ida y vta. En la sig fila del LD trabajar como sigue: 2 pts en el primer pt, 0-2-4-6 d., A.2 (= 61 pts), 0-2-4-6 d., 2 pts en el último pt de la fila = 65-69-73-77 pts. Ahora trabajar como sigue: 1 pt orillo en PT MUSGO - ver explicación arriba, 1-3-5-7 pts en pt jersey, A.2, 1-3-5-7 pts en pt jersey, 1 pt orillo en pt musgo. Trabajar los pts orillo en pt musgo hasta finalizar las medidas. TALLA L/XL-XXL-XXXL: En la sig fila por el LD aum 1 pt a cada lado de la labor dentro del pt orillo – VER TIP PARA LOS AUMENTOS, repetir los aum en las filas del LD 2-4-8 vcs más = 75-83-95 pts. Trabajar los pts aumentados en pt jersey. TODAS LAS TALLAS: = 65-75-83-95 pts. Cuando se ha trabajado A.2 una vez en vertical, trabajar como sigue por el LD: 1 pt orillo en pt musgo, 27-32-36-42 pts en pt jersey, A.3 (= 9 pts), 27-32-36-42 pts en pt jersey, 1 pt orillo en pt musgo. Trabajar A.3 un total de 2 vcs en vertical. Trabajar 0-6-0-4 filas en pt jersey. En la sig fila por el LD, dism 3-1-1-3 pts repartidos = 62-74-82-92 pts. Trabajar 1 fila de revés por el LR. Trabajar A.4 – ver el diagrama para la talla correspondiente (= 12-12-10-10 pts) 5-6-8-9 vcs en el ancho. Trabajar A.4 un total de 2-2-3-3 vcs en vertical. Ahora trabajar A.5 (= 6 pts) 10-12-13-15 vcs, AL MISMO TIEMPO en la primera fila dism 0-0-2-0 pts repartidos = 62-74-80-92 pts. Rematar cuando se ha trabajado A.5 una vez en vertical. Trabajar los pts entre el 2º y el 3er MP de la misma manera.. TERMINACIÓN: Coser el lado dentro del pt orillo, 27 cm desde el borde inferior de la manga hacia arriba. Coser de la misma manera en el otro lado. CENEFA: Se trabaja en redondo en ag circular. Comenzar en la costura de una manga y trabajar con ag circular tamaño 3.5 mm con Safran por el LD como sigue: Recoger 20-25-28-30 pts dentro de 1 pt orillo en pt musgo, trabajar de derecho los 63-67-71-75 pts del gancho aux, recoger 40-50-56-60 pts dentro de 1 pt orillo, trabajar de derecho los 63-67-71-75 pts del gancho aux, recoger 20-25-28-30 pts = 206-234-254-270 pts. trabajar 1 vta de revés - AL MISMO TIEMPO insertar 4 MP en la labor como sigue: 40-47-52-56 r., insertar el 1er MP, 23 r., insertar el 2º MP, 80-94-104-112 r., insertar el 3er MP, 23 r., insertar el 4º MP, trabajar el resto de la vta (= 40-47-52-56 r.). Al aum los pts no aum entre el 1º y 2º MP (= escote) ni entre el 3º y 4º (= centro de la espalda). Trabajar 1 vta de derecho y AL MISMO TIEMPO aum 14-15-18-22 pts repartidos = 220-249-272-292 pts. Trabajar 1 vta de revés. Ahora trabajar A.6 (= 6 pts) AL MISMO TIEMPO en la 1ª vta aum 14-15-16-20 pts repartidos = 234-264-288-312 pts. A.6 se ha trabajado 39-44-48-52 vcs en el ancho. Repetir A.6 1 vez más en vertical AL MISMO TIEMPO en la 1ª vta aum 24-30-36-36 pts repartidos = 258-294-324-348 pts. A.6 se ha trabajado ahora 43-49-54-58 vcs en la vta. Cuando se ha completado A.6, rematar flojo. |
|||||||||||||||||||
Explicaciones del diagrama |
|||||||||||||||||||
|
|||||||||||||||||||
 |
|||||||||||||||||||
 |
|||||||||||||||||||
 |
|||||||||||||||||||
 |
|||||||||||||||||||
¿Terminaste este patrón?Entonces, etiqueta tus fotos con #dropspattern #kameliashoulderpiece o envíalas a la galería #dropsfan. ¿Necesitas ayuda con este patrón?Encontrarás 27 videos tutoriales, un espacio para comentarios/preguntas y más visitando la página del patrón en garnstudio.com © 1982-2026 DROPS Design A/S. Todos los derechos reservados. Este documento, incluyendo todas sus sub-secciones, está protegido por los derechos de autor (copyright). Lee más acerca de lo que puedes hacer con nuestros patrones en la parte de abajo de cada patrón de nuestro sitio. |
|||||||||||||||||||


Con más de 40 años en el diseño de modelos de punto y de ganchillo, DROPS Design ofrece una de las más vastas colecciones de patrones gratuitos en el internet - traducidos en 17 idiomas. Al día de hoy, contamos con 324 catálogos y 12290 patrones - de los cuales 11673 están traducidos en español.
Nosotros trabajamos con mucho esmero para brindarte lo mejor que las labores de punto y ganchillo tienen para ofrecer,inspiración y consejos, así como hilos de magnífica calidad a precios increíbles! Te gustaría usar nuestros patrones para otro fin además del uso personal? Puedes leer acerca de lo que estás permitida a hacer en el texto de Copyright en la parte de abajo de todos nuestros patrones. Felices labores!
Escribe un comentario sobre DROPS 160-25
¡Nos encantaría saber qué piensas acerca de este patrón!
Si quieres escribir una pregunta referente al patrón, por favor asegúrate de elegir la categoría correcta en el formulario debajo, para acelerar el proceso de respuesta. Los campos obligatorios están marcados con un *.