
Categorías populares
¿Buscas un hilo?


Comentarios / Preguntas (114)
![]() Caitlynn escribió:
Caitlynn escribió:
Hi, I really want to knit this but I'm strugling with the size. I'm right inbetween the S and M/L but I don't know how to change the pattern/ downsize it to fit. Is there a formula I can use to help with that?
23.10.2025 - 14:31DROPS Design respondió:
Hi Caithlynn,
Based on the gauge, which tells you how many stitches there are in 10 cm, you can calculate how many stitches you need to cast on, etc., to get different measurements. 23.10.2025 - 17:54
![]() Gudrun escribió:
Gudrun escribió:
Cast on 402 sts on needle 3.5 mm. Work 2 ridges in GARTER ST. Switch to needle 4 mm. Then work as follows: * P 6, A.1 *, repeat from *-* 12 more times, P 6, insert 1 marker (= back piece), * P 6, A.1 *, repeat from *-* 12 more times, P 6, insert 1 marker (= front piece). Move the markers upwards when working. When A.1 has been worked 1 time vertically, there are 350 sts on needle. 6+13*9+6+6+13*9+6=258, what do i do with the other 144 sts?
15.07.2025 - 11:22DROPS Design respondió:
Hi Gudrun, in second row of A.1 you have 7 stitches insted of 9. [(6+A.1)*13]+6= [(6+7)*13+6}=(13*13)+6=169+6=175. 175*2 (front and back)=350. Happy knitting!
17.07.2025 - 11:00
![]() Reiah N escribió:
Reiah N escribió:
Hi! So I’m at the decrease section in the top where it says to continue decreasing every 4 cm 3 more times for size M. does that mean I have to purl 2 together every 4cm? Or do I have to purl 2 together in every purl section in a row, then leave 4 cm until I start the next decrease row and purl 2 together again and repeat it for the third time, all while doing A.2 between each purl section? Sorry for the bother 😰!
23.01.2025 - 09:39DROPS Design respondió:
Dear Reiah, you will decrease as indicated in the first row every 4cm vertically. That is, work 1 decrease row as indicated, work normally until you have worked 4cm from the decrease row, work a decrease row as the previous one (the decreases and the charts); repeat once more 4cm later. Happy knitting!
25.01.2025 - 19:54
![]() Reiah N escribió:
Reiah N escribió:
Hi! Thank you so much for the answer last time 😍. After finishing the row of A.1, and starting the next row do we have to p 6 (for size m) every time before working A.2 like with A.1 ? Until the piece measures 10 cm? Thank you so much 😁
14.01.2025 - 16:54DROPS Design respondió:
Dear Reiah, when A.1 is done, there are 7 sts between each purl section, work now *purl 6, A.2* all the round, then after 10 cm from cast on edge, start decreasing in the purl section as explained in the written pattern. Happy knitting!
15.01.2025 - 08:03
![]() Reiah N escribió:
Reiah N escribió:
Hi! I’m knitting this in size medium and it says that I’m supposed to p6+7(A.1) x10 , p6, p6+7(A.1) x10 , p6. I have 30 stitches left What do I do with them? Thank you so much 🥰
11.01.2025 - 08:36DROPS Design respondió:
Dear Reiah, you work: (purl 6, A.1)x 11 times (10 more, so 11 in total), purl 6, (marker), (purl 6, A.1) x 11 times (total), purl 6, (marker). The charts are read from the bottom up so in the first row of A.1 you have 9 stitches (which are decreased to 7). So you will have: (6+9)x11 + 6 + (6+9)x11 +6 = 342 stitches. Happy knitting!
12.01.2025 - 16:04
![]() Penny escribió:
Penny escribió:
Is there a straight needle instruction available for this pattern.
18.09.2024 - 06:24DROPS Design respondió:
Dear Penny, this lesson might help you adjusting the pattern for straight needles. Happy knitting!
18.09.2024 - 08:57
![]() Nina escribió:
Nina escribió:
On the back piece when the 33 sts or slipped on a holder are the 22 stitches worked first as before and when the project is turned that's when K together close to the neck sts holder or are they K together at the beginning of the row?
03.06.2024 - 07:30DROPS Design respondió:
Dear Nina, work 1 row from RS as before working the first 22 sts and slipping them on a thread or keeping them on the needle but they will be worked later; slip the next 33 sts on a thread for neck and work the last 22 sts for shoulder as before, finish now each shoulder separately. Happy knitting!
03.06.2024 - 08:24
![]() Nina escribió:
Nina escribió:
When working in round and doing A1 and A2 it says k from RS and P from WS. Does that mean we P6 before A1 and k3 before the passo then k3 after then back to P6 or is the 3 st before the passo part of the P6 or is it P6, P3 then passo?
20.05.2024 - 10:01DROPS Design respondió:
Dear Nina, when working in the round you will always work from RS, ie the stitches in A.1 and in A.2 will be knitted on every round, and the purl stitches between diagrams will be always purled. When working in rows after dividing for armholes, you will then purl the stitches in A.2 from wrong side and knit the stitches between diagrams (reversed stocking stitch). Happy knitting!
21.05.2024 - 13:22
![]() Carina escribió:
Carina escribió:
Hej, Gäller garnval. Om jag vill byta Muskat till t.ex. Cotton Merino eller Merino extra fine, är det möjligt och hur mycket garn behöver jag då. Garnkonverteraren kunde inte svara! TACK
18.04.2024 - 11:53DROPS Design respondió:
Hej Carina, jo det kan den, vælg Muskat, vælg antal gram for din størrelse, vælg 1 tråd, så får du både Cotton Merino og Merino Extra Fine med flere :)
19.04.2024 - 14:31
![]() Jenny escribió:
Jenny escribió:
Hello, in A.2, there should be a yarn-over at the beginning and at the end of each 7 stitches? I just know how to do a yarn-over before knitting the actual stitch, how is it done after knitting a stitch? Or am I misreading this, and there should only be one yarn-over in the first row? But then the total amount of stitches would be exactly the same, whereas there would be more stitches in row 3. thanks!
17.01.2024 - 13:00DROPS Design respondió:
Dear Jenny, on first row in A.2 you start and end A.2 with a yarn over and make a double decrease in the middle, so that the number of stitches remains the same, this means work the first row in A.2 as follows: YO, K2, slip 1, K2 tog, psso, K2, YO. Happy knitting!
18.01.2024 - 08:19
|
||||||||||
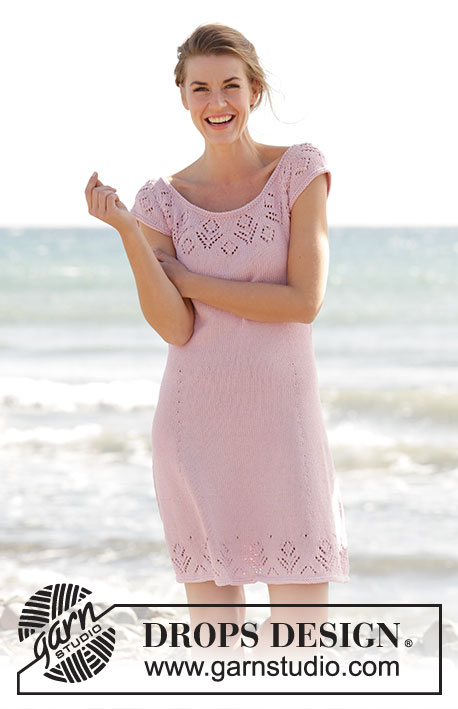
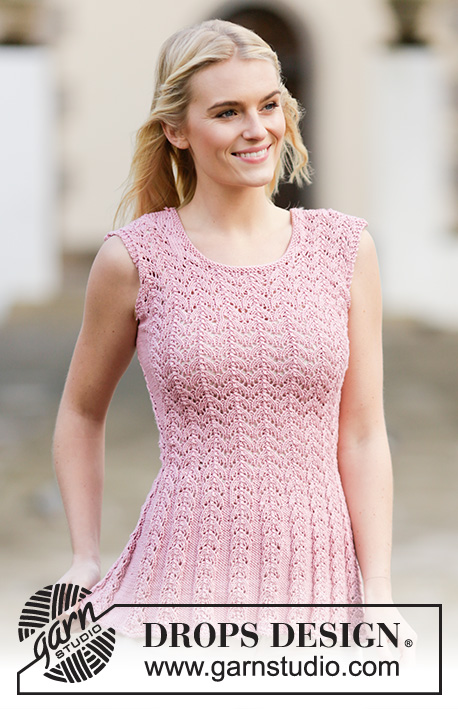
Love Is In The Air#loveisintheairtop |
||||||||||
 |
 |
|||||||||
Top de punto DROPS con patrón de calados en ”Muskat”. Talla: S - XXXL.
DROPS 160-24 |
||||||||||
|
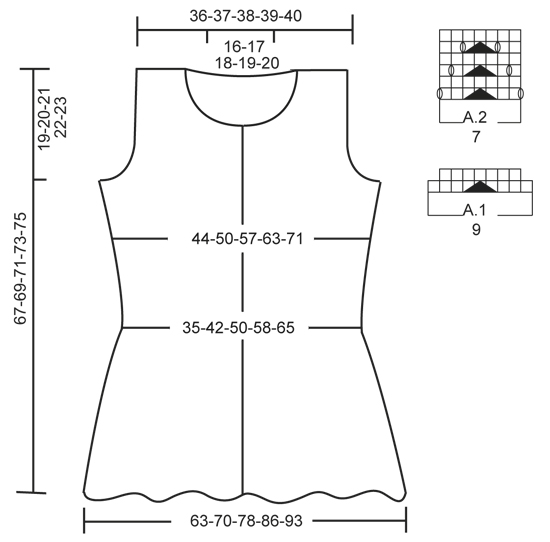
PT MUSGO (trabajado en redondo): * 1 vta de derecho, 1 vta de revés *, repetir de *a*. 1 pliegue = 2 vtas. PUNTO MUSGO ( de ida y vta en ag): Trabajar todas las filas de derecho. 1 pliegue = 2 filas de derecho. PATRÓN: Ver los diagramas A.1 y A.2. TIP PARA LOS AUMENTOS: Trabajar hasta que quede 1 pt antes del marcapuntos (MP), 1 HEB (lazada), 2 r. (el Mp queda entre estos 2 pts), 1 HEB = 2 pts aumentados. En la sig vta trabajar las HEB de derecho retorcido para evitar que se formen agujeros. ----------------------------------------------------------------------- TOP: Se trabaja en redondo en ag circular. Mont 302-342-402-430-486 pts en ag circular tamaño 3.5 mm con Muskat. Trabajar 2 pliegues en PT MUSGO - ver explicación arriba. Cambiar a ag circular tamaño 4 mm. Ahora trabajar como sigue: * 7-6-6-5-5 r., A.1 *, repetir de *a* 8-10-12-14-16 vcs más, 7-6-6-5-5 r., insertar 1 MP (= espalda), * 7-6-6-5-5 r., A.1 *, repetir de *a* 8-10-12-14-16 vcs más, 7-6-6-5-5 r., insertar 1 MP (= delantero). Mover los MP según se avanza la labor. Cuando se ha trabajado A.1 una vez en vertical hay 266-298-350-370-418 pts en aguja. Ahora trabajar A.2 (= 7 pts) sobre A.1 hasta finalizar las medidas. Cuando la labor mida 10 cm, dism como sigue: * 2 pjr, 5-4-4-3-3 r., A.2 *, repetir de *a* 8-10-12-14-16 vcs más, 2 pjr, 5-4-4-3-3 r., MP, * 2 pjr, 5-4-4-3-3 r., A.2 *, repetir de *a* 8-10-12-14-16 vcs más, 2 pjr, 5-4-4-3-3 r., MP = 246-274-322-338-382 pts (= 20-24-28-32-36 pts disminuidos). Continuar de revés y con el patrón como antes hasta que la labor mida 13-14-14-15-15 cm. Ahora dism como sigue: *4-3-3-2-2 r., 2 pjr, A.2 *, repetir de *a* 8-10-12-14-16 vcs más, 4-3-3-2-2 r., 2 pjr, MP, * 4-3-3-2-2 r., 2 pjr, A.2 *, repetir de *a* 8-10-12-14-16 vcs más, 4-3-3-2-2 r., 2 pjr, MP = 226-250-294-306-346 pts (= 20-24-28-32-36 pts disminuidos). Continuar las dism (es decir, dism de modo alterno a cada lado de cada sección de revés) cada 3-4-4-5-5 cm 4-3-3-2-2 vcs más = 146-178-210-242-274 pts. Trabajar la sig vta como sigue: * 1 r., A.2 *, repetir de *a* 8-10-12-14-16 vcs más, 1 r., MP, * 1 r., A.2 *, repetir de *a* 8-10-12-14-16 vcs más, 1 r., MP. Continuar con este patrón. Cuando la labor mida 30 cm, aum 1 pt a cada lado de cada MP (= 4 pts aum) - ¡LEER TIP PARA LOS AUMENTOS! Trabajar de revés los pts aumentados. Repetir los aum cada 1½-2-2½-3½-3½ cm 9-7-6-5-5 vcs más = 186-210-238-266-298 pts. Cuando la labor mida 46-47-48-49-50 cm, trabajar pt musgo sobre los 7 pts a cada lado de cada MP en los laterales (= 14 pts en pt musgo a cada lado), trabajar el resto de pts como antes. Cuando la labor mida 48-49-50-51-52 cm, trabajar sólo sobre los primeros 93-105-119-133-149 pts en la vta (= espalda), desl los pts del delantero a un gancho aux.. ESPALDA: = 93-105-119-133-149 pts. Ahora trabajar la labor de ida y vta en aguja. Cerrar 4 pts para las sisas al inicio de las sig 2 filas = 85-97-111-125-141 pts. Ahora cerrar para la sisa dentro de 3 pts en pt musgo: cerrar 1 pt a cada lado cada 2ª fila 4-10-16-23-29 vcs, trabajando 2 pjr (si se trabaja sobre A.2 se trabaja 2 pjd, trabajar los pts que no entran en el patrón en pt jersey) = 77-77-79-79-83 pts. Cuando la labor mida 65-67-69-71-73 cm, desl los 31-33-35-37-39 pts centrales a un gancho aux para el escote y finalizar cada hombro por separado = 23-22-22-21-22 pts. En la sig fila desde el escote, trabajar juntos de derecho los primeros 2 pts = 22-21-21-20-21 pts. Trabajar los pts laterales que no entran en A.2 en pt jersey. Continuar trabajando A.2, pts de revés y pt jersey como antes. Cuando la labor mida 66-68-70-72-74 cm, trabajar 1 pliegue en pt musgo sobre todos los pts, rematar. Trabajar el otro hombro de la misma manera. DELANTERO: = 93-105-119-133-149 pts. Ahora trabajar la labor de ida y vta en aguja. Trabajar como la espalda hasta que la labor mida 57-59-61-63-65 cm. Ahora desl los 21-23-25-27-29 pts centrales a un gancho aux para el escote y finalizar cada hombro por separado. Cerrar hacia el escote cada 2ª fila como sigue: 2 pts 2 vcs y 1 pt 2 vcs. Continuar con las dism para la sisa, cuando se han completado todas las dism, hay 22-21-21-20-21 pts en la ag. Trabajar en pt jersey los pts que no entran en A.2 en los lados. Continuar trabajando A.2, pts de revés y pt jersey como antes. Cuando la labor mida 66-68-70-72-74 cm, trabajar 1 pliegue en pt musgo (ver explicación arriba) sobre todos los pts, rematar. Trabajar el otro hombro de la misma manera. TERMINACIÓN: Hacer la costura de los hombros. CENEFA DEL ESCOTE: Recoger 100-120 pts (incl los pts en el gancho aux para el escote) con ag circular tamaño 3.5 mm y Muskat. Trabajar 2 pliegues. Rematar. |
||||||||||
Explicaciones del diagrama |
||||||||||
|
||||||||||
 |
||||||||||
¿Terminaste este patrón?Entonces, etiqueta tus fotos con #dropspattern #loveisintheairtop o envíalas a la galería #dropsfan. ¿Necesitas ayuda con este patrón?Encontrarás 26 videos tutoriales, un espacio para comentarios/preguntas y más visitando la página del patrón en garnstudio.com © 1982-2026 DROPS Design A/S. Todos los derechos reservados. Este documento, incluyendo todas sus sub-secciones, está protegido por los derechos de autor (copyright). Lee más acerca de lo que puedes hacer con nuestros patrones en la parte de abajo de cada patrón de nuestro sitio. |
||||||||||


Con más de 40 años en el diseño de modelos de punto y de ganchillo, DROPS Design ofrece una de las más vastas colecciones de patrones gratuitos en el internet - traducidos en 17 idiomas. Al día de hoy, contamos con 324 catálogos y 12290 patrones - de los cuales 11685 están traducidos en español.
Nosotros trabajamos con mucho esmero para brindarte lo mejor que las labores de punto y ganchillo tienen para ofrecer,inspiración y consejos, así como hilos de magnífica calidad a precios increíbles! Te gustaría usar nuestros patrones para otro fin además del uso personal? Puedes leer acerca de lo que estás permitida a hacer en el texto de Copyright en la parte de abajo de todos nuestros patrones. Felices labores!
Escribe un comentario sobre DROPS 160-24
¡Nos encantaría saber qué piensas acerca de este patrón!
Si quieres escribir una pregunta referente al patrón, por favor asegúrate de elegir la categoría correcta en el formulario debajo, para acelerar el proceso de respuesta. Los campos obligatorios están marcados con un *.