
Categorías populares
¿Buscas un hilo?


Comentarios / Preguntas (139)
![]() Richard escribió:
Richard escribió:
Thanks for the prompt reply, given the current crisis. I've looked at the video link, but regrettably, there is no sound. I'll 'Google' it & see if I can find another link. All the best. Richard.
03.04.2020 - 11:34DROPS Design respondió:
Dear Richard, our videos do not have sounds because we are a worldwide company and our videos are watched by people around the world, speaking different languages, many of whom do not understand English. That's why we always recommend to follow written pattern/read the text/explanations at the same time. Happy knitting!
03.04.2020 - 11:48
![]() Richard escribió:
Richard escribió:
Hi everyone. Having completed the raglan stage of the garment, I now have to decrease evenly for the next round, as follows:- I have 308 sts/28 sts = 11. Do I knits every 10th st & 11th st together OR 11th st & 12th st together??When A5 has been worked, can you explain what is meant when you say "work an elevation in the back of the neck"? Otherwise, I am doing fine & expect to complete the garment during the next few days. Be sure to keep away from Coronavirus. Good luck.
03.04.2020 - 11:11DROPS Design respondió:
Dear Richard, work the 10th and 11 th st tog a total of 28 times (= 28x11=308 sts, you then have: 28 x 10 = 280 sts). This video shows how to make an elevation on mid back of a jumper (worked here top down but the idea is the same), you will work extra rows with short rows on the back of piece only so that the neckline on back piece is higher than the neckline on front piece. Happy knitting!
03.04.2020 - 11:27
![]() Kara escribió:
Kara escribió:
I’m getting ready to cast on but not sure about which size to select. The finished sizing doesn’t make any sense. Are the numbers given for a flat piece? I’m not sure how you measure the bust. Thank you
01.04.2020 - 18:12DROPS Design respondió:
Dear Kara, correct, measurements are always taken flat from side to side - compare a similar garment you have and like the shape to find out the matching size. Read more about sizing here. Happy knitting!
02.04.2020 - 07:50
![]() Richard escribió:
Richard escribió:
To all the Drops team, Hi all, I am such an idiot! This morning I questioned myself, once again, "where was I going wrong"? I was trying to knit 'A3' for the total 76 stitches of the sleeve! It suddenly came to me, that 'A3' was ONLY kitted either side of the transitions, between the sleeve & the body :>) So, the completed garment will show 1 hole, running the length of the Raglan decreases, of the sleev & the body... Thank you.
29.03.2020 - 11:50DROPS Design respondió:
Dear Richard, glad to see you found out how to work A.3 :) Thanks for your feedback and enjoy the rest of the jumper - come back if necessary! Happy knitting!
30.03.2020 - 09:38
![]() Richard escribió:
Richard escribió:
Hi, again. I will try again, but using double-pointed needles with 20 sts cast on, as follows:- I have placed a marker 5 sts along & now knitted 2sts tog. The remaining 3 sts are the 'A3' I continue as follows:- Y.O. - slip 1 st. - knit 2 sts tog. - psso. At this stage all is correct! - I have 4 sts. before the marker. But if I continue to knit in A3 (Y.O. - slip 1 st. - knit 2 sts tog. - psso). I do not have 7 sts. - I HAVE ONLY 6 STS! Help. Richard.
28.03.2020 - 14:48
![]() Brigitte Veerman escribió:
Brigitte Veerman escribió:
Ik begrijp niet helemaal hoe de ronding gebreid moet worden op het achterpand voor de hals. Waar moet ik de markeerder middenvoor zetten. Ook de mouwen staan op de rondbreinaald. In totaal heb je 184 steken. Dus 2x92 st. Dus midden is steek 45 of 46. Maar dat lijkt mij niet middenvoor. Eerste stuk is mouw. Moet je dan gewoon middenachter aanhechten en breien tot middenvoor. Tot 14 st voor markeerder. En dan omdraaien terugbreien voorbij middenachter tot 14 st voor markeerder?
28.03.2020 - 00:01DROPS Design respondió:
Dag Brigitte,
Nadat het telpatroon op de pas klaar is, kun je een verhoging op het achterpand breien in de vorm van verkorte toeren. Voordat je de mouwen en de panden op één rondbreinaald zet, heb je 100 steken op het voorpand en 100 steken op het achterpand. In het midden van deze 100 steken is midden voor/midden achter. Daar kun je dus een markeerder zetten en doortrekken naar boven. Voor de verhoging midden achter brei je verkorte toeren zoals aangegeven in de beschrijving.
29.03.2020 - 12:04
![]() Richard escribió:
Richard escribió:
Thank you for your response. Good luck. Richard
27.03.2020 - 10:20
![]() Richard escribió:
Richard escribió:
Good morning/afternoon. Once again, I am struggling! I understand that the first & last stitches will have the markers & that their are 74 stitches between the two markers. Do I knit AFTER the first marker (Y.O. - slip 1 st - k 2 tog - psso ). But at what stage do I do the raglan decease? It is difficult knitting the sleeve in, as they are 'bunched' together. Alternatively, if I disregarded A3 all-together (no holes in garment), I could continue as the pattern, up to the yoke.
27.03.2020 - 09:22DROPS Design respondió:
Dear Richard, the raglan decreases are worked on each side of each A.3 = k2 tog, (A.3 = yo, slip 1 as if to K, K2 tog, psso, YO), slip 1 as if to K, K1, psso- if you choose to not work A.3, just remember to work the raglan decreases so that you get the correct number of stitches for the circular yoke. Happy knitting!
27.03.2020 - 10:11
![]() Richard escribió:
Richard escribió:
Good morning. Hope you are all well. thank you for the last reply. So, tell me, Is it correct that the last stitch of the back is the first stitch of the left sleeve (which is the middle stitch of A3)? So, do I knit YO "BEFORE this last stitch" or AFTER it?? I have knitted quite a few of your patterns, but this part has given me the greatest problem... Help. Thank you, Richard.
26.03.2020 - 10:06DROPS Design respondió:
Dear Richard, the last st on back piece will be the last st on A.3 (at the transition of left sleeve and back piece), ie: sleeve, A.3 (= next to last st on sleeve + last st on sleeve = the one with the marker + 1st st on back piece), back piece. So that these 3 st will be worked as follows in A.3: YO, slip next to last st on sleeve, work tog st with marker + next st, psso (= 1 st remains), YO = there are now 3 sts (1 yarn over, 1 st, 1 yarn over) and the marker is still in the mid st (= the dec). Same should happen on other transitions, ie the middle st in each A.3 should be the st with the marker = the first or last stitch on sleeves. Hope this helps :)
26.03.2020 - 10:33
![]() Marisa escribió:
Marisa escribió:
Bonjour, est-il possible de faire ce pull avec une encolure moins ouverte (pour qu’on ne voit pas le t-shirt, je porte toujours un sous mes pulls) ? Merci d’avance !
25.03.2020 - 15:08DROPS Design respondió:
Bonjour Marisa, vous pouvez essayer de modifier un peu l'encolure, mais le résultat sera automatiquement différent - n'hésitez pas à contacter votre magasin, même par mail ou téléphone, pour toute assistance personnalisée. Retrouvez tous nos modèles de pulls tricotés de bas en haut ici. Bon tricot!
25.03.2020 - 17:17
|
|||||||||||||||||||
Nordic Summer#nordicsummersweater |
|||||||||||||||||||
 |
 |
||||||||||||||||||
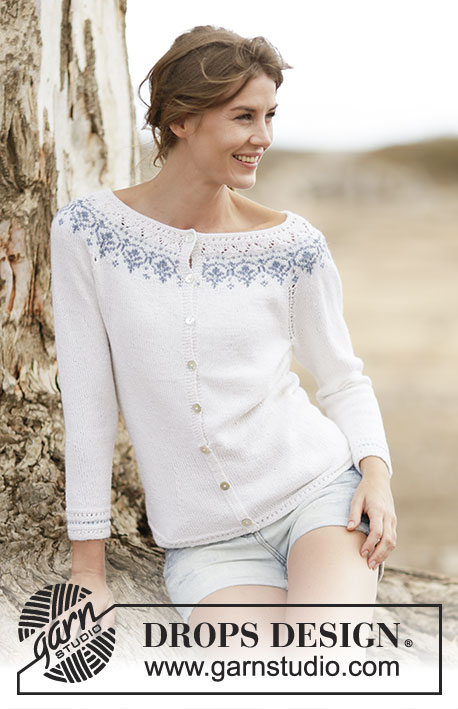
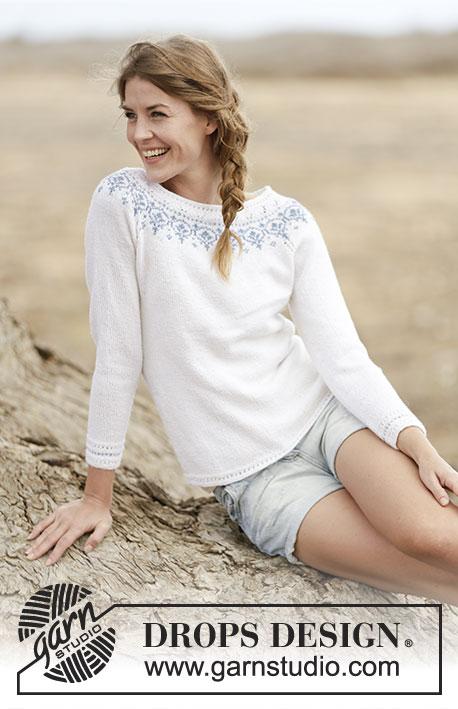
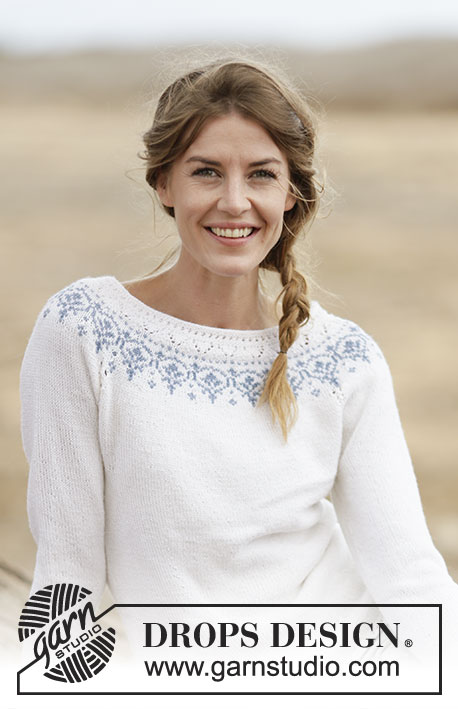
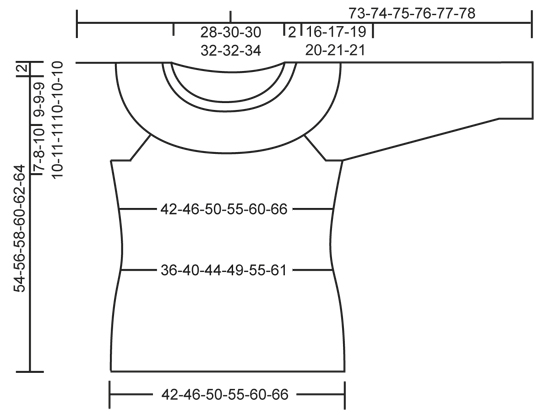
Jersey de punto DROPS con raglán y canesú redondo en ”BabyMerino”. Tallas: S - XXXL.
DROPS 161-33 |
|||||||||||||||||||
|
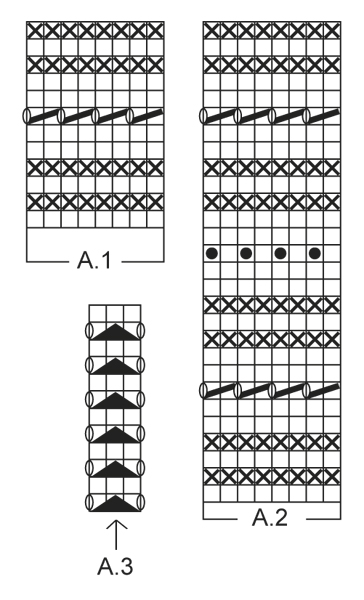
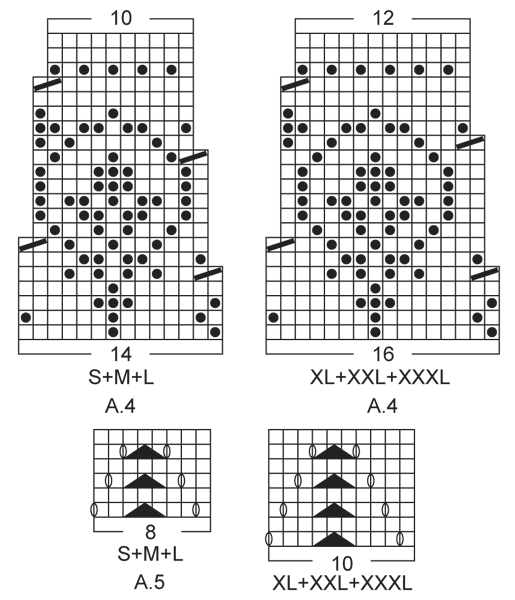
PATRÓN: Ver los diagramas A.1-A.5 DISMINUCIONES DE LA CINTURA: Dism para la cintura en los 4 marcapuntos (MP) Dism como sigue después del 1er y 3er MP: 2 pjd. Dism como sigue cuando queden 2 pts antes del 2º y 4º MP: desl 1 pt como de derecho, 1d., pasar el pt desl por encima. TIP PARA LOS AUMENTOS: Aum para la cintura en los 4 MPs como sigue: hacer 1 HEB (lazada) después del 1er y 3er MP y antes del 2º y 4º MP. En la sig vta trabajar las HEB de derecho retorcido para evitar que se formen agujeros. RAGLÁN: Dism para el raglán a cada lado de A.3 en cada transición entre la manga y el cuerpo. Dism como sigue después de A.3: Desl 1 pt como de derecho, 1 d., pasar el pt desl por encima. Dism como sigue 2 pts antes de A.3: 2 pjd. ----------------------------------------------------------------------- CUERPO: Trabajar en redondo en aguja circular. Mont 200-220-240-264-288-316 pts con ag circular tamaño 2.5 mm con color blanco. Trabajar el patrón según el diagrama A.1. Cuando se ha trabajado A.1 una vez en vertical, cambiar a ag circular tamaño 3 mm. Ahora trabajar en pt jersey. RECUERDE MANTENER LA MISMA TENSIÓN DEL TEJIDO. Cuando la labor mida 8-8-8-8-10-10 cm, insertar 4 MP en la labor como sigue: insertar el 1er MP después de los primeros 24-28-31-36-42-48 pts, el 2º MP después de los sig 52-54-58-60-60-62 pts, el 3º después de los sig 48-56-62-72-84-96 pts y el 4º dspués de los sig 52-54-58-60-60-62 pts (24-28-31-36-42-48 pts restantes en la ag después del último MP). Ahora dism para la CINTURA en los 4 MPs - ver explicaciones arriba (= 4 pts dism). Repetir las dism cada 4ª vta un total de 7-7-7-7-6-6 vcs = 172-192-212-236-264-292 pts. Cuando la labor mida 22 cm para todas las tallas, aum después del 1er y 3er MP y antes del 2º y 4º MP - leer TIP PARA LOS AUMENTOS (= 4 pts aum). Repetir los aum cada 4ª-4ª-6ª-6ª-8ª-8ª vta un total de 7-7-7-7-6-6 vcs = 200-220-240-264-288-316 pts. Continuar trabajando hasta que la labor mida 38-39-39-40-41-43 cm. Trabajar la sig vta como sigue: Cerrar 5-5-5-6-6-6 pts para la sisa, trabajar 90-100-110-120-132-146 pts en pt jersey (= delantero), cerrar 10-10-10-12-12-12 pts para la sisa, trabajar 90-100-110-120-132-146 pts en pt jersey (= espalda) y cerrar los últimos 5-5-5-6-6-6 pts para la sisa. Dejar la labor en espera y trabajar las mangas. MANGAS: Se trabaja en redondo con ag de doble punta. Mont 56-56-58-60-62-64 pts con ag de doble punta tamaño 2.5 mm y color blanco. Trabajar el patrón según el diagrama A.2. Cuando se ha completado A.2 una vez en vertical, cambiar a ag de doble punta tamaño 3 mm. Insertar 1 MP al inicio de la vta (= centro bajo la manga) y trabajar en pt jersey. Cuando la labor mida 8 cm, aum 2 pts en el centro bajo la manga. Repetir los aum cada 9ª-7ª-7ª-6ª-6ª-5ª vta un total de 12-14-14-16-16-17 vcs = 80-84-86-92-94-98 pts. Cuando la labor mida 41-40-39-38-38-38 cm (ATENCIÓN: medidas más cortas en las tallas más grandes debido a una mayor largura de la copa de la manga y una mayor anchura de hombros), cerrar los 10-10-10-12-12-12 pts centrales bajo la manga (es decir, cerrar 5-5-5-6-6-6 pts a cada lado del MP) = 70-74-76-80-82-86 pts restantes en la ag. Dejar la labor en espera y trabajar otra manga. CANESÚ: Desl las mangas a la misma ag circular que el cuerpo como sigue: Continuar con blanco y trabajar los pts de la primera manga AL MISMO TIEMPO insertar 1 MP en el primer pt y 1 MP en el último pt de la manga y trabajar los pts del delantero, trabajar los pts de la otra manga, AL MISMO TIEMPO insertar 1 MP en el primer pt y 1 MP en el último pt de la manga y trabajar los pts de la espalda = 320-348-372-400-428-464 pts en la ag y 4 MPs en la labor. Ahora trabajar en pt jersey en redondo AL MISMO TIEMPO trabajar A.3 en cada transición entre el cuerpo y las mangas (la flecha del diagrama debe coincidir con el pt con MP). AL MISMO TIEMPO dism para el raglán a cada lado de A.3 en cada transición entre el cuerpo y las mangas - ver explicación arriba (= 8 pts dism). Repetir las dism para el raglán cada 4ª vta un total de 6-7-8-8-9-9 vcs = 272-292-308-336-356-392 pts. Después de la última dism trabajar 1 vta de derecho, AL MISMO TIEMPO dism 20-26-28-32-36-40 pts repartidos = 252-266-280-304-320-352 pts en la ag. Ahora trabajar el patrón en redondo según A.4, AL MISMO TIEMPO dism según el diagrama - elegir el diagrama correspondiente a la talla. Cuando se ha completado A.4 una vez en vertical quedan 180-190-200-228-240-264 pts en la ag. Trabajar 1 vta de derecho AL MISMO TIEMPO dism 4-6-8-28-30-44 pts repartidos = 176-184-192-200-210-220 pts. Ahora trabajar el patrón según A.5 - elegir el patrón correspondiente a la talla. Cuando se ha completado A.5, trabajar una elevación en la parte posterior del cuello. Insertar 1 MP en el centro del delantero. Comenzar en el centro de la espalda y trabajar de derecho hasta que queden 14-14-16-16-18-20 pts antes del MP. Girar la labor, trabajar la vta de derecho hasta que queden 14-14-16-16-18-20 pts antes del MP por el otro lado. Girar, trabajar de derecho hasta que queden 30-30-34-34-38-42 pts antes del MP. Girar la labor, trabajar la vta de derecho hasta que queden 30-30-34-34-38-42 pts antes del MP por el otro lado. Girar, trabajar de derecho hasta que queden 46-46-52-52-58-64 pts antes del MP. Girar la labor, trabajar la vta de derecho hasta que queden 46-46-52-52-58-64 pts antes del MP por el otro lado. Girar, trabajar de derecho hasta que queden 62-62-70-70-76-86 pts antes del MP. Girar la labor, trabajar la vta de derecho hasta que queden 62-62-70-70-76-86 pts antes del MP por el otro lado. Girar y trabajar la vta de derecho hasta el inicio de la vta. CENEFA DEL ESCOTE: Cambiar a ag circular tamaño 2.5 mm y trabajar en redondo sobre todos los pts según el diagrama A.1, AL MISMO TIEMPO dism 30-28-36-34-44-44 pts repartidos = 146-156-156-166-166-176 pts. Cuando se ha trabajado A.1 una vez en vertical, rematar flojo de derecho. TERMINACIÓN: Coser las aberturas bajo las mangas. |
|||||||||||||||||||
Explicaciones del diagrama |
|||||||||||||||||||
|
|||||||||||||||||||
 |
|||||||||||||||||||
 |
|||||||||||||||||||
 |
|||||||||||||||||||
¿Terminaste este patrón?Entonces, etiqueta tus fotos con #dropspattern #nordicsummersweater o envíalas a la galería #dropsfan. ¿Necesitas ayuda con este patrón?Encontrarás 32 videos tutoriales, un espacio para comentarios/preguntas y más visitando la página del patrón en garnstudio.com © 1982-2026 DROPS Design A/S. Todos los derechos reservados. Este documento, incluyendo todas sus sub-secciones, está protegido por los derechos de autor (copyright). Lee más acerca de lo que puedes hacer con nuestros patrones en la parte de abajo de cada patrón de nuestro sitio. |
|||||||||||||||||||


Con más de 40 años en el diseño de modelos de punto y de ganchillo, DROPS Design ofrece una de las más vastas colecciones de patrones gratuitos en el internet - traducidos en 17 idiomas. Al día de hoy, contamos con 325 catálogos y 12298 patrones - de los cuales 11696 están traducidos en español.
Nosotros trabajamos con mucho esmero para brindarte lo mejor que las labores de punto y ganchillo tienen para ofrecer,inspiración y consejos, así como hilos de magnífica calidad a precios increíbles! Te gustaría usar nuestros patrones para otro fin además del uso personal? Puedes leer acerca de lo que estás permitida a hacer en el texto de Copyright en la parte de abajo de todos nuestros patrones. Felices labores!
Escribe un comentario sobre DROPS 161-33
¡Nos encantaría saber qué piensas acerca de este patrón!
Si quieres escribir una pregunta referente al patrón, por favor asegúrate de elegir la categoría correcta en el formulario debajo, para acelerar el proceso de respuesta. Los campos obligatorios están marcados con un *.