
Categorías populares
¿Buscas un hilo?


Comentarios / Preguntas (139)
![]() Odette escribió:
Odette escribió:
Kann ich auch auf normale Stricknadeln stricken bis arm Höhe, danach alles auf ein Nadeln stricken , habe dann ein naht, ich kann leider nicht mit ein rundstricknadel stricken
16.07.2020 - 18:24DROPS Design respondió:
Liebe Odette, hier wird erklärt, wie man eine Anleitung für Hin- und Rück-Reihen anpasst. Viel Spaß beim stricken!
17.07.2020 - 08:03
![]() Joëlle escribió:
Joëlle escribió:
Beste, ik begrijp de raglan niet, zoals ik het lees en doe loopt het patroon van A3 altijd naar links aan beide kanten van de mouw, denk niet dat dit de bedoeling. I, brei elke 4de naald als volgt, na de markeerder, 1 rechts aflhalen, 2 St rechts breien en afgehaalde St overhalen, 1 omsl, dan raglan 1 r afh, 1r, afgeh St overhalen, verder breien tot 2 St voor de maarkeerder, 2 r samen breien, 1 omsl. Kunnen jullie mij verder helpen, alvast bedankt, Joëlle
05.06.2020 - 00:04DROPS Design respondió:
Dag Joëlle,
A.3 zit precies op de overgang van de mouw naar het pand en waar de pijl in A.3 staat (dus het midden van A.3) zit de markeerdraad. Je meerdert aan beide kanten van A.3 voor de raglan, dus aan de kant van de mouw en aan de kant van het pand. A.3 en de markeerdraad blijft in de hoogte steeds op dezelfde plek.
2 steken voordat A.3 begint brei je 2 steken samen, dan brei je A.3 en dan haal je 1 steek recht af, brei je 1 steek en haal je de afgehaalde steek over de gebreide steek. 18.06.2020 - 13:29
![]() Els Van Zantvliet escribió:
Els Van Zantvliet escribió:
Ik ben net begonnen en heb de eerste 8 cm gebreid. nu heb ik de steekmarkeerders geplaatst. Nu lees ik het volgende: TAILLE: Minder voor de taille bij de 4 markeerders. Minder als volgt na de 1e en 3e markeerder: 2 r samen. Minder als volgt als er 2 st over zijn voor de 2e en 4e markeerder: 1 r afh, 1 r, afgeh st overh. Dan klopt mijn telling toch niet? Ik brei maat xl. dan heb ik toch maar 14 steken geminderd ipv totaal 28? alvast bedankt. Groetjes Els
18.05.2020 - 08:28DROPS Design respondió:
Dag Els,
Voor de taille minder je telkens bij alle 4 de markeerders, dus je maakt 4 minderingen per mindernaald, waardoor je op 28 minderingen in totaal komt.
19.05.2020 - 13:26
![]() Richard escribió:
Richard escribió:
Brilliant. Thank you all very very much. Take care...
09.04.2020 - 19:19
![]() Richard escribió:
Richard escribió:
Hi, once again. Thank you for your last reply. My final question is:- Because I finish A5 at the beginning of left sleeve, do I CAST OFF?.....OR do I join new yarn in white to the mid back & then, knit as described up to 16 sts before the mid front marker?? Hopefully you can help me to complete the is garment. It is for a woman of 84. Thanks all.
09.04.2020 - 18:20DROPS Design respondió:
Dear Richard, no you don't need to cast off just work from the current begin of the rounds until 16 sts remain before marker on front piece, turn and work row back same way. You will work last row of the short rows to your beg of round again to work neck edge. Happy knitting!
09.04.2020 - 18:34
![]() Richard escribió:
Richard escribió:
Hi, again I don't understand, because the pattern states "When A5 has been worked, work an elevation in the back of neck. Insert 1 marker mid front. Beg mid back and K (with white) until 16 sts remain before the marker". Now, you are saying "you have to work to the mid back (find it as explained previously) and another one on the mid front". I'm so sorry, but how can this be? I really appreciate all your efforts to help me.
09.04.2020 - 17:25DROPS Design respondió:
Dear Richard, I'm sorry to have been confusing, you don't need marker on mid back here, so you just need to find the mid front (put the piece flat and insert a marker on mid front), and now work the short rows working until the given number of stitches remain before the marker on mid front (you will work more rows on the other stitches but always less stitches). Hope this is clearer now, sorry for confusion. Happy knitting!
09.04.2020 - 18:05
![]() Richard escribió:
Richard escribió:
Thank you, thank you... But please tell me, as I have finished A5 on the last stitch of the back, do I cut the yarn & then rejoin a new yarn (in white) as you say, at the mid-back. Then I would knit until 16 sts before the marker of the mid-front : then turn?? I am so near to finishing & will post a photo to the Drops Gallery, when I have done so. Thank you all, during this most difficult time.
09.04.2020 - 14:24DROPS Design respondió:
Dear Richard, you have to work to the mid back (find it as explained previously) and another one on the mid front. Now work from RS until 16 sts remain before marker on mid front, turn and work from WS until 16 sts remain before marker on mid front on the other side (= there are now 32 unworked sts on mid front), turn and continue working back & forth leaving then always more stitches before marker mid front at the end of each row both from RS and WS. Happy knitting!
09.04.2020 - 16:37
![]() Richard escribió:
Richard escribió:
Good morning. How do I get to work the elevation in the back of neck? I understand how this works, but if my piece finishes at the end of the back/beginning of left sleeve; how do I begin knitting from the mid-back? Do I cast off & then begin at the mid-back with a new yarn. Also, when I 'turn', do I 'knit' or 'purl'?? Sorry to trouble you at this difficult time. Richard.
08.04.2020 - 11:18DROPS Design respondió:
Dear Richard, elevation is worked in garter stitch: you will knit from RS and knit from WS. Happy knitting :)
09.04.2020 - 16:34
![]() Richard escribió:
Richard escribió:
Hi, everyone. I trust that you are all well, in this difficult time. Having completed A4, the remaining A5 does not present a problem. However, because I will finish at the beginning of the left sleeve, how do I get to work the elevation in the back of neck? The instructions are to insert 1 marker mid-front! How do I end the yarn between the back & the left sleeve? Do I join new yarn at mid neck, to continue. Thank you. Richard.
06.04.2020 - 10:59DROPS Design respondió:
Dear Richard, lie your work flat so that you can find the mid back of jumper, insert a marker ther and work to this marker, then start the elevation from this marker. Happy knitting!
09.04.2020 - 14:14
![]() Richard escribió:
Richard escribió:
OK. Thanks.
03.04.2020 - 11:50
|
|||||||||||||||||||
Nordic Summer#nordicsummersweater |
|||||||||||||||||||
 |
 |
||||||||||||||||||
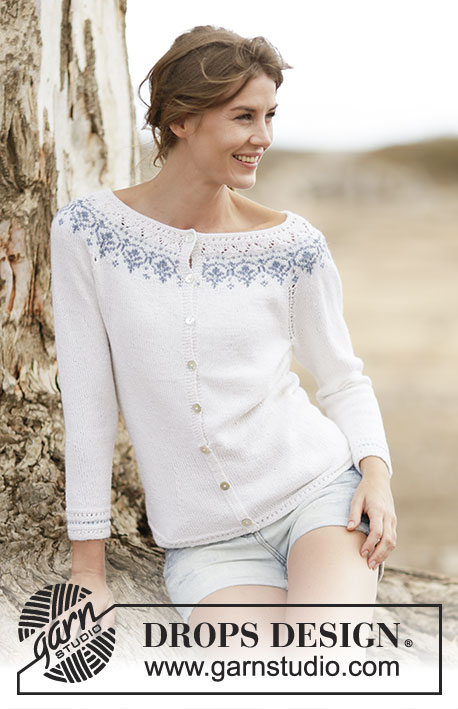
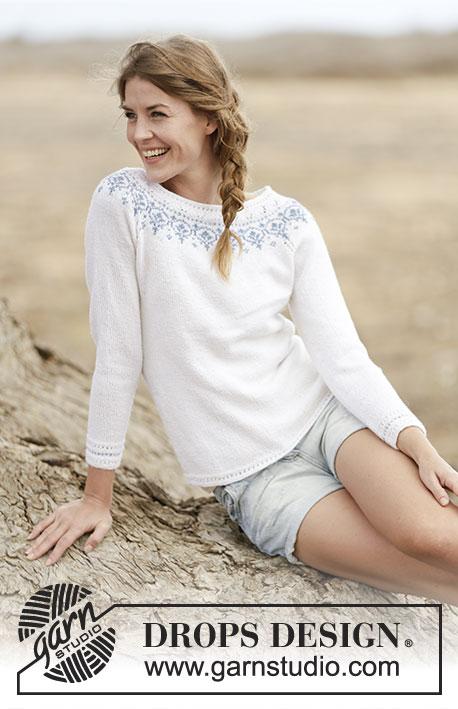
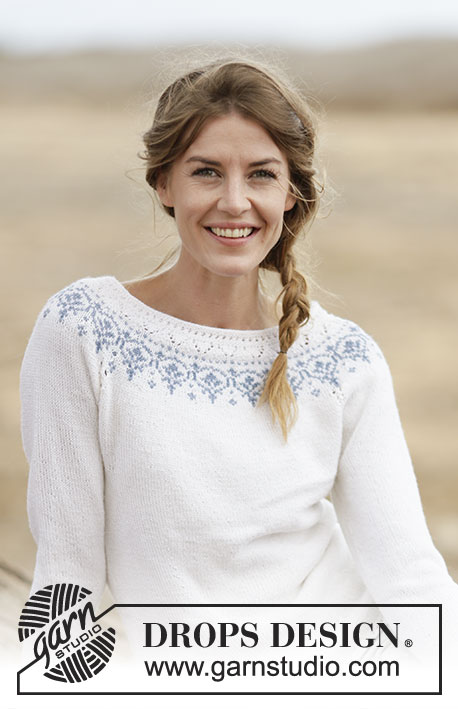
Jersey de punto DROPS con raglán y canesú redondo en ”BabyMerino”. Tallas: S - XXXL.
DROPS 161-33 |
|||||||||||||||||||
|
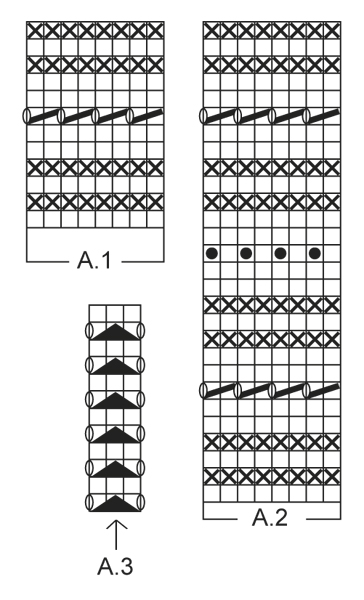
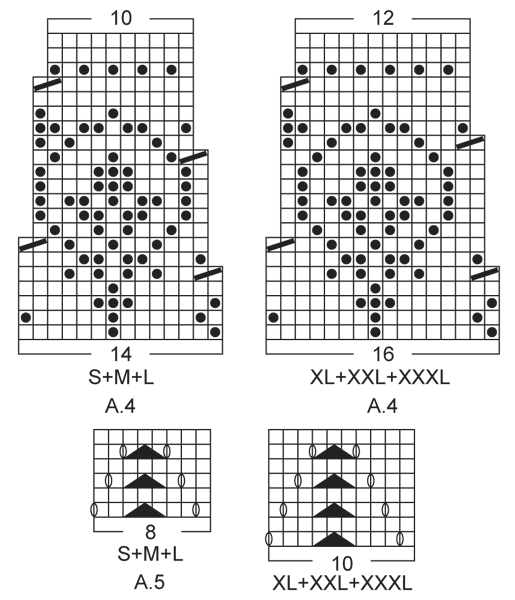
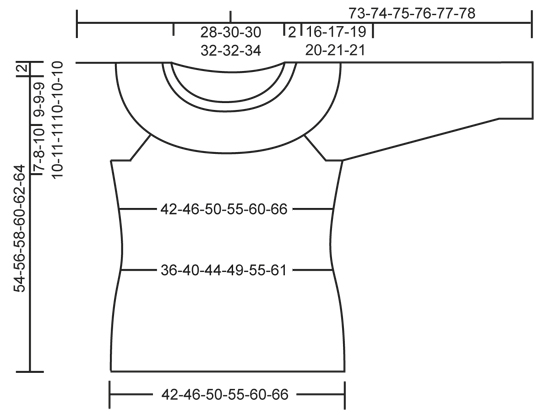
PATRÓN: Ver los diagramas A.1-A.5 DISMINUCIONES DE LA CINTURA: Dism para la cintura en los 4 marcapuntos (MP) Dism como sigue después del 1er y 3er MP: 2 pjd. Dism como sigue cuando queden 2 pts antes del 2º y 4º MP: desl 1 pt como de derecho, 1d., pasar el pt desl por encima. TIP PARA LOS AUMENTOS: Aum para la cintura en los 4 MPs como sigue: hacer 1 HEB (lazada) después del 1er y 3er MP y antes del 2º y 4º MP. En la sig vta trabajar las HEB de derecho retorcido para evitar que se formen agujeros. RAGLÁN: Dism para el raglán a cada lado de A.3 en cada transición entre la manga y el cuerpo. Dism como sigue después de A.3: Desl 1 pt como de derecho, 1 d., pasar el pt desl por encima. Dism como sigue 2 pts antes de A.3: 2 pjd. ----------------------------------------------------------------------- CUERPO: Trabajar en redondo en aguja circular. Mont 200-220-240-264-288-316 pts con ag circular tamaño 2.5 mm con color blanco. Trabajar el patrón según el diagrama A.1. Cuando se ha trabajado A.1 una vez en vertical, cambiar a ag circular tamaño 3 mm. Ahora trabajar en pt jersey. RECUERDE MANTENER LA MISMA TENSIÓN DEL TEJIDO. Cuando la labor mida 8-8-8-8-10-10 cm, insertar 4 MP en la labor como sigue: insertar el 1er MP después de los primeros 24-28-31-36-42-48 pts, el 2º MP después de los sig 52-54-58-60-60-62 pts, el 3º después de los sig 48-56-62-72-84-96 pts y el 4º dspués de los sig 52-54-58-60-60-62 pts (24-28-31-36-42-48 pts restantes en la ag después del último MP). Ahora dism para la CINTURA en los 4 MPs - ver explicaciones arriba (= 4 pts dism). Repetir las dism cada 4ª vta un total de 7-7-7-7-6-6 vcs = 172-192-212-236-264-292 pts. Cuando la labor mida 22 cm para todas las tallas, aum después del 1er y 3er MP y antes del 2º y 4º MP - leer TIP PARA LOS AUMENTOS (= 4 pts aum). Repetir los aum cada 4ª-4ª-6ª-6ª-8ª-8ª vta un total de 7-7-7-7-6-6 vcs = 200-220-240-264-288-316 pts. Continuar trabajando hasta que la labor mida 38-39-39-40-41-43 cm. Trabajar la sig vta como sigue: Cerrar 5-5-5-6-6-6 pts para la sisa, trabajar 90-100-110-120-132-146 pts en pt jersey (= delantero), cerrar 10-10-10-12-12-12 pts para la sisa, trabajar 90-100-110-120-132-146 pts en pt jersey (= espalda) y cerrar los últimos 5-5-5-6-6-6 pts para la sisa. Dejar la labor en espera y trabajar las mangas. MANGAS: Se trabaja en redondo con ag de doble punta. Mont 56-56-58-60-62-64 pts con ag de doble punta tamaño 2.5 mm y color blanco. Trabajar el patrón según el diagrama A.2. Cuando se ha completado A.2 una vez en vertical, cambiar a ag de doble punta tamaño 3 mm. Insertar 1 MP al inicio de la vta (= centro bajo la manga) y trabajar en pt jersey. Cuando la labor mida 8 cm, aum 2 pts en el centro bajo la manga. Repetir los aum cada 9ª-7ª-7ª-6ª-6ª-5ª vta un total de 12-14-14-16-16-17 vcs = 80-84-86-92-94-98 pts. Cuando la labor mida 41-40-39-38-38-38 cm (ATENCIÓN: medidas más cortas en las tallas más grandes debido a una mayor largura de la copa de la manga y una mayor anchura de hombros), cerrar los 10-10-10-12-12-12 pts centrales bajo la manga (es decir, cerrar 5-5-5-6-6-6 pts a cada lado del MP) = 70-74-76-80-82-86 pts restantes en la ag. Dejar la labor en espera y trabajar otra manga. CANESÚ: Desl las mangas a la misma ag circular que el cuerpo como sigue: Continuar con blanco y trabajar los pts de la primera manga AL MISMO TIEMPO insertar 1 MP en el primer pt y 1 MP en el último pt de la manga y trabajar los pts del delantero, trabajar los pts de la otra manga, AL MISMO TIEMPO insertar 1 MP en el primer pt y 1 MP en el último pt de la manga y trabajar los pts de la espalda = 320-348-372-400-428-464 pts en la ag y 4 MPs en la labor. Ahora trabajar en pt jersey en redondo AL MISMO TIEMPO trabajar A.3 en cada transición entre el cuerpo y las mangas (la flecha del diagrama debe coincidir con el pt con MP). AL MISMO TIEMPO dism para el raglán a cada lado de A.3 en cada transición entre el cuerpo y las mangas - ver explicación arriba (= 8 pts dism). Repetir las dism para el raglán cada 4ª vta un total de 6-7-8-8-9-9 vcs = 272-292-308-336-356-392 pts. Después de la última dism trabajar 1 vta de derecho, AL MISMO TIEMPO dism 20-26-28-32-36-40 pts repartidos = 252-266-280-304-320-352 pts en la ag. Ahora trabajar el patrón en redondo según A.4, AL MISMO TIEMPO dism según el diagrama - elegir el diagrama correspondiente a la talla. Cuando se ha completado A.4 una vez en vertical quedan 180-190-200-228-240-264 pts en la ag. Trabajar 1 vta de derecho AL MISMO TIEMPO dism 4-6-8-28-30-44 pts repartidos = 176-184-192-200-210-220 pts. Ahora trabajar el patrón según A.5 - elegir el patrón correspondiente a la talla. Cuando se ha completado A.5, trabajar una elevación en la parte posterior del cuello. Insertar 1 MP en el centro del delantero. Comenzar en el centro de la espalda y trabajar de derecho hasta que queden 14-14-16-16-18-20 pts antes del MP. Girar la labor, trabajar la vta de derecho hasta que queden 14-14-16-16-18-20 pts antes del MP por el otro lado. Girar, trabajar de derecho hasta que queden 30-30-34-34-38-42 pts antes del MP. Girar la labor, trabajar la vta de derecho hasta que queden 30-30-34-34-38-42 pts antes del MP por el otro lado. Girar, trabajar de derecho hasta que queden 46-46-52-52-58-64 pts antes del MP. Girar la labor, trabajar la vta de derecho hasta que queden 46-46-52-52-58-64 pts antes del MP por el otro lado. Girar, trabajar de derecho hasta que queden 62-62-70-70-76-86 pts antes del MP. Girar la labor, trabajar la vta de derecho hasta que queden 62-62-70-70-76-86 pts antes del MP por el otro lado. Girar y trabajar la vta de derecho hasta el inicio de la vta. CENEFA DEL ESCOTE: Cambiar a ag circular tamaño 2.5 mm y trabajar en redondo sobre todos los pts según el diagrama A.1, AL MISMO TIEMPO dism 30-28-36-34-44-44 pts repartidos = 146-156-156-166-166-176 pts. Cuando se ha trabajado A.1 una vez en vertical, rematar flojo de derecho. TERMINACIÓN: Coser las aberturas bajo las mangas. |
|||||||||||||||||||
Explicaciones del diagrama |
|||||||||||||||||||
|
|||||||||||||||||||
 |
|||||||||||||||||||
 |
|||||||||||||||||||
 |
|||||||||||||||||||
¿Terminaste este patrón?Entonces, etiqueta tus fotos con #dropspattern #nordicsummersweater o envíalas a la galería #dropsfan. ¿Necesitas ayuda con este patrón?Encontrarás 32 videos tutoriales, un espacio para comentarios/preguntas y más visitando la página del patrón en garnstudio.com © 1982-2026 DROPS Design A/S. Todos los derechos reservados. Este documento, incluyendo todas sus sub-secciones, está protegido por los derechos de autor (copyright). Lee más acerca de lo que puedes hacer con nuestros patrones en la parte de abajo de cada patrón de nuestro sitio. |
|||||||||||||||||||


Con más de 40 años en el diseño de modelos de punto y de ganchillo, DROPS Design ofrece una de las más vastas colecciones de patrones gratuitos en el internet - traducidos en 17 idiomas. Al día de hoy, contamos con 325 catálogos y 12298 patrones - de los cuales 11696 están traducidos en español.
Nosotros trabajamos con mucho esmero para brindarte lo mejor que las labores de punto y ganchillo tienen para ofrecer,inspiración y consejos, así como hilos de magnífica calidad a precios increíbles! Te gustaría usar nuestros patrones para otro fin además del uso personal? Puedes leer acerca de lo que estás permitida a hacer en el texto de Copyright en la parte de abajo de todos nuestros patrones. Felices labores!
Escribe un comentario sobre DROPS 161-33
¡Nos encantaría saber qué piensas acerca de este patrón!
Si quieres escribir una pregunta referente al patrón, por favor asegúrate de elegir la categoría correcta en el formulario debajo, para acelerar el proceso de respuesta. Los campos obligatorios están marcados con un *.