
Categorías populares
¿Buscas un hilo?


Comentarios / Preguntas (25)
![]() Avril McKoy escribió:
Avril McKoy escribió:
Hello, I am a little confused when doing the raglan increase. For sleeves, each side of raglan meaning increasing by 4 stitches per sleeve each increase? And for body 4 stitches? In total per round of increase? Thanks ☺️
28.10.2023 - 15:19DROPS Design respondió:
Dear Avril, as explained in RAGLAN, you increase 1 stitch on each side of A.1. Even though A.1 is in the sleeves, the increases are divided into the parts as follows: Before the first A.1, the increase will go for the right side of the back, after the first A.1 and before the second A.1 the increases are for the right sleeve. After the second A.1 and before the 3rd A.1 the increases are for the front piece. After the 3rd A.1 and before the 4th A.1 the increases are for the left sleeve. After the 4th A.1, the last increase is for the back piece. So, when you increase for the sleeves or for the body you work the increases indicated above for the body or the sleeves. Happy knitting!
29.10.2023 - 20:33Barbara escribió:
Hello, Iam working this pattern with two strands air and my gauge is as requested. I have finished the raglan part on size XL after 38 rows, my problem is that it is 28cm instead of 33cm. Thank you
27.11.2018 - 23:38DROPS Design respondió:
Dear Barbara, for raglan sweater it is very important to have the proper gauge for not only the stitchcount, but also for the rows as well. If you knit to few rows the shoulder / yoke will be too short. You can compensate for this, if, at regular intrewalls insert a round without increases at the yoke. I hope this helps. Happy Knitting!
28.11.2018 - 03:45
![]() Anne Olsen escribió:
Anne Olsen escribió:
Jeg forstår ikke hvor ofte jeg skal øke. Hver 2. omg. 4 ganger (jeg skal strikke L), men bare 1. gang den 4. omg. og igjen 4. ganger på hver 6. omg. Skal jeg da etter hver bare øke hver 2. og 6. når jeg har økt den 4. omg. én gang?
20.03.2017 - 21:18DROPS Design respondió:
Hej Anne. Först öker du i hver 2. omg 4 ganger (paa bolen) og först naar du er faerdig gaar du videre med at öke i hver 4. omg (1 gang) og til sidst i hver 6. omg (4 ganger). Husk at samtidig öker du ogsaa paa ermerne de antal gange som din str siger.
21.03.2017 - 14:49
![]() Marianne escribió:
Marianne escribió:
Mijn vraag lijkt niet geplaatst te zijn, ik probeer het nog eens. In het gedeelte " lijf" moet een markeerder geplaatst worden in de averechte steek. Moet deze steek over het hele deel vanaf de oksel tot de onderkant averecht gebreid blijven worden? Zodat een soort averechte "naad" ontstaat? Of moet deze, nadat de markeerder is geplaatst, in het gerstekorrelpatroon worden meegebreid?
21.10.2016 - 13:27DROPS Design respondió:
Hoi. Jawel :) Zie mijn antwoord hieronder.
21.10.2016 - 15:05
![]() Marianne escribió:
Marianne escribió:
Ik begrijp dat ik een markeerder moet plaatsen bovenaan de zijkant, in de oksel, in een averechte steek. Maar moet ik die averechte steek blijven breien in de volgende toeren? Ofwel: ontstaat er een soort zijnaad met een averechte steek? Of wordt het in de volgende toeren gewoon meegenomen in de gerstekorrel?
21.10.2016 - 12:51DROPS Design respondió:
Hoi Marianne. Je breit deze st steeds av - je krijgt dan een "lijn" in de zijkanten. Je breit de st NIET in gerstekorrel
21.10.2016 - 15:04Shilpa escribió:
Thanks for your speedy reply! Just to clarify, when you say 'at the same time', doesn't that mean some of the increase rounds will have 12 increases? Or do the sleeve increases start after the all the body increases are complete? And, if there are 8/increase row as you've mentioned, doesn't that mean the stitch count for the sleeves is too low? Thanks!
23.06.2016 - 00:22DROPS Design respondió:
Dear Shilpa, all raglan inc are done when working yoke, but you will not inc on every inc round on all pieces, ie in larger size, you will inc on first round: 2 sts on each sleeve only (= every round = 4 sts inc), then on next round, you will inc 2 sts in all pieces (= every other round in body and every round in sleeve = 8 sts inc), repeat these 2 rounds a total of 3 times = you have inc 6 times every round on sleeves and 3 times every other round on body. ie you will inc sometimes only on sleeve (= + 4 sts inc on round), only on body (= + 4 sts inc on round) and on each pieces (= +8 sts inc on round). Happy knitting!
23.06.2016 - 08:55Shilpa escribió:
Hello! I'm knitting the XXXL with 10ply on 8.0mm and am confused by the increases. Increases are by 4 stitches only (NOT 8), the difference is where these increases go, correct? This creates 47st per sleeve (38 from sleeve increases and 9 from 2xA1 with k in between), but then the A1 section creates a straight stripe for a long portion, unlike the picture. I've been increasing 8/round, which seems to create more shoulder space, and matches the picture, but doesn't add up. Help, please!
22.06.2016 - 14:52DROPS Design respondió:
Dear Shilpa, you inc for raglan either 4 sts (when inc only in sleeve or only in body) or 8 sts (when inc both in body and sleeve), ie in larger size, you will inc 8 times every other round, 3 times every 4th round and 2 times every 6th round, and at the same time, you inc for sleeve 6 times every round, 9 times every other round and 4 times every round. Increase are made before A.1 (when inc at beg of piece) or after A.1 (when inc at the end of piece). Happy knitting!
22.06.2016 - 15:00
![]() Elisabeth escribió:
Elisabeth escribió:
Merci infiniment de votre patience et de vos conseils. Cette fois, j'ai compris ! Bonne journée.
11.05.2016 - 15:55
![]() Elisabeth escribió:
Elisabeth escribió:
Bonjour, Je tricote la taille XXL. Les manches se situeront autour de la maille endroit entre les deux A1, non ? Je me rapproche du cas désespéré :-)
11.05.2016 - 14:12DROPS Design respondió:
Bonjour Elisabeth, la m end tricotée au tout 1er tour, entre chaque A.1 correspond effectivement aux manches. En taille XXL, tricotez 5 fois: 1 tour avec 8 augm = 1 avant + 1 après chaque A.1 (= augm manches, dos et devant) et 1 tour avec 4 augm = 1 m après le A.1 de chaque manche + 1 m avant le A.1 de chaque manche) - Au 6ème tour, pas d'augm. Au 7ème tour, augmentez 8 m (= manches, dos et devant) et ainsi de suite. Bon tricot!
11.05.2016 - 15:49
![]() Elisabeth escribió:
Elisabeth escribió:
Bonjour, Une toute dernière question, svp : au premier tour, je commence par une augmentation avant le premier marqueur, si j'ai bien compris ? Merci encore de votre patience. Bien cordialement.
11.05.2016 - 10:27DROPS Design respondió:
Bonjour Elisabeth, les augmentations se font après le marqueur (le marqueur doit être et rester après A.1) et après le marqueur (le marqueur doit être et rester avant A.1) quand on augmente 2 m au total dans chaque pièce. Ainsi, vous augmentez 2 m entre chaque motif de A.1 (soit pour les manches, soit pour le dos/le devant) - notez bien les augmentations à faire pour votre taille, vous n'augmenterez pas pour chaque pièce à chaque fois. Indiquez moi la taille que vous réalisez pour plus de détail. Bon tricot!
11.05.2016 - 11:51
|
|||||||
Day After Day#dayafterdaysweater |
|||||||
|
|
|||||||
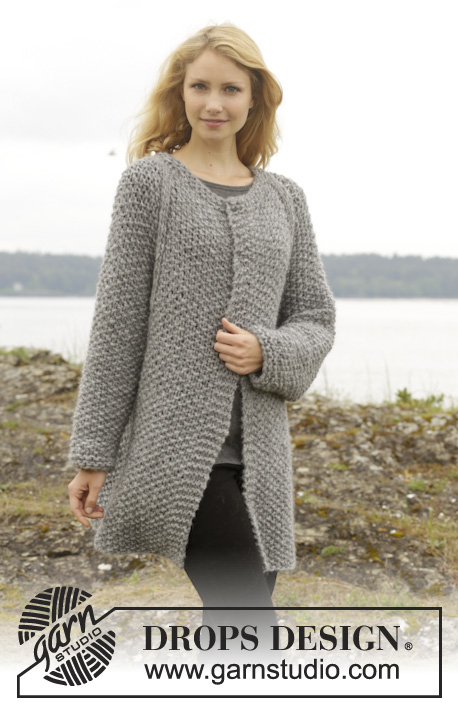
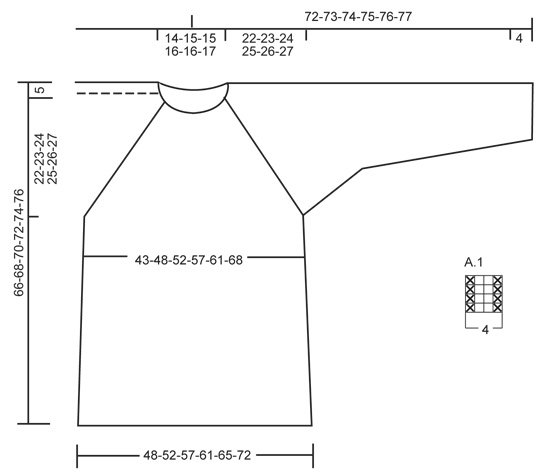
Jersey de punto DROPS con punto arroz y raglán tejido de arriba abajo en "Cloud" o "Snow". Talla: S - XXXL.
DROPS 157-27 |
|||||||
|
TIP PARA TOMAR LAS MEDIDAS: Debido al peso de la lana, hacer todas las mediciones con la prenda suspendida, de lo contrario quedará muy larga cuando se ponga. PUNTO MUSGO (de ida y vta en ag). trabajar todas las filas de derecho. 1 pliegue = 2 filas de derecho. PUNTO MUSGO (en redondo en ag circular): * 1 vta de derecho y 1 vta de revés*, repetir de * a *. 1 pliegue = 2 vtas. PATRÓN: Ver el diagrama A.1. El diagrama muestra todas las filas del patrón vistas por el LD. PUNTO ARROZ: Fila/Vuelta 1: *1 d., 1 r.,*, repetir de * a *. Filas /Vuelta 2: derecho sobre derecho y revés sobre revés. repetir la 2ª fila/vta. RAGLÁN: Aum para el raglán trabajando una HEB (lazada) a cada lado de A.1 para cada raglán. En la sig vta trabajar la HEB como punto retorcido (es decir trabajar por detrás del pt en vez de por delante) para evitar que se formen agujeros. ATENCIÓN! Trabajar los pts nuevos en pt arroz. TIP PARA LOS AUMENTOS: Aum 1 pt trabajando 1 HEB. En la sig vta trabajar la HEB como pt retorcido (es decir tejer por detrás del pt en vez de por delante) para evitar que se formen agujeros. ATENCIÓN! Trabajar los pts nuevos en pt arroz. TIP PARA LAS DISMINUCIONES: Dism dentro 1 pt orillo en pt musgo a cada lado. Dism como sigue después de 1 pt orillo en pt musgo : 2 pjd. Dism como sigue antes de 1 pt orillo en pt musgo y 2 pts en pt arroz: desl 1 pt como de derecho, 1 d., pasar el pt desl por encima, 1 pt orillo en pt musgo. ---------------------------------------------------------------------------------------------------------------------------------------------- JERSEY: Se trabaja en redondo en ag circular. Mont 44-48-52-56-60-64 pts en ag circular tamaño 10 mm con Cloud o Snow. Trabajar 1 vta en pt jersey, AL MISMO TIEMPO aum 10 pts repartidos = 54-58-62-66-70-74 pts. Ahora insertar 4 marcapuntos (MP) en la labor, comenzar por los pts de raglán en el lado derecho de la espalda: insertar un MP, A.1 (= 4 pts), 1 d., A.1 (= manga), insertar un MP, 18-20-22-24-26-28 pts en PT ARROZ - ver explicaciones arriba (= delantero), insertar un MP, A.1, 1 d., A.1 (= manga), insertar un MP, 18-20-22-24-26-28 pts en pt arroz (= espalda). Continuar de la misma manera, AL MISMO TIEMPO en la sig vta aum para el RAGLÁN - ver explicaciones arriba!. ATENCIÓN! Trabajar de diferente modo los aum para el cuerpo y las mangas. RECUERDE MANTENER LA MISMA TENSIÓN DE LA MUESTRA RAGLÁN EN EL CUERPO: Aum cada 2ª vta 2-3-4-5-6-8 vcs, cada 4ª vta 1-1-1-2-2-3 vcs y cada 6ª vta 4-4-4-3-3-2 vcs. Ahora hay 32-36-40-44-48-54 pts para el delantero y la espalda RAGLÁN EN LA MANGA: Aum cada vta 3-4-4-5-5-6 vcs, cada 2ª vta 7-7-8-8-9-9 vcs y cada 4ª vta 4 vcs para todas las tallas. Ahora hay 37-39-41-43-45-47 pts para cada manga. Cuando se hayan completado todos los aum hay 138-150-162-174-186-202 pts en la vta. La labor mide 27-29-31-33-35-37 cm - LEER TIP PARA TOMAR LAS MEDIDAS. Ahora desl los primeros 37-39-41-43-45-47 pts a un gancho aux para la manga, mont 7 pts bajo la manga, trabajar los sig 32-36-40-44-48-54 pts (= delantero), desl los sig 37-39-41-43-45-47 pts a un gancho aux para la manga, mont 7 pts nuevos bajo la manga, trabajar los 32-36-40-44-48-54 pts restantes (= espalda). CUERPO: Ahora hay 78-86-94-102-110-122 pts para el cuerpo. Continuar en pt arroz sobre los sig 3 pts, 1 r. (= lado), insertar un MP en este pt., pt arroz sobre los sig 38-42-46-50-54-60 pts, 1 r. (= el lado), insertar un MP en este pt, pt arroz sobre los 38-42-46-50-54-60 pts restantes de la vta. AHORA MEDIR LA LABOR DESDE AQUÍ. Cuando la labor mida 7 cm, aum 1 pt a cada lado de los pts de revés con MP de los lados - LEER TIP PARA LOS AUMENTOS. Repetir los aum cuando la labor mida 22-23-24-25-26-27 cm = 86-94-102-110-118-130 pts. Continuar trabajando hasta que la labor mida un total de 66-68-70-72-74-76 cm - recuerde el TIP PARA TOMAR LAS MEDIDAS. Rematar con derecho sobre derecho y revés sobre revés. MANGA: La manga se trabaja de ida y vta en ag circular . Desl los 37-39-41-43-45-47 pts desde el gancho aux de vta a ag circular tamaño 10 mm. Ahora continuar en pt arroz sobre todos los pts. Mont 4 pts al final de las sig 2 filas = 45-47-49-51-53-55 pts. ATENCIÓN: Trabajar los pts nuevos en pt arroz con 1 pt orillo en pt musgo a cada lado. En la sig fila dism 1 pt a cada lado de la labor - Leer TIP PARA LAS DISMINUCIONES! Repetir las dism en cada fila del LD 4 vcs más = 35-37-39-41-43-45 pts. Ahora dism cada 4½-3½-3½-3-3-3 cm 6-7-7-8-9-9 vcs = 23-23-25-25-25-27 pts. Cuando la manga mida 39-38-38-38-38-37 cm desde los pts nuevos bajo la manga - recuerde el TIP PARA TOMAR LAS MEDIDAS - cambiar a ag circular tamaño 9 mm . Trabajar 2 pliegues en PT MUSGO _ ver las explicaciones arriba. Rematar. Tejer la otra manga de la misma manera. TERMINACIÓN: Coser bajo las mangas dentro de 1 pt orillo en pt musgo. Coser las aberturas bajo las mangas. CENEFA DEL ESCOTE: Recoger 44-48-52-56-60-64 pts (= 1 pt en cada pt de la fila de montaje) alrededor del escote con ag tamaño 9 mm con Cloud o Snow. Trabajar 1 pliegue, AL MISMO TIEMPO ajustar el nº de pts a 48-50-50-52-52-54. Trabajar 2 pliegues. Rematar. |
|||||||
Explicaciones del diagrama |
|||||||
|
|||||||
 |
|||||||
¿Terminaste este patrón?Entonces, etiqueta tus fotos con #dropspattern #dayafterdaysweater o envíalas a la galería #dropsfan. ¿Necesitas ayuda con este patrón?Encontrarás 25 videos tutoriales, un espacio para comentarios/preguntas y más visitando la página del patrón en garnstudio.com © 1982-2026 DROPS Design A/S. Todos los derechos reservados. Este documento, incluyendo todas sus sub-secciones, está protegido por los derechos de autor (copyright). Lee más acerca de lo que puedes hacer con nuestros patrones en la parte de abajo de cada patrón de nuestro sitio. |
|||||||


Con más de 40 años en el diseño de modelos de punto y de ganchillo, DROPS Design ofrece una de las más vastas colecciones de patrones gratuitos en el internet - traducidos en 17 idiomas. Al día de hoy, contamos con 324 catálogos y 12290 patrones - de los cuales 11685 están traducidos en español.
Nosotros trabajamos con mucho esmero para brindarte lo mejor que las labores de punto y ganchillo tienen para ofrecer,inspiración y consejos, así como hilos de magnífica calidad a precios increíbles! Te gustaría usar nuestros patrones para otro fin además del uso personal? Puedes leer acerca de lo que estás permitida a hacer en el texto de Copyright en la parte de abajo de todos nuestros patrones. Felices labores!
Escribe un comentario sobre DROPS 157-27
¡Nos encantaría saber qué piensas acerca de este patrón!
Si quieres escribir una pregunta referente al patrón, por favor asegúrate de elegir la categoría correcta en el formulario debajo, para acelerar el proceso de respuesta. Los campos obligatorios están marcados con un *.