
Categorías populares
¿Buscas un hilo?


Comentarios / Preguntas (22)
![]() Pavlína escribió:
Pavlína escribió:
Dobrý den, sháním návod na takovýto svetr z šestiúhelníku, ale háčkovaný. Jednoduše dl. sloupky. Měli byste?? Děkuji
20.02.2019 - 20:17DROPS Design respondió:
Hi Pavlina, please look for crocheted circle jacket on the website. Happy crocheting!
25.02.2020 - 07:52
![]() Pavlína escribió:
Pavlína escribió:
Dobrý den, sháním návod na takovýto svetr z šestiúhelníku, ale háčkovaný. Jednoduše dl. sloupky. Měli byste?? Děkuji
20.02.2019 - 20:15
![]() Bernadette escribió:
Bernadette escribió:
Also, can I knit the sleeves on normal pointed needles? Why does the pattern ask for circular needles but knit back and forth? Could this be worsening the distortion? Thanks for your help again!
24.09.2017 - 23:06DROPS Design respondió:
Dear Bernadette, the sleeves are knitted with circulars to have the number of stitches comfortably fit onto the needle, but, if you prefer, you can knit them on straights. However, I do not think that the type of the needle you are knitting with affects the distortion. Happy Knitting!
25.09.2017 - 00:20
![]() Bernadette escribió:
Bernadette escribió:
I've ripped out the whole sleeve and started again with particular attention to tension. The stitches are neither increased not decreased but the distortion is still there. Please can I check that I've interpreted the pattern correctly? A3 is worked as follows: 1 edge stitch,knit 2 together (k2t) yarn over (YO), k2t, YO etc ending in k2t, YO, edge stitch. Knit row. 1 edge stitch, knit 1, k2t, YO, k2t, YO etc, ending in YO knit 1, edge stitch. Is that right?
24.09.2017 - 23:01DROPS Design respondió:
Dear Bernadette, sorry to hear you are still having troubles with the sleeve. You read the pattern correctly, however the second row is a purl row (from the wrong side, the diagram shows every row from the right side). And please do try to block the piece out (wet and pin into shape, then let it dry). I hope this helps. Happy Knitting!
25.09.2017 - 00:17
![]() Bernadette escribió:
Bernadette escribió:
Please help! I have completed the main body of the garment, which is fine. However the sleeves are completely out of shape - it looks as though there is a consistent increase on one side and a decrease on the other! I don't think it is the tension. Rather than a rectangle, it looks like a parallelogram! The pattern looks right and I have definitely not added or dropped any stitches. When I fold in two to stitch together, the seams don't match.
16.09.2017 - 19:54DROPS Design respondió:
Dear Bernadette, the sleeves should be more or less symmetric, when folded. Granted that the ajour pattern has a tendency to slightly distort the shape, but if you look at the dieagram, there is equal number of decreases and increases, the number of stitches do not chnage. Try to wet-block the piece and pull it into shape, while it is wet. I hope this helps. Happy Knitting!
17.09.2017 - 23:46
![]() Bernadette Buckley escribió:
Bernadette Buckley escribió:
After casting off and then on again to make the armholes, do I YO after every 7 markers as previously? The pattern doesn't say to do this. Also when casting off, the pattern says that 57 stitches should remain "on the needle". Is this a mistake? (Circular needles are being used here. Does it mean ' 57 stitches should remain AT THE END OF THE ROW? The wording is very unclear!
01.07.2017 - 20:00DROPS Design respondió:
Dear Mrs Buckley, correct, 57 sts should remain before end of round, then continue pattern as before with YOs to inc circle. Happy knitting!
03.07.2017 - 09:28
![]() Anne escribió:
Anne escribió:
Chart A2 has YO at the beginning and end of each repeat. This is 2YO next to each other. Working the following row, you lose one of the YO and end up not increasing and one big hole. Could you please explain how to work this to stay in pattern and keep the increase?
27.10.2015 - 17:10DROPS Design respondió:
Dear Anne, diagram A.2 starts with K1 on every round (first st in A.2 = white square in the column at the right side). Read more about diagram here. Happy knitting!
28.10.2015 - 11:19
![]() Kerstin escribió:
Kerstin escribió:
Hallo liebes Drops-Team, jedesmal bewundere ich Eure schönen Kreisjacken, sowie auch dieses Model. Gestrickt habe ich noch keine, weil ich schon beim ermitteln der Grösse scheitere. Die angegebenen Masse sagen mir gar nichts!!?? Wie ermittele ich meine Grösse? Vielen Dank
19.08.2015 - 14:21DROPS Design respondió:
Liebe Kerstin, dann wählen Sie am besten die Grösse, die Sie üblicherweise tragen. Die Zahlen sind die cm-Angaben an der Stelle, an der sie eingezeichnet sind. Vielleicht kann Ihnen jemand beim messen helfen.
19.11.2015 - 17:42
![]() Elena escribió:
Elena escribió:
Grazie mille, ci riprovo!
29.12.2014 - 16:51
![]() Elena escribió:
Elena escribió:
Salve, purtroppo non riesco ad avanzare nel lavoro. dopo il primo A.2 bisogna ricominciare dall'inizio di A.2 ??? non riesco proprio a capire
29.12.2014 - 15:03DROPS Design respondió:
Buongiorno Elena. Sì è corretto: dopo aver completato A,2 una prima volta, continua a lavorare iniziando di nuovo dalla prima riga del diagramma A.2. Proseguirà con il diagramma A.2 finchè il lavoro non misura 17-18-19-20 cm (a seconda della taglia). Buon lavoro!
29.12.2014 - 15:28
|
|||||||||||||||||||
Saralyn#saralyncardigan |
|||||||||||||||||||
 |
 |
||||||||||||||||||
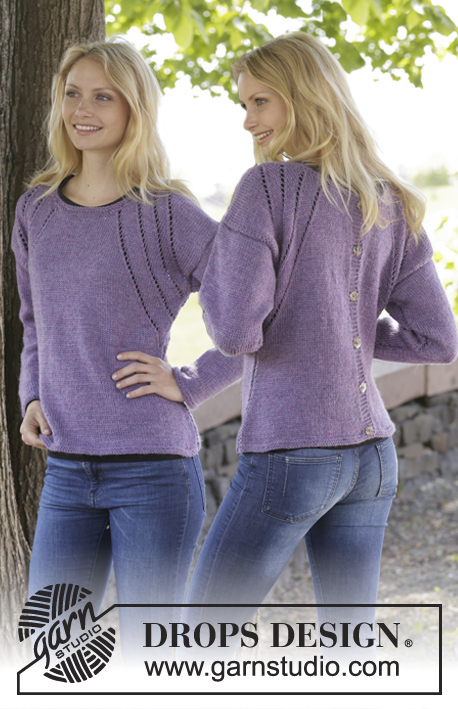
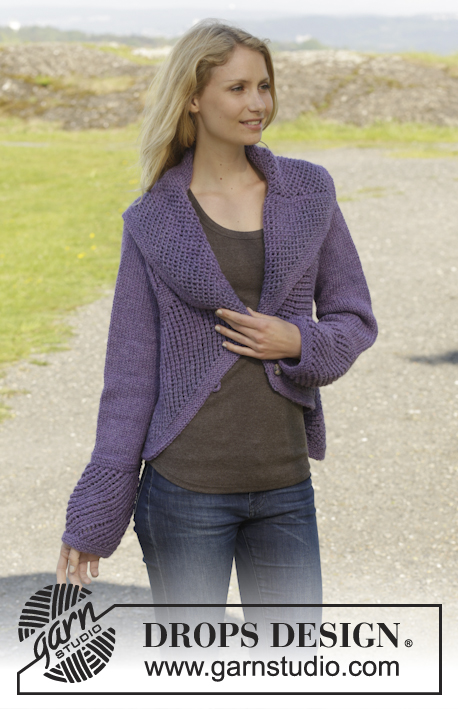
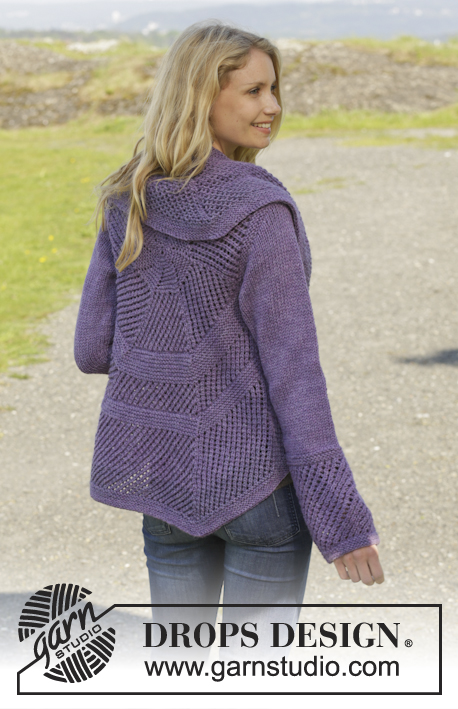
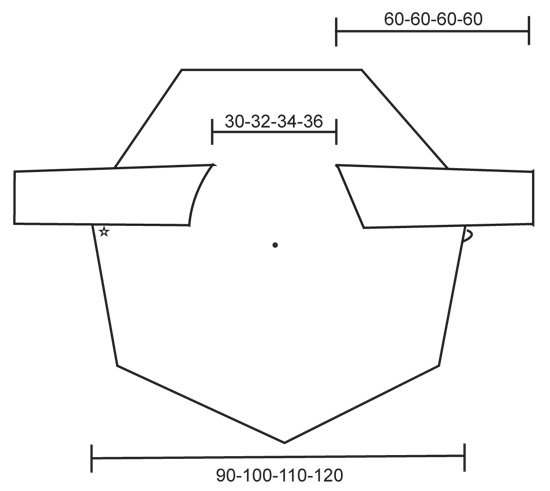
Chaqueta de punto DROPS tejida en círculo en punto musgo con patrón de calados en ”Big Merino”. Talla: S - XXXL.
DROPS 156-37 |
|||||||||||||||||||
|
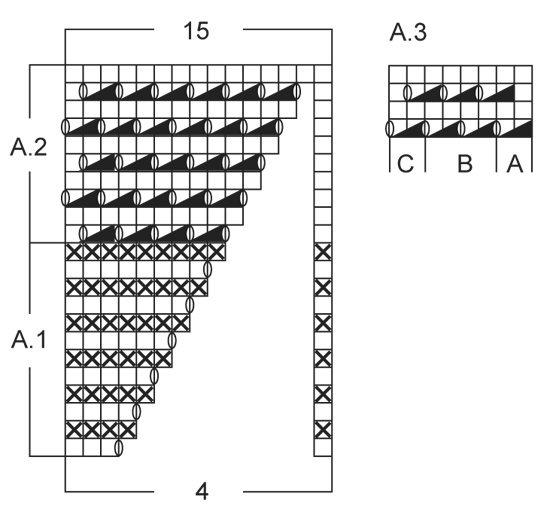
PUNTO MUSGO (en redondo en ag circular): *1 vta de derecho, 1 vta de revés*, repetir de * a *. 1 pliegue = 2 vtas. PUNTO MUSGO (de ida y vta en ag): Trabajar todas las filas de derecho. 1 pliegue = 2 filas de derecho. PATRÓN: Ver los diagramas A.1 - A.3. Los diagramas muestran todas las filas del patrón visto por el LD. TIP PARA LOS AUMENTOS: Aum 1 pt trabajando una HEB (lazada). En la sig fila trabajar la HEB como pt retorcido (es decir tejer por detrás del pt en vez de por delante) para evitar que se formen agujeros. ---------------------------------------------------------------------------------------------------------------------------------------------- CUERPO: Se trabaja en redondo en un círculo desde el centro de la espalda. Mont 7 pts con Big Merino y dividir en 4 ag de doble punta tamaño 5 mm. Trabajar 1 vta de derecho, AL MISMO TIEMPO trabajar 2 pts de derecho en cada pt = 14 pts. Insertar 7 marcapuntos (MP) en la labor, con 2 pts de separación. El 1er MP = al inicio de la vta = el escote en la parte de la espalda. Trabajar 1 vta de revés. En la sig vta trabajar de derecho, AL MISMO TIEMPO trabajar 2 pts en cada 2º pt = 21 pts. Trabajar 1 vta de revés. En la sig vta trabajar de derecho con 2 pts en cada 3er pt = 28 pts. Trabajar 1 vta de revés. Ahora trabajar según A.1, trabajar 1 repetición sobre los 4 pts entre cada MP. Cuando se ha trabajado A.1, continuar según A.2. Después de A.2 continuar con el patrón de A.2 de la misma manera con 7 aum en cada 2ª vta, trabajar los aum dentro del patrón. Cambiar a ag circular tamaño 5 mm cuando sea necesario. RECUERDE MANTENER LA MISMA TENSIÓN DE LA MUESTRA! Cuando la labor mida 17-18-19-20 cm desde el centro, trabajar 3 pliegues en PT MUSGO - ver explicaciones arriba - sobre todos los pts. ATENCIÓN! continuar con los aum cada 2ª vta, aum trabajando una HEB después de cada MP (= 7 aum) Trabajar la sig vta como sigue: Trabajar 25-27-29-31 pts, cerrar 32-34-37-40 pts (= sisa), trabajar hasta que queden 57-61-66-71 pts en la ag, cerrar 32-34-37-40 pts (= sisa) y trabajar 25-27-29-31 pts. Trabajar 1 vta de revés - AL MISMO TIEMPO mont 32-34-37-40 pts nuevos sobre cada sisa, el mismo nº de pts que se cerraron para la sisa. Trabajar 4 pliegues. Continuar con A.2 y los aum hasta 4-5-7-9 cm, trabajar 5 pliegues con aum, trabajar A.2 con aum hasta completar 13-16-18-20 cm, finalizar con 5 pliegues con aum - la labor mide aprox 45-50-55-60 cm desde el centro hacia afuera. Rematar FLOJO. MANGA: La manga se trabaja de ida y vta en ag circular. Mont 44-46-48-50 pts (incl 1 pt orillo a cada lado) con ag tamaño 5 mm con Big Merino, trabajar 3 pliegues en PT MUSGO - ver explicaciones arriba (= 1ª fila = LR). Trabajar la sig fila como sigue por el LD: 1 pt orillo en pt musgo, A.3A (= 2 pts), A.3B hasta que queden 3 pts, finalizar con A.3C (= 2 pts) y 1 pt orillo en pt musgo. Cuando la labor mida 17 cm, trabajar 3 pliegues. Ahora trabajar en pt jersey con 1 pt orillo en pt musgo a cada lado - AL MISMO TIEMPO en la sig fila por el LD aum 1 pt a cada lado - leer TIP PARA LOS AUMENTOS, repetir los aum cada 3½-3-2½-2 cm un total de 9-10-12-15 vcs = 62-66-72-80 pts. Cuando la labor mida 52 cm en todas las tallas, cerrar para la copa de la manga al inicio de cada fila a cada lado como sigue: 5 pts 1 vez, después 2-2-3-3 pts a cada lado hasta que la labor mida aprox 60 cm - ATENCIÓN! Para la talla XL/XXL cerrar 3 pts sólo 6 vcs a cada lado, después 2 pts. Rematar los pts restantes. TERMINACIÓN: Coser las mangas dentro de 1 pt orillo. Coser las mangas para que el centro de la copa de la manga quede donde las sisas están más próximas (es decir, donde se cerró el 1er pt para la primera sisa y donde se cerró el último punto para la segunda sisa) y la costura de las mangas queda donde las sisas están más alejadas (es decir, en el lado opuesto - véase el gráfico). BOTÓN Y PRESILLA: Extienda la chaqueta, como se muestra en el gráfico con el LD hacia arriba y las mangas hacia fuera, coser el botón en el lado izquierdo, debajo de la manga, por el LD. Trabajar 1 presilla a modo de ojal con ganchillo tamaño 4 mm en el borde de remate bajo la manga en el lado derecho como sigue: 1 p.b. en el borde de remate de la chaqueta, 5 p.de cad., saltar aprox 1 cm y asegurar con 1 p.b. en el borde de remate. |
|||||||||||||||||||
Explicaciones del diagrama |
|||||||||||||||||||
|
|||||||||||||||||||
 |
|||||||||||||||||||
 |
|||||||||||||||||||
¿Terminaste este patrón?Entonces, etiqueta tus fotos con #dropspattern #saralyncardigan o envíalas a la galería #dropsfan. ¿Necesitas ayuda con este patrón?Encontrarás 25 videos tutoriales, un espacio para comentarios/preguntas y más visitando la página del patrón en garnstudio.com © 1982-2026 DROPS Design A/S. Todos los derechos reservados. Este documento, incluyendo todas sus sub-secciones, está protegido por los derechos de autor (copyright). Lee más acerca de lo que puedes hacer con nuestros patrones en la parte de abajo de cada patrón de nuestro sitio. |
|||||||||||||||||||


Con más de 40 años en el diseño de modelos de punto y de ganchillo, DROPS Design ofrece una de las más vastas colecciones de patrones gratuitos en el internet - traducidos en 17 idiomas. Al día de hoy, contamos con 324 catálogos y 12290 patrones - de los cuales 11685 están traducidos en español.
Nosotros trabajamos con mucho esmero para brindarte lo mejor que las labores de punto y ganchillo tienen para ofrecer,inspiración y consejos, así como hilos de magnífica calidad a precios increíbles! Te gustaría usar nuestros patrones para otro fin además del uso personal? Puedes leer acerca de lo que estás permitida a hacer en el texto de Copyright en la parte de abajo de todos nuestros patrones. Felices labores!
Escribe un comentario sobre DROPS 156-37
¡Nos encantaría saber qué piensas acerca de este patrón!
Si quieres escribir una pregunta referente al patrón, por favor asegúrate de elegir la categoría correcta en el formulario debajo, para acelerar el proceso de respuesta. Los campos obligatorios están marcados con un *.