
Categorías populares
¿Buscas un hilo?


Comentarios / Preguntas (91)
![]() Val escribió:
Val escribió:
I'm in trouble. Since I did yesterday a wrong decrease (is not clear this explanation),now I have to remake again the round of yesterday, and it's all a mess. The stitch markers skip since I had to unravel? the k 2 tog, so I don't know if the stitch marker have to stay 2 stiches ahead or after... it's all a mess right now, I ve also lost the starting point of the beginning of the round... now what I will do? I lost the right places of the stitches , nothing match anymore how they should be
14.12.2021 - 16:57DROPS Design respondió:
Dear Val, it's a bit tricky to have an idea of your work, maybe you can bring your work to your store or show them a picture so that they can help you easely? The markers on the sides should have been inserted when divding piece, you can try to follow the middle of the 10 sts cast on on your work inserting your marker, then decrease simply as explained under DECREASE TIP on each side of these markers. Hope it will help. Happy knitting!
15.12.2021 - 07:44
![]() Val escribió:
Val escribió:
Sorry, i'm confused because the dec tip says "slip 1 st as if k, k1 ,psso" and not 'K1, splip 1 as if to k, k1, psso.... " not says "K2 tog, K1, slip marker, K1, slip 1 as if to K, K1, psso, and work until 3 sts remain". Also, the "repeat dec every 2 cm until piece measure 14 cm from MARKER under sleeves" . What marker under sleeve? My marker under sleeve is follow my current row, so I'm confused, Thank you 4 help!
14.12.2021 - 16:44DROPS Design respondió:
Dear Val, the marker mid under sleeve is the marker placed in the middle of the 10 stitches cast on when dividing yoke. you will decrease on each side of the middle 2 sts under sleeve: decrease, K1, marker, K1, decrease. measuring these 14 cm from the marker = from the new stitches cast on mid under sleeve when dividing. Can this help?
15.12.2021 - 07:41
![]() Val escribió:
Val escribió:
Sorry I don't understand the decrease explanation ( I ve watched videos, is not that I don't understand how to do the 2k tog or psso) but I don' t understand what stitches I have to pick up. The instructions says "On next round dec 1 st on each side of each marker in the sides" I don't understand in which sense ' I knitted the first 11 stitches before marker, I did k 2 tog, before marker, now I have again to do k 2 tog or sl 1, k1 and psso? I don't get it.. thank you!
13.12.2021 - 22:48DROPS Design respondió:
Dear Val, you mean on body, correct? Work until 3 sts remain before the marker on the side of the jumper (body), K2 tog, K1, slip marker, K1, slip 1 as if to K, K1, psso, and work until 3 sts remain before next marker on the other side of the jumper and repeat the decrease. This video shows how to work this kind of decrease (on a sleeve in the video). Hope it can help you. Happy knitting!
14.12.2021 - 07:48
![]() Confused escribió:
Confused escribió:
Sorry, I'm at this point " cast on 10 new sts under sleeve, insert a marker in the middle of these 10 sts" ... I've never knitted a sweater so I don't understand how to hold this sweater and how to add the cast on stitches under sleeve... in which sense? There's a video? Thank you...
05.12.2021 - 17:50DROPS Design respondió:
Dear Confused, you can check the following lesson with pictures on how to knit a sweater in the round. https://www.garnstudio.com/lesson.php?id=71&cid=19 You can also check this video: https://www.garnstudio.com/video.php?id=1634&lang=en Happy knitting!
05.12.2021 - 20:53
![]() Melinda Berlanger escribió:
Melinda Berlanger escribió:
Bonjour, pour la manche, où mesurer les 38 cm? ou on a monter les 10 mailles? ou bien de l'épaule? de même pour coudre sous les manches, comment devons nous joindre les coutures? merci beaucoup
25.11.2021 - 14:41DROPS Design respondió:
Bonjour Mme Berlanger, mesurez la longueur de la manche au milieu du dessus de la manche, à partir des mailles reprises pour cette partie; cette vidéo montre comment fermer l'ouverture sous les manches (les 10 mailles montée sous la manche). Bon tricot!
25.11.2021 - 16:42
![]() Conny Andersen escribió:
Conny Andersen escribió:
Hej Nu har jeg strikket blusen i str xxxl. Der var fejl i opskriften, så jeg måtte regne ud hvor mange masker jeg skulle slå op for at maskeantallet passede med mønstret med rensdyr. Den ser ikke ud som på billedet fordi man skal strikke 11 omgange efter mønster a1. Det gør at m2 kommer til at svæve langt under a1. Det ser ikke særlig smart ud. Så jeg er lidt skuffet
10.11.2021 - 07:40
![]() Caroline escribió:
Caroline escribió:
I'm working this in size M, lovely pattern and going very well. On the body where it says 'When piece measures 56-58-60-62-64-66 cm'. Is this measured from the 10 new stitches please under the arm as was the 13 cm? thank you.
07.11.2021 - 11:43DROPS Design respondió:
Dear Caroline, the measurements are in total, not just under the arm. Happy knitting!
07.11.2021 - 13:50
![]() Christina escribió:
Christina escribió:
Hallo Liebes Team, Den Rumpfteil des Pullis habe ich bereits fertig gestellt. Beim stricken des Musters am Ärmel habe ich allerdings 74 Masche, die ich auf das Muster aufteilen soll (für je 12 Maschen). Was soll mit dem restlichen Maschen unter dem Arm gemacht werden, die nicht im Muster gestrickt werden?
25.10.2021 - 23:15DROPS Design respondió:
Liebe Christina, Sie stricken stets so viele Maschen wie möglich im Muster, das Muster geht an der unteren Ärmelmitte nicht auf. Es kommen dann ja noch die Abnahmen an der unteren Ärmelmitte hinzu, dadurch geht das Muster dann auch weiterhin nicht auf. Achten Sie darauf, dass Sie das Muster ab der oberen Ärmelmitte abzählen (wie in der Anleitung beschrieben), damit es mittig zu liegen kommt. Viel Spaß beim Weiterstricken!
26.10.2021 - 12:13
![]() Donata escribió:
Donata escribió:
Hallo liebes Drops Design Team, Ist es vorgesehen, dass der Pullover gespannt wird zur Fertigstellung?
25.10.2021 - 15:02DROPS Design respondió:
Liebe Donata, vorgesehen ist es nicht unbedingt, aber Sie können den Pullover anfeuchten und auf das passende Maß spannen, bei Einstrickmustern kann das sinnvoll sein, um das Muster etwas zu glätten, falls es etwas unregelmäßig geworden ist. Viel Spaß mit diesem schönen Pullover!
25.10.2021 - 19:37
![]() Valentina escribió:
Valentina escribió:
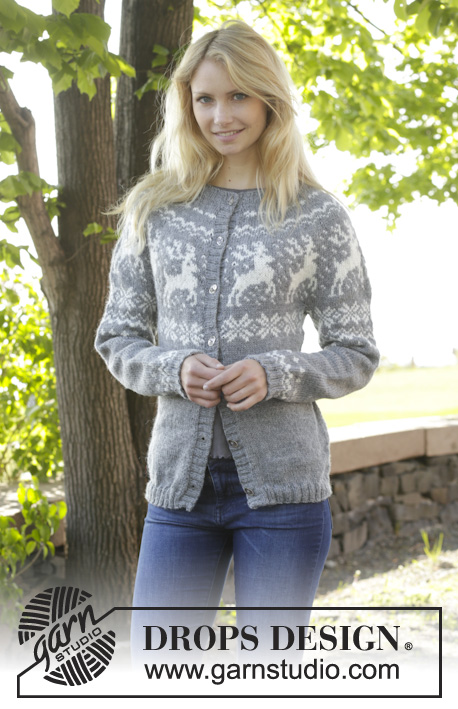
Hello, is it possible to have a more HQ photo of the lady that wear the sweater? I would like to see better the details especially in the collar YOKE 's zone. Also, I have a request about colors. Do you know if there's a knitting tool online that permit to change colors of a fair isle pattern, to see how it would look like changing colors? I would like to use more colors, but I can't image how it will result. Thanks for the infos!
20.10.2021 - 01:13DROPS Design respondió:
Dear Valentina, we only have thse pictures available that you can see on the pattern. If you are curious, why don't you check Ravelry as a number of different people knitted this and have their projects and pictures there. Happy Stitching!
20.10.2021 - 02:29
|
||||||||||
Silver Stag#silverstagsweater |
||||||||||
 |
 |
|||||||||
Jersey de punto DROPS con canesú redondo y patrón de renos, tejido de arriba abajo en ”Karisma”. Talla: S - XXXL.
DROPS 157-23 |
||||||||||
|
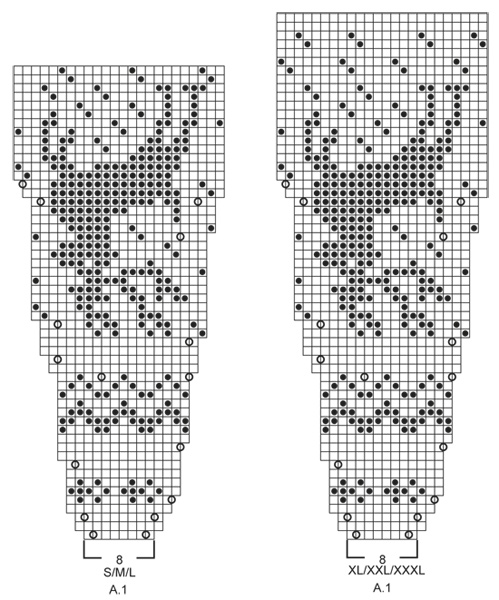
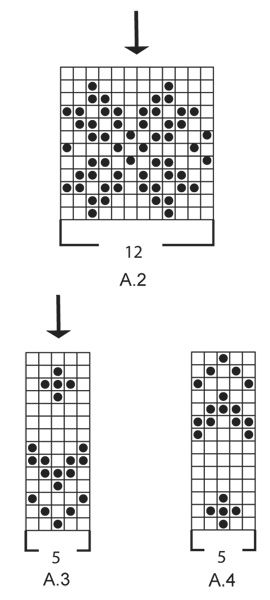
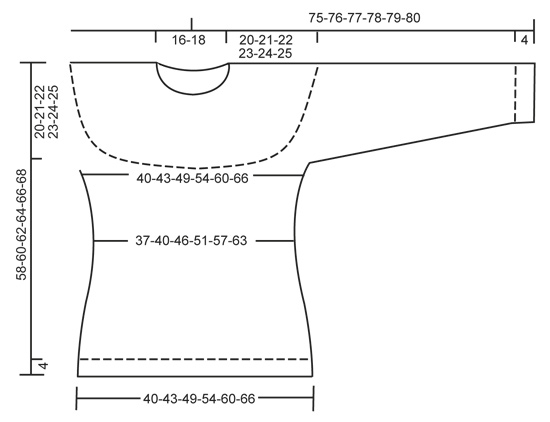
PATRÓN: Ver los diagramas A.1-A.4. Los diagramas muestran todas las filas del patrón visto por el LD. Trabajar todo el patrón en pt jersey. TIP PARA LAS DISMINUCIONES (se aplica a los lados y las mangas): Dism antes del marcapuntos (MP) y 1 pt de derecho como sigue: 2 pjd. Dism después del marcapuntos (MP) y 1 pt de derecho como sigue: Desl 1 pt como de derecho, 1 d., pasar el pt desl por encima. TIP PARA LOS AUMENTOS (se aplica a los lados): Aum un total de 4 pts en la fila. Trabajar hasta que quede 1 pt antes del MP, 1 HEB, 2 pts en pt jersey, 1 HEB = 2 pts aum. En la sig vta trabajar las HEB de derecho retorcido (es decir trabajar por detrás del pt en vez de por delante) para evitar que se formen agujeros. ----------------------------------------------------------------------- JERSEY: Se trabaja en redondo con ag circular, de arriba abajo. Trabajar las mangas en redondo con ag de doble punta. CANESU: Mont 88-92-96-100-104-108 pts con ag circular tamaño 3 mm con gris medio. Trabajar pt elástico 2 r./2 d. hasta que la labor mida 3 cm. Ahora cambiar a ag circular tamaño 4 mm y trabajar 1 vta en pt jersey, AL MISMO TIEMPO aum 0-4-8-20-24-28 pts repartidos = 88-96-104-120-128-136 pts. Ahora trabajar como sigue: A.1 (= 8 pts) 11-12-13-15-16-17 vcs en el ancho. RECUERDE MANTENER LA MISMA TENSIÓN DE LA MUESTRA! Cuando se ha trabajado A.1 una vez en vertical, hay 264-288-312-360-384-408 pts en la vta. Continuar con 2-5-8-4-7-10 vtas con gris medio. ATENCIÓN: En las tallas S,L,XL,XXXL parar el trabajo cuando queden 24 pts (= 1 repetición) antes de la última vta. Aquí comienzan las sig vtas. El patrón queda ahora en la posición correcta después de dividir los pts para las mangas y el cuerpo. Trabajar la sig vta como sigue: Trabajar los primeros 37-40-46-52-58-64 pts (= mitad de la espalda), desl los sig 58-64-64-76-76-76 pts a un gancho aux (= manga), mont 10 pts nuevos bajo la manga, insertar un MP en el centro de estos 10 pts, trabajar los sig 74-80-92-104-116-128 pts (= delantero), desl los sig 58-64-64-76-76-76 pts a un gancho aux (= manga), mont 10 pts nuevos bajo la manga, insertar un MP en el centro de estos 10 pts, trabajar los 37-40-46-52-58-64 pts restantes (= mitad de la espalda). CUERPO: Ahora hay 168-180-204-228-252-276 pts para el cuerpo. Trabajar A.2 (= 12 pts) sobre todos los pts de la vta. Continuar de la misma manera hasta que A.2 se haya trabajado 1 vez en vertical. Ahora trabajar la labor en pt jersey en gris medio. En la sig vta dism 1 pt a cada lado de cada MP en los lados - VER TIP PARA LAS DISMINUCIONES. Repetir las dism cada 2 cm 2 vcs más = 156-168-192-216-240-264 pts. Cuando la labor mida 12-13-14-15-16-17 cm desde el MP bajo la manga, aum 1 pt a cada lado de cada MP en cada lado - ver TIP PARA LOS AUMENTOS. Repetir los aum cada 2 cm 2 vcs más = 168-180-204-228-252-276 pts. Cuando la labor mida 56-58-60-62-64-66 cm, cambiar a ag circular tamaño 3 mm y aum 20-24-24-28-28-32 pts repartidos = 188-204-228-256-280-308 pts. Continuar trabajando pt elástico como sigue: *2 d., 2 r.*, repetir de * a *. Cuando el elástico se haya trabajado 4 cm, rematar con derecho sobre derecho y revés sobre revés. MANGAS: Primero se trabaja el patrón, después se continua la manga en gris medio. Desl los pts del gancho aux de vta a ag de doble punta tamaño 4 mm. Ahora hay 58-64-64-76-76-76 pts para la manga. Trabajar 1 fila en pt jersey. Ahora mont 10 pts nuevos bajo la manga = 68-74-74-86-86-86 pts. Insertar un MP en el centro de estos pts nuevos. Ahora trabajar la manga en redondo. Trabajar A.2. ATENCIÓN: Ajustar el patrón para que los 2 pts centrales del diagrama (ver la flecha) sean los 2 pts centrales de la manga. Cuando se ha trabajado A.2, continuar con A.3. ATENCIÓN: Ajustar el patrón para que el pt central del diagrama (ver la flecha) sea uno de los 2 pts centrales de la manga, AL MISMO TIEMPO comenzar las dism bajo la manga - recuerde el TIP PARA LAS DISMINUCIONES. Repetir las dism cada 3-2½-2½-2½-2½-2½ cm 9-12-12-12-12-12 vcs más = 48-48-48-60-60-60 pts. Cuando la manga mida 38 cm, trabajar A.4. ATENCIÓN: Ajustar para que el pt central del diagrama (ver la flecha) sea uno de los 2 pts centrales de la manga. Cuando se ha trabajado A.4 una vez en vertical, cambiar a ag de doble punta tamaño 3 mm y aum 4-8-8-0-4-4 pts repartidos = 52-56-56-60-64-64 pts. Ahora trabajar pt elástico (= 2 d./2 r.) 3 cm. Rematar con derecho sobre derecho y revés sobre revés. TERMINACIÓN Coser las aberturas bajo las mangas. |
||||||||||
Explicaciones del diagrama |
||||||||||
|
||||||||||
 |
||||||||||
 |
||||||||||
 |
||||||||||
¿Terminaste este patrón?Entonces, etiqueta tus fotos con #dropspattern #silverstagsweater o envíalas a la galería #dropsfan. ¿Necesitas ayuda con este patrón?Encontrarás 25 videos tutoriales, un espacio para comentarios/preguntas y más visitando la página del patrón en garnstudio.com © 1982-2026 DROPS Design A/S. Todos los derechos reservados. Este documento, incluyendo todas sus sub-secciones, está protegido por los derechos de autor (copyright). Lee más acerca de lo que puedes hacer con nuestros patrones en la parte de abajo de cada patrón de nuestro sitio. |
||||||||||


Con más de 40 años en el diseño de modelos de punto y de ganchillo, DROPS Design ofrece una de las más vastas colecciones de patrones gratuitos en el internet - traducidos en 17 idiomas. Al día de hoy, contamos con 324 catálogos y 12290 patrones - de los cuales 11675 están traducidos en español.
Nosotros trabajamos con mucho esmero para brindarte lo mejor que las labores de punto y ganchillo tienen para ofrecer,inspiración y consejos, así como hilos de magnífica calidad a precios increíbles! Te gustaría usar nuestros patrones para otro fin además del uso personal? Puedes leer acerca de lo que estás permitida a hacer en el texto de Copyright en la parte de abajo de todos nuestros patrones. Felices labores!
Escribe un comentario sobre DROPS 157-23
¡Nos encantaría saber qué piensas acerca de este patrón!
Si quieres escribir una pregunta referente al patrón, por favor asegúrate de elegir la categoría correcta en el formulario debajo, para acelerar el proceso de respuesta. Los campos obligatorios están marcados con un *.