
Categorías populares
¿Buscas un hilo?


Comentarios / Preguntas (91)
![]() Knitting Well Done escribió:
Knitting Well Done escribió:
Hello , I don't understand how to centered the diagram even if I follow the lesson... do you have a video that show exactly what to do to center it and make the sleeve? Thank you 👱🏻♀️
13.03.2022 - 11:29
![]() Vale escribió:
Vale escribió:
I'm so sorry to have to ask again but I don't understand: how can I decrease every 2,5 cm if there's a pattern? With 2 tog decrease, it will be deformed the pattern motif... I'm so confused .. I'm referring to this "When A.2 has been worked, continue with A.3. NOTE: Adjust pattern so that the middle st in diagram (see arrow) is one of the 2 middle sts on sleeve, AT THE SAME TIME beg dec under sleeve - remember DECREASE TIP" The decrease tip mean to knit just 2 stitches together?
20.02.2022 - 00:33DROPS Design respondió:
Dear Vale, if your tension is right in height, you should decrease approx. on every 7th round in size M = ca on every 2,5 cm; decrease as explained under DECREASE TIP , ie work until 3 sts remain before marker and decrease as shown in this video - the pattern will not match anymore at the transitions between rounds, that's just okay. Happy knitting!
21.02.2022 - 09:58
![]() Vale escribió:
Vale escribió:
I'm sorry to ask but: I don't understand how to decrease every 2,5 cm, if I have a pattern? If I decrease, the pattern will be deformed... also, what decrease I should do? (2 tog?) how? This is the pattern I'm referring: "When A.2 has been worked, continue with A.3. NOTE: Adjust pattern so that the middle st in diagram (see arrow) is one of the 2 middle sts on sleeve, AT THE SAME TIME beg dec under sleeve - remember DECREASE TIP" Thank you...seems difficult without a chart.
20.02.2022 - 00:29
![]() Vale escribió:
Vale escribió:
Sorry, I have problems again in the instructions " When A.2 has been worked, continue with A.3. NOTE: Adjust pattern so that the middle st in diagram (see arrow) is one of the 2 middle sts on sleeve, AT THE SAME TIME beg dec under sleeve - remember DECREASE TIP. Repeat dec every 3-2½-2½-2½-2½-2½ cm / 1 1/8"-7/8"-7/8"-7/8"-7/8"-7/8" 9-12-12" etc . I don't also understand how to adjust "pattern so that the middle st in diagram is one of the 2 middle". what mean? Please..help...
19.02.2022 - 15:30DROPS Design respondió:
Dear Vale, this lesson will explain you how to center a diagram. Happy knitting!
21.02.2022 - 09:17
![]() Pattern escribió:
Pattern escribió:
Sorry again but I don't understand the previously answer, in your comment says "you should increase a total of 60 sts in size L and get so 228", but I don't know what increase of 60 stitches is it exactly? Thank you again....
01.02.2022 - 17:29DROPS Design respondió:
Oops sorry, I mistyped, I meant you have 204 sts on the needle in size L - you now increase 24 sts evenly (this lesson explains how to increase evenly on a round), there are now 228 sts and you will repeat K2, P2 all the round - US-pattern will be edited asap. Happy knitting!
02.02.2022 - 07:34
![]() Patterns Difficult escribió:
Patterns Difficult escribió:
Hello, this pattern have a mistake in the Body instructions. Yesterday I had to try and try. I have 230 stitches and it says to "Continue to work rib as follows: * K 2, P 2 *, repeat from *-* until 2 sts remain, K 2. When rib has been worked for 4 cm / 1½'', bind off with K over K and P over P." But with 230 stitches, it will end with 2Kand start with 2K so I will have 4 K between the others 2k p2 2k p2 etc. What happened? Why 230 stitches?It's not an Even number to do ribbing...Thanks..
01.02.2022 - 12:22DROPS Design respondió:
Hi, it looks like there is a mistake in the US-English pattern, you should increase a total of 60 sts in size L and get so 228 sts and work K2 P2 over these 228 sts (= 57 times (K2,P2). thanks for noticing. Happy knitting!
01.02.2022 - 16:13
![]() Karine escribió:
Karine escribió:
Koon L suurust. Siis kui on vaja kududa varrukale mustrit A4 (5silmust) on silmuseid 48 3 simust jääb üle kuidas neid kududa?
03.01.2022 - 19:49DROPS Design respondió:
Tere Karine! Koo nii palju silmuseid mustrisse, kui mahub, ülejäänud nii, kuidas ilusam jääb. Head kudumist!
07.01.2022 - 21:55
![]() Val escribió:
Val escribió:
Sorry , I have to ask again, is it sure that decrease is "work until 3 sts remain before the marker this: K2 tog, K1, slip marker, K1, slip 1 as if to K, K1, psso, and work until 3 sts remain before next marker on the other side of the jumper and repeat the decrease.”" I see that in the psso passage, Should not be simply : slip marker, K1, slip 1 as if to K , and psso? Why K1 is repeated 2 times? the video tutorial says this only (not 2 times k2) : K1, slip 1 psso
14.12.2021 - 18:16DROPS Design respondió:
Dear Val, when working body you will decrease a total of 4 stitches on the round (= 2 sts decreased at each marker) / when working sleeve you will decrease that way only 2 sts (only 1 marker, mid under sleeve). Happy knitting!
15.12.2021 - 08:25
![]() Val escribió:
Val escribió:
Sorry >
14.12.2021 - 18:13
![]() Val escribió:
Val escribió:
Hello,I was able to adjust everything.I'm now again the beginning of the round, before start the dec tip. So, I hope this time I 've understood well: So I have to: knit the first 12 stitches, but before reach the first stitch marker of the round, 3 stitches before, I have to “work until 3 sts remain before the marker, K2 tog, K1, slip marker, K1, slip 1 as if to K, K1, psso, and work until 3 sts remain before next marker on the other side of the jumper and repeat. Right? Thank you again!
14.12.2021 - 17:43DROPS Design respondió:
Dear Val, looks right, I'm just wondering about the first 12 stitches, rounds were worked on yoke from mid back, so that you continue from mid back towards the side, and then work until 3 sts remain before 1st marker on the side and decrease etc.. But if you could find the sides of the jumper, it looks then fine, as the decreases are worked on each side (below sleeves). Happy knitting!
15.12.2021 - 07:55
|
||||||||||
Silver Stag#silverstagsweater |
||||||||||
 |
 |
|||||||||
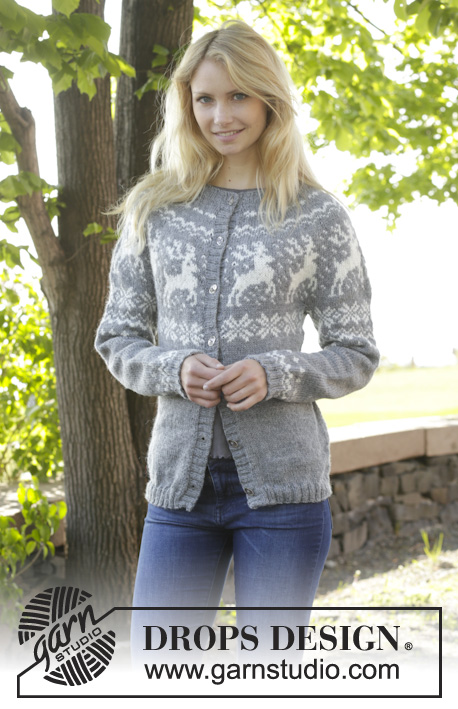
Jersey de punto DROPS con canesú redondo y patrón de renos, tejido de arriba abajo en ”Karisma”. Talla: S - XXXL.
DROPS 157-23 |
||||||||||
|
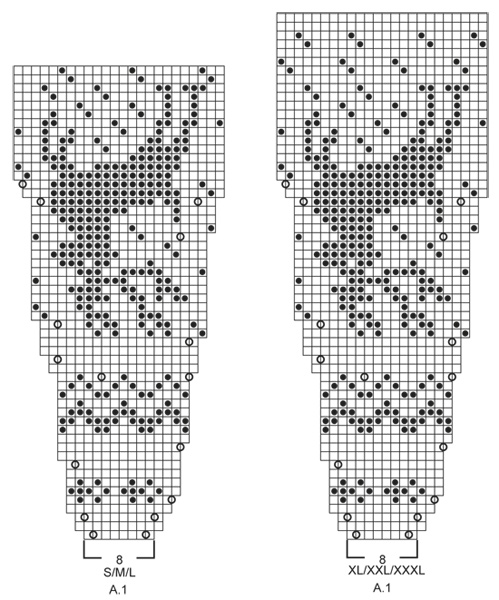
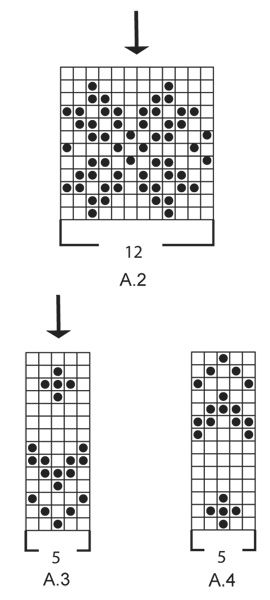
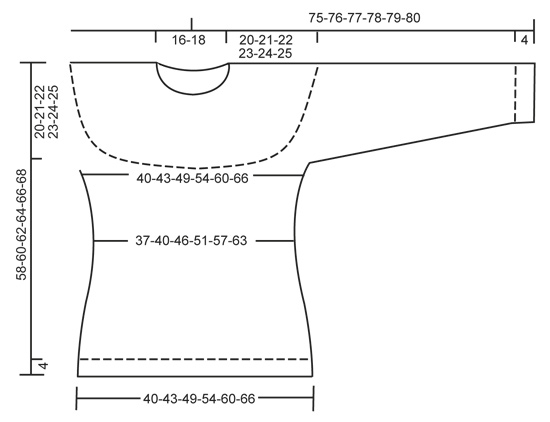
PATRÓN: Ver los diagramas A.1-A.4. Los diagramas muestran todas las filas del patrón visto por el LD. Trabajar todo el patrón en pt jersey. TIP PARA LAS DISMINUCIONES (se aplica a los lados y las mangas): Dism antes del marcapuntos (MP) y 1 pt de derecho como sigue: 2 pjd. Dism después del marcapuntos (MP) y 1 pt de derecho como sigue: Desl 1 pt como de derecho, 1 d., pasar el pt desl por encima. TIP PARA LOS AUMENTOS (se aplica a los lados): Aum un total de 4 pts en la fila. Trabajar hasta que quede 1 pt antes del MP, 1 HEB, 2 pts en pt jersey, 1 HEB = 2 pts aum. En la sig vta trabajar las HEB de derecho retorcido (es decir trabajar por detrás del pt en vez de por delante) para evitar que se formen agujeros. ----------------------------------------------------------------------- JERSEY: Se trabaja en redondo con ag circular, de arriba abajo. Trabajar las mangas en redondo con ag de doble punta. CANESU: Mont 88-92-96-100-104-108 pts con ag circular tamaño 3 mm con gris medio. Trabajar pt elástico 2 r./2 d. hasta que la labor mida 3 cm. Ahora cambiar a ag circular tamaño 4 mm y trabajar 1 vta en pt jersey, AL MISMO TIEMPO aum 0-4-8-20-24-28 pts repartidos = 88-96-104-120-128-136 pts. Ahora trabajar como sigue: A.1 (= 8 pts) 11-12-13-15-16-17 vcs en el ancho. RECUERDE MANTENER LA MISMA TENSIÓN DE LA MUESTRA! Cuando se ha trabajado A.1 una vez en vertical, hay 264-288-312-360-384-408 pts en la vta. Continuar con 2-5-8-4-7-10 vtas con gris medio. ATENCIÓN: En las tallas S,L,XL,XXXL parar el trabajo cuando queden 24 pts (= 1 repetición) antes de la última vta. Aquí comienzan las sig vtas. El patrón queda ahora en la posición correcta después de dividir los pts para las mangas y el cuerpo. Trabajar la sig vta como sigue: Trabajar los primeros 37-40-46-52-58-64 pts (= mitad de la espalda), desl los sig 58-64-64-76-76-76 pts a un gancho aux (= manga), mont 10 pts nuevos bajo la manga, insertar un MP en el centro de estos 10 pts, trabajar los sig 74-80-92-104-116-128 pts (= delantero), desl los sig 58-64-64-76-76-76 pts a un gancho aux (= manga), mont 10 pts nuevos bajo la manga, insertar un MP en el centro de estos 10 pts, trabajar los 37-40-46-52-58-64 pts restantes (= mitad de la espalda). CUERPO: Ahora hay 168-180-204-228-252-276 pts para el cuerpo. Trabajar A.2 (= 12 pts) sobre todos los pts de la vta. Continuar de la misma manera hasta que A.2 se haya trabajado 1 vez en vertical. Ahora trabajar la labor en pt jersey en gris medio. En la sig vta dism 1 pt a cada lado de cada MP en los lados - VER TIP PARA LAS DISMINUCIONES. Repetir las dism cada 2 cm 2 vcs más = 156-168-192-216-240-264 pts. Cuando la labor mida 12-13-14-15-16-17 cm desde el MP bajo la manga, aum 1 pt a cada lado de cada MP en cada lado - ver TIP PARA LOS AUMENTOS. Repetir los aum cada 2 cm 2 vcs más = 168-180-204-228-252-276 pts. Cuando la labor mida 56-58-60-62-64-66 cm, cambiar a ag circular tamaño 3 mm y aum 20-24-24-28-28-32 pts repartidos = 188-204-228-256-280-308 pts. Continuar trabajando pt elástico como sigue: *2 d., 2 r.*, repetir de * a *. Cuando el elástico se haya trabajado 4 cm, rematar con derecho sobre derecho y revés sobre revés. MANGAS: Primero se trabaja el patrón, después se continua la manga en gris medio. Desl los pts del gancho aux de vta a ag de doble punta tamaño 4 mm. Ahora hay 58-64-64-76-76-76 pts para la manga. Trabajar 1 fila en pt jersey. Ahora mont 10 pts nuevos bajo la manga = 68-74-74-86-86-86 pts. Insertar un MP en el centro de estos pts nuevos. Ahora trabajar la manga en redondo. Trabajar A.2. ATENCIÓN: Ajustar el patrón para que los 2 pts centrales del diagrama (ver la flecha) sean los 2 pts centrales de la manga. Cuando se ha trabajado A.2, continuar con A.3. ATENCIÓN: Ajustar el patrón para que el pt central del diagrama (ver la flecha) sea uno de los 2 pts centrales de la manga, AL MISMO TIEMPO comenzar las dism bajo la manga - recuerde el TIP PARA LAS DISMINUCIONES. Repetir las dism cada 3-2½-2½-2½-2½-2½ cm 9-12-12-12-12-12 vcs más = 48-48-48-60-60-60 pts. Cuando la manga mida 38 cm, trabajar A.4. ATENCIÓN: Ajustar para que el pt central del diagrama (ver la flecha) sea uno de los 2 pts centrales de la manga. Cuando se ha trabajado A.4 una vez en vertical, cambiar a ag de doble punta tamaño 3 mm y aum 4-8-8-0-4-4 pts repartidos = 52-56-56-60-64-64 pts. Ahora trabajar pt elástico (= 2 d./2 r.) 3 cm. Rematar con derecho sobre derecho y revés sobre revés. TERMINACIÓN Coser las aberturas bajo las mangas. |
||||||||||
Explicaciones del diagrama |
||||||||||
|
||||||||||
 |
||||||||||
 |
||||||||||
 |
||||||||||
¿Terminaste este patrón?Entonces, etiqueta tus fotos con #dropspattern #silverstagsweater o envíalas a la galería #dropsfan. ¿Necesitas ayuda con este patrón?Encontrarás 25 videos tutoriales, un espacio para comentarios/preguntas y más visitando la página del patrón en garnstudio.com © 1982-2026 DROPS Design A/S. Todos los derechos reservados. Este documento, incluyendo todas sus sub-secciones, está protegido por los derechos de autor (copyright). Lee más acerca de lo que puedes hacer con nuestros patrones en la parte de abajo de cada patrón de nuestro sitio. |
||||||||||


Con más de 40 años en el diseño de modelos de punto y de ganchillo, DROPS Design ofrece una de las más vastas colecciones de patrones gratuitos en el internet - traducidos en 17 idiomas. Al día de hoy, contamos con 324 catálogos y 12290 patrones - de los cuales 11675 están traducidos en español.
Nosotros trabajamos con mucho esmero para brindarte lo mejor que las labores de punto y ganchillo tienen para ofrecer,inspiración y consejos, así como hilos de magnífica calidad a precios increíbles! Te gustaría usar nuestros patrones para otro fin además del uso personal? Puedes leer acerca de lo que estás permitida a hacer en el texto de Copyright en la parte de abajo de todos nuestros patrones. Felices labores!
Escribe un comentario sobre DROPS 157-23
¡Nos encantaría saber qué piensas acerca de este patrón!
Si quieres escribir una pregunta referente al patrón, por favor asegúrate de elegir la categoría correcta en el formulario debajo, para acelerar el proceso de respuesta. Los campos obligatorios están marcados con un *.