
Categorías populares
¿Buscas un hilo?


Comentarios / Preguntas (68)
![]() Darlene escribió:
Darlene escribió:
I Have never knitted a pattern that is so confusing it it knitted on round needles or on 2 double needles please help if you can.
16.09.2014 - 19:49DROPS Design respondió:
Dear Darlene, you start working leg in the round on double pointed needle, then work the top of foot back and forth, pick up sts each side of the middle upper foot and continue in the round over all sts dec for shaping. The edge around the leg is then worked back and forth and sew to the leg. Happy knitting!
17.09.2014 - 08:57
![]() Andrea escribió:
Andrea escribió:
A great pattern. Quick and easy to knit, comfy and cozy to wear. Would definitely make again.
14.09.2014 - 03:45
![]() Helene escribió:
Helene escribió:
Just the ticket for warm toes on a frosty winter's night! I would sew a leather sole onto the bottom of the slipper for durability.
04.07.2014 - 22:35
![]() Tordis Skurdal escribió:
Tordis Skurdal escribió:
Ser tøffe ut, og varmer godt oppover leggen
25.06.2014 - 22:15
![]() Isabel Campos escribió:
Isabel Campos escribió:
Fantásticas para andar em casa
21.06.2014 - 21:12
![]() Martina Herold escribió:
Martina Herold escribió:
Möchte ich auf jeden Fall im Winter nicht vermissen !!!
15.06.2014 - 21:04Amalia Briceño escribió:
Las quiero tejer para mis 5 hijas y 7 nietas
15.06.2014 - 16:52
![]() Fatemeh escribió:
Fatemeh escribió:
Varm og god, for kalde vinter dager
05.06.2014 - 13:41
|
|||||||
One Step Ahead#onestepaheadslippers |
|||||||
 |
 |
||||||
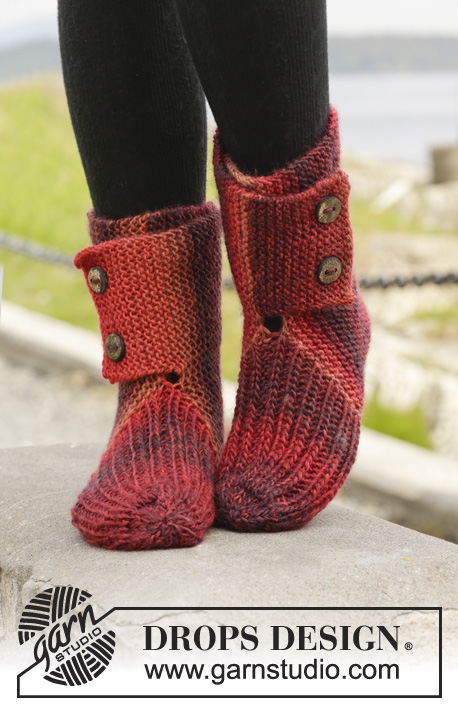
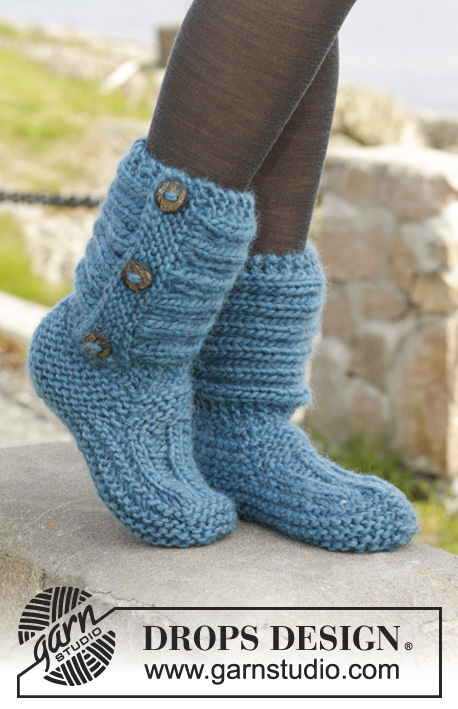
Zapatillas de punto DROPS en punto musgo y punto elástico en "Andes".
DROPS 158-47 |
|||||||
|
PUNTO MUSGO ( en redondo con ag de doble punta): *1 vta de derecho y 1 vta de revés*, repetir de *a*. 1 pliegue = 2 vtas. PUNTO MUSGO (de ida y vta en ag): Trabajar todas las filas de derecho. 1 pliegue = 2 filas de derecho. PATRÓN: Ver el diagrama A.1 PATRÓN 2: Fila 1 (= LD): * 2 d., 2 r.*,repetir de * a * hasta que queden 2 pts, 2 d. Fila 2 (= LR): trabajar derecho sobre derecho y revés sobre revés. Repetir la 2ª fila. ---------------------------------------------------------------------------------------------------------------------------------------------- ZAPATILLA: Primero se trabaja un borde en la parte inferior de la pierna, después se trabaja la parte del pie. Finalmente se teje la caña amplia de lado a lado. BORDE: Mont 37-37-39 pts con ag de doble punta tamaño 6 mm con Andes. Trabajar en PT MUSGO en redondo - ver explicaciones arriba - hasta que la labor mida aprox 4 cm., finalizar después de 1 vta de revés. RECUERDE MANTENER LA MISMA TENSIÓN DE LA MUESTRA! PIE: Ahora trabaja la labor de ida y vta. Dejar los primeros 10 pts en la ag, desl los 27-27-29 pts restantes a un gancho aux. Ahora trabajar la parte central según el PATRÓN 2 - ver explicaciones arriba, sobre los 10 pts - AL MISMO TIEMPO al final de las sig 2 filas montar 1 pt orillo nuevo (trabajar los pts orillo en PT MUSGO - ver explicación arriba) = 12 pts. Cuando la parte central mida 7-8½-10 cm, cerrar 1 pt orillo a cada lado = 10 pts. Desl los pts desde el gancho aux de vta a la ag y recoger 12-14-16 pts a cada lado de la parte central (dentro de 1 pt orillo) = 61-65-71 pts en la ag. AHORA MEDIR LA LABOR DESDE AQUÍ! Insertar 1 marcapuntos (MP) en el centro de los 10 pts de la parte central (= centro de la parte delantera en la punta ) y 1 MP en el pt de la parte posterior del talón, ahora hay 30-32-35 pts entre los MP a cada lado. Continuar la labor en redondo en pt musgo. Cuando la labor mida 2 cm, trabajar 2 pjd a cada lado de cada MP cada 2ª vta (= 4 pts menos por vta). Continuar dism hasta que la labor mida 5-5-6 cm. Rematar los pts restantes. Hacer la costura bajo el pie cogiendo la parte exterior del pt para evitar una costura abultada. CAÑA AMPLIA TEJIDA DE LADO A LADO: Se trabaja de ida y vta en ag. Mont 22 pts con ag tamaño 6 mm coh Andes. Trabajar 4 pliegues, AL MISMO TIEMPO en la última fila aum 6 pts repartidos = 28 pts. Trabajar según A.1 (= 28 pts) hasta que la labor mida aprox 35-36-38 cm. Trabajar 4 pliegues, AL MISMO TIEMPO en la 1ª fila dism 6 pts repartidos = 22 pts. Rematar. Colocar el borde de remate sobre el borde de montaje y coser 3 botones a modo de adorno en los pliegues de la caña. TERMINACIÓN: Coser la caña a la fila de montaje del borde de la pierna. Coser la caña para que los botones queden en el exterior de la zapatilla con la apertura mirando hacia atrás, hacia el talón - coser por el LR para que la costura sea invisible. Trabajar otra zapatilla de la misma manera, asegúrate de que la abertura de la caña queda en el lado opuesto. |
|||||||
Explicaciones del diagrama |
|||||||
|
|||||||
 |
|||||||
¿Terminaste este patrón?Entonces, etiqueta tus fotos con #dropspattern #onestepaheadslippers o envíalas a la galería #dropsfan. ¿Necesitas ayuda con este patrón?Encontrarás 18 videos tutoriales, un espacio para comentarios/preguntas y más visitando la página del patrón en garnstudio.com © 1982-2026 DROPS Design A/S. Todos los derechos reservados. Este documento, incluyendo todas sus sub-secciones, está protegido por los derechos de autor (copyright). Lee más acerca de lo que puedes hacer con nuestros patrones en la parte de abajo de cada patrón de nuestro sitio. |
|||||||


Con más de 40 años en el diseño de modelos de punto y de ganchillo, DROPS Design ofrece una de las más vastas colecciones de patrones gratuitos en el internet - traducidos en 17 idiomas. Al día de hoy, contamos con 324 catálogos y 12290 patrones - de los cuales 11675 están traducidos en español.
Nosotros trabajamos con mucho esmero para brindarte lo mejor que las labores de punto y ganchillo tienen para ofrecer,inspiración y consejos, así como hilos de magnífica calidad a precios increíbles! Te gustaría usar nuestros patrones para otro fin además del uso personal? Puedes leer acerca de lo que estás permitida a hacer en el texto de Copyright en la parte de abajo de todos nuestros patrones. Felices labores!
Escribe un comentario sobre DROPS 158-47
¡Nos encantaría saber qué piensas acerca de este patrón!
Si quieres escribir una pregunta referente al patrón, por favor asegúrate de elegir la categoría correcta en el formulario debajo, para acelerar el proceso de respuesta. Los campos obligatorios están marcados con un *.