
Categorías populares
¿Buscas un hilo?


Comentarios / Preguntas (148)
![]() Lene escribió:
Lene escribió:
Jeg fatter ikke raglanindtagningerne! "INDTAGNINGSTIPS (gælder raglanindtagningen): Alle indtagninger sker fra retsiden, med 4 m retstrik mellem hver indtagning Tag ind således før 4 m retstrik: 2 r sammen. Tag ind således efter 4 m retstrik: Tag 1 m løs af, 1 r, løft den løse m over." Jeg forstår ikke, hvor de 4 m retstrik skal være. Man plejer at tage ind til raglan på hver side af markeringerne.
07.07.2020 - 16:22DROPS Design respondió:
Hej Lene. De 4 maskorna retstrik är de 2 m før och 2 m efter märktråden du har satt i alla overganger mellem ærmer og ryg- og forstykke. Märktråden sitter alltså mitt i dessa 4 maskor. Mvh DROPS Design
08.07.2020 - 12:29
![]() Ineke escribió:
Ineke escribió:
Brei ik de voorbies ook in ribbelsteek of tricotsteek. Alvast bedankt.
29.06.2020 - 16:35DROPS Design respondió:
Dag Ineke,
De voorbies wordt inderdaad ook in ribbelsteek gebreid.
30.06.2020 - 15:16
![]() Maria Kassalia escribió:
Maria Kassalia escribió:
Dann in jeder 2. R (0) 4-5-9-11 (12-16) x – d.h. insgesamt (9) 12-14-17-19 (21-24) Abnahmen.Können sie bitte mir erklären wie ich weiter abnähemen muß. Vielen Dank
08.06.2020 - 08:18DROPS Design respondió:
Liebe Frau Kassalia, es wird abgenommen, wie unter TIPP ZUR ABNAHME (Raglan) beschrieben, dh jeweils 8 Maschen pro Reihe je nach der Größe: in jeder 4.R insgesamt (9) 8-9-8-8 (9-8) x, dann in jeder 2. R (0) 4-5-9-11 (12-16) x (= d.h. insgesamt (9) 12-14-17-19 (21-24) Mal). Vergessen Sie nicht den Halsausschnitt gleichzeitig zu arbeiten. Viel Spaß beim stricken!
08.06.2020 - 09:07
![]() Marilyn escribió:
Marilyn escribió:
Hi again!!! I have had to rip out the last rows of yolk and beginning assembly a couple of times because I seem to end up with the stitches going the wrong direction.... After the last decrease ( 1st beg and end of RS) end with 52 stitches. Do I turn and do a WS knit before adding the slipped stitches or do I start right there? When I read what you say it seems easy but I get one end turned around so I wonder if its whether I start on RS or WS once down to 52 stitches?
15.05.2020 - 23:15DROPS Design respondió:
Dear Marilyn, after the last decrease row on yoke (when you get 52 sts), turn and work the next row from WS, then cut the yarn. Now work the sts from thread on right front piece, pick up new sts, work the 52 sts from needle, pick up new sts and work the sts from thread on left front piece. Happy knitting!
18.05.2020 - 07:18
![]() Megan escribió:
Megan escribió:
Hi I am a new knitter. Trying to get started and want to cast on, but hesitate because it says "include 4 band sts in each side towards mid front" - don't know what this means or how to do it. Thx
14.05.2020 - 16:53DROPS Design respondió:
Dear Megan, you should cast on teh number of stitches given in the pattern. However, at both end of the row (which will be the two middle edges of the jacket), out of the already casted on stitches, 4 stitches will act as buttonband (on both side). I hope this helps. Happy Knitting!
15.05.2020 - 03:27
![]() Marilyn escribió:
Marilyn escribió:
Let me thank you for helping me. I wish the patterns were written in the detail you provide. For assembly - I have 1 dec on the RS do I begin to pick up the stitches by knitting and then continue to knit the stitches on the holder - turn and knit back to end of needle - pickup and then knit the holder stitches OR do I cut wool and simply slip stitches onto needle without knitting them onto it? Sorry for being such a novice! And thanks for your patience !
13.05.2020 - 22:49DROPS Design respondió:
Dear Marilyn, when you have the 52 sts left on yoke, cut the yarn, slip the sts from neck on right front piece back on needle, pick up sts to the first of the 52 sts, work the 52 sts, pick up sts to the sts on thread and slip the sts back on needle. Now work 4 ridges, but do not forget the last buttonholes after 1 ridge. Happy knitting!
14.05.2020 - 08:20
![]() Lone escribió:
Lone escribió:
Der står følgende: DROPS RUNDP nr 3 – eller det p.nr du skal bruge for at få 24 m x 48 p retstrik på 10 x 10 Er det ikke 24 m x 32 pinde retstrik på 10 x 10 og ikke 48 pinde?
13.05.2020 - 20:54
![]() Marilyn escribió:
Marilyn escribió:
One last question - on the ASSEMBLY. Is it really " picking up stitches" or rather slipping the stitch holder stitches back to the main section (56 + 10 +10 stitches for the 1/3 month size?) . Why does it say "approx" picked up stitches?
13.05.2020 - 04:42DROPS Design respondió:
Dear Marilyn, you will slip the 8 sts put on a thread for neck on each side back on needle + pick up stitches between these stitches and the next stitch on needle. Happy knitting!
13.05.2020 - 08:53
![]() Marilyn escribió:
Marilyn escribió:
Hi again, Im now struggling with the last bit of the YOKE for the 1/3month size. I started with 192 stitches - my decreasing ( 8 stitches per row 14 times) brings me down to 80 stitches. Are the following 4 rows where I decrease 4 more stitches ? If so what part of the neck - front neck or back neck? What does it mean " when 2 dec remain" ? Thanks
13.05.2020 - 04:28DROPS Design respondió:
Dear Marilyn, in smaller size, when you are about to work the next to last decrease row, work the first 8 sts from RS and slip them on a thread, work remaining sts on row dec for raglan as before, turn and work the first 8 sts from WS, slip them on a thread, work to the end of row. Work now next row decreasing 1 st on each side (beg +end of row) + raglan as before, work return row. Decrease 1 st on each side of next row from RS = 52 sts should remain. Happy knitting!
13.05.2020 - 08:51
![]() Marilyn escribió:
Marilyn escribió:
And one other question - does the raglan decrease start after TWO rows of garter ( one ridge) on circular needles with sleeves and jacket ? OR is the video right where raglan decrease begin with the parts just slipped on needle not knitted?
10.05.2020 - 22:05DROPS Design respondió:
Dear Marilyn, correct, you first work 2 rows over all stitches then start to decrease on next row from RS. Video shows the technique, remember to always work as explained in the pattern. Happy knitting!
11.05.2020 - 10:30
|
|
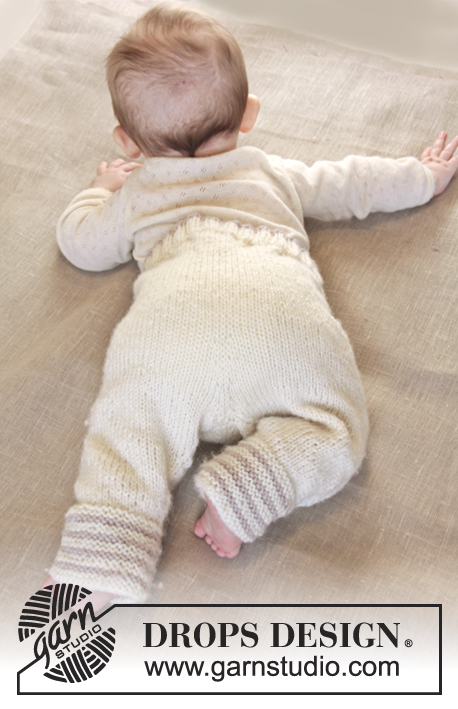
Sleep Tight#sleeptightcardigan |
|
|
|
|
Chaqueta de punto para bebé en punto musgo con raglán en DROPS BabyMerino. Talla prematuro - 4 años.
DROPS Baby 25-33 |
|
|
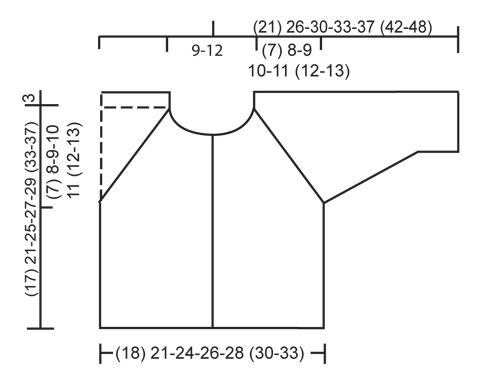
PT MUSGO (de ida y vta en ag): Trabajar todas las filas de derecho. 1 pliegue = 2 filas de derecho. OJALES: Dism para los ojales en la cenefa derecha. 1 ojal = trabajar juntos de derecho el segundo y tercer pt desde el borde y hacer 1 HEB (lazada). Comenzar a trabajar los ojales cuando todas las partes están en la misma ag circular. Cerrar para los ojales cuando la labor mida: Talla prematura: 11 y 14 cm Talla 0/1 meses: 14 y 18 cm Talla 1/3 meses: 17 y 21 cm. Talla 6/9 meses: 18 y 24 cm Talla 12/18 meses: 19,23 y 27 cm Talla 2 años: 22, 26 y 30 cm Talla 3/4 años: 25, 29 y 33 cm Adicionalmente cerrar para un ojal después del primer pliegue en el cuello. TIP PARA LAS DISMINUCIONES (se aplica al raglán): Todas las dism se trabajan por el LD con 4 pts en pt musgo entre cada dism.. Dism como sigue antes de 4 pts en pt musgo: 2 pjd. Dism como sigue después de 4 pts en pt musgo: Desl 1 pt como de derecho, 1 d., pasar el pt desl por encima. ---------------------------------------------------------------------------------------------------- CHAQUETA: Se trabaja de ida y vta en ag circular desde el centro delantero. Mont (96) 108-124-132-144 (152-168) pts (incl 4 pts de la cenefa a cada lado hacia el centro del delantero) en ag circular tamaño 3 mm con beige claro. Trabajar en PT MUSGO - ver explicación arriba. RECUERDE MANTENER LA MISMA TENSIÓN DE LA MUESTRA ! Cuando la labor mida (10) 13-16-17-18 (21-24) cm,, trabajar como sigue por el LD: (22) 25-29-31-34 (36-40) pts = delantero derecho, cerrar los sig 8 pts, (36) 42-50-54-60 (64-72) = espalda, cerrar los sig 8 pts, (22) 25-29-31-34 (36-40) pts = delantero izquierdo. Dejar la labor en espera y trabajar las mangas. MANGA: La manga se trabaja de ida y vta en ag circular. Mont (36) 38-38-38-40 (42-44) pts ( incl 1 pt orillo a cada lado para la costura) en ag tamaño 3 mm con beige claro y trabajar en pt musgo, AL MISMO TIEMPO cuando la labor mida 4 cm, aum a cada lado como sigue: aum 1 pt cada (10) 8-8-6-6 (8-8) filas un total de (3) 5-7-10-11 (12-14) vcs = (42) 48-52-58-62 (66-72) pts. Cuando la labor mida (10) 14-17-18-21 (24-29) cm, cerrar 5 pts a cada lado = (32) 38-42-48-52 (56-62) pts. Dejar la labor en espera y trabajar otra manga. CANESÚ: Desl las mangas a la misma ag circular en la que está el cuerpo, donde se remató para las sisas = (144) 168-192-212-232 (248-276) pts. Insertar 1 marcapuntos (MP) en todas las transiciones entre la manga y el cuerpo (= 4 MP). Cerrar para los OJALES en la cenefa derecha - ver explicación arriba. Después de 2 filas dism para el raglán - VER TIP PARA LAS DISMINUCIONES, con 4 pts en pt musgo entre las dism, dism 8 pts por fila. Dism antes y después de los MPs como sigue: Dism cada 4ª fila un total de (9) 8-9-8-8 (9-8) vcs, después cada 2ª fila un total de (0) 4-5-9-11 (12-16) vcs - es decir, dism un total de (9) 12-14-17-19 (21-24) pts. AL MISMO TIEMPO cuando queden 2 dism, desl los (8) 8-10-9-10 (10-11) pts más externos en cada lado a ganchos aux para el escote. Después dism 1 pt hacia el escote cada 2ª fila un total de 2 vcs a cada lado. Después de todas las dism para el raglán y el escote quedan (52) 52-56-54-56 (56-58) pts en la ag. TERMINACIÓN: Recoger aprox 68-86 pts alrededor del escote (incl los pts en la ag y los pts de los ganchos aux en el delantero) en ag tamaño 3 mm con beige claro. Trabajar 4 pliegues - AL MISMO TIEMPO después de 1 pliegue cerrar para el ojal encima de los ojales de la cenefa. Rem. Coser las costuras de las mangas dentro de 1 pt orillo. Coser las aberturas bajo la manga. Coser los botones en la cenefa izquierda. REMATE A GANCHILLO: Trabajar un remate alrededor de la abertura de la chaqueta con ag de ganchillo tamaño 3 mm como sigue: *1 p.b., 1 p.de cad, saltar aprox 0.5 cm *, repetir de * a * y finalizar con 1 p.e. en el primer p.b. |
|
 |
|
¿Terminaste este patrón?Entonces, etiqueta tus fotos con #dropspattern #sleeptightcardigan o envíalas a la galería #dropsfan. ¿Necesitas ayuda con este patrón?Encontrarás 24 videos tutoriales, un espacio para comentarios/preguntas y más visitando la página del patrón en garnstudio.com © 1982-2026 DROPS Design A/S. Todos los derechos reservados. Este documento, incluyendo todas sus sub-secciones, está protegido por los derechos de autor (copyright). Lee más acerca de lo que puedes hacer con nuestros patrones en la parte de abajo de cada patrón de nuestro sitio. |


Con más de 40 años en el diseño de modelos de punto y de ganchillo, DROPS Design ofrece una de las más vastas colecciones de patrones gratuitos en el internet - traducidos en 17 idiomas. Al día de hoy, contamos con 324 catálogos y 12290 patrones - de los cuales 11675 están traducidos en español.
Nosotros trabajamos con mucho esmero para brindarte lo mejor que las labores de punto y ganchillo tienen para ofrecer,inspiración y consejos, así como hilos de magnífica calidad a precios increíbles! Te gustaría usar nuestros patrones para otro fin además del uso personal? Puedes leer acerca de lo que estás permitida a hacer en el texto de Copyright en la parte de abajo de todos nuestros patrones. Felices labores!
Escribe un comentario sobre DROPS Baby 25-33
¡Nos encantaría saber qué piensas acerca de este patrón!
Si quieres escribir una pregunta referente al patrón, por favor asegúrate de elegir la categoría correcta en el formulario debajo, para acelerar el proceso de respuesta. Los campos obligatorios están marcados con un *.