
Categorías populares
¿Buscas un hilo?


Comentarios / Preguntas (52)
![]() Nasreen Syed escribió:
Nasreen Syed escribió:
And the second question I have is about the sleeves That you said to place a market at the beginning of the round and dec 1 st at both the sides of the marker so where am I starting the round from or dec the st from cause if I am starting the round from under the arm that means I am dec the 16 st I cast on earlier so is that ok and what does mid under the sleeves mean Thanks I'll appreciate your help I am almost done now this where I am stuck
20.01.2016 - 23:48DROPS Design respondió:
Dear Mrs Syed, marker mid under sleeve = marker at beg of round has to be inserted in the middle of the new sts cast on (these 16 sts you cast on on body and on sleeve) - insert a marker in the middle of these 16 sts and dec as under dec tip 2: work round until 3 sts remain before marker, work next 2 sts tog, work 2 sts (marker is between these 2 sts), and work the next 2 sts twisted tog. Happy knitting!
21.01.2016 - 10:39
![]() Nasreen Syed escribió:
Nasreen Syed escribió:
Hi I tried to find the video which could help me but couldn't find one So if you can explain it to me I'll appreciate it the first thing I want to know is the dividing of the. Body at the marker at each end there 2 markers at each side total 4 holding 16 st at each side so where am I deviding from I'll appreciate if you'll explain cause this is the last part iam on Thanks
20.01.2016 - 23:42DROPS Design respondió:
Dear Mrs Syed, when working body, you cast on 16 sts for under sleeve, insert a marker in the middle of the 16 sts on each side - when you get correct measurement from armhole, divide at markers on the side to work back piece and front piece separetely. Happy knitting!
21.01.2016 - 10:37
![]() Nasreen Syed escribió:
Nasreen Syed escribió:
It's about the sleeve when it says place a marker at the beginning of the round ( mid under sleeve ) and then dec 1 st on both the side of the marker so am I dec the 16 st I cast on under the sleeve or where am I starting my round Please explain I'll appreciate thanks If you have video it will really help thanks
20.01.2016 - 07:28DROPS Design respondió:
Dear Mrs Syed, you will find all relevant videos to each technique used in that pattern under tab "videos" - remember you will also get any personnal assistance from the store where you bought your yarn. Happy knitting!
20.01.2016 - 12:10
![]() Nasreen Syed escribió:
Nasreen Syed escribió:
And how am I dividing the work between the markers Thanks
20.01.2016 - 00:28DROPS Design respondió:
See below
20.01.2016 - 11:52
![]() Nasreen Syed escribió:
Nasreen Syed escribió:
And also when you said inc 16 st do you mean all at one time or what and then you said go round ribbing the body but how will you do that when in the middle we have st on the holder And also you said put marker on both the side but there is already holder there
16.01.2016 - 23:08
![]() Nasreen Syed escribió:
Nasreen Syed escribió:
If anybody has worked on simply sweet onesie please need some help
16.01.2016 - 18:42
![]() Nasreen Syed escribió:
Nasreen Syed escribió:
Hi I am so confuse here first I want to know how are we joining the work with button band on top of each other Secondly when you come to the point where you slip the 32 stitches between the markers on the st holder then what do you do with it Then the first inc of 16 st under the sleeves what does that mean and there is another 2 times 16 st increase under the sleeves it's too confusing Can you please walk me through it I'll appreciate it please Thanks
16.01.2016 - 08:57DROPS Design respondió:
Dear Nasreen, work tog the sts from right band with the sts from left band; K the 1st st from right band tog with the 1st st from left band, then work 2nd st from right band tog with the 2nd st from left band, etc. 2)these 32 sts are for sleeves and will be worked afterwards (see "Sleeve" in pattern) - on next round after the 32 st are on a st holder, cast on 16 sts under each sleeve for armhole. Happy knitting!
16.01.2016 - 11:21
![]() Nasreen escribió:
Nasreen escribió:
In your explanation for A1 In round 2 it p3 (k3) means I need to do both the st like p3 and k3 and the dec p2 k2 how is the devil happening
16.11.2015 - 17:07DROPS Design respondió:
Dear Nasreen, when working rib in the round, as well as back and forth you will always work K over K and P over P. Remember you will get all individual assistance from your DROPS store. Happy knitting!
16.11.2015 - 17:56
![]() Nasreen escribió:
Nasreen escribió:
And also about the raglan I am doing the inc like Yo before the Kst then yo before the Kst like after the marker but the inc st are all Kst so how do I pattern them or just leave them as it is like Kst Please explain I am really appreciating your help thanks
16.11.2015 - 17:00DROPS Design respondió:
Dear Nasreen, you will work the inc sts in rib : the first 2 yos will be worked P then next 2 will be worked K and so on - see "raglan" at the beg of the pattern. Happy knitting!
16.11.2015 - 18:03
![]() Nasreen escribió:
Nasreen escribió:
Thank you so much for your explanation Now I am working the pattern on the circular needle so how do I join the work and as you say in the pattern the 2 bands will come on top of each other so how that will happen and dec the band stitches how is that happening Thanks please explain it I'll appreciate sorry to bother you this much but the pattern is so precious that I really want to do it
16.11.2015 - 16:56DROPS Design respondió:
Dear Nasreen, when you start to work in the round after the split for neck, work together the 6 sts from right and left band 2 by 2 (= 1 st from right front band with 1 st from left front band) until all 6 sts are worked together and continue in pattern as stated Happy knitting!
16.11.2015 - 17:54
|
||||||||||
Simply Sweet#simplysweetonesie |
||||||||||
|
|
||||||||||
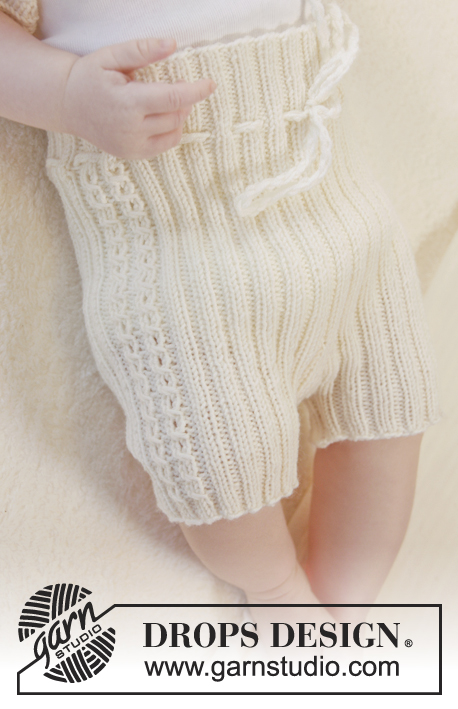
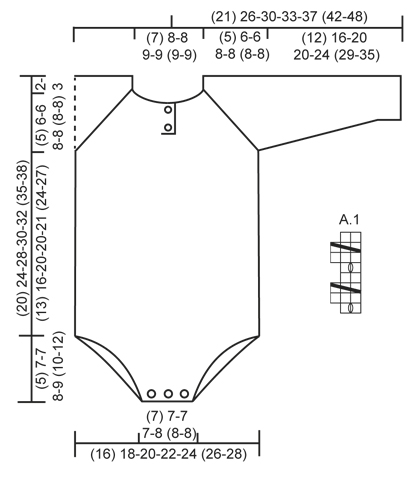
Body de punto para bebé en punto elástico, tejido de arriba abajo en DROPS BabyMerino. Talla prematuro - 4 años.
DROPS Baby 25-30 |
||||||||||
|
PT MUSGO (de ida y vta en ag): Trabajar todas las filas de derecho. 1 pliegue = 2 filas de derecho. PATRÓN: Ver el diagrama A.1. El diagrama muestra todas las filas del patrón visto por el LD. RAGLÁN: Todos los aum se trabajan por el LD. Aum 1 pt a cada lado de las 4 líneas del raglán haciendo 1 HEB a cada lado de los 2 pts de derecho en cada línea del raglán (visto por el LD). Trabajar las HEB dentro del pt elástico, es decir, trabajar de revés los 2 primeros pts del LR, de derecho los 2 sig pts del LR etc... – ATENCIÓN: No trabajar las HEB retorcidas (deben de quedar agujeros a cada lado de los 2 pts de derecho en la línea del raglán). OJALES: Dism para los ojales en la cenefa derecha. 1 ojal = tejer juntos de derecho el 3º y 4º pt desde el borde y hacer una HEB (dism para los ojales por el LR). Dism para los ojales cuando la labor mida: TALLA (prematuro): 1 y 3 cm. TALLA 0/1 meses + 1/3 meses: 1 y 4 cm. TALLA 6/9 meses + 12/18 meses: 1 y 4½ cm. TALLA (2 años + 3/4 años): 1 y 5 cm. TIP-1 PARA LAS DISMINUCIONES (se aplica a la abertura entre las piernas): Trabajar las dism dentro de 3 pts del borde en pt musgo. POR EL LD: Dism después de 3 pts en pt musgo como sigue: 2 pjr retorcido. Dism como sigue antes de 3 pts en pt musgo (comenzar cuando quedan 5 pts en la fila): 2 pjr. POR EL LR: Dism después de 3 pts en pt musgo como sigue: 2 pjd retorcido. Dism como sigue antes de 3 pts en pt musgo (comenzar cuando quedan 5 pts en la fila): 2 pjd. TIP-2 PARA LAS DISMINUCIONES (se aplica a las mangas): Trabajar hasta que queden 3 pts antes del marcapuntos (MP), trabajar 2 pts juntos (en pt elástico), trabajar 2 pts (el MP queda entre estos 2 pts) y después trabajar 2 pts juntos retorcidos (en pt elástico). --------------------------------------------------------------------- BODY: La labor se trabaja de arriba abajo. Trabajar de ida y vta en ag circular hasta pasada la abertura del cuello, después trabajar la labor en redondo en ag de doble punta/ag circular antes de la división para las piernas. Trabajar las mangas en redondo en ag de doble punta. CANESÚ: Mont (54) 60-60-64-74 (74-74) pts (incl 6 pts de la cenefa a cada lado hacia el centro del delantero) en ag circular tamaño 3.5 mm con Baby Merino color blanco hueso. Trabajar 2 PLIEGUES en pt musgo - ver explicación arriba (1ª fila = LD). Después trabajar una elevación en la parte de detrás del cuello como sigue (1ª fila = LD): Trabajar de derecho hasta que queden (6) 8-8-8-10 (10-10) pts, girar, estirar el hilo y trabajar de derecho hasta que queden (6) 8-8-8-10 (10-10) pts en el otro lado. Girar la labor, estirar el hilo y trabajar de derecho hasta que queden (12) 16-16-16-20 (20-20) pts, girar, estirar el hilo y trabajar de derecho hasta que queden (12) 16-16-16-20 (20-20) pts en el otro lado. Girar la labor, estirar el hilo y trabajar de derecho hasta que queden (18) 24-24-24-30 (30-30) pts, girar, estirar el hilo y trabajar de derecho hasta que queden (18) 24-24-24-30 (30-30) pts en el otro lado. Girar la labor, estirar el hilo y trabajar de derecho el resto de la fila. Trabajar la sig fila como sigue por el LR: 6 pts de la cenefa de derecho, de revés los sig (42) 48-48-52-62 (62-62) pts AL MISMO TIEMPO aum (32) 26-42-38-44 (60-60) pts repartidos sobre estos pts y finalizar con 6 pts de derecho para la cenefa (recuerde los OJALES en la cenefa - ver explicación arriba) = (86) 86-102-102-118 (134-134) pts en la ag. TRABAJAR LA SIG FILA COMO SIGUE POR EL LD: TALLA (prematuro) + 0/1 mes: 6 pts de la cenefa en PT MUSGO - ver explicaciones arriba, 2 d., 2 r., A.1 (= 2 pts); 2 r., 2 d. (insertar 1 marcapuntos (MP) en el centro de estos 2 pts = línea de raglán), * 2 r., 2 d.*, repetir de * a * un total de 3 vcs, 2 r., 2 d. (insertar 1 MP en el centro de estos 2 pts = línea de raglán), *2 r., 2 d.*, repetir de * a * un total de 5 vcs, 2 r., 2 d. (insertar 1 MP en el centro de estos 2 pts = línea de raglán), *2 r., 2 d.*, repetir de * a * un total de 3 vcs, 2 r., 2 d. (insertar 1 MP en el centro de estos 2 pts = línea de raglán), 2 r., A.1 (= 2 pts), 2 r., 2 d. y 6 pts de la cenefa en PT MUSGO. TALLA 1/3 meses + 6/9 meses + 12/18 meses: 6 pts de la cenefa en PT MUSGO - ver explicaciones arriba, 2 d., 2 r., A.1 (= 2 pts); 2 r., 2 d. ,2 r., 2 d. (insertar 1 MP en el centro de estos 2 pts = línea de raglán), * 2 r., 2 d.*, repetir de * a * un total de 3-3-5 vcs, 2 r., 2 d. (insertar 1 MP en el centro de estos 2 pts = línea de raglán), *2 r., 2 d.*, repetir de * a * un total de 7 vcs, 2 r., 2 d. (insertar 1 MP en el centro de estos 2 pts = línea de raglán), *2 r., 2 d.*, repetir de * a * un total de 3-3-5 vcs, 2 r., 2 d. (insertar 1 MP en el centro de estos 2 pts = línea de raglán), 2 r., 2 d. ,2 r., A.1 (= 2 pts), 2 r., 2 d. y 6 pts de la cenefa en PT MUSGO. TALLA (2 años + 3/4 años): 6 pts de la cenefa en PT MUSGO - ver explicaciones arriba, **2 d., 2 r., A.1 (= 2 pts); 2 r.**, repetir de ** a ** un total de 2 vcs, 2 d. (insertar 1 MP en el centro de estos 2 pts = línea de raglán), * 2 r., 2 d.*, repetir de * a * un total de 5 vcs, 2 r., 2 d. (insertar 1 MP en el centro de estos 2 pts = línea de raglán), *2 r., 2 d.*, repetir de * a * un total de 9 vcs, 2 r., 2 d. (insertar 1 MP en el centro de estos 2 pts = línea de raglán), *2 r., 2 d.*, repetir de * a * un total de 5 vcs, 2 r., 2 d. (insertar 1 MP en el centro de estos 2 pts = línea de raglán), **2 r., A.1 (= 2 pts), 2 r., 2 d.**, repetir de ** a ** un total de 2 vcs y finalizar con 6 pts de la cenefa en PT MUSGO. TODAS LAS TALLAS: Continuar con el patrón de ida y vta. AL MISMO TIEMPO en la sig fila por el LD aum para el RAGLÁN - ver explicaciones arriba (= 8 pts aum). repetir los aum cada 2ª fila/vta (es decir cada fila por el LD) (7) 7-7-11-11 (11-11) vcs más (= un total de (8) 8-8-12-12 (12-12) aum a cada lado de cada línea de raglán). AL MISMO TIEMPO cuando la labor mida (4) 5-5-6-6 (7-7) cm, las cenefas se termina y la prenda se trabaja en redondo con ag como sigue (ajustar para que la sig fila se trabaje por el LD): Unir la labor con los pts de la cenefa derecha hacia arriba (de modo que las cenefas estén sobrepuestas y los ojales se encuentran en el borde). Trabajar 1 vta en redondo , AL MISMO TIEMPO tejer juntos de derecho los 6 pts de la cenefa derecha y la cenefa izquierda de 2 en 2, trabajar el resto de la vta, cortar el hilo y comenzar la sig vta en el centro de la espalda. Continuar con el pt elástico y el patrón en redondo, AL MISMO TIEMPO continuar los aum para el raglán como antes pero trabajar los 6 pts en el centro del delantero como sigue: 2 r., A.1 (= 2 pts) y 2 r. Después del último aum para el raglán hay (144) 144-160-192-208 (224-224) pts en la ag. Trabajar (0) 2-2-2-2 (2-2) vtas más como antes, la labor mide aprox (7) 8-8-10-11 (11-11) cm desde el hombro. En la sig vta desl los (32) 32-32-40-48 (48-48) pts entre cada MP sobre las mangas a un gancho aux ( trabajar los pts antes de desl al gancho aux) = (40) 40-48-56-56 (64-64) pts restantes en el delantero y la espalda. CUERPO: = (80) 80-96-112-112 (128-128) pts. En la sig vta mont FLOJO (8) 16-12-12-16 (16-20) pts bajo cada manga = (96) 112-120-136-144 (160-168) pts en el cuerpo - AHORA MEDIR LA LABOR DESDE AQUÍ. Colocar 1 MP a cada lado. Continuar en pt elástico en redondo como antes (= 2 d./2 r.) con A.1 en el delantero como antes. Cuando la labor mida (13) 16-20-20-21 (24-27) cm desde la sisa dividir la labor en los MP de cada lado y finalizar el delantero y la espalda por separado. ESPALDA: = (48) 56-60-68-72 (80-84) pts. Trabajar en pt elástico de ida y vta como antes pero trabajar los 3 pts más externos a cada lado en pt musgo. AL MISMO TIEMPO dism 1 pt dentro de los 3 pts del borde a cada lado - LEER TIP-1 PARA LAS DISMINUCIONES (= 2 pts dism). Repetir las dism en cada fila (es decir por el LD y por el LR) (6) 10-12-16-14 (18-14) vcs más (= un total de (7) 11-13-17-15 (19-15) vcs) y después en cada 2ª fila (es decir cada fila por el LD) un total de (5) 5-5-5-7 (7-11) vcs = (24) 24-24-24-28 (28-32) pts quedan en la ag. Trabajar 1 fila de derecho por el LD, AL MISMO TIEMPO dism (8) 8-8-8-10 (10-12) pts repartidos = (16) 16-16-16-18 (18-20) pts quedan en la ag. Trabajar 10 filas de derecho (= 5 pliegues) y rematar flojo con derecho por el LR. DELANTERO: = (48) 56-60-68-72 (80-84) pts. Trabajar en pt elástico de ida y vta como antes pero trabajar los 3 pts más externos a cada lado en pt musgo. AL MISMO TIEMPO dism 1 pt dentro de los 3 pts del borde a cada lado - LEER TIP-1 PARA LAS DISMINUCIONES (= 2 pts dism). Repetir las dism en cada fila (es decir por el LD y por el LR) (11) 13-17-21-19 (23-17) vcs más (= un total de (12) 14-18-22-20 (24-18) vcs) y después en cada 2ª fila (es decir cada fila por el LD) un total de (0) 2-0-0-2 (2-8) vcs = (24) 24-24-24-28 (28-32) pts quedan en la ag. Trabajar 1 fila de derecho por el LD, AL MISMO TIEMPO dism (8) 8-8-8-10 (10-12) pts repartidos = (16) 16-16-16-18 (18-20) pts quedan en la ag. Trabajar 1 fila de derecho por el LR. En la sig fila (= LD), cerrar para 3 ojales como sigue: (3) 3-3-3-3 (3-4) d., * 1 HEB, 2 pjd, (2) 2-2-2-3 (3-3) d.*, repetir de * a * 1 vez más, 2 pjd, 1 HEB y (3) 3-3-3-3 (3-4) d. Trabajar 4 filas de derecho (= 2 pliegues) y rematar flojo con derecho por el LR. MANGA: = (32) 32-32-40-48 (48-48) pts. Mont FLOJO (8) 16-12-12-16 (16-20) pts bajo la manga = (40) 48-44-52-64 (64-68) pts en ag (trabajar en redondo en ag de doble punta). Insertar 1 MP al inicio de la vta (= centro bajo la manga) - AHORA MEDIR LA LABOR DESDE AQUÍ. Continuar en pt elástico en redondo como antes (= 2 d./2 r.). AL MISMO TIEMPO cuando la manga mida 1 cm, dism 1 pt a cada lado de MP - LEER TIP-2 PARA LAS DISMINUCIONES. Repetir las dism cada (4) 4-6-6-6 (8-8) filas (3) 7-3-7-7 (7-7) vcs más (= un total de (4) 8-4-8-8 (8-8) vcs) = (32) 32-36-36-48 (48-52) restantes en la ag. Cuando la manga mida (12) 16-20-20-24 (29-35) cm, rematar flojo con derecho sobre derecho y revés sobre revés. Trabajar la otra manga de la misma manera. TERMINACIÓN: Coser la abertura bajo la manga. Coser 2 botones en la cenefa izquierda del cuello y 3 botones en la parte inferior del body. |
||||||||||
Explicaciones del diagrama |
||||||||||
|
||||||||||
 |
||||||||||
¿Terminaste este patrón?Entonces, etiqueta tus fotos con #dropspattern #simplysweetonesie o envíalas a la galería #dropsfan. ¿Necesitas ayuda con este patrón?Encontrarás 26 videos tutoriales, un espacio para comentarios/preguntas y más visitando la página del patrón en garnstudio.com © 1982-2026 DROPS Design A/S. Todos los derechos reservados. Este documento, incluyendo todas sus sub-secciones, está protegido por los derechos de autor (copyright). Lee más acerca de lo que puedes hacer con nuestros patrones en la parte de abajo de cada patrón de nuestro sitio. |
||||||||||


Con más de 40 años en el diseño de modelos de punto y de ganchillo, DROPS Design ofrece una de las más vastas colecciones de patrones gratuitos en el internet - traducidos en 17 idiomas. Al día de hoy, contamos con 324 catálogos y 12245 patrones - de los cuales 11625 están traducidos en español.
Nosotros trabajamos con mucho esmero para brindarte lo mejor que las labores de punto y ganchillo tienen para ofrecer,inspiración y consejos, así como hilos de magnífica calidad a precios increíbles! Te gustaría usar nuestros patrones para otro fin además del uso personal? Puedes leer acerca de lo que estás permitida a hacer en el texto de Copyright en la parte de abajo de todos nuestros patrones. Felices labores!
Escribe un comentario sobre DROPS Baby 25-30
¡Nos encantaría saber qué piensas acerca de este patrón!
Si quieres escribir una pregunta referente al patrón, por favor asegúrate de elegir la categoría correcta en el formulario debajo, para acelerar el proceso de respuesta. Los campos obligatorios están marcados con un *.