
Categorías populares
¿Buscas un hilo?


Comentarios / Preguntas (33)
![]() Paola escribió:
Paola escribió:
Perché il numero totale di maglie deve essere divisibile per 7 + 1 maglia se lo schema è su 7 maglie? Sto lavorando direttamente in tondo anche il bordo, vale anche in quel caso? Grazie
29.10.2025 - 21:56DROPS Design respondió:
Buonasera Paola, il motivo deve avere la maglia in più perchè si deve spostare, è un motivo a spirale. Buon lavoro!
31.10.2025 - 18:14
![]() Paola escribió:
Paola escribió:
Perché il numero totale di maglie deve essere divisibile per 7 + 1 maglia se lo schema è su 7 maglie? Sto lavorando direttamente in tondo anche il bordo, vale anche in quel caso? Grazie
29.10.2025 - 21:55DROPS Design respondió:
Buonasera Paola, il motivo deve avere la maglia in più perchè si deve spostare, è un motivo a spirale. Buon lavoro!
31.10.2025 - 18:18
![]() Inger Pettersson escribió:
Inger Pettersson escribió:
Tusen, tusen tack för alla fina gratismönster ni publicerar! När jag stickat klart denna mössa, kommer den att skickas till Ukraina. /Inger
02.08.2025 - 23:52
![]() Gitt-Marie G escribió:
Gitt-Marie G escribió:
Ja förstår inte mönstret ,stickar med rundsticka runt runt och börjar möstret * sticka 1 en,2 m räta tills, 2 rm, 2am*varvet ut . 2v spiralmönster4rm,2am.* Sticka 1 rm, 2rm tills,1 rm,2am ** Sticka 2varn spiralmönster 3rm,2am * sticka 1 rm,2 tills ,2am** Sticka 1 v spiralmönster 2rm och 2am m.m.
04.05.2025 - 17:26DROPS Design respondió:
Hej Gitt-Marie, se gerne vores video hvordan du strikker spiralmønster. Klik på videoer øverst i opskriften :)
08.05.2025 - 10:49
![]() Jean Ryan escribió:
Jean Ryan escribió:
How much wool do i actually need to knit this hat?
25.10.2024 - 15:14
![]() Jean Ryan escribió:
Jean Ryan escribió:
How much wool is actualy used to complete the hat?
25.10.2024 - 15:13DROPS Design respondió:
Dear Mrs Ryann you will find the total amount of yarn required under the header together with sizes, needle size and tension, for this hat you need for example 100 g DROPS Alaska/50 g a ball = 2 balls Alaska; should you like to use any other yarn, feel free to use the yarn converter. Happy knitting!
25.10.2024 - 16:14
![]() Janice M Underwood escribió:
Janice M Underwood escribió:
When you day displace a stitch do you mean you are actually moving the rib pattern over one stitch?
03.04.2024 - 14:34DROPS Design respondió:
Dear Mrs Underwood, by repeating the pattern in the round, the purl stitch will automatically move - in this video we show how to work such a spiral pattern with K4, P2, even if the number of K stitches is different, it can help you to understand how it works, but remember to follow the correct number of stitches stated for the size in the pattern. Happy knitting!
03.04.2024 - 15:58
![]() Janice M Underwood escribió:
Janice M Underwood escribió:
I am working this pattern, and find errors. The rib is 5x2 but you say cast on 78. that is not divisible by 7. you do not indicate wrong side or right so I am working I believe on the wrong side. Also, what does "displace" a stitch mean, and where does this happen, in the decrease section? The order of steps is very confusing.
02.04.2024 - 22:51DROPS Design respondió:
Hi Janice, The rib is divisible by 7 + 1, as the spiral pattern consists of 7 stitches and the 1 stitch at the end is the stitch used when displacing. You are working in the round, so always from the right side. The displacement occurs when you begin the new round with the extra stitch at the end of the previous round. This is also the case when working decreases. Happy knitting!
03.04.2024 - 06:36
![]() Lori escribió:
Lori escribió:
Hi. Thank you for your reply on July 10, 23. I should have been clearer in my question. I was not suggesting a rib. Why do the instructions begin knitting flat & then require joining the edging when the hat is complete. Would the same affect be achieved with a Cast on & Knit 1 row, Purl 1 row until the desired rows prior to the start of the pattern? Thank you again for your time.
10.07.2023 - 17:28DROPS Design respondió:
Dear Lori, as explained in the previous response, working in the round in garter stitch will result in a slight misalignment at the end of the round. For that reason, we work it back and forth and then join the piece together and continue in the round. Happy knitting!
10.07.2023 - 17:40
![]() Lori escribió:
Lori escribió:
This pattern advises to Cast on and work 4 ridges in Garter Stitch (back & forth). Then place piece together and work in the round. Why do you instruct starting the hat using this method rather than Knit and Purl in the round after the desired number of stitches are Cast on? Thank you.
10.07.2023 - 02:01DROPS Design respondió:
Hi Lori, This pattern has a garter stitch bottom edge rather than rib. Garter stitch will have a slight 'jump' at the back if it is worked in the round (knit 1 round, purl 1 round), which is why it is worked back and forth before finishing the hat in the round. You can work a ribbed edge in the round if you wish, but this will not be quite so close-fitting as the garter stitch. Happy knitting!
10.07.2023 - 07:29
|
|
Swirl N Twirl#swirlntwirlhat |
|
 |
 |
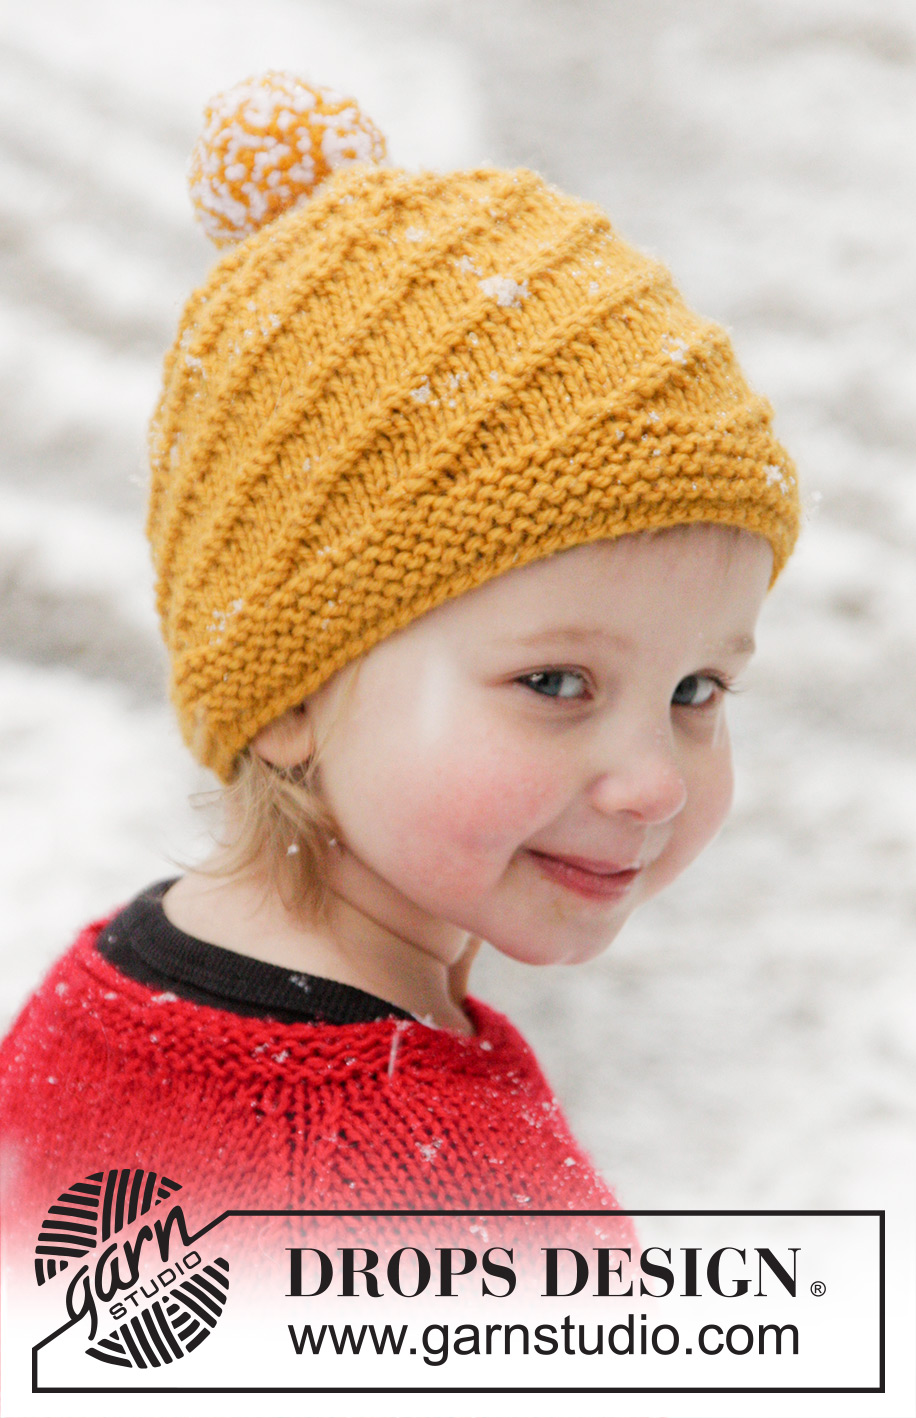
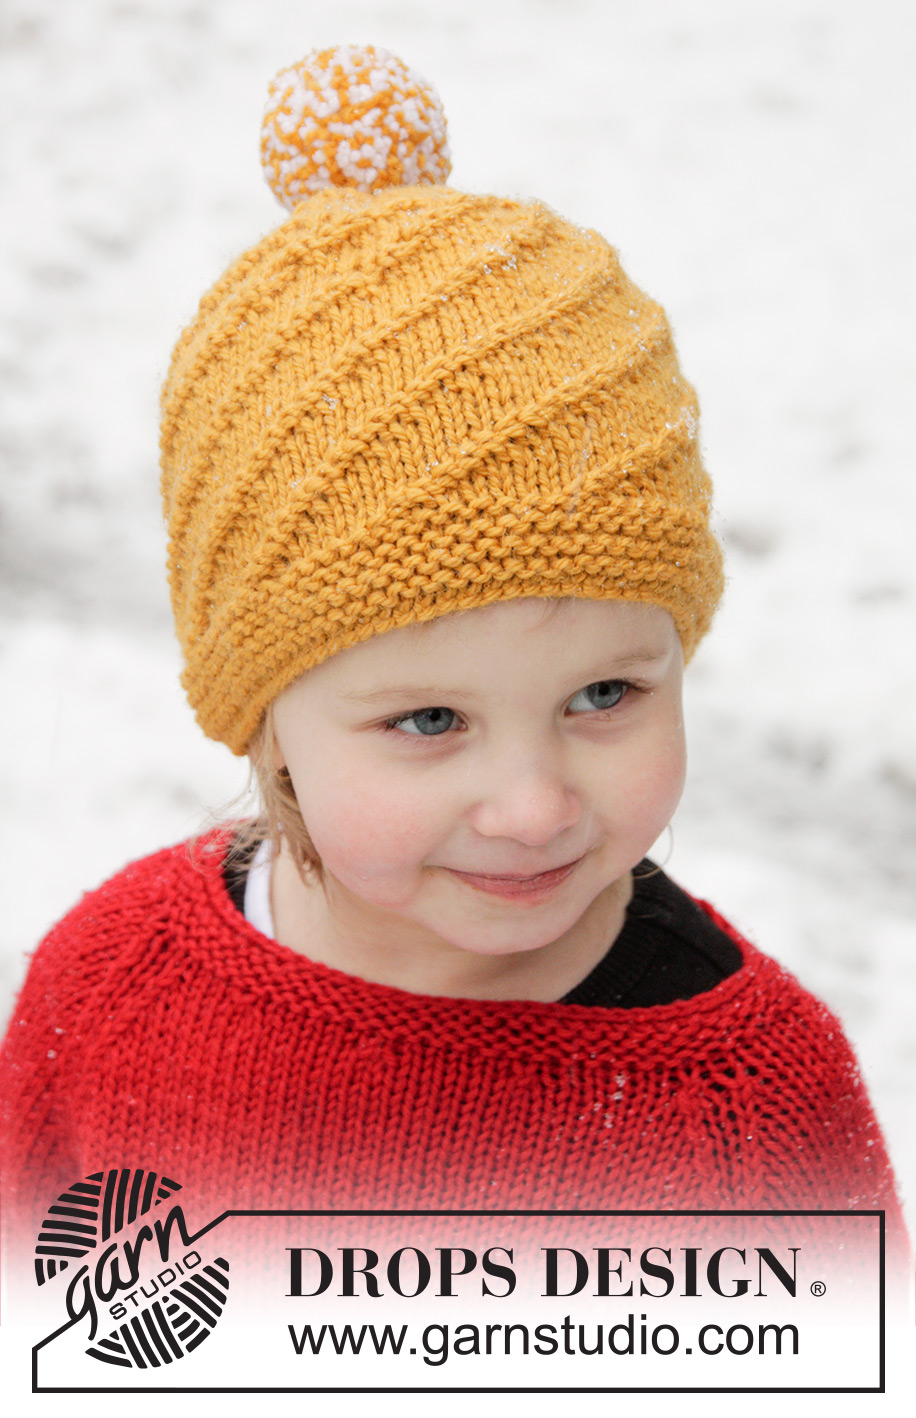
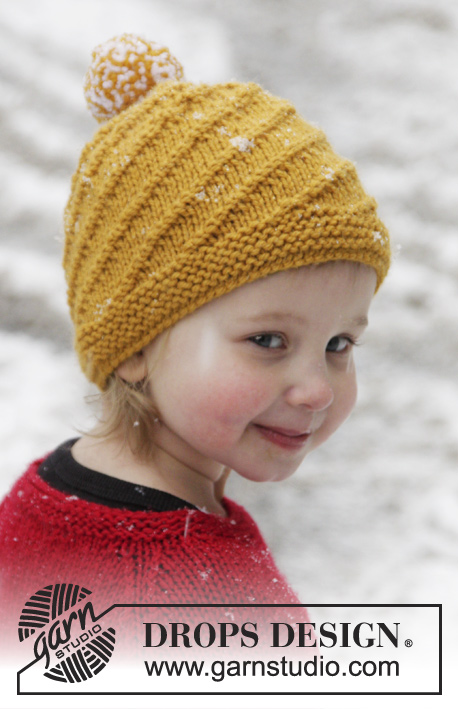
Gorro DROPS de punto con patrón en espiral, en “Alaska”. Talla: 1-12 años.
DROPS Extra 0-1020 |
|
|
PT MUSGO (de ida y vuelta en la ag): Tejer todas las hileras de derecho. 1 surco = 2 hileras tejidas de derecho. PATRÓN EN ESPIRAL: * 5-6-5-5-6 pts derechos, 2 pts reveses *, repetir de *a* en toda la vta. El Patrón es tejido sobre 7-8-7-7-8 pts y el número de pts es múltiplo de 7-8-7-7-8 + 1. Cuando se teje en redondo, el patrón se desplazará 1 pt hacia la derecha en cada vta y forma un patrón en espiral. TIP PARA DISMINUCIÓN: Dism 1 pt antes de cada marcapuntos. Tejer hasta que resten 2 pts antes del marcapuntos, deslizar el pt sig de derecho, 1d, pasar el pt desl por encima. ------------------------------------------------------ GORRO: Mon 78-81-85-85-89 pts en ag circular tamaño 4.5 mm con mostaza y tejer 4 surcos en PT MUSGO – ver explicación arriba, de ida y vuelta en la ag. Después unir la pieza y tejer en redondo de acuerdo al PATRÓN EN ESPIRAL – ver explicación arriba. RECUERDE MANTENER LA MISMA TENSIÓN DE TEJIDO DE LA MUESTRA! Tejer hasta que la pieza mida aprox 11-13-13-14-16 cm. NOTA! No estirar la pieza cuando esté midiendo, el gorro se contraerá verticalmente y a lo ancho debido al patrón. Después dism a la vez que teje el patrón en espiral, de la manera sig: * 1d, 2 pjd, 2-3-2-2-3 pts derechos, 2r *, repetir de *a* en toda la vta = 67-71-73-73-78 pts. Tejer 2 vtas del patrón en espiral con 4-5-4-4-5 pts derechos, 2r. * 1d, 2 pjd, 1-2-1-1-2 pts derechos, 2r *, repetir de *a* en toda la vta = 56-61-61-61-67 pts. Tejer 2 vtas del patrón en espiral con 3-4-3-3-4 pts derechos y 2r. * 1d, 2 pjd, 0-1-0-0-1 pts derechos, 2r *, repetir de *a* en toda la vta = 45-51-49-49-56 pts. Tejer 1 vta del patrón en espiral con 2-3-2-2-3 pts derechos y 2r. En la vta sig, tejer todos los pts de derecho – AL MISMO TIEMPO, insertar 5 marcapuntos en la pieza de la manera sig: Insertar el primer marcapuntos al inicio de la vta, después insertar los 4 marcapuntos sig con 9-10-10-10-11 pts entre cada marcapuntos. Hay 9-11-9-9-12 pts entre el primer y último marcapuntos. Después tejer de derecho y, AL MISMO TIEMPO, dism 1 pt antes de cada marcapuntos – LEER TIP PARA DISMINUCIÓN, dism a cada 2 vtas 3-4-4-4-4 veces en total = 30-31-29-29-36 pts. Después dism en cada vta 3-3-3-3-4 veces = 15-16-14-14-16 pts. En la vta sig, tejer 1-0-0-0-0 pts derechos, después 2d y 2 pts juntos en toda la vta = 8-8-7-7-8 pts restantes en la ag. Cortar el hilo y pasarlo a través de los pts restantes, fruncir y rem. Unir con una costura los surcos en el lado de la parte de abajo del gorro, coser en las hebras externas de los pts de orillo. POMPÓN: Hacer 1 pompón de aprox 10 cm de diámetro con 1 hilo blanco hueso y 1 hilo mostaza sostenidos juntamente. Coser el pompón en la parte de arriba del gorro. |
|
¿Terminaste este patrón?Entonces, etiqueta tus fotos con #dropspattern #swirlntwirlhat o envíalas a la galería #dropsfan. ¿Necesitas ayuda con este patrón?Encontrarás 18 videos tutoriales, un espacio para comentarios/preguntas y más visitando la página del patrón en garnstudio.com © 1982-2026 DROPS Design A/S. Todos los derechos reservados. Este documento, incluyendo todas sus sub-secciones, está protegido por los derechos de autor (copyright). Lee más acerca de lo que puedes hacer con nuestros patrones en la parte de abajo de cada patrón de nuestro sitio. |
|


Con más de 40 años en el diseño de modelos de punto y de ganchillo, DROPS Design ofrece una de las más vastas colecciones de patrones gratuitos en el internet - traducidos en 17 idiomas. Al día de hoy, contamos con 324 catálogos y 12290 patrones - de los cuales 11673 están traducidos en español.
Nosotros trabajamos con mucho esmero para brindarte lo mejor que las labores de punto y ganchillo tienen para ofrecer,inspiración y consejos, así como hilos de magnífica calidad a precios increíbles! Te gustaría usar nuestros patrones para otro fin además del uso personal? Puedes leer acerca de lo que estás permitida a hacer en el texto de Copyright en la parte de abajo de todos nuestros patrones. Felices labores!
Escribe un comentario sobre DROPS Extra 0-1020
¡Nos encantaría saber qué piensas acerca de este patrón!
Si quieres escribir una pregunta referente al patrón, por favor asegúrate de elegir la categoría correcta en el formulario debajo, para acelerar el proceso de respuesta. Los campos obligatorios están marcados con un *.