
Categorías populares
¿Buscas un hilo?


Comentarios / Preguntas (37)
![]() Jamie Jedinak escribió:
Jamie Jedinak escribió:
Hello! Do you know how I can translate this page into English? Thank you so very much these are beautiful and I look forward to learning how to make them thank you for all the links with video etc. :-) happy new year! :-) Jamie
20.01.2021 - 05:36DROPS Design respondió:
Dear Mrs Jedinak, this pattern is available in US-English, click on the scroll down menu below the photo and select your language - remember crochet terms are different in UK-English and in US-English. Happy crocheting!
20.01.2021 - 07:56
![]() Kelly escribió:
Kelly escribió:
Is er een complete video voor het haken van de sokken van Milla? Heeeeel graag :-) Mvg, Kelly
12.10.2019 - 04:31DROPS Design respondió:
Dag Kelly,
Nee, helaas is er niet een complete videotutorial van specifiek deze sokken. Wel van de verschillende technieken die gebruikt worden. De video's vind je onderaan het patroon (boven de opmerkingen). Laat evt. weten waar je tegenaan loopt, zodat we je kunnen helpen.
15.10.2019 - 16:24
![]() Natalia Potsada escribió:
Natalia Potsada escribió:
Hallo, mit welcher Reihe aus dem Diagramm beginne ich bei dem Schaft? Danke.
03.05.2019 - 20:06DROPS Design respondió:
Liebe Frau Potsada, das Muster vom Fuß muss beim Schaft weitergehäkelt werden, Die letzte Runde wurde eine 3.Runde im A.1, die 1. Reihe beim Schaft wird dann die 4. Reihe in A.1 (dann Reihe 1 bis 4 arbeiten). Viel Spaß beim häkeln!
06.05.2019 - 08:33
![]() Susan escribió:
Susan escribió:
Oh darn! I began crocheting this awesome pattern thinking that it would be completely explained. I haven't learned how to read diagrams and your link to read patterns wasn't much help. Unfortunately, I will need to change my project 😟
18.09.2018 - 18:06
![]() Neulojaenkeli escribió:
Neulojaenkeli escribió:
Koskaan en ollut virkannut sukkia, mutta muuta kyllä paljonkin. Ihmettelin piirostanne kun ei ollut ns. yleisen ohjeen muikainen ja varsinkin tätä kierrokselta toiselle siirtymäkohtaa, sillä se näkyy sukissa aika selkeästi, sen olisi voinut suunnitella paremmin. Muuten sukat kauniit. Ja sain kuin sainkin ohjeesta selvää, vaikka se on sekava. Parempi piirros olisi auttanut asiaa. Onneksi sukista oli aika selkeä kuva kuitenkin.
18.06.2018 - 05:15
![]() Bonnie Kisiel escribió:
Bonnie Kisiel escribió:
I am determined to complete this sock pattern. However, I need someone to clarify why line 3 shows 12 stitches and then line 4 shows that somehow 9 stitches (characters) are supposed to fit into 12 with 4 picots! Thank you.
21.10.2017 - 05:51DROPS Design respondió:
Dear Mrs Kisiel, there are 4 picots in each repeat in width (in A.1B as well as in A.1C) on row 2 in the diagram, then work the row 1-4 and there will be 4 picots on last row in diagram (= row 4). Repeat diagram in height from row 1. Happy crocheting!
23.10.2017 - 09:42
![]() Beverly escribió:
Beverly escribió:
Can you please explain the following: (= 30-40-45 sc). Work 1 sc in every sc while AT THE SAME TIME inc 6-2-0 sc evenly = 36-42-45 sc on round. Continue as follows: A.1A (= 1 st), A.1C (= 12 sts), A.1D over the last 23-29-32 sc.
18.03.2017 - 00:03DROPS Design respondió:
Dear Beverly, work first 1 round with sc, at the same time, inc evenly 6 sc in 1st size and 2 sc in 2nd size (no inc in 3rd size). Then work diagrams: A.1A over the next st, then work A.1C (=12 st) 1 time in width, then repeeat A.1D over the last 23-29-32 sc. Happy crocheting!
20.03.2017 - 08:39Wesam escribió:
I make it out thank you so much for your help and time, love your pattern and waiting for more, thanks again
17.10.2015 - 01:59Wesam escribió:
Hey, that's a really awesome patern and it's really beautiful socks, but I'm having a small problem, I can't understand the diagrams would anyone help me please. Thanks.
12.10.2015 - 22:09DROPS Design respondió:
Dear Mrs Wesam, please click here to learn more about didagrams. Each st/group of st is representated by 1 symbol - see diagram text. The vertical lines delimit the parts of the diagram to be worked (A.1A, A.1C, A.1D) or to be repeated (A.1B). Happy crocheting!
13.10.2015 - 09:37
![]() Siebke escribió:
Siebke escribió:
Goedemorgen "Dropsdesign", Klopt het dat ik een punt onderaan de hiel heb. Op de foto ziet het er zo mooi rond uit. Heb de hiel precies zo afgewerkt als in het filmpje, de sok dubbel vouwen en samenhaken. vriendelijke groeten, Siebke
10.09.2015 - 09:11DROPS Design respondió:
Hoi Siebke. Bedoel je dat er een puntje is aan de onderkant waar je de naad middenachter hebt? Dat kan, maar meestal wordt dat veel beter na een keer wassen en dragen. Als je het niet mooi vindt, kan je ook de naad een beetje aanpassen, zodat die niet zo "scherp" is.
11.09.2015 - 14:10
|
|||||||||||||
Milla#millasocks |
|||||||||||||
|
|
|||||||||||||
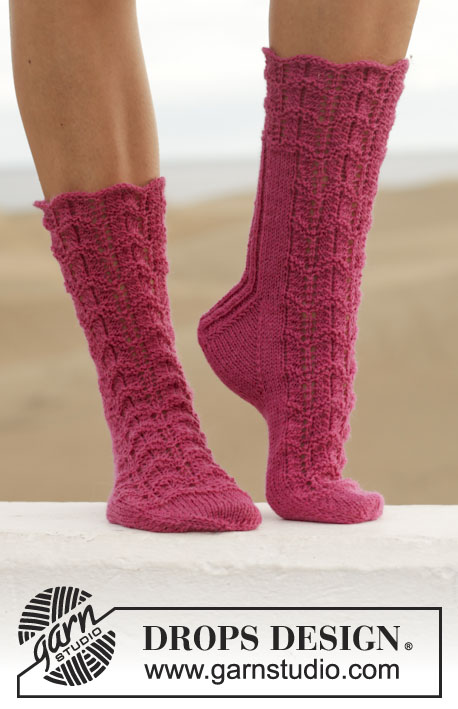
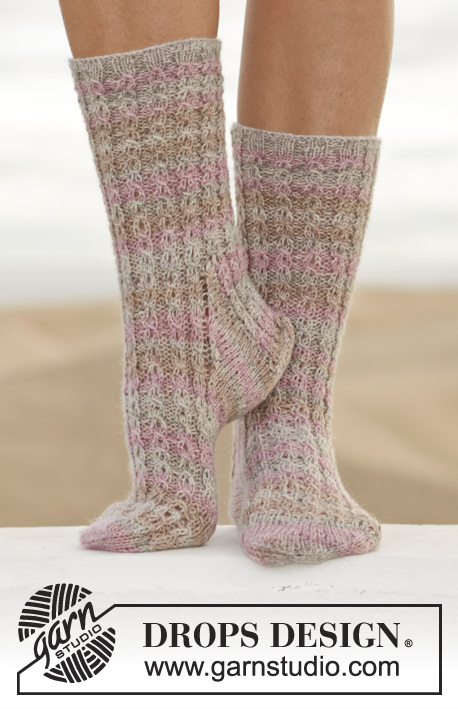
Calcetas DROPS a ganchillo con patrón de calados, en 1 hilo “Big Fabel” o 2 hilos “Fabel”. Talla: 35-43.
DROPS 154-33 |
|||||||||||||
|
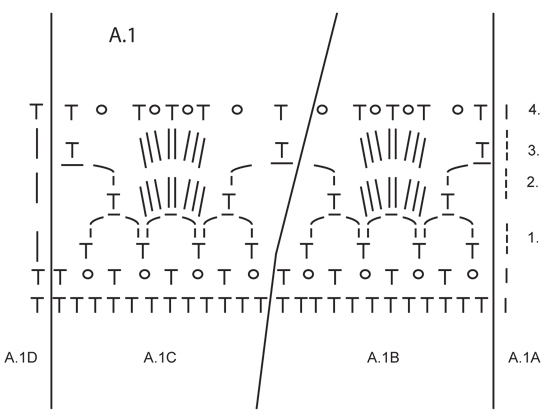
INFORMACIÓN PARA LA ELABORACIÓN DEL TRABAJO: Sustituir el primer p.b. al inicio de cada vta de p.b. con 1 cad. Terminar cada vta con 1 p.bjs en la cad del inicio de la vta. Sustituir el primer p.a. al inicio de cada vta de p.a. con 3 cad. Terminar cada vta con 1 p.bjs en la 3ª cad del inicio de la vta. PATRÓN: Ver diagrama A.1. ------------------------------------------------------ CALCETA: La pieza es trabajada en redondo a partir de la punta del pie y de regreso al empeine, después, trabajar de ida y vuelta a partir del centro de la parte de atrás del talón. Mon 4 cad en ag de ganchillo tamaño 3.5 mm con 1 hilo Big Fabel o 2 hilos Fabel y formar un anillo con 1 p.bjs en la 1ª cad. VUELTA 1: Hacer 5 p.b. en el anillo de cad – LEER INFORMACIÓN PARA LA ELABORACIÓN DEL TRABAJO! VUELTA 2: Hacer 2 p.b. en cada p.b. = 10 p.b. VUELTA 3: * 1 p.b. en el primer p.b., 2 p.b. en el p.b. sig *, repetir de *a* 5 veces en total = 15 p.b. VUELTA 4: * 1 p.b. en cada uno de los primeros 2 p.b., 2 p.b. en el p.b. sig *, repetir de *a* 5 veces en total = 20 p.b. VUELTA 5: Hacer 1 p.b. en cada p.b. VUELTA 6: * 1 p.b. en cada uno de los primeros 3 p.b., 2 p.b. en el p.b. sig *, repetir de *a* 5 veces en total = 25 p.b. VUELTA 7: Hacer 1 p.b. en cada p.b. VUELTA 8: * 1 p.b. en cada uno de los primeros 4 p.b., 2 p.b. en el p.b. sig *, repetir de *a* 5 veces en total = 30 p.b. Los aum ahora están terminados en la talla 35/37. VUELTA 9: * 1 p.b. en cada uno de los primeros 5 p.b., 2 p.b. en el p.b. sig *, repetir de *a* 5 veces en total = 35 p.b. VUELTA 10: * 1 p.b. en cada uno de los primeros 6 p.b., 2 p.b. en el p.b. sig *, repetir de *a* 5 veces en total = 40 p.b. Los aum ahora están terminados en la talla 38/40. VUELTA 11: * 1 p.b. en cada uno de los primeros 7 p.b., 2 p.b. en el p.b. sig *, repetir de *a* 5 veces en total = 45 p.b. Los aum ahora están terminados en la talla 41/43. TODAS LAS TALLAS: (= 30-40-45 p.b.). Hacer 1 p.b. en cada p.b. y, AL MISMO TIEMPO, aum 6-2-0 p.b. distribuidos equitativamente = 36-42-45 p.b. en la vta. Continuar de la manera sig: A.1A (= 1 pt), A.1C (= 12 pts), A.1D sobre los últimos 23-29-32 p.b. NOTA! Las primeras dos vtas del diagrama muestran el inicio del patrón y son trabajadas solamente una vez, repetir las vueltas 1-4. Continuar trabajando de esta manera hasta que la pieza mida aprox 14-16-18 cm, ajustar para que la última vta sea la 3ª vta de A.1. Después hacer p.b. de ida y vuelta sobre los últimos 22-28-31 p.b. (es decir, no trabajar sobre los pts de A.1A, A.1C y el primer pt de A.1D) – recuerde la INFORMACIÓN PARA LA ELABORACIÓN DEL TRABAJO! Continuar hasta que la pieza mida 22-24-27 cm, colocar la calceta en dos y unir en el centro de la parte de atrás con una hilera de p.bjs a través de ambas partes, por el LR. Cortar y asegurar el hilo. PIERNA: Empezar en el frente de la calceta. Trabajar A.1A como antes, A.1B, continuar con A.1B (ajustar para 2½-2½-3 repeticiones en total de A.1B hasta el centro de la parte de atrás. Ahora continuar de esta manera en las diferentes tallas: Talla 35/37-38/40: Terminar el último A.1B (= un total de 3-3 repeticiones de A.1B). Talla 41/43: Trabajar una repetición más de A.1B (= un total de 4 repeticiones de A.1B). Todas las tallas: Trabajar A.1C y terminar con 1 p.bjs en el primer pt. Trabajar 2 repeticiones de A.1 en altura. Cortar y asegurar el hilo. |
|||||||||||||
Explicaciones del diagrama |
|||||||||||||
|
|||||||||||||
 |
|||||||||||||
¿Terminaste este patrón?Entonces, etiqueta tus fotos con #dropspattern #millasocks o envíalas a la galería #dropsfan. ¿Necesitas ayuda con este patrón?Encontrarás 10 videos tutoriales, un espacio para comentarios/preguntas y más visitando la página del patrón en garnstudio.com © 1982-2026 DROPS Design A/S. Todos los derechos reservados. Este documento, incluyendo todas sus sub-secciones, está protegido por los derechos de autor (copyright). Lee más acerca de lo que puedes hacer con nuestros patrones en la parte de abajo de cada patrón de nuestro sitio. |
|||||||||||||


Con más de 40 años en el diseño de modelos de punto y de ganchillo, DROPS Design ofrece una de las más vastas colecciones de patrones gratuitos en el internet - traducidos en 17 idiomas. Al día de hoy, contamos con 325 catálogos y 12298 patrones - de los cuales 11696 están traducidos en español.
Nosotros trabajamos con mucho esmero para brindarte lo mejor que las labores de punto y ganchillo tienen para ofrecer,inspiración y consejos, así como hilos de magnífica calidad a precios increíbles! Te gustaría usar nuestros patrones para otro fin además del uso personal? Puedes leer acerca de lo que estás permitida a hacer en el texto de Copyright en la parte de abajo de todos nuestros patrones. Felices labores!
Escribe un comentario sobre DROPS 154-33
¡Nos encantaría saber qué piensas acerca de este patrón!
Si quieres escribir una pregunta referente al patrón, por favor asegúrate de elegir la categoría correcta en el formulario debajo, para acelerar el proceso de respuesta. Los campos obligatorios están marcados con un *.