
Categorías populares
¿Buscas un hilo?


Comentarios / Preguntas (67)
![]() Catherine escribió:
Catherine escribió:
Très déçue. Fini, le chausson a une forme qui ne va pas du tout, pend sous le talon de plusieurs cms, dessous bien trop large (et oui, j'ai pris la taille recommandée et fait l'échantillon, et non, je n'ai pas fait d'erreurs en tricotant). Le rendu au bout du pied au niveau des côtes mousse n'est pas du tout tendu non plus comme sur la photo. J'ai pourtant un pied tout à fait standard.
27.08.2023 - 22:15DROPS Design respondió:
Bonjour Catherine, nous sommes désolés de lire que vous n'avez pas obtenu le résultat escompté. Ces chaussons ont eu un certain succès sur Ravelry où vous pourrez voir différentes réalisations qui pourront peut-être vous aider. Sinon, n'hésitez pas à poser votre question ici. Bon tricot!
28.08.2023 - 16:38
![]() Kimberly M escribió:
Kimberly M escribió:
At what point in the instructions do we work the pattern to reach the finished length of 22-24-27 cm? At the instruction "when 6 ridges in total have been worked" the slipper has not yet reached the finished length. Would it be possible to supply a photograph of the slipper before the seam is sewn? This would be helpful for other projects as well that need assembly. Thank you.
21.01.2022 - 11:35DROPS Design respondió:
Dear Kimberley, the slippers are worked top down - like in this video which is showing the seam under foot, maybe it can help you?
21.01.2022 - 15:55
![]() Marie escribió:
Marie escribió:
I casted on 53 stitches; 53 minus 13 divided by 2; knit 20, add a marker, work the 13 stitches, add another marker, finish the round. The visual markers saved me a lot of aggravation.
18.01.2022 - 17:27
![]() Kamila escribió:
Kamila escribió:
The amount of increases indicates that you should repeat the A.1 pattern 2x: "Repeat inc on every row (both RS and WS) a total of 15-17-20 times" A.1 is high for 8 rows, so repeating it twice gives us 16 rows. What about the increases that go beyond the A.1 pattern repeats? What I do in that case? Keep on working revers stocking stitch on those 13 sts?
04.09.2021 - 22:34DROPS Design respondió:
Dear Kamila, you compensate the remaining stitches by working in garter stitch. Happy knitting!
05.09.2021 - 17:48
![]() Joan Taylor escribió:
Joan Taylor escribió:
I have done the four ridges and then the first increase row but after that the instructions are scant. Do we still knit the 19 stitches and then increase? This way you will have more than 13 stitches in the middle. It would have been helpful if you had worked us through the first few rows after the first one because it leaves too many questions. Do we still use wool over when purling as it doesn’t fit right or knitting into the back of the stitch. The details of this pattern is missing.
21.04.2021 - 00:48DROPS Design respondió:
Hi Joan, You increase either side of pattern A.1, so the middle stitches remain the same number. You increase by making a yarn over, both when working the right and wrong side; the yarn overs are then purled/knitted twisted on the subsequent row. Hope this helps and happy knitting!
21.04.2021 - 07:39
![]() Lena Holum escribió:
Lena Holum escribió:
Jeg strikker str 38/40. Hvis man skal øke 2 m på retten og 2 m på vrangen totalt 17 gngr blir det totalt 68 m (4 x 17) i tillegg til de 53 man legger opp. Det blir 121 m, ikke 87. Det går derimot opp hvis man øker 2 m pr 2 rader. Dette er forvirrende.
25.01.2019 - 19:26DROPS Design respondió:
Hei Lena. Du øker 1 maske på hver side av de 13 midterste maskene (= 2 masker) totalt 17 ganger. 17 x 2 = 34 masker økt. Du hadde 53 masker på pinnen fra før = 87 masker på pinnen. God fornøyelse
30.01.2019 - 14:59
![]() Magda Rosario escribió:
Magda Rosario escribió:
Also, how many times do I repeat the A1 diagram?
12.08.2016 - 02:25DROPS Design respondió:
Dear Magda, you only repeat it once.
14.08.2016 - 12:06
![]() Magda Rosario escribió:
Magda Rosario escribió:
When do I start increasing? The instructions indicate to increase on the rs and ws, when do I do that? Are these increases for the sides of the slipped? And where do I increase? Thank you for your help.
12.08.2016 - 02:18DROPS Design respondió:
Dear Magda, you start increasing in the first row. The increases are for the sides of the slippers and you have to increase before and after working A1 on each side.
14.08.2016 - 12:10
![]() Eva Jansson escribió:
Eva Jansson escribió:
Enligt bild på mönstret ska det vara 2 bårder med hålmönster men kan inte hitta det i mönstret. Har stickat som det står men får bara ett mönster. Undrar även om hur omslaget i diagrammet ska stickas från avigsidan, rät eller avig?
09.03.2016 - 21:40DROPS Design respondió:
Hej Eva, du bør hinna med mönstret 2 ggr innan du fortsätter med rätstickat över alla m. Omslaget i diagrammet stickas som vanligt så du får ett litet hål. Lycka till!
10.03.2016 - 10:07
![]() ALLAIN Cindy escribió:
ALLAIN Cindy escribió:
Bjr, je viens de finir le diagramme mais je n'ai qu'un seul "V" et non deux comme sur la photo du chausson, dois je quand même commencer le point mousse et les diminutions ? Ou faut il répéter deux fois le diagramme ? Merci d'avance, c'est la 1ère fois que j'utilise un diagramme, après avoir recommencer 4 fois je penses avoir compris, mais j'ai l'impression qu'il me manque une partie !! Cindy
22.06.2015 - 18:33DROPS Design respondió:
Bonjour Cindy, c'est exact, vous devez continuer en répétant le diagramme et en continuant les augmentations comme avant, en arrêtant 1 rang après la dernière augmentation, votre ouvrage doit mesurer 9-10-11 cm (cf taille), vous continuez ensuite au point mousse. Bon tricot!
22.06.2015 - 18:43
|
|||||||||||||||||||
Jane#janeslippers |
|||||||||||||||||||
|
|
|||||||||||||||||||
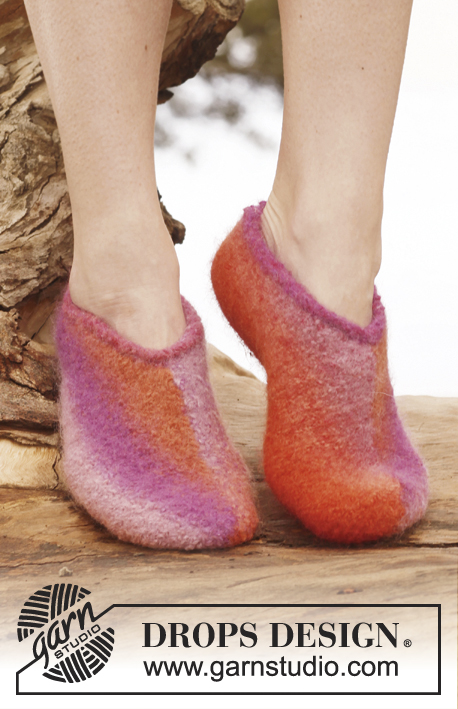
Pantuflas de punto DROPS, en 1 hilo “Big Fabel” o 2 hilos “Fabel”. Números: 35 – 43.
DROPS 147-19 |
|||||||||||||||||||
|
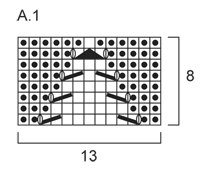
PATRÓN: Ver diagrama A.1. El diagrama muestra todas las hileras en el patrón vistas por el LD, PT MUSGO (de ida y vuelta en la ag): Tejer todas las hileras de derecho. 1 surco = 2 hileras tejidas de derecho. TIP PARA AUMENTO: Aum 1 pt en cada lado de los 13 pts centrales haciendo 1 HEB (lazada), en la hilera sig, tejer las HEB retorcidas (es decir, insertar la ag por atrás del pt en vez de adelante) para evitar que se formen agujeros. Tejer los pts aum en pt jersey. ------------------------------------------------------ PANTUFLA: Tejida de ida y vuelta en ag circular a partir del centro de la parte de atrás, empezar en la parte de arriba y tejer hacia abajo. Mon 49-53-57 pts en ag tamaño 4.5 mm con 1 hilo Big Fabel o 2 hilos Fabel. Tejer 4 surcos en pt musgo sobre todos los pts – ver explicación arriba! Después tejer de la manera sig, por el LD: 1 pt en pt musgo, 17-19-21 pts en pt jersey, A.1 (= 13 pts), 17-19-21 pts en pt jersey, 1 pt en pt musgo. Continuar este patrón – AL MISMO TIEMPO, en la 1ª hilera, aum 1 pt en cada lado de los 13 pts centrales – ver TIP PARA AUMENTO! Repetir este aum en cada hilera (es decir, tanto por el LD como por el LR) un total de 15-17-20 veces = 79-87-97 pts. Tejer 1 hilera después del último aum. Ahora la pieza mide aprox 9-10-11 cm. Continuar en pt musgo sobre todos los pts – AL MISMO TIEMPO, después de 3 surcos, rem 1 pt al inicio de las 6 hileras sig (es decir, 3 pts rem en cada lado) = 73-81-91 pts. Después de haber tejido 6 surcos en total, rem flojamente. TERMINACIÓN: Hacer la costura en la planta del pie y ascender a lo largo del centro de la parte de atrás – coser orilla con orilla para evitar que se forme una costura abultada en la planta del pie. Tejer la otra pantufla. |
|||||||||||||||||||
Explicaciones del diagrama |
|||||||||||||||||||
|
|||||||||||||||||||
 |
|||||||||||||||||||
¿Terminaste este patrón?Entonces, etiqueta tus fotos con #dropspattern #janeslippers o envíalas a la galería #dropsfan. ¿Necesitas ayuda con este patrón?Encontrarás 14 videos tutoriales, un espacio para comentarios/preguntas y más visitando la página del patrón en garnstudio.com © 1982-2026 DROPS Design A/S. Todos los derechos reservados. Este documento, incluyendo todas sus sub-secciones, está protegido por los derechos de autor (copyright). Lee más acerca de lo que puedes hacer con nuestros patrones en la parte de abajo de cada patrón de nuestro sitio. |
|||||||||||||||||||


Con más de 40 años en el diseño de modelos de punto y de ganchillo, DROPS Design ofrece una de las más vastas colecciones de patrones gratuitos en el internet - traducidos en 17 idiomas. Al día de hoy, contamos con 324 catálogos y 12290 patrones - de los cuales 11685 están traducidos en español.
Nosotros trabajamos con mucho esmero para brindarte lo mejor que las labores de punto y ganchillo tienen para ofrecer,inspiración y consejos, así como hilos de magnífica calidad a precios increíbles! Te gustaría usar nuestros patrones para otro fin además del uso personal? Puedes leer acerca de lo que estás permitida a hacer en el texto de Copyright en la parte de abajo de todos nuestros patrones. Felices labores!
Escribe un comentario sobre DROPS 147-19
¡Nos encantaría saber qué piensas acerca de este patrón!
Si quieres escribir una pregunta referente al patrón, por favor asegúrate de elegir la categoría correcta en el formulario debajo, para acelerar el proceso de respuesta. Los campos obligatorios están marcados con un *.