
Categorías populares
¿Buscas un hilo?


Comentarios / Preguntas (98)
![]() Angie escribió:
Angie escribió:
Bonjour Je souhaiterais réaliser ce modèle avec un mélange A Cotton 54 % Viscose 46 % Aiguilles circulaires 3.5 Que me conseillez vous comme numéro d'aiguilles ? Merci
12.04.2026 - 10:09
![]() Angie escribió:
Angie escribió:
Bonjour Je souhaiterais réaliser ce modèle avec un mélange A Cotton 54 % Viscose 46 % Aiguilles circulaires 3.5 Que me conseillez vous comme numéro d'aiguilles ? Merci
12.04.2026 - 10:08DROPS Design respondió:
Bonjour Angie, indépendamment de la composition de votre fil, vous devez avoir ici 21 mailles x 28 rangs point fantaisie = 10 x 10 cm; si vous voulez comparer votre fil à celui du modèle, vous pouvez consulter le nuancier de Cotton Light, ici. Bon tricot!
13.04.2026 - 10:06
![]() Lisa escribió:
Lisa escribió:
Näst sista raden i framstyckebeskrivningen står det att "nu sätts det i 1 tråd (= mitt på axeln)", jag förstår inte. Ska man markera i en maska med en tråd för att skapa en markering? Eller ska man sätta i en tråd hela det varvet? Och sist ska man sticka de 2 näst sita v av M1, menar ni då de 2 översta som är slätstickning? De kommer alltså efter denna tråd? Tacksam för förklaring
16.02.2026 - 15:48DROPS Design respondió:
Hei Lisa. Nu sätts det i 1 tråd (= mitt på axeln) = Ja,for att skapa en markering (= HÄRIFRÅN MÄTS NU ARB). De 2 näst siste = 1 varv med rm från avigsidan og 1 varv rm från rätsidan. mvh DROPS Design
03.03.2026 - 11:38
![]() Karin Öhlén escribió:
Karin Öhlén escribió:
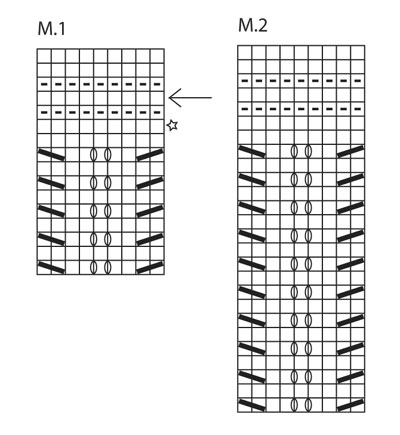
Hej, hittar ingen förklaring till vad stjärnan och pilen i diagram M1 betyder. Tacksam för snabbt svar.
15.11.2025 - 07:45DROPS Design respondió:
Hei Karin. Forklaring til pilen og stjernen fins i selve oppskriften. Et godt tips er å lese igjennom en oppskrift før man begynner å strikke. mvh DROPS Design
17.11.2025 - 20:59
![]() Jo escribió:
Jo escribió:
I cannot understand the M1 pattern. After I complete the 9 stitch grid I have lost a number of stitches, I'm sure this occurs after I complete the symbol which tells me to k2 tog.
22.03.2025 - 00:07DROPS Design respondió:
Dear Jo, row 1 of M.1 is worked as: Knit 2 together, knit 2, yarn over, knit 1, yarn over, knit 2, slip 1 st as if to K, K 1, psso . So you decrease 2 stitches but you also increase 2 stitches. Due to this, the number of stitches in the round remains the same, so you shouldn't lose any stitches. Happy knitting!
23.03.2025 - 20:41
![]() Barbara Mede escribió:
Barbara Mede escribió:
Hello . i am doing the NECK EDGE. Knit up approx. 38-41 sts (from RS, incl sts on stitch holders) on circular needle size 4 mm along neckline of RIGHT FRONT PIECE until begin of BACK PIECE (= the 34 new stitches in garter st) . K 3 rows back and forth, then bind off. How do i join the Right Front Piece Neck Edge to the Back Piece Neck Edge? Thank you.
23.12.2023 - 08:44DROPS Design respondió:
Dear Barbara, you don't work the neck edge in the back piece; you have already worked it before. When working the front neck edges you join them to the back piece by sewing. Happy knitting!
28.12.2023 - 23:18
![]() Barbara escribió:
Barbara escribió:
How do you incorporate the extra 34 stitches at the back into the pattern…. When the stitch repeat is 9 stitches ie; 34 is not divisible by 9. Thank you
07.11.2023 - 12:42DROPS Design respondió:
Dear Barbara, you will now work the edge stitches on each front piece and the 34 new stitches in M.1 = 36 sts / 9 = 4 repeats, ie work 3 edge stitches in garter stitch, repeat M.1 until 3 sts remain and end with 3 edge stitches in garter stitch. Happy knitting!
07.11.2023 - 13:41
![]() Gerda escribió:
Gerda escribió:
Hallo, ik ben dit leuke vestje aan het breien en heb een vraag over de mouw. Ik moet voor mijn maat maar 11 steken erbij opzetten. Worden de mouwen dan niet erg kort in verhouding tot de 20 steken die je erbij opzet voor de kleinere maten? Vr. Groeten Gerda
19.06.2023 - 20:53
![]() Barb escribió:
Barb escribió:
Right Front Piece.\\r\\nThe instruction says \\\"Then bind off at beg of every row from mid front: 2 sts 2 times and 1 st 4 times = 49-58-58-67 sts remain on shoulder.\\\"\\r\\nDoes that mean bind off every row or every 2nd row?
17.06.2023 - 14:05DROPS Design respondió:
Dear Barb, it means to bind off on every row that starts from the mid front (so technically it would be every other/2nd row). Happy knitting!
17.06.2023 - 16:36
![]() Barbara escribió:
Barbara escribió:
Hello. I cannot see anywhere on this pattern where it mentions the gauge ? Regards, Barbara
24.04.2023 - 14:00DROPS Design respondió:
Dear Barbara, you will find the tension in the upper part of the pattern together with the sizes, yarn and amount of yarn and needle size + buttons. Happy knitting!
24.04.2023 - 16:27
|
||||||||||||||||
Mystic River#mysticrivercardigan |
||||||||||||||||
 |
 |
|||||||||||||||
Saco DROPS, de punto, con mangas cortas y patrón de calados en “Cotton Light” o “Belle”. Talla: S – XXXL.
DROPS 136-6 |
||||||||||||||||
|
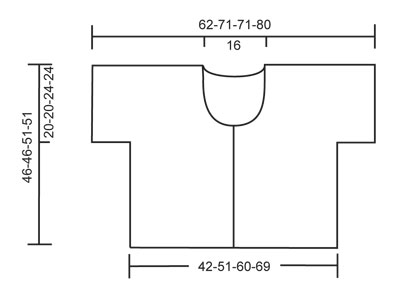
PATRÓN: Ver diagramas M.1 y M.2 – los diagramas muestran el patrón por el LD. 1 diagrama = 1 repetición = 9 pts en anchura. Tejer la pieza del frente de la manera sig (de abajo hacia arriba): Diagrama M.1: 2-2-3-3 veces, diagrama M.2: 1 vez, diagrama M.1: 1 vez, diagrama M.2: 1 vez y diagrama M.1: 2 veces. Tejer la pieza de la espalda de la manera sig (de arriba hacia abajo): Diagrama M.1: 2 veces, diagrama M.2: 1 vez, diagrama M.1: 1 vez, diagrama M.2: 1 vez y diagrama M.1: 2-2-3-3 veces. PT MUSGO (de ida y vuelta en la ag): Tejer todas las vtas de derecho. ------------------------------------------------------ SACO: Primero tejer la pieza del delantero derecho y aum para la manga, después tejer la pieza del delantero izquierdo y manga, después deslizar estos conjuntamente y tejer hacia abajo en la pieza de la espalda. Tejido de ida y vuelta en una ag circular para tener espacio suficiente para todos los pts. DELANTERO DERECHO: Mon 49-58-67-76 pts (incl 1 pt de orillo en el lado y 3 pts del borde del lado del centro del frente) en ag tamaño 4 mm con Cotton Light o Belle. Tejer 4 vtas de derecho (1ª vta = LR), después tejer 1 vta de revés por el LR. Tejer la vta sig de la manera sig: 3 pts del borde en PT MUSGO – ver explicación arriba, PATRÓN – ver explicación arriba – hasta que reste 1 pt, tejer éste en pt musgo. Continuar de esta manera. RECUERDE MANTENER LA MISMA TENSIÓN DE TEJIDO DE LA MUESTRA! Al mismo tiempo, cuando la pieza mida 26-26-27-27 cm, mon 20-20-11-11 pts nuevos para la manga, al final de la vta sig en el lado (menos pts en las tallas más grandes debido a una mayor anchura de hombros) = 69-78-78-87 pts. LEER TODA LA SECCIÓN SIGUIENTE ANTES DE CONTINUAR! Tejer los pts de la manga en el patrón, mas tejer los 3 pts más externos en pt musgo. AL MISMO TIEMPO, cuando la pieza mida 27-27-29-29 cm, rem para 1 ojal tejiendo juntos de derecho el 2º y 3er pt a partir de la orilla y después haciendo 1 HEB (lazada). Repetir el rem para el ojal cuando la pieza mida 30-30-32-32 cm. Cuando la pieza mida 31-31-33-33 cm, deslizar los 12 pts más externos del lado del centro del frente en un gancho o seguro aux para el cuello. Después rem al inicio de cada vta a partir del centro del frente: 2 pts 2 veces y 1 pt 4 veces = 49-58-58-67 pts restantes en el hombro. Continuar tejiendo como antes, con 1 pt del lado del centro del frente en pt musgo, hasta que la pieza mida aprox 46-46-51-51 cm – ajustar para que la última vta sea tejida por el LD y sea la vta marcada con una flecha en el diagrama M.1. Ahora insertar un marcapuntos (MP) (= centro en la parte de arriba del hombro). AHORA MEDIR LA PIEZA DESDE AQUÍ! Tejer las 2 vtas sig del diagrama M.1, dejar la pieza a un lado. DELANTERO IZQUIERDO: Mon y tejer como la pieza del delantero derecho, pero a la inversa. NOTA: No rem para los ojales. ESPALDA: 1ª vta = LR (= última vta en el diagrama M.1). Tejer los pts de la pieza del delantero derecho a la ag circular tamaño 4 mm, mon 34 pts nuevos (= escote de la espalda) y tejer los pts de la pieza del delantero izquierdo a la ag circular = 132-150-150-168 pts en total. Continuar con el PATRÓN como está explicado arriba, mas tejer 4 vtas en pt musgo sobre los 34 pts nuevos antes de que ellos también sean incluidos en el patrón! Cuando la pieza mida 20-20-24-24 cm a partir del MP en el hombro, rem los 20-20-11-11 pts de la manga en cada lado (rem al inicio de las 2 vtas sig) = 92-110-128-146 pts restantes en la ag. Continuar el patrón, con 1 pt de orillo en pt musgo en cada lado. Cuando esté tejiendo el diagrama M.1 por última vez, terminar con la vta marcada con una estrella. La pieza ahora mide aprox 45-45-50-50 cm a partir del MP en el hombro. Ahora tejer 3 vtas de derecho (1ª vta = LR). Después rem FLOJAMENTE de derecho por el LD – NOTA: Es importante evitar que quede una orilla de rem apretada. ORILLA DEL ESCOTE: Levantar aprox 38-41 pts (por el LD, incl los pts en los ganchos o seguros aux) en ag circular tamaño 4 mm a lo largo de la línea del escote del DELANTERO DERECHO hasta el inicio de la ESPALDA (= los 34 nuevos pts en pt musgo) . Tejer 3 vtas de derecho de ida y vuelta, después rem. Repetir a lo largo del DELANTERO IZQUIERDO. TERMINACIÓN: Hacer las costuras de las mangas y laterales en una, a 1 pt del pt de orillo. Coser los botones. |
||||||||||||||||
Explicaciones del diagrama |
||||||||||||||||
|
||||||||||||||||
 |
||||||||||||||||
 |
||||||||||||||||
¿Terminaste este patrón?Entonces, etiqueta tus fotos con #dropspattern #mysticrivercardigan o envíalas a la galería #dropsfan. ¿Necesitas ayuda con este patrón?Encontrarás 12 videos tutoriales, un espacio para comentarios/preguntas y más visitando la página del patrón en garnstudio.com © 1982-2026 DROPS Design A/S. Todos los derechos reservados. Este documento, incluyendo todas sus sub-secciones, está protegido por los derechos de autor (copyright). Lee más acerca de lo que puedes hacer con nuestros patrones en la parte de abajo de cada patrón de nuestro sitio. |
||||||||||||||||


Con más de 40 años en el diseño de modelos de punto y de ganchillo, DROPS Design ofrece una de las más vastas colecciones de patrones gratuitos en el internet - traducidos en 17 idiomas. Al día de hoy, contamos con 324 catálogos y 12290 patrones - de los cuales 11685 están traducidos en español.
Nosotros trabajamos con mucho esmero para brindarte lo mejor que las labores de punto y ganchillo tienen para ofrecer,inspiración y consejos, así como hilos de magnífica calidad a precios increíbles! Te gustaría usar nuestros patrones para otro fin además del uso personal? Puedes leer acerca de lo que estás permitida a hacer en el texto de Copyright en la parte de abajo de todos nuestros patrones. Felices labores!
Escribe un comentario sobre DROPS 136-6
¡Nos encantaría saber qué piensas acerca de este patrón!
Si quieres escribir una pregunta referente al patrón, por favor asegúrate de elegir la categoría correcta en el formulario debajo, para acelerar el proceso de respuesta. Los campos obligatorios están marcados con un *.