
Categorías populares
¿Buscas un hilo?


Comentarios / Preguntas (112)
![]() Kate escribió:
Kate escribió:
The ‘body’ section is for horizontal ribbing instead of vertical ribbing like in the photo!
24.12.2025 - 22:53
![]() Sarah escribió:
Sarah escribió:
I am trying to make a longer sleeve (for someone with longer than average arms). How do I make this adjustment to the sleeves?
21.11.2025 - 23:49DROPS Design respondió:
Dear Sarah, depending on how much cm you should add, you can add some extra cm before starting increasing, work some more rounds between each increase and/or divide piece mid under sleeve after the extra cm required. Happy knitting!
24.11.2025 - 08:23
![]() De Keyser Liesbet escribió:
De Keyser Liesbet escribió:
Kan dit op 2 nld worden gemaakt. Hoe is de verhouding dan?
21.11.2025 - 13:04
![]() De Keyser Liesbet escribió:
De Keyser Liesbet escribió:
Kan dit op gewone nld en de rug 246 st ik dat niveel voor xl
18.11.2025 - 10:51DROPS Design respondió:
Dag Liesbet,
De reden dat je op de rondbreinaald moet breien is omdat je veel steken op de naald hebt als je van midden voor naar midden voor breit.
Om een patroon aan te passen om op rechte naalden te breien hebben we een instructie gemaakt. Deze vind je hier.
22.11.2025 - 09:23
![]() Patrycja escribió:
Patrycja escribió:
Dziękuje za odpowiedź. Oczywiście że jasne . Jeszcze pytanie odnośnie żakardu. Liczba oczek musi być podzielna przez 12? Czy dobrze kombinuję? Pojedynczy motyw pojawi się w rozmiarze m 13 razy. Czyli 185 oczek odejmuje od tego 14 bo na listwy bo żeczne , zostaje mi 157. Nie bardzo to podzielę przez 12. Wychodzi 13 motywów i coś.
20.08.2025 - 14:21DROPS Design respondió:
Witaj Patrycjo, zobacz kurs DROPS TUTAJ, fragment zatytułowany 'Gdy liczba oczek nie zgadza się z liczbą powtórzeń schematu'. Pozdrawiam!
21.08.2025 - 12:22
![]() Patrycja escribió:
Patrycja escribió:
No właśnie wydaje mi się to zupełnie odwrotne. Gdy zrobię zamykanie oczek po ściągaczu to sweter wyjdzie zwężany od dołu. Chyba że się mylę? W projekcie wydaje się być prosty w talii
20.08.2025 - 10:13DROPS Design respondió:
Witaj ponowie Patrycjo, gdy masz 100 o. i wykonasz ściągacz i na tej samej liczbie oczek wykonasz drugą próbkę, ale dżersejem, to ściągacz będzie znacznie węższy niż dżersej (bez naciągania robótki). Aby część dżersejem miała taką samą szerokość jak część ściągaczem, musisz zmniejszyć liczbę oczek w części dżersejem. Mam nadzieję, że teraz jest to jaśniejsze. Pozdrawiamy!
20.08.2025 - 10:23
![]() Patrycja escribió:
Patrycja escribió:
Dzień dobry, robię rozmiar M. Nie rozumiem dlaczego zaraz po scidgsczu jest takie zwężenie W tym samym czasie równomiernie zamknąć 53-61-65-65-69-73 oczka (nie zamykać oczek ponad obszyciami przodów), kończyć przerabiając 2 oczka lewe, 2 oczka prawe, 2 oczka lewe, 2 oczka prawe, 2 oczka lewe, 2 oczka prawe i 2 oczka ściegiem francuskim = 173-185-197-221-233-257 oczek". Czy faktycznie sweter jest zwężany od dołu? I to samo jest przy rękawach. W jakim celu taki myk?
20.08.2025 - 06:49DROPS Design respondió:
Witaj Patrycjo, dzięki temu zabiegowi unikniesz widocznej różnicy szerokości między ściągaczem, a resztą robótki. Gdybyś tego nie zrobiła, to sweter miałby wygląd nieco retro, gdy ściągacz na dole był wyraźnie węższy niż body. Pozdrawiamy!
20.08.2025 - 08:08
![]() Knitterbee escribió:
Knitterbee escribió:
Hi! Is the first bottom hole knitted during the first ribbing section? If yes, the bottom hole would look differently than from the example photos? Or do I misunderstand something here? Thank you very much for answering the question and as well as the beautiful pattern!
28.05.2025 - 18:25DROPS Design respondió:
Dear Knitterbee, the first buttonhole is worked when the piece measures 6cm from the bottom, since the piece is worked from the bottom up. So you would cast off for the first/lowermost buttonhole right as you end the lower rib edge, which is exactly where it's placed if you check the zoomed out photo. Happy knitting!
31.05.2025 - 23:26
![]() Katie escribió:
Katie escribió:
Help! When I am binding off 13 stitches for the shawl collar, I wasn’t finished yet with the M1 pattern. So, when the instructions say “work 37 stitches for the right front piece, do I work those stitches in the color that I was supposed to be on in the pattern (which is my star color)? This seems weird as then my star color would be at my sleeve bind off rather than the main color. But if I use the main color, then the pattern is off.
25.05.2025 - 02:22DROPS Design respondió:
Dear Katie, you should continue the pattern while you decrease for the neck. Happy knitting!
25.05.2025 - 23:01
![]() Annica escribió:
Annica escribió:
Ska det minskas 65maskor (L) direkt efter byte till sticka nr5 efter mudden nedtill? Under hur många varv görs denna minskning? Enligt beskrivning ser det ut som det är på ett och samma varv alla dessa minskningar görs så att dey sedan blir 197 maskor (L) kvar. Tacksam för hjälp!
15.04.2025 - 07:39
|
||||||||||
Harald#haraldjacket |
||||||||||
 |
 |
|||||||||
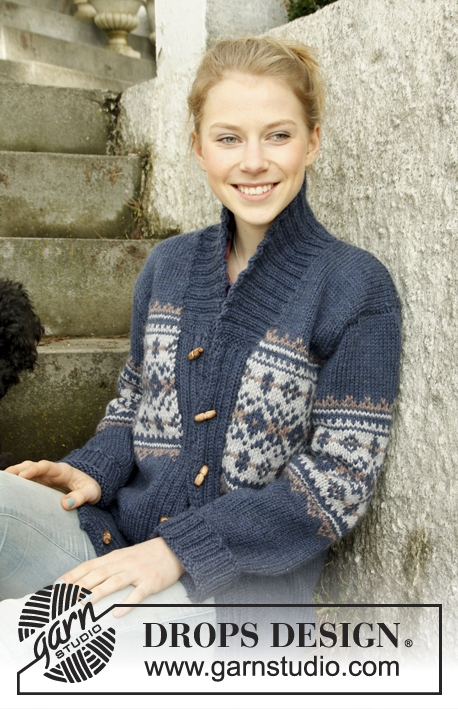
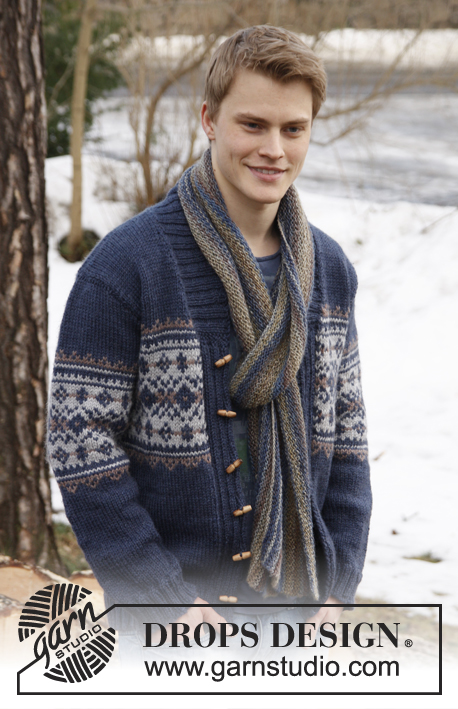
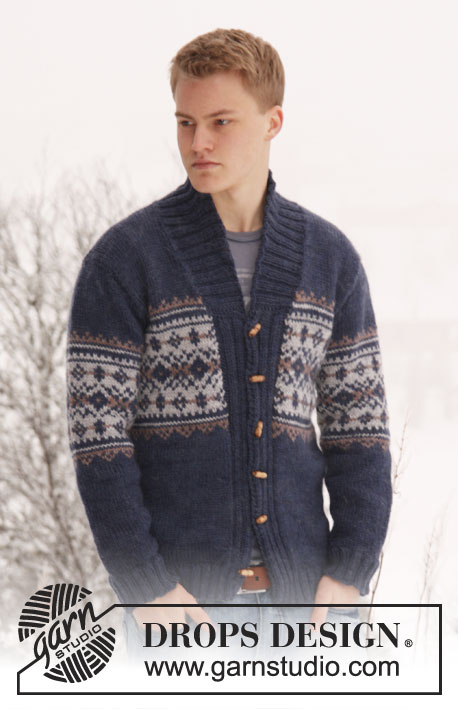
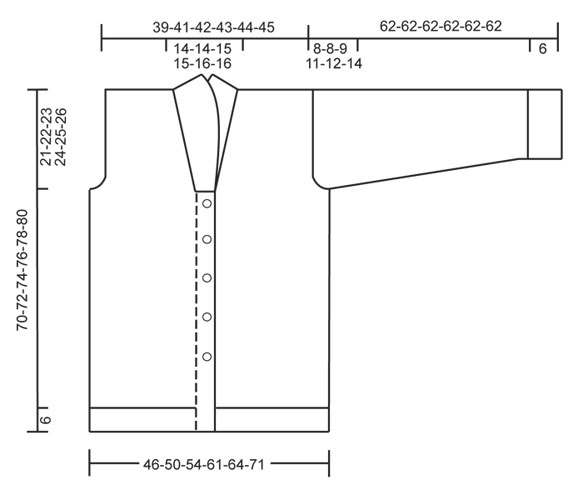
Cardigan DROPS para hombre, de punto, con jacquard y cuello chal en “Alaska”. Talla: S – XXXL.
DROPS Extra 0-813 |
||||||||||
|
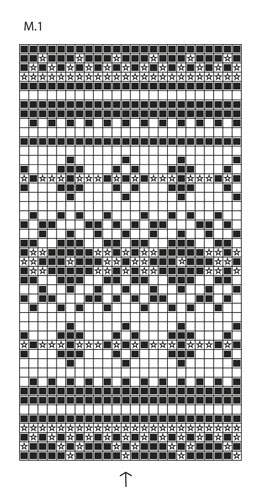
PT MUSGO (de ida y vuelta en la ag): Tejer todas las vtas de derecho. OJALES: Rem para los ojales en el borde izquierdo, todos los rem son hechos por el LD. 1 ojal = Tejer juntos de revés el 5º y 6º pt a partir del centro del frente y hacer 1 HEB (lazada). En la vta sig tejer la HEB retorcida de derecho. Rem para los ojales cuando la pieza mida: TALLA S: 6, 14, 23, 31, 40 y 48 cm. TALLA M: 6, 15, 24, 32, 41 y 49 cm. TALLA L: 6, 15, 24, 33, 42 y 50 cm. TALLA XL: 6, 13, 21, 28, 36, 43 y 51 cm. TALLA XXL: 7, 14, 22, 29, 37, 44 y 52 cm. TALLA XXXL: 7, 15, 22, 30, 37, 45 y 53 cm. PATRÓN: Ver diagrama M.1 – el diagrama muestra 2 repeticiones a lo ancho. Tejer todo el patrón en pt jersey. TIP PARA DISMINUCIÓN (aplica a la línea del escote del frente): Dism después/antes de 1 pt de orillo en pt musgo. Todas las dism son hechas por el LD. Dism después de 1 pt de orillo de la manera sig: Deslizar 1 pt de derecho, 1d, pasar el pt desl por encima. Dism antes de 1 pt de orillo de la manera sig: Tejer 2 pjd. CUERPO: Tejido de ida y vuelta en ag circular a partir del centro del frente. Mon 226-246-262-286-302-330 pts en ag circular tamaño 4 mm con azul oscuro Alaska. Tejer 1 vta de revés por el LR. Después tejer la vta sig, de la manera sig, por el LD: 2 pts de orillo en PT MUSGO – ver explicación arriba - * 2d/2r *, repetir de *a* hasta que resten 4 pts y terminar con 2d y 2 pts de orillo en PT MUSGO. Continuar el resorte de esta manera hasta que la pieza mida 6 cm. AL MISMO TIEMPO, cuando la pieza mida 6-6-6-6-7-7 cm, rem para los OJALES en el borde izquierdo – ver explicación arriba. Después del resorte, cambiar a ag circular tamaño 5 mm y tejer la vta sig, por el LD, de la manera sig: 2 pts en pt musgo, 2d, 2r, 2d, 2r, 2d, 2r (= 14 pts del borde), tejer en pt jersey hasta que resten 14 pts y, AL MISMO TIEMPO, dism 53-61-65-65-69-73 pts distribuidos equitativamente (no dism sobre los bordes), terminar con 2r, 2d, 2r, 2d, 2r, 2d y 2 pts en pt musgo = 173-185-197-221-233-257 pts. Insertar un marcapuntos (MP) a 47-50-53-59-62-68 pts de cada lado (= 79-85-91-103-109-121 pts entre los MP en la pieza de la espalda). Después tejer en pt jersey con 14 pts del borde en cada lado del centro del frente como antes. RECUERDE MANTENER LA MISMA TENSIÓN DE TEJIDO DE LA MUESTRA! Cuando la pieza mida 32-33-34-35-36-37 cm, tejer el diagrama M.1 de la manera sig: Tejer 14 pts del borde como antes con azul oscuro, tejer el diagrama M.1 hasta que resten 15 pts, tejer el 1er pt en el diagrama M.1 (de manera que el patrón empiece y termine de la misma manera en cada lado del borde) y terminar con 14 pts del borde en azul oscuro como antes. Cuando la pieza mida 49-50-51-52-53-54 cm, tejer la vta sig, por el LD, de la manera sig: Rem los primeros 13 pts, insertar un MP (este marca dónde empezar a levantar pts para el cuello), tejer 31-34-37-42-45-51 pts (= pieza del delantero derecho), rem 6-6-6-8-8-8 pts para la sisa, tejer 73-79-85-95-101-113 pts (= pieza de la espalda), rem 6-6-6-8-8-8 pts para la sisa y tejer el resto de la vta (= 44-47-50-55-58-64 pts en la pieza del delantero izquierdo). Virar y rem los primeros 13 pts, insertar un MP (este marca dónde terminar de levantar pts para el cuello), tejer el resto de la vta = 31-34-37-42-45-51 pts. Terminar cada parte por separado. ESPALDA: = 73-79-85-95-101-113 pts. Continuar el diagrama M.1 (cuando el diagrama M.1 ha sido tejido 1 vez verticalmente, continuar con azul oscuro hasta completar las medidas) – AL MISMO TIEMPO, rem para las sisas al inicio de cada vta, en cada lado: 3 pts 0-0-0-1-1-2 veces, 2 pts 1-1-2-2-3-4 veces y 1 pt 1-3-3-4-4-4 veces = 67-69-71-73-75-77 pts restantes en la ag. Cuando la pieza mida 68-70-72-74-76-78 cm, rem los 21-21-23-23-25-25 pts centrales para el escote. Ahora terminar cada hombro por separado. Continuar rem 1 pt en la vta sig a partir del escote = 22-23-23-24-24-25 pts restantes en el hombro. Rem cuando la pieza mida 70-72-74-76-78-80 cm. DELANTERO DERECHO: = 31-34-37-42-45-51 pts. Continuar el diagrama M.1 como lo hizo en la pieza de la espalda, con 1 pt de orillo en pt musgo del lado del centro del frente. AL MISMO TIEMPO, rem para la sisa en el lado como lo hizo en la pieza de la espalda. AL MISMO TIEMPO, cuando la pieza mida 50-51-52-53-54-55 cm, dism 1 pt en el lado del escote – VER TIP PARA DISMINUCIÓN! Repetir la dism en cada 4ª vta un total de 3-3-4-4-6-6 veces, y en cada 8ª vta un total de 3-3-3-3-2-2 veces. Después que todos los rem y dism estén hechos, restan 22-23-23-24-24-25 pts en el hombro. Rem cuando la pieza mida 70-72-74-76-78-80 cm. DELANTERO IZQUIERDO: Tejer como la pieza del delantero derecho, pero a la inversa. MANGA: Tejida en redondo en ag de doble punta, cambiar a ag circular cuando sea necesario. Mon 52-52-56-56-60-60 pts en ag de doble punta tamaño 4 mm con azul oscuro. Tejer 1 vta de derecho, después tejer resorte = 2d/2r. Cuando la pieza mida 6 cm, cambiar a ag de doble punta tamaño 5 mm. Tejer 1 vta de derecho y, AL MISMO TIEMPO, dism 11-9-11-11-13-13 pts distribuidos equitativamente = 41-43-45-45-47-47 pts. Insertar un MP al inicio de la vta (= centro de la parte de abajo de la manga). Después tejer en pt jersey. Cuando la pieza mida 7-7-7-7-9-10 cm, aum 1 pt en cada lado del MP del centro de la parte de abajo de la manga). Repetir los aum un total de 11-13-14-16-17-19 veces: Talla S: en cada 10ª vta, Talla M: Cada 8ª vta, Talla L: Cada 7ª vta, Talla XL: Cada 6ª vta, Talla XXL: Cada 5ª vta, y Talla XXXL: Cada 4ª vta = 63-69-73-77-81-85 pts. AL MISMO TIEMPO, cuando la pieza mida 30-30-29-27-26-24 cm, insertar un MP en el pt central en la vta (= centro en la parte más alta del hombro). Tejer el diagrama M.1 – NOTA: El pt marcado con una flecha en el diagrama debe ser el pt con MP del centro de la parte de arriba de la manga). Cuando el diagrama M.1 ha sido tejido 1 vez verticalmente, continuar con azul oscuro hasta completar las medidas. AL MISMO TIEMPO, cuando la pieza mida 54-54-53-51-50-48 cm (medidas más cortas en las tallas más grandes debido a copete de manga más largo y a una mayor anchura de hombros), rem 6-6-6-8-8-8 pts en el centro de la parte de abajo de la manga. Después tejer de ida y vuelta en la ag hasta completar las medidas. AL MISMO TIEMPO, rem para el copete de manga al inicio de cada vta, en cada lado: 2 pts 3-3-3-3-3-4 veces y 1 pt 2-2-2-4-4-5 veces. Después rem 2 pts en cada lado hasta que la pieza mida 61 cm en todas las tallas, después rem 3 pts 1 vez en cada lado. Rem los pts restantes, la pieza mide aprox 62 cm en todas las tallas. TERMINACIÓN: Hacer las costuras de los hombros. CUELLO CHAL: Levantar pts (a 1 pt del pt de orillo) en ag circular tamaño 4 mm con azul oscuro – empezar en el centro del frente en la pieza del delantero derecho. Levantar aprox 34 a 44 pts hasta el hombro, después 22 a 28 pts a lo largo del escote, y 34 a 44 pts descendiendo a lo largo de la pieza del delantero izquierdo hasta el MP = 90 a 116 pts. Tejer 1 vta de derecho por el LR y, AL MISMO TIEMPO, aum el número de pts a 126-130-138-142-150-154. Después tejer resorte de la manera sig (visto por el LD): 2 pts en pt musgo, * 2d, 2r *, repetir de *a* y terminar con 2d y 2 pts en pt musgo. Continuar de esta manera hasta que el cuello mida aprox 5 cm. Ahora aum 1 pt en cada una de las 12 secciones de reveses, visto por el LD (= escote de la espalda) = 138-142-150-154-162-166 pts. Después tejer derecho sobre derecho y revés sobre revés hasta que el cuello mida aprox 7 cm. Ahora tejer de la manera sig: Tejer 1 vta como antes y deslizar los primeros 10 pts tejidos en un gancho o seguro aux, virar la pieza, tejer el resto de la vta y deslizar los primeros 10 pts tejidos al inicio de la vta en otro gancho o seguro aux. Virar la pieza, tejer el resto de la vta y deslizar los primeros 10 pts tejidos al inicio de la vta en el primer gancho o seguro aux, virar la pieza, tejer el resto de la vta y deslizar los primeros 10 pts tejidos al inicio de la vta en el otro gancho o seguro aux. Continuar de esta manera hasta tener un total de 40 pts en los ganchos o seguros aux en cada lado. Después deslizar los pts de los ganchos o seguros aux de regreso en la ag y tejer 1 vta como antes sobre todos los 138-142-150-154-162-166 pts – NOTA: Para evitar que se formen agujeros en cada transición donde la pieza fue virada, deslizar la hebra delantera del pt sig retorcida en la ag y tejer junto con el primer pt en la ag. Rem con derecho sobre derecho y revés sobre revés. Asegurar el cuello prolijamente con puntadas en cada lado del borde – coser orilla con orilla para evitar que se forme una costura abultada. CONTINUACIÓN DE LA TERMINACIÓN: Coser las mangas y los botones. |
||||||||||
Explicaciones del diagrama |
||||||||||
|
||||||||||
 |
||||||||||
 |
||||||||||
¿Terminaste este patrón?Entonces, etiqueta tus fotos con #dropspattern #haraldjacket o envíalas a la galería #dropsfan. ¿Necesitas ayuda con este patrón?Encontrarás 28 videos tutoriales, un espacio para comentarios/preguntas y más visitando la página del patrón en garnstudio.com © 1982-2026 DROPS Design A/S. Todos los derechos reservados. Este documento, incluyendo todas sus sub-secciones, está protegido por los derechos de autor (copyright). Lee más acerca de lo que puedes hacer con nuestros patrones en la parte de abajo de cada patrón de nuestro sitio. |
||||||||||


Con más de 40 años en el diseño de modelos de punto y de ganchillo, DROPS Design ofrece una de las más vastas colecciones de patrones gratuitos en el internet - traducidos en 17 idiomas. Al día de hoy, contamos con 324 catálogos y 12290 patrones - de los cuales 11675 están traducidos en español.
Nosotros trabajamos con mucho esmero para brindarte lo mejor que las labores de punto y ganchillo tienen para ofrecer,inspiración y consejos, así como hilos de magnífica calidad a precios increíbles! Te gustaría usar nuestros patrones para otro fin además del uso personal? Puedes leer acerca de lo que estás permitida a hacer en el texto de Copyright en la parte de abajo de todos nuestros patrones. Felices labores!
Escribe un comentario sobre DROPS Extra 0-813
¡Nos encantaría saber qué piensas acerca de este patrón!
Si quieres escribir una pregunta referente al patrón, por favor asegúrate de elegir la categoría correcta en el formulario debajo, para acelerar el proceso de respuesta. Los campos obligatorios están marcados con un *.