
Categorías populares
¿Buscas un hilo?


Comentarios / Preguntas (24)
![]() Anna escribió:
Anna escribió:
Please ignore my previous question!
02.07.2025 - 18:46
![]() Anna escribió:
Anna escribió:
Do you have visual explanations for the following instructions: :Sew in outermost sts in moss st inside crochet border so that the crochet border is loose on the outside of seam:.
02.07.2025 - 18:16DROPS Design respondió:
Dear Anna, you can use this video to sew the pocket, just note that the seam shouldn't covert/ sewm the crochet edge that shouldn't be fixed to the dress, only the pocket should be sewn. Happy Assembly!
04.07.2025 - 11:46
![]() Anna escribió:
Anna escribió:
If we follow the instruction to cast off 6 stitches then work 60 and then cast off 6 stitches and then work 60: then the front piece would have 6 bound off stitches on one side and back piece would have 6 bound-off stitches on the other side. Wouldn't this create a form problem? Meaning that the front piece would have a gap on one side and the back piece on one side? Is what I am saying clear?
20.05.2025 - 17:53DROPS Design respondió:
Dear Anna, the round starts here 3 sts before the left side of dress, cast off the first 6 sts on the round for armhole, then work front piece (60 sts in total), then cast off the next 6 sts for armhole (right side of dress) and finish with stitches for back piece (60 sts in total); you have now 2 gaps, one on each side dividing front and back pieces. Finish each side separately back and forth on needle. Can this help? Or do I still misunderstand what you mean here?
21.05.2025 - 08:12
![]() Anna escribió:
Anna escribió:
If we follow the instruction to cast off 6 stitches then work 60 and then cast off 6 stitches and then work 60: the piece will not be even. Shouldn't we casting off on both sides? Can you explain that part? Thank you
20.05.2025 - 08:09DROPS Design respondió:
Dear Anna, in the first size you have 132 sts on the needle: cast off the first 6 sts for armhole, work 59 sts (= the remaining stitch on needle + the next 59 sts = 60 sts for front piece), cast off 6 sts for armhole, andn work the remaining stitches (= 59 sts + the remaining st on needle = 60), so that you get 6+60+6+60=132 sts. Happy knitting!
20.05.2025 - 10:28
![]() Anna escribió:
Anna escribió:
Hello, I want to make sure that I understand well the following instruction: "ROUND 1: * K 1, P 1 *, repeat from *-*. ROUND 2: K over P and P over K. Repeat 2nd round." So 1st round: K1 and P2; 2nd round: P over K and K over P; and there is a 3rd round where we repeat the previous round? Thank you!
18.05.2025 - 11:14DROPS Design respondió:
Dear Anna, it means that the next rounds after round 2 (so rounds 3, 4, 5, 6, e.t.c) will be worked as round 2; round 1 is only worked once. Happy knitting!
18.05.2025 - 13:07
![]() Gabriele Bohn escribió:
Gabriele Bohn escribió:
Wie viel Wolle brauche ich für die kleinste Grösse ? Danke für eine rasche Antwort
10.03.2025 - 09:40DROPS Design respondió:
Liebe Frau Bohn, die Garnmenge für jede Größe finden Sie oben unter Tab "Anleitung", dh in die kleinste Größe 300 g DROPS Merino Extra Fine/50 g das Knäuel = 6 Knäuel. Viel Spaß beim Stricken!
10.03.2025 - 10:35
![]() Petra escribió:
Petra escribió:
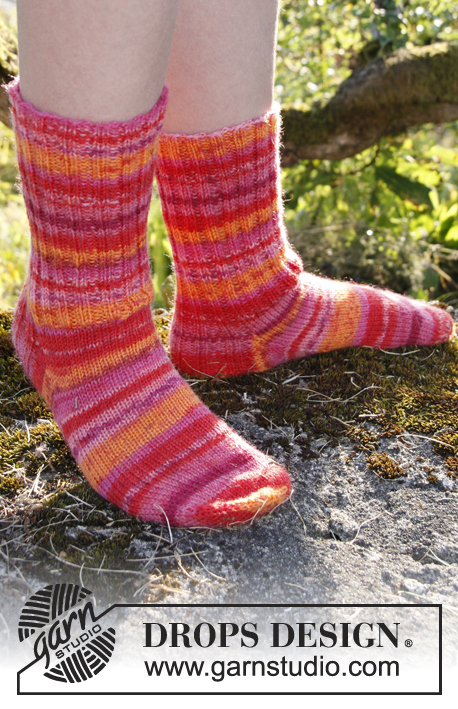
Liebes Drops-Team, mit welcher Wolle und Farbe wurde die Strickhose angefertigt, die das Mädchen zu. Kleid, Drops-Children 22-10, trägt? Ich freue mich auf Ihre Antwort. Schöne Grüße aus Xanten Petra Körbes
30.11.2021 - 10:26DROPS Design respondió:
Liebe Petra, die Strickhose wird mit DROPS Fabel Nr 310, sunset gestrickt - hier finden Sie die Anleitung. Viel Spaß beim stricken!
30.11.2021 - 16:40
![]() Cecilia escribió:
Cecilia escribió:
Divino patrón, muchas gracias. Lo hice en agujas rectas. Les agradezco si pueden dar las explicaciones para agujas rectas en otros patrones. Gracias!
16.11.2020 - 04:31
![]() Caja Harsdorf escribió:
Caja Harsdorf escribió:
Jeg har aldrig fået svar på mit spørgsmål. Det første svar var overhovedet ikke relevant, og det næste, har I ikke svaret på. Dårlig servece
18.09.2019 - 16:29
![]() Caja Harsdorf escribió:
Caja Harsdorf escribió:
Når jeg har brugt 100 gr. og kun har 9 cm. , kan jeg jo kun få strikket 45 cm, og skal strikke 49 inden jeg skal begynde at tage ind, så der vil da være en manko. Jeg har lavet strikkeprøve inden start, og den passede perfekt, så det er ikke der det er galt. Når I ser på mønstret, kan I så ikke regne ud, hvor meget jeg skal bruge mere. Med venlig hilsen Caja harsdorf
12.09.2019 - 20:54DROPS Design respondió:
Hej Caja, Vi har lagt et nøgle til i den største størrelse. God fornøjelse!
26.09.2019 - 15:57
|
|
Lyrah#lyrahdress |
|
 |
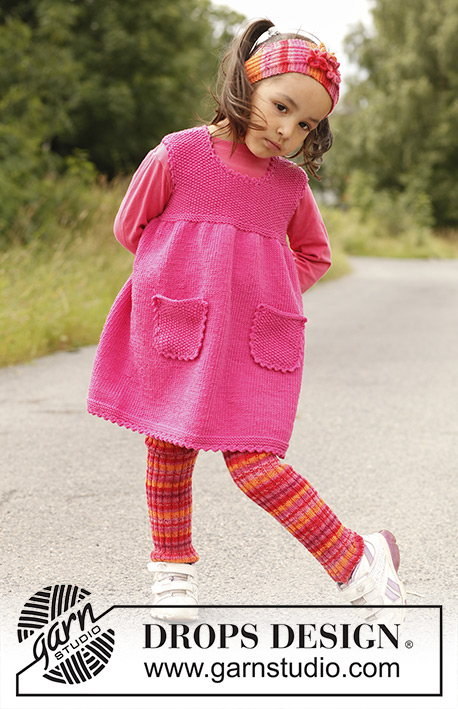 |
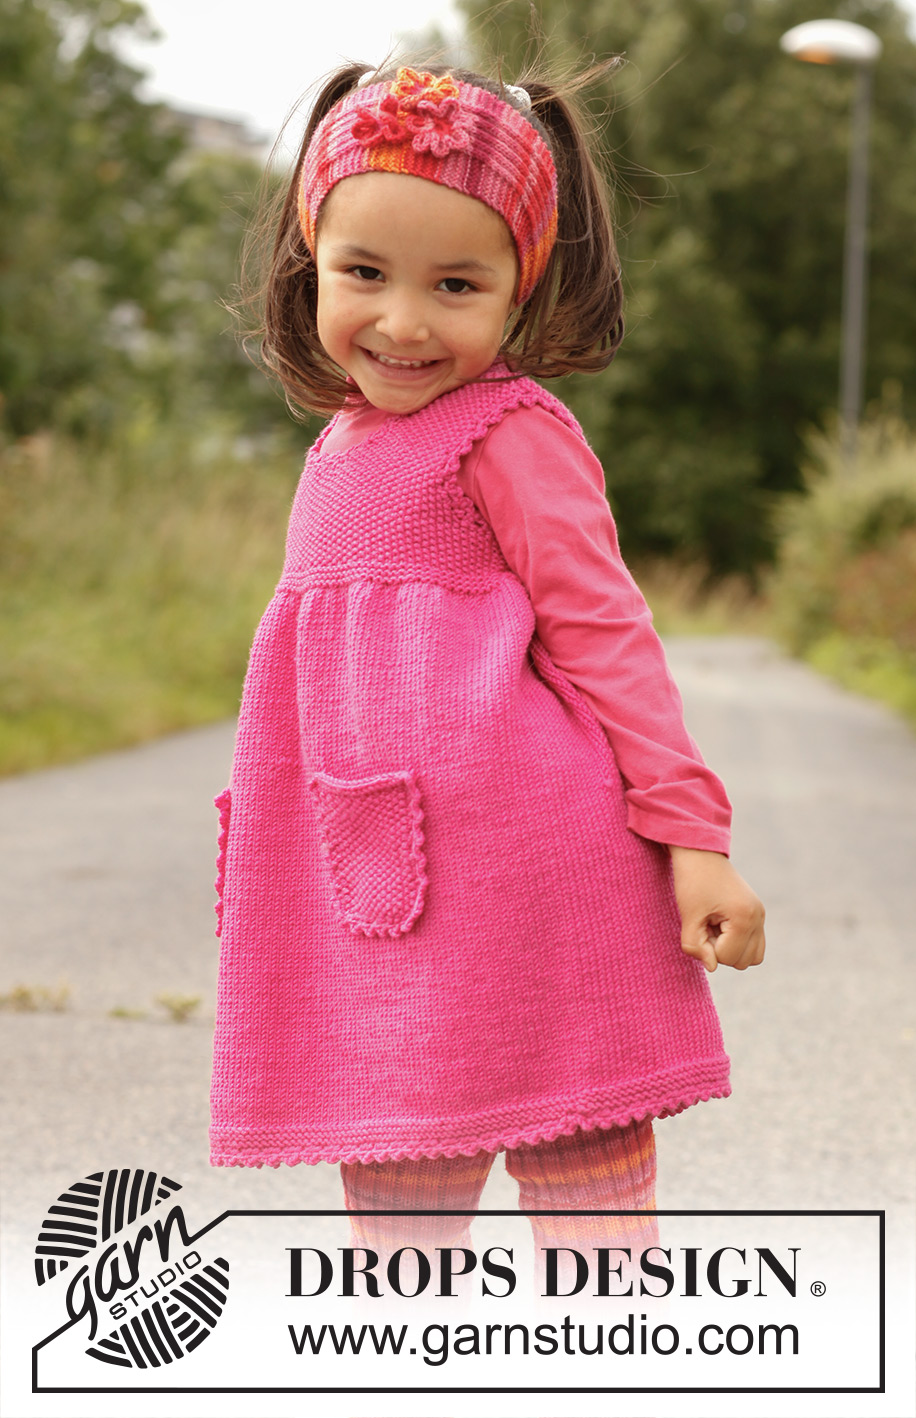
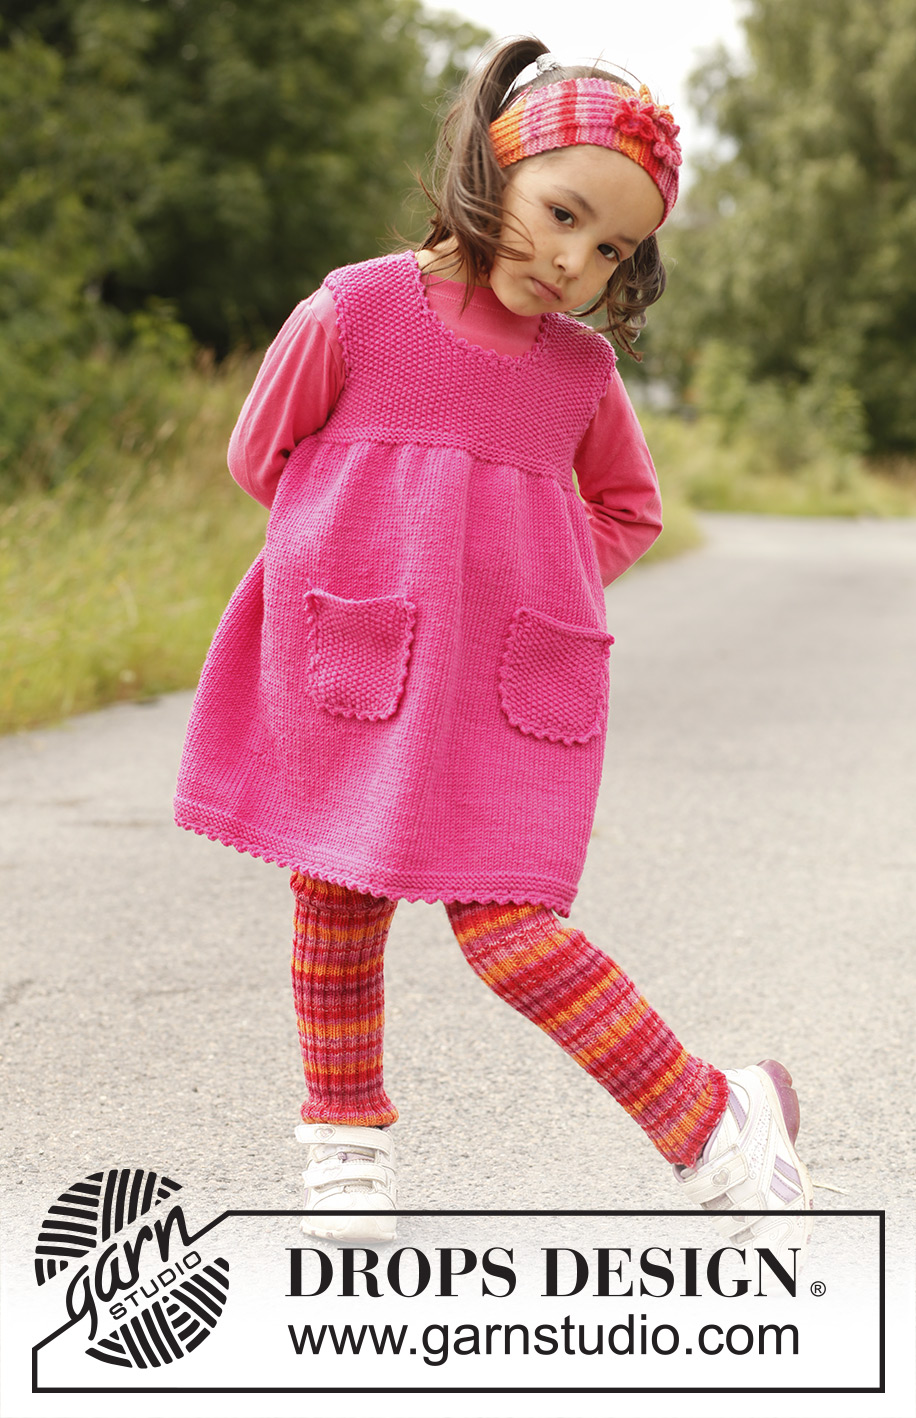
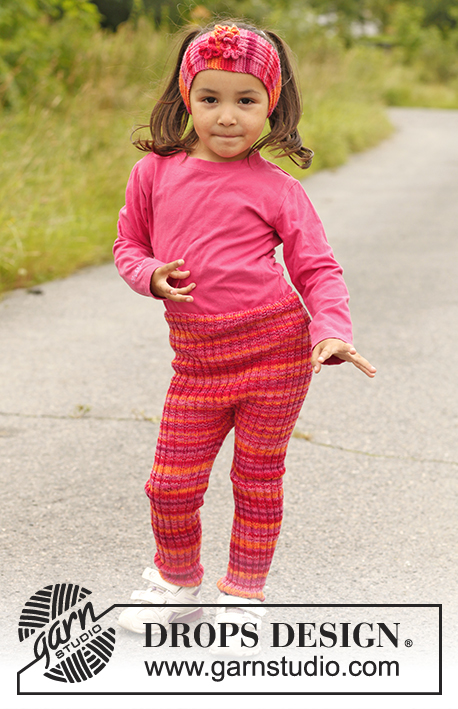
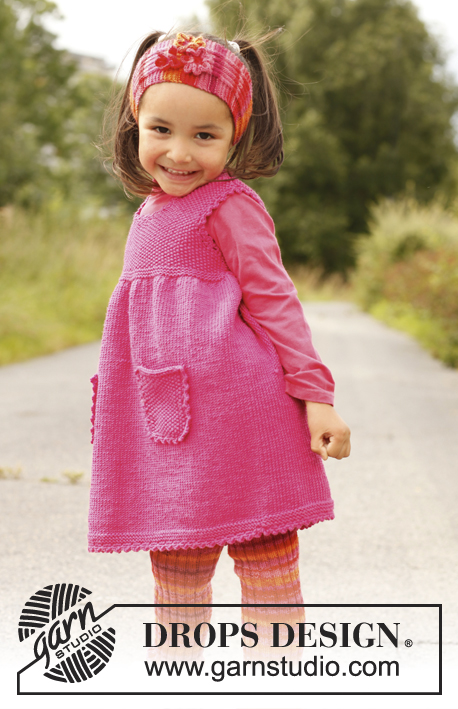
Túnica de punto en DROPS Merino Extra Fine, con bolsillos y pechera en punto de arroz. Tallas para niños, 3 a 12 años.
DROPS Children 22-10 |
|
|
PT ARROZ: VUELTA 1: * 1d, 1r *, repetir de *a*. VUELTA 2: derecho sobre revés y revés sobre derecho. Repetir la 2ª vta. ORILLA EN PICOT: Trabajar en ag de ganchillo tamaño 3.5 mm con Merino Extra Fine de la manera sig: 1 p.b. en el primer pt, * 3 cad, 1 p.a. en la primera cad, saltar 1 cm, asegurar con 1 p.b. *, repetir de *a*. Al trabajar en redondo, terminar con 1 p.bjs en el primer p.b. (en vez de trabajar el último p.b.). ------------------------------------------------------ CUERPO: Tejido en redondo, en ag circular. Mon 198-210-228-234-240 pts en ag circular tamaño 3.5 mm con Merino Extra Fine. Tejer 1 vta de derecho, 1 vta de revés, 1 vta de derecho, 1 vta de revés, 1 vta de derecho y 1 vta de revés. Cambiar a ag circular tamaño 4 mm y tejer en pt jersey. RECUERDE MANTENER LA MISMA TENSIÓN DE TEJIDO DE LA MUESTRA! Cuando la pieza mida 32-36-39-43-46 cm, tejer la vta sig de la manera sig: * 4d, 2 pjd *, repetir de *a* en toda la vta = 165-175-190-195-200 pts. Tejer la vta sig de la manera sig: * 3d, 2 pjd *, repetir de *a* = 132-140-152-156-160 pts. Cambiar a ag circular tamaño 3.5 mm. Tejer 1 vta de revés, 1 vta de derecho, 1 vta de revés, 1 vta de derecho y 1 vta de revés. Cambiar a ag circular tamaño 4 mm, tejer 1 vta de derecho, después tejer en PT ARROZ hasta completar las medidas – ver explicación arriba! AL MISMO TIEMPO, cuando la pieza mida 37-41-45-49-53 cm, tejer la vta sig de la manera sig: Rem 6 pts para la sisa, tejer 60-64-70-72-74 pts (= pieza del delantero), rem 6 pts para la sisa, tejer el resto de la vta (= pieza de la espalda). Terminar la pieza del delantero y espalda por separado. ESPALDA: = 60-64-70-72-74 pts. Continuar con pt arroz de ida y vuelta en la ag – AL MISMO TIEMPO, rem para las sisas al inicio de cada vta: 1 pt 4-4-5-5-5 veces en cada lado = 52-56-60-62-64 pts. Cuando la pieza mida 48-53-58-63-68 cm, rem los 18-20-24-26-28 pts centrales para el escote y terminar cada hombro por separado. Después, rem en cada vta a partir del escote: 1 pt 2 veces = 15-16-16-16-16 pts restantes en el hombro. Rem cuando la pieza mida 50-55-60-65-70 cm. DELANTERO: = 60-64-70-72-74 pts. Rem para las sisas como lo hizo en la pieza de la espalda. Cuando la pieza mida 41-45-49-53-57 cm, rem los 12-14-16-18-18 pts centrales para el escote y terminar cada hombro por separado. Después, rem en cada vta a partir del escote: 2 pts 1 vez y 1 pt 3-3-4-4-5 veces = 15-16-16-16-16 pts restantes en el hombro. Rem cuando la pieza mida 50-55-60-65-70 cm. BOLSILLO: Tejido de ida y vuelta, en ag circular. Mon 18-18-20-20-22 pts en ag circular tamaño 4 mm. Tejer en pt arroz por 9-9-10-10-11 cm. Después tejer 1 vta de derecho por el LD y 1 vta de derecho por el LR, después rem de derecho por el LD. Trabajar una ORILLA EN PICOT – ver explicación arriba, a lo largo de ambos lados y orilla inferior del bolsillo (no a lo largo de la orilla de rem). Tejer el otro bolsillo. TERMINACIÓN: Hacer las costuras de los hombros. Trabajar una ORILLA EN PICOT – ver explicación arriba, alrededor de las sisas, a lo largo de toda la línea del escote y en la parte de abajo del cuerpo. Colocar los bolsillos en la pieza del delantero, a aprox 12-13-14-15-16 cm de la orilla de montaje, con una separación de aprox 10-11-12-14-15 cm entre uno y otro bolsillo. Coser en los pts externos del pt arroz, junto a la orilla en ganchillo, para que la orilla en ganchillo quede suelta en la parte externa de la costura. |
|
 |
|
¿Terminaste este patrón?Entonces, etiqueta tus fotos con #dropspattern #lyrahdress o envíalas a la galería #dropsfan. ¿Necesitas ayuda con este patrón?Encontrarás 12 videos tutoriales, un espacio para comentarios/preguntas y más visitando la página del patrón en garnstudio.com © 1982-2026 DROPS Design A/S. Todos los derechos reservados. Este documento, incluyendo todas sus sub-secciones, está protegido por los derechos de autor (copyright). Lee más acerca de lo que puedes hacer con nuestros patrones en la parte de abajo de cada patrón de nuestro sitio. |
|


Con más de 40 años en el diseño de modelos de punto y de ganchillo, DROPS Design ofrece una de las más vastas colecciones de patrones gratuitos en el internet - traducidos en 17 idiomas. Al día de hoy, contamos con 324 catálogos y 12290 patrones - de los cuales 11675 están traducidos en español.
Nosotros trabajamos con mucho esmero para brindarte lo mejor que las labores de punto y ganchillo tienen para ofrecer,inspiración y consejos, así como hilos de magnífica calidad a precios increíbles! Te gustaría usar nuestros patrones para otro fin además del uso personal? Puedes leer acerca de lo que estás permitida a hacer en el texto de Copyright en la parte de abajo de todos nuestros patrones. Felices labores!
Escribe un comentario sobre DROPS Children 22-10
¡Nos encantaría saber qué piensas acerca de este patrón!
Si quieres escribir una pregunta referente al patrón, por favor asegúrate de elegir la categoría correcta en el formulario debajo, para acelerar el proceso de respuesta. Los campos obligatorios están marcados con un *.