
Categorías populares
¿Buscas un hilo?


Comentarios / Preguntas (63)
Jackie escribió:
Should I cast on with a provisional cast on?
12.12.2015 - 16:42DROPS Design respondió:
Dear Jackie, for the head band you can cast on with a provisionnal cast on or follow the pattern and graft tog cast on and cast off row. Happy knitting!
14.12.2015 - 09:52
![]() Annette C escribió:
Annette C escribió:
Drops youtube videos have no sound!
10.12.2015 - 17:19DROPS Design respondió:
Dear Annette, Our videos do not have sound. We are a worldwide company and our videos are watched by people around the world, speaking different languages, many of whom do not understand English. We have therefore written instructions to accompany this video, and there is no sound to disturb while watching. Enjoy!
10.12.2015 - 18:22
![]() Annette F escribió:
Annette F escribió:
I love the headband but working the English Rib on the Circular Needles is soon frustrating!!! I have thrown away yards and yards of yarn and am starting from scratch - yet again - for the FIFTH time! I finally made it to the 5th row on the last try before finding a stick 'missing' or an extra one somehow 'appearing' - Grrrrr.... :-( I'm nothing if not determined!! :-/
28.11.2015 - 07:10DROPS Design respondió:
Dear Annette, the headband is worked flat (= in rows) while neckwarmer is worked in the round. See tab "Videos" to watch how to work english rib either in the round or back and forth. Happy knitting!
30.11.2015 - 11:23
![]() Mary Durst escribió:
Mary Durst escribió:
What is the difference between K 2 tog and K tog YO and slipped st?
26.08.2014 - 20:09DROPS Design respondió:
Dear Mrs Durst, when you K2 tog, you knit 2 sts together - when you K tog YO and slipped st, you work together the YO made on previous row over the st slipped on previous row. see videos for both videos "Fishermans rib" or "Fishermans rib in the round" under tab "videos". Happy knitting!
27.08.2014 - 09:40
![]() Jette Hoffmann escribió:
Jette Hoffmann escribió:
Der er i allerhøjeste grad en graverende fejl. Jeg har strikket den nu og strikkefastheden holder, men den måler kun 41 cm i omkreds. Der mangler MINDST 15 masker i Jeres opskrift. Meget meget ærgeligt.. Jeg undrede mig også over, at jeg ikke kunne må maskerne til at nå rundt på rundpind 60 cm, så det endte med at jeg strikkede "halsedissen" frem og tilbage på en rundpind.. De bedste julehilsner fra Jette Hoffmann Frederikssund
21.12.2013 - 18:31DROPS Design respondió:
Hej Jette. Hvis din strikkefasthed er korrekt (= 7 m per 10 cm) og du har 38 masker, så passer omkredsen også: 38/7 x 10 = 54 cm. God jul til dig også :-)
22.12.2013 - 14:16
![]() Susan escribió:
Susan escribió:
I am making the headband but it appears to be thinner by one 'row/section' - the model has 4 sections and mine has 3. I'm working with 10 stitches per the pattern but is the model's wider version done with 13 or 14 to repeat * to * 3 time?
27.11.2013 - 13:49DROPS Design respondió:
Dear Susan, to work with 4 V sts from RS would require to cast on 13 sts and more than 1 skein - pattern has been written so that just 1 skein is enough. Happy knitting!
05.12.2013 - 20:55
![]() Terrie escribió:
Terrie escribió:
Could you send me a list of how much yard I would need for both head band and scarf also what needles I will need and anything else. I use to do a little knitting many years ago and now my granddaughter wants this so I am going to try
26.11.2013 - 03:39DROPS Design respondió:
Dear Terrie, you will find all required materials (yarn and needles) under the tab "materials" on the right side of the picture, ie 100 g for headband and 300 g for neckwarmer. Happy knitting!
26.11.2013 - 09:26
![]() Kühner Katja escribió:
Kühner Katja escribió:
Guten Morgen, ich glaube hier liegt ein Fehler vor. Die Anleitung passt von dem Muster nicht zum Bild, und der Farbwechsel in der Beschreibung deutet auch darauf hin. Viele Grüße
15.11.2013 - 07:57DROPS Design respondió:
Guten Tag Frau Kühner, es ist die richtige Anleitung zum Bild. Es heisst auch nicht Farbwechsel sondern Fadenwechsel: dort wird beschreiben, wie Sie möglichst unsichtbar ein neues Knäuel Wolle ansetzen.
15.11.2013 - 09:47
![]() Inge escribió:
Inge escribió:
Kann es sein, dass bei der Anleitung "Stirnband" der Rest fehlt? Lg von Inge
18.10.2013 - 19:18DROPS Design respondió:
Liebe Inge, ja das stimmt. Wir haben den Rest nun ergänzt.
21.10.2013 - 08:30
![]() El escribió:
El escribió:
DROPS 134-53 DROPS design: Model nr. PO-044-045 Bij de laatste toer van de hoofband voordat je aan het afkanten begint kom ik op 7st uit waardoor het eind iets smaller is dan het begin. Klop dit?
28.03.2013 - 16:40DROPS Design respondió:
Nee, dat klopt niet. Het aantal st moet gelijk blijven.
03.05.2013 - 16:49
|
|
Bold and Beautiful#boldandbeautifulset |
|
 |
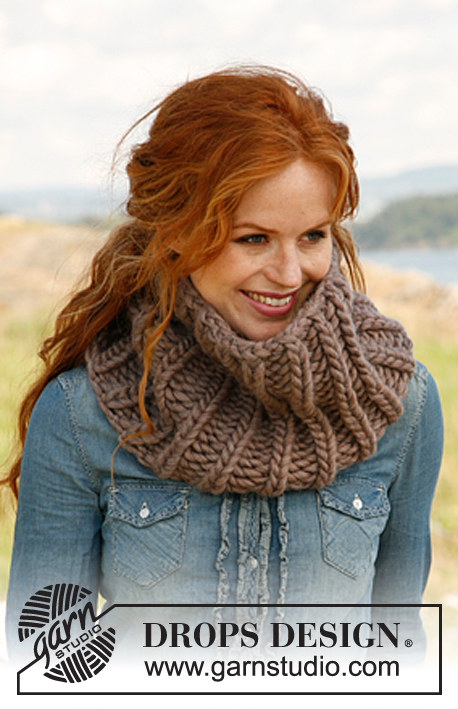 |
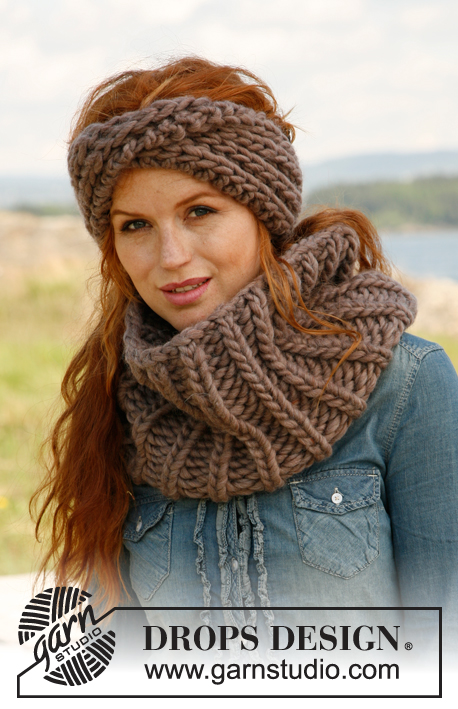
Banda para la cabeza y calentador de cuello DROPS tejidos en punto inglés en “Polaris”.
DROPS 134-53 |
|
|
PUNTO INGLÉS (de ida y vuelta en la ag): VUELTA 1: 1 pt en pt musgo, * 2 pjd, 1 HEB (lazada), desl 1 pt de revés *, repetir de *a* hasta 3 pts restantes, terminar con 2 pjd y 1 pt en pt musgo. VUELTA 2: 1 pt en pt musgo, * 1 HEB, desl 1 pt de revés, tejer juntos de derecho la HEB y el pt desl *, repetir de *a* un total de 2 veces, terminar con 1 HEB, desl 1 pt de revés, 1 pt en pt musgo. VUELTA 3: 1 pt en pt musgo, * tejer juntos de derecho la HEB y el pt desl, 1 HEB, desl 1 pt de revés *, repetir de *a* hasta 3 pts restantes, tejer juntos de derecho la HEB y el pt desl, 1 pt en pt musgo. Repetir la 2ª y 3ª vuelta. PUNTO INGLÉS (en redondo, en ag circular): VUELTA 1: * 1 HEB, desl 1 pt de revés, 1d *, repetir de *a*. VUELTA 2: * tejer juntos de revés la HEB y el pt desl, 1 HEB, desl 1 pt de revés *, repetir de *a*. VUELTA 3: * 1 HEB, desl 1 pt de revés, tejer juntos de derecho la HEB y el pt desl *, repetir de *a*. Repetir la 2ª y 3ª vta. TIP PARA CAMBIAR DE OVILLO DE LANA: Para cambiar de ovillo con Polaris, separar el hilo en uso en dos en los últimos 15 cm – cortar una de las partes, hacer lo mismo con el hilo del nuevo ovillo. Colocar los primeros y los últimos 15 cm, uno encima del otro, para que el hilo tenga una espesura normal y continuar tejiendo – esto se hace para obtener un cambio de hilos invisible. ------------------------------------------------------ BANDA PARA LA CABEZA: Mon 10 pts en ag tamaño 12 mm con Polaris. Tejer PUNTO INGLÉS de ida y vuelta en la ag – ver explicación arriba. Recuerde el TIP PARA CAMBIAR DE OVILLO DE LANA! Cuando la pieza mida aprox 55 cm (o el largo deseado) – terminar después de la 3ª vta en punto inglés – tejer la vta sig de la manera sig: 1 pt en pt musgo, * 1r, tejer juntos de derecho la HEB y el pt desl *, repetir de *a* hasta 2 pts restantes, terminar con 1r y 1 pt en pt musgo. Rem pts derecho sobre derecho y revés sobre revés. Retorcer la pieza una vez y unir con una costura en el centro posterior con puntadas prolijas para obtener una costura invisible. Hacer algunos puntos de costura en el centro del frente para fijar la torsión en la banda para la cabeza. CALENTADOR DE CUELLO: Tejer en redondo, en ag circular. Mon 38 pts en ag circular tamaño 12 mm con Polaris. Tejer en PUNTO INGLÉS en redondo, en ag circular – ver explicación arriba – hasta que la pieza mida aprox 30 cm. Terminar después de la 2ª vta en punto inglés – tejer la vta sig de la manera sig: 1d, * tejer juntos de derecho la HEB y el pt desl, 1r *, repetir de *a* hasta 1 pt restante, terminar con 1d. Después rem pts derecho sobre derecho y revés sobre revés. |
|
¿Terminaste este patrón?Entonces, etiqueta tus fotos con #dropspattern #boldandbeautifulset o envíalas a la galería #dropsfan. ¿Necesitas ayuda con este patrón?Encontrarás 10 videos tutoriales, un espacio para comentarios/preguntas y más visitando la página del patrón en garnstudio.com © 1982-2026 DROPS Design A/S. Todos los derechos reservados. Este documento, incluyendo todas sus sub-secciones, está protegido por los derechos de autor (copyright). Lee más acerca de lo que puedes hacer con nuestros patrones en la parte de abajo de cada patrón de nuestro sitio. |
|


Con más de 40 años en el diseño de modelos de punto y de ganchillo, DROPS Design ofrece una de las más vastas colecciones de patrones gratuitos en el internet - traducidos en 17 idiomas. Al día de hoy, contamos con 324 catálogos y 12284 patrones - de los cuales 11664 están traducidos en español.
Nosotros trabajamos con mucho esmero para brindarte lo mejor que las labores de punto y ganchillo tienen para ofrecer,inspiración y consejos, así como hilos de magnífica calidad a precios increíbles! Te gustaría usar nuestros patrones para otro fin además del uso personal? Puedes leer acerca de lo que estás permitida a hacer en el texto de Copyright en la parte de abajo de todos nuestros patrones. Felices labores!
Escribe un comentario sobre DROPS 134-53
¡Nos encantaría saber qué piensas acerca de este patrón!
Si quieres escribir una pregunta referente al patrón, por favor asegúrate de elegir la categoría correcta en el formulario debajo, para acelerar el proceso de respuesta. Los campos obligatorios están marcados con un *.