
Categorías populares
¿Buscas un hilo?


Comentarios / Preguntas (135)
![]() Camilla escribió:
Camilla escribió:
I give up! I am quite experienced knitter, this is the first time i give up
24.04.2026 - 22:30
![]() Camilla escribió:
Camilla escribió:
Jag har läst mönstret så här: varv 1 från höger till vänster, varv två från vänster till höger. Har för mig att det stod så i en kommentar, men varven kanske alltid ska läsas från hö - vä? Lite lurigt då mitten ändå blir ✅
24.04.2026 - 17:18DROPS Design respondió:
Hei Camilla. Ja, man leser et strikkediagram motsatt av slik man normalt leser: Fra høyre mot venstre, nedenfra og opp. Du begynner altså nederst i det høyre hjørnet, og jobber deg mot venstre og oppover. mvh DROPS Design
27.04.2026 - 10:51
![]() Camilla escribió:
Camilla escribió:
Är inte mönstret fel på aviga varven med att man ska FÖRST göra omslag sedan sticka ihop två rm i bakre maskbågen, borde man inte göra som på räta varv först sticka ihop, SEN omslag, resultatet ser konstigt ut på den sidan, blir inte lika snygga ”hål” på mönstrets vänstra sida jämfört med högra
24.04.2026 - 17:14DROPS Design respondió:
Hei Camilla. Skjønner hva du mener, men på denne oppskriften er det skrevet/tegnet slik. Det er ikke feil, men om du ønsker å forandre det slik du mener blir penere, må du gjerne gjøre det. mvh DROPS Design
27.04.2026 - 10:15
![]() Gillian escribió:
Gillian escribió:
I have completed the first row of the chart (23 sts) and knitted remaining sts to the end of the row. Do i have to knit another row ? if not how do i get back to the 23st to do the second row?
14.04.2026 - 18:03
![]() Gillian escribió:
Gillian escribió:
I have completed the first row of the chart (23 sts) and knitted remaining sts to the end of the row. Do i have to knit another row ? if not how do i get back to the 23st to do the second row?
14.04.2026 - 15:51DROPS Design respondió:
Dear Gillian, short rows start from the first row M.1, starting from the right side work 30 to 47 sts (see size) - with the first 23 sts as shown in M.1 and the remaining sts in garter stitch, turn and work garter stitch and 2nd row M.1 (read diagram from the left towards the right), turn work 46-70 sts with 3rd row M.1 and knit remaining sts, turn and knit + work 4th row M.1, turn and continue short rows as stated for the size continuing M.1 and knitting remaining sts. Happy knitting!
15.04.2026 - 07:36
![]() Gillian escribió:
Gillian escribió:
Can you tell me what 1 YO between 2 sts mean
14.04.2026 - 15:25DROPS Design respondió:
Dear Gillian, work the previous stitch as shown in diagram, make 1 yarn over then work the next stitch as shown in diagram = you have worked 1 yarn over between 2 stitches. On first row M.1 eg, work: K3, YO, K2 tog, P2, YO, slip 1, K1, psso, K5, K2 tog, YO,l P2, K1, YO, K2 tog, K2. Happy knitting!
14.04.2026 - 15:43
![]() Inge Glarborg escribió:
Inge Glarborg escribió:
Jeg for ikke det samme hulmønster frem på hver side af trekanterne, altså de første og sidste 5 masker, når jeg strikker M1, som det ser ud på fotoet
12.04.2026 - 22:19DROPS Design respondió:
Hei Inge. Om man følger diagrammet skal man få det hullmønstret man ser på bildet. Husk at bildet viser diagrammet loddrett, mens selve diagrammet ligger vannrett (jakken strikkes sidelengs). Men hvordan blir ditt mønster? mvh DROPS Design
13.04.2026 - 14:49
![]() Sibylle escribió:
Sibylle escribió:
Meine Frage ist leider noch nicht beantwortet. Das Muster wird doch nicht am unteren Rand begonnen. Die Blende besteht aus 4 Krausrippen. Dann beginnt das Muster. Doch nicht direkt am unteren Rand?
09.02.2026 - 19:57DROPS Design respondió:
Liebe Sibylle, Sie stricken tatsächlich die ersten 23 Maschen gemäß Diagramm, dabei werden ja auch ein paar Maschen am Anfang des Diagramms kraus rechts gestrickt. Die Löcher (nach der 3. Masche im Diagramm) sind am unteren Rand nicht gut erkennbar, das liegt aber an der Fotoaufnahme bzw. daran, dass die Jacke genau an der Stelle etwas geknickt liegt. An der anderen Seite des mittleren Musters können Sie die Löcher gut erkennen.
18.02.2026 - 20:18
![]() Sibylle escribió:
Sibylle escribió:
Laut Beschreibung wird das Muster direkt am Rand begonnen. Laut Bild aber nicht.
08.02.2026 - 17:06DROPS Design respondió:
Liebe Sibylle, auch laut Beschreibung stricken Sie zuerst 4 Krausrippen, dann kommt erst das Muster. Sie stricken die vordere Blende also zuerst und dann geht es mit dem Muster weiter. Viel Spaß beim Stricken!
09.02.2026 - 08:38
![]() Lucia Nardella escribió:
Lucia Nardella escribió:
Se il diagramma M1 mostra come lavorare le maglie sul diritto del lavoro dove indica cone lavorare il rovescio quando necessario?
21.10.2025 - 13:47DROPS Design respondió:
Buonasera Lucia, i diagrammi mostrano tutti i ferri del lavoro, anche quelli lavorati sul rovescio. Buon lavoro!
21.10.2025 - 17:53
|
||||||||||||||||||||||
DROPS Baby 20-12 |
||||||||||||||||||||||
 |
 |
|||||||||||||||||||||
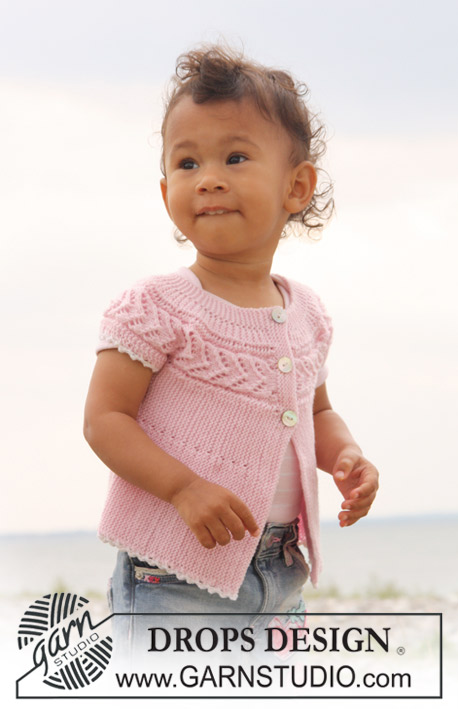
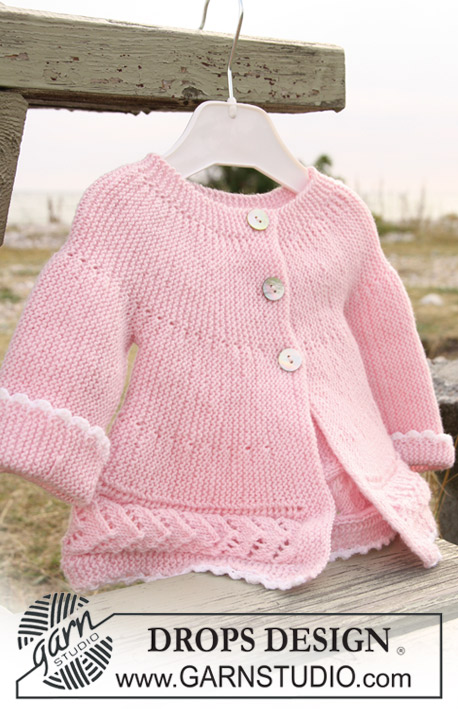
Chaqueta tejida de lado a lado en punto musgo con patrón de calados para bebé y niños en DROPS BabyMerino
DROPS Baby 20-12 |
||||||||||||||||||||||
|
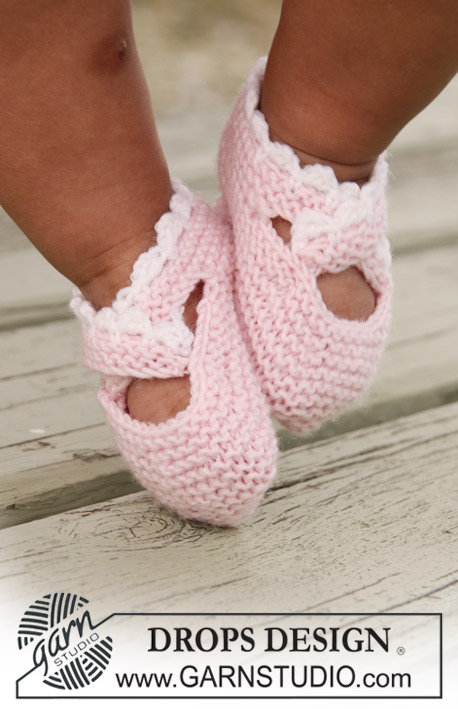
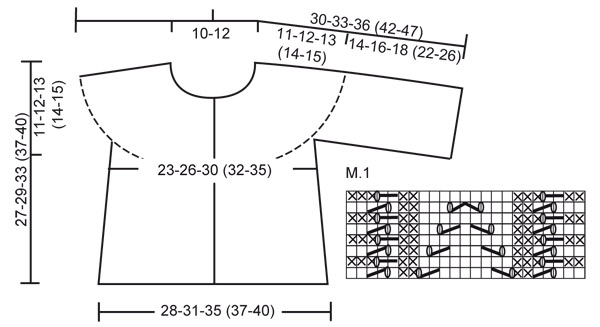
CHAQUETA: PATRÓN:Ver el diagrama M.1. El diagrama muestra el patrón por el LD. TIP PARA LA ELABORACIÓN DEL TRABAJO: Cuando se gira en el centro de la labor, desl el primer pt como del derecho, tensar el hilo y continuar como antes, esto permite evitar hacer un agujero en la transición. ------------------------------------------------------------------------------- CHAQUETA: Comenzar en el delantero izquierdo, trabajar hacia la manga, la espalda, la otra manga y finalizar en el delantero derecho. Mont flojo 62-68-78 (88-96) pts en ag tamaño 2.5 mm con Baby Merino y trabajar 8 filas del derecho para la cenefa (la primera fila = el LD). Trabajar la sig fila como sigue por el LD: trabajar los primeros 15 pts de derecho, AL MISMO TIEMPO aum 8 pts repartidos ( aum 1 pt haciendo 1HEB (lazada)), trabajar de derecho el resto de los pts de la ag = 70-76-86 (96-104) pts. Trabajar 1 fila de derecho por el LR en todos los pts, trabajar la HEB como pt retorcido para evitar que se formen agujeros. Continuar como sigue: Trabajar los primeros 23 pts en la ag con M.1, y de derecho el resto de pts en cada fila. AL MISMO TIEMPO trabajar las filas acortadas como sigue - ver TIP PARA LA ELABORACIÓN DEL TRABAJO: *trabajar los primeros 30-32-38 (42-47) pts, girar la labor y trabajar la fila de vta, trabajar los primeros 46-50-57 (65-70) pts, girar la labor y trabajar la fila de vta, trabajar los primeros 64-70-80 (90-98) pts, girar la labor y trabajar la fila de vta, trabajar los 70-76-86 (96-104) pts, girar la labor y trabajar la fila de vta*, repetir de * a * hasta que la labor mida aprox 16-17.5-19.5 (20.5-22) cm desde la fila de montaje ( medir justo antes del 1er giro, es decir , sobre M.1). Cortar el hilo. Ahora desl los primeros 41-45-52 (60-65) pts hacia el borde inferior a un gancho aux ( = el lado). Mont 36-42-46 (60-70) pts nuevos sobre los pts en el gancho aux (es decir antes de los 29-31-34 (36-39) pts que quedan en la ag.) para la manga y ahora continuar como sigue ( la primera fila = el LD): *trabajar los primeros 41-47-51 (65-75) pts, girar la labor y trabajar la fila de vta, trabajar los primeros 59-67-74 (90-103) pts, girar la labor y trabajar la fila de vta, trabajar todos los 65-73-80 (96-109) pts, girar la labor y trabajar la fila de vta*. Repetir de * a *. Cuando la labor mida 16-17-18 (18-20) cm desde la fila de montaje de los pts para la manga ( medir por el sitio más ancho, es decir a lo largo del borde inferior) cerrar 36-42-46 (60-70) pts desde el borde de la manga hacia al cuerpo. Cortar el hilo. Desl los 41-45-52 (60-65) pts del gancho aux del lateral de vta a la ag e insertar un marcapuntos (MP) en la labor. Continuar desde el borde inferior del cuerpo como antes de * a * como se describe para el delantero ( la primera fila = por el LD). Cuando la labor mida 28-31-35 (37-40) cm desde el MP (medir justo antes del primer giro, es decir sobre M.1) cortar el hilo. Desl los primeros 41-45-52 (60-65) pts hacia el borde inferior a un gancho aux (=lado). Mont 36-42-46 (60-70) pts nuevos sobre los pts en el gancho aux (es decir antes de los 29-31-34 (36-39) pts que quedan en la ag.) para la manga y ahora continuar como antes de * a *, como se describe para la otra manga. Cuando la manga mida lo mismo que la manga izquierda cerrar 36-42-46 (60-70) pts desde el borde de la manga hacia el cuerpo. Cortar el hilo. Desl los 41-45-52 (60-65) pts del gancho aux del lateral de vta a la ag y continuar desde el borde inferior del cuerpo como antes de * a *, como se describe para el delantero ( la primera fila = por el LD). Cuando el delantero derecho mida lo mismo que el delantero izquierdo (menos la cenefa) trabajar la sig fila por el LD como sigue: trabajar de derecho los primeros 23 pts, AL MISMO TIEMPO dism 8 pts repartidos (dism 1 pt trabajando 2 pjd) y de derecho los 47-53-63 (73-81) pts que quedan en la fila = 62-68-78 (88-96) pts. Ahora trabajar la cenefa como sigue ( la primera fila = por el LR): trabajar 3 filas de derecho en todos los pts, en la sig fila por el LD hacer 3 ojales como sigue(desde el borde inferior hacia el escote): Trabajar 41-45-53 (61-65) pts de derecho, 1 HEB, 2 pjd, 7-8-9 (10-12) pts de derecho, 1 HEB, 2 pjd, 7-8-9 (10-12) pts de derecho, 1 HEB, 2 pjd y finalizar con 1 d. Girar la labor y trabajar todos los pts de la fila del derecho. Ahora trabajar 5 filas de derecho en todos los pts y rem flojo por el LD. TERMINACIÓN: Coser bajo las mangas, borde con borde. Coser los botones. REMATE A GANCHILLO: Trabajar el remate a lo largo del borde inferior con ag de ganchillo tamaño 3 mm y color blanco como sigue: 1 p.b., *3 p.de cad., 1 p.a. en el primero de los 3 p.de cad., saltar aprox 1 cm, 1 p.b.*, repetir de *a*. Trabajar un remate similar alrededor de ambas mangas. |
||||||||||||||||||||||
Explicaciones del diagrama |
||||||||||||||||||||||
|
||||||||||||||||||||||
 |
||||||||||||||||||||||
¿Terminaste este patrón?Entonces, etiqueta tus fotos con #dropspattern o envíalas a la galería #dropsfan. ¿Necesitas ayuda con este patrón?Encontrarás 16 videos tutoriales, un espacio para comentarios/preguntas y más visitando la página del patrón en garnstudio.com © 1982-2026 DROPS Design A/S. Todos los derechos reservados. Este documento, incluyendo todas sus sub-secciones, está protegido por los derechos de autor (copyright). Lee más acerca de lo que puedes hacer con nuestros patrones en la parte de abajo de cada patrón de nuestro sitio. |
||||||||||||||||||||||


Con más de 40 años en el diseño de modelos de punto y de ganchillo, DROPS Design ofrece una de las más vastas colecciones de patrones gratuitos en el internet - traducidos en 17 idiomas. Al día de hoy, contamos con 324 catálogos y 12290 patrones - de los cuales 11685 están traducidos en español.
Nosotros trabajamos con mucho esmero para brindarte lo mejor que las labores de punto y ganchillo tienen para ofrecer,inspiración y consejos, así como hilos de magnífica calidad a precios increíbles! Te gustaría usar nuestros patrones para otro fin además del uso personal? Puedes leer acerca de lo que estás permitida a hacer en el texto de Copyright en la parte de abajo de todos nuestros patrones. Felices labores!
Escribe un comentario sobre DROPS Baby 20-12
¡Nos encantaría saber qué piensas acerca de este patrón!
Si quieres escribir una pregunta referente al patrón, por favor asegúrate de elegir la categoría correcta en el formulario debajo, para acelerar el proceso de respuesta. Los campos obligatorios están marcados con un *.