
Categorías populares
¿Buscas un hilo?


Comentarios / Preguntas (56)
![]() Carrie escribió:
Carrie escribió:
Comment crocheter un talon du chaussons 123_24
08.11.2025 - 17:57DROPS Design respondió:
Bonjour Carrie, le talon de ces chaussons est simplement formé en pliant l'ouvrage en double, technique utilisée dans nombre de nos modèles dont vous trouverez une vidéo ici qui devrait vous aider à visualiser comment on procède. Bon crochet!
10.11.2025 - 07:26
![]() Akira escribió:
Akira escribió:
Wenn man mit der Ferse fertig ist wie geht das weiter Wo setze ich genau an Häkel ich nicht gleich die Öffnung für den schaft Das mit der Bearbeitung für den schaft versteh ich nicht ganz
24.11.2020 - 22:07DROPS Design respondió:
Liebe Akira, dieses Video zeigt am 1.55 wie man den Schaft häkelt - hier sollen Sie aber dazu 12 Luftmaschen am Ende der 1. Reihe häkeln, dh nicht in Runden dann wie im Video weiterhäkeln. Hoffentlich kann es Ihnen weiterhelfen. Viel Spaß beim häkeln!
25.11.2020 - 07:46
![]() Adriana Guerra escribió:
Adriana Guerra escribió:
Pagina genial
15.04.2019 - 02:37
![]() Kelsey escribió:
Kelsey escribió:
Hi there.... if I didn't want the slippers to be that hole-y could I just continue to single crochet all the way up the foot? Are there any special steps I should follow to do that?
17.09.2018 - 15:44DROPS Design respondió:
Dear Kelsey, you can continue with single crochets if you rather like to, just continue adjusting to the length/number of rows required for your size. Happy crocheting!
17.09.2018 - 17:39Susan escribió:
My daughter bought her wool while on holiday so there is no hope of her going back to shop in America to ask about pattern. She is new to diagram patterns having only used worded patterns before. The M1 /M2 part has got her foxed. Not very good for her.
01.04.2018 - 23:27DROPS Design respondió:
Dear Susan, you can always contact your DROPS store, even per mail or on social medias (see their profile). Whenw working diagram, each symbol is the key to one stitch/group of st. Start reading diagrams from the bottom corner on the right side towards the left from RS and from the left towards the right from WS. Happy crocheting!
03.04.2018 - 08:55
![]() Marlies Monster escribió:
Marlies Monster escribió:
Begrijp ik het goed dat je bij patroon m1a eerst 2x een tour met vaste moet haken en daarna een tour met noem maar even twee samen gestelde stokjes.
13.10.2017 - 21:48DROPS Design respondió:
Hallo Marlies, Bij telpatroon M.1 is de eerste toer (dus niet de eerste 2 toeren), een toer met vasten. (= P.s.: De eerste vaste op de toer wordt vervangen door een losse (zie 'informatie voor het haken' bovenaan het patroon), deze wordt in het telptroon aangegeven met een verticaal streepje.
04.11.2017 - 14:19
![]() Johanne Elise Reianes escribió:
Johanne Elise Reianes escribió:
Hei! Jeg har problemer med og forstå diagrammet, og jeg ser jeg ikke er alene. Kan dere legge ut en bedre forklaring? I diagrammet er det en stav i slutten av første runde med st sammen, det kan vel ikke være riktig, denne står alene single st? Og i andre omg med staver sammen er det en single st som kommer hver tredje sammenhekling, slik ser det ikke ut på bildet.. Der er det to og to staver sammen rundt hele...
10.05.2016 - 20:18DROPS Design respondió:
Hej Johanne. Som jeg forstaar det saa hekler du staver sammen men 1 lm mellem hver og den sidste single stav er til afslutning paa omg. (og kun der).
13.05.2016 - 12:24
![]() Sara escribió:
Sara escribió:
Hej! Har tittat på det här mönstret ett tag nu och har äntligen bestämt mig för att börja virka. Mitt problem är att jag har hittat ett garn som kräver en virknål i storlek 5 mm. Om jag följer beskrivningen, hur mycket kommer resultatet påverkas??
26.09.2015 - 19:59DROPS Design respondió:
Hej För att få rätt storlek på dessa tofflor krävs denna stickfasthet: "DROPS VIRKNÅL NR 4 – eller den virknål du måste ha för att få 14 fm x 20 v på 10 x 10 cm." Gör en provlapp för att se så du får dessa mått. Lycka till!
30.09.2015 - 11:16Jessica escribió:
What does the 5-5-6 mean and to see crochet info? I replace the 5 with part one of crochet info? Anyone know?
19.05.2015 - 03:15DROPS Design respondió:
Dear Jessica, this pattern is written in 3 sizes. In first 2 sizes you will crochet 5 sts in ch-ring, in largest size you will crochet 6 sts in ch-ring. Depending on your size follow first, 2nd or 3rd number. Happy crocheting!
19.05.2015 - 08:29
![]() Karin Allikas escribió:
Karin Allikas escribió:
Mul on raske aru saada mustrist, et kuida pidi ma peaks hakkama heegeldama? Kas M.1 suunas võis siis M.1A ja siis sealt otse edasi M.1B ja siis jälle M.1A? Vabandan natukene selle rumala küsimuse pärast aga olen alles algaja.
25.01.2014 - 21:38DROPS Design respondió:
"Nüüd jätka skeemiga M.1 ringis. Heegelda M.1A, siis korda M.1B ja lõpeta aass-ga ringi algusse. Jätka niimoodi, kuni töö on u 11-13-14 cm kõrgune." St. M.1A tehakse ainult ringi alguses ja siis korratakse skeemi M.1B.
30.04.2014 - 17:11
|
||||||||||||||||
Pixie Dreams |
||||||||||||||||
 |
 |
|||||||||||||||
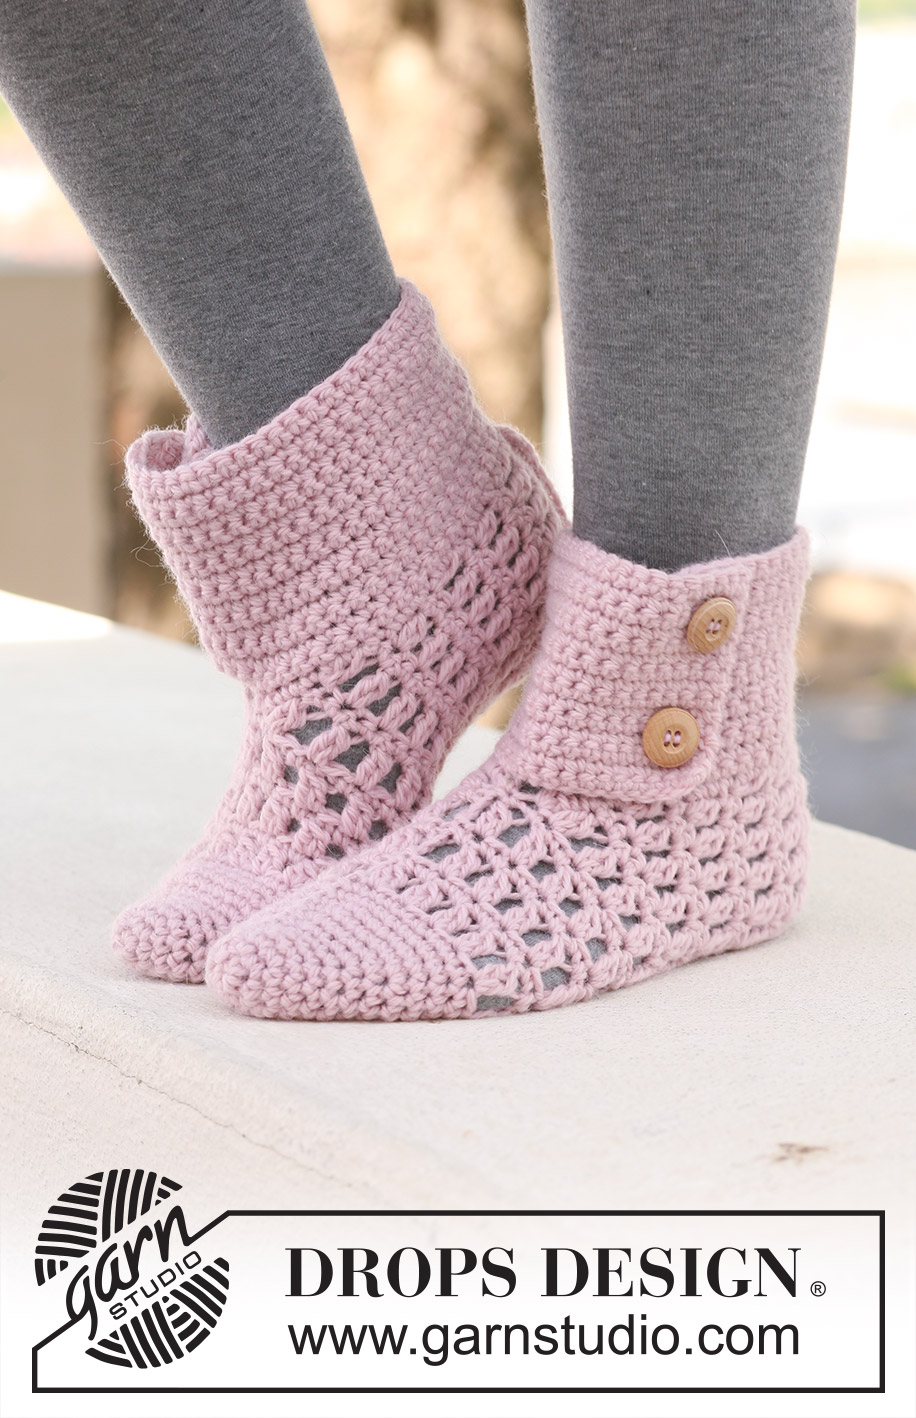
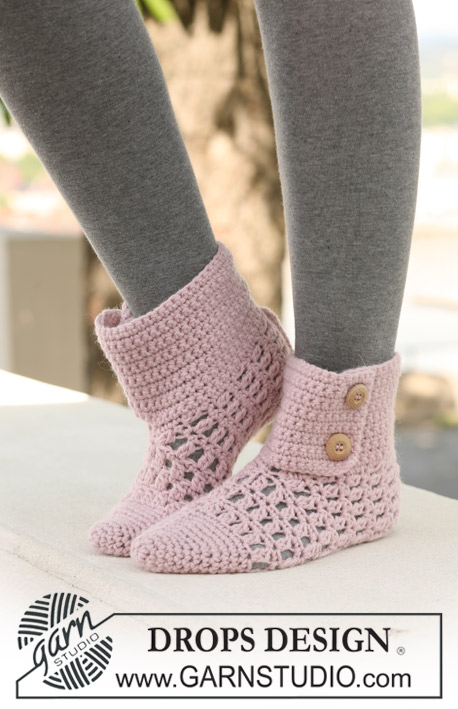
Pantuflas DROPS en ganchillo / crochet en “Nepal”.
DROPS 123-24 |
||||||||||||||||
|
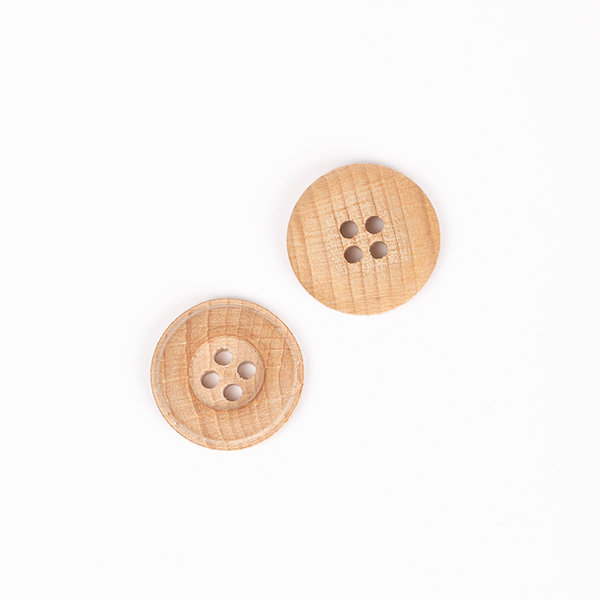
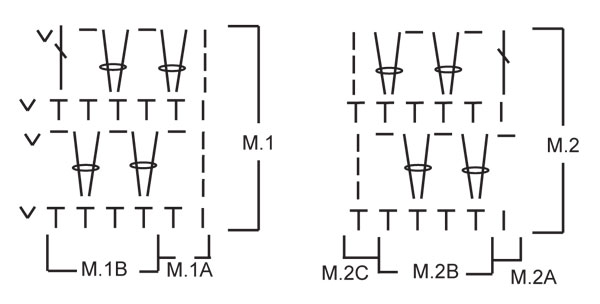
INFORMACIÓN PARA LA ELABORACIÓN DEL TEJIDO: Sustituir el primer p.b. en la vta con 1 cad. Sustituir el primer p.a. en la vta con 3 cad. Terminar cada vta con 1 p.bjs en la 1ª/3ª cad del inicio de la vta, (en la 1ª/3ª cad del inicio de la vta anterior cuando se trabaja de ida y vuelta). PATRÓN: Ver diagrama M.1 y M.2 ------------------------------------------------------ PIE: Empezar por el dedo. Trabajar con ag de ganchillo tamaño 4 mm y Nepal. VUELTA 1: Mon 3 cad y formar un anillo con 1 p.bjs en la primera cad. VUELTA 2: 5-5-6 p.b. en el anillo – Ver INFORMACIÓN PARA LA ELABORACIÓN DEL TEJIDO! VUELTA 3: 2 p.b. en cada p.b. = 10-10-12 p.b. VUELTA 4: * 1 p.b. en el primer p.b., 2 p.b. en el p.b. sig *, repetir de *a* hasta el final = 15-15-18 p.b. VUELTA 5-7: 1 p.b. en cada p.b. VUELTA 8: * 1 p.b. en el primer p.b., 1 p.b. en el 2º p.b. y 2 p.b. en el 3er p.b. *, repetir de *a* hasta el final = 20-20-24 p.b. VUELTA 9: * 1 p.b. en cada uno de los primeros 3 p.b., y 2 p.b. en el 4º p.b. *, repetir de *a* hasta el final = 25-25-30 p.b. VUELTA 10: * 1 p.b. en cada uno de los primeros 4 p.b., y 2 p.b. en el 5º p.b. *, repetir de *a* hasta el final = 30-30-36 p.b. Continuar con 1 p.b. en cada p.b. hasta que la pieza mida 6-6-7 cm. Ahora cont en M.1 en redondo. Trabajar M.1A, después repetir M.1B y terminar con 1 p.bjs en el pt del inicio de la vta. Cont de esta manera hasta que la pieza mida aprox 11-13-14 cm. TALÓN: Ahora dividir la pieza y cont de ida y vuelta a partir del centro del empeine, en M.2, trabajar M.2A, después repetir M.2B y terminar con M.2C. Cuando la pantufla mida aprox 22-24-27 cm, colocarla horizontalmente y unir en ganchillo por el centro de la parte de atrás, con una vuelta de p.b. a través de ambas partes. Cortar y asegurar el hilo. PIERNA: PANTUFLA DERECHA: Trabajar 1 vta de p.b. alrededor de la abertura de la pantufla (empezar en el centro del frente). Cuando esté nuevamente en el principio, trabajar 12 cad (para la lengüeta), virar y trabajar 1 p.b. en cada una de estas cad. Ahora cont de ida y vuelta con 1 p.b. en cada p.b. hasta que la pierna mida 8 cm. Cortar y asegurar el hilo. PANTUFLA IZQUIERDA: Empezar con 12 cad, después trabajar 1 vta de p.b. alrededor de la abertura (empezar en el centro del frente). Cuando esté nuevamente en el principio, virar y trabajar 1 p.b. en cada p.b. y 1 p.b. en cada cad. Ahora cont de ida y vuelta con 1 p.b. en cada p.b. hasta que la pierna mida 8 cm. Cortar y asegurar el hilo. Coser 2 botones decorativos a través de ambas partes en la lengüeta. |
||||||||||||||||
Explicaciones del diagrama |
||||||||||||||||
|
||||||||||||||||
 |
||||||||||||||||
¿Terminaste este patrón?Entonces, etiqueta tus fotos con #dropspattern o envíalas a la galería #dropsfan. ¿Necesitas ayuda con este patrón?Encontrarás 9 videos tutoriales, un espacio para comentarios/preguntas y más visitando la página del patrón en garnstudio.com © 1982-2026 DROPS Design A/S. Todos los derechos reservados. Este documento, incluyendo todas sus sub-secciones, está protegido por los derechos de autor (copyright). Lee más acerca de lo que puedes hacer con nuestros patrones en la parte de abajo de cada patrón de nuestro sitio. |
||||||||||||||||


Con más de 40 años en el diseño de modelos de punto y de ganchillo, DROPS Design ofrece una de las más vastas colecciones de patrones gratuitos en el internet - traducidos en 17 idiomas. Al día de hoy, contamos con 324 catálogos y 12290 patrones - de los cuales 11685 están traducidos en español.
Nosotros trabajamos con mucho esmero para brindarte lo mejor que las labores de punto y ganchillo tienen para ofrecer,inspiración y consejos, así como hilos de magnífica calidad a precios increíbles! Te gustaría usar nuestros patrones para otro fin además del uso personal? Puedes leer acerca de lo que estás permitida a hacer en el texto de Copyright en la parte de abajo de todos nuestros patrones. Felices labores!
Escribe un comentario sobre DROPS 123-24
¡Nos encantaría saber qué piensas acerca de este patrón!
Si quieres escribir una pregunta referente al patrón, por favor asegúrate de elegir la categoría correcta en el formulario debajo, para acelerar el proceso de respuesta. Los campos obligatorios están marcados con un *.