
Categorías populares
¿Buscas un hilo?


Comentarios / Preguntas (125)
![]() Ann escribió:
Ann escribió:
Do you have videos on how to sew the seam for the knitted wrist edge and then the seam for the seed stitch body, both with an invisible seam? (The shoulder seam video you have up is a different stitch). Thanks!
15.05.2016 - 16:24DROPS Design respondió:
Dear Ann, seam on upper sleeve/shoulder and under arm can be worked both as a shoulder seam. You can then tighten the yarn a bit more to tighten sts tog and make it less visible. Happy knitting!
17.05.2016 - 10:17
![]() Erika escribió:
Erika escribió:
So on the right front piece we are binding off the neck stitches on the RS and on the left front piece we bind off on the WS-- doesn't this mean the neck shaping will happen on different rows and not be even?
21.04.2016 - 02:54DROPS Design respondió:
Dear Erika, there may be only 1 row difference that will not be visible then. Happy knitting!
21.04.2016 - 09:12
![]() Erika escribió:
Erika escribió:
On the left front piece when you bind off the first 2 stitches do you do this on the RS or WS? When you put the 11 stitches on to the stitch holder do you knit across those stitches so that the yarn ends up back on the right side of the cable?
19.04.2016 - 04:01DROPS Design respondió:
Dear Erika, the 2 sts dec over cable are worked from WS as on right front piece - You can put the 11 sts for neck on a st holder at the beg of a row from WS so that you work them first and don't have to cut the yarn. Happy knitting!
19.04.2016 - 09:07
![]() Hanne Andersen escribió:
Hanne Andersen escribió:
Når man køber garn til 31kr pr. Nøgle er det slet ikke ok at der er knuder midt i nøglet . Troede man kunne strikke videre. Sidder lige nu i en håbløs kamp på at redde mit strikketøj. Knuden gik op 6 cm under hvor jeg var nået til og trævler op nedefra lige nu . Jeg er så skuffet og ærgerlig
21.02.2016 - 22:38
![]() Abigail escribió:
Abigail escribió:
If m1 goes 1st on the RS it will be the left front piece though, no? You said the opposite below. Please confirm. I think this pattern needs to be clarified as it is very unclear. Thank you for your help.
18.02.2016 - 13:23DROPS Design respondió:
Dear Abigail, the first row in pattern is worked from WS, ie you will start with left front piece and finish with right front piece. On next row from RS, you will first work right front piece and then finish with left front piece (jacket is worked bottom up). Happy knitting!
18.02.2016 - 14:21
![]() Abigail escribió:
Abigail escribió:
Oh sorry, ignore my last comment. The pattern for the body is k6 m3 m2 m1 k6 on the RS , and k6 m1 m2 m3 on the WS, correct?
18.02.2016 - 12:37DROPS Design respondió:
Dear Abigail, from WS (= 1st row after bottom edge and inc evenly) work K6, M.3, M.2, M.1 and K6 - from RS, work K6, M.1, M.2, M.3 and K6. M.3 is worked at beg of row from WS and end of row from RS, M.1 is worked at end of row from WS and beg of row from RS. Happy knitting!
18.02.2016 - 14:11
![]() Abigail escribió:
Abigail escribió:
So opposite m3 on the WS will be m1 on RS? So EVERY row (WS & RS) is this sequence: K6 m3 m2 m1 k6?
18.02.2016 - 12:17Abigail escribió:
When starting the chart rows, it looks like to me: WS: k6, m3, m2, m1, k6 On the next row, RS, should this be: k6, m3, m2, m1, k6 Or, should it be: k6, m1, m2, m3, k6, so that you are matching up the charts m1 and m3 on either side?
17.02.2016 - 18:12DROPS Design respondió:
Dear Abigail, from RS you will work, K6, M.1, M.2, M.3 and K6, ie M1 is worked on the right front piece and M3 on the left front piece. Happy knitting!
18.02.2016 - 09:55
![]() Hev escribió:
Hev escribió:
If the charts show the RS only, how do you know what to do on the WS please? Thank you for your assistance
17.02.2016 - 17:26DROPS Design respondió:
Dear Mrs Hev, in diagrams 1 square = 1 st x 1 row. The x symbol= reversed stocking st (= P from RS but K from WS) and the white symbole = stocking st (= K from RS but P from WS), as explained under diagram text. So that M.1 is worked over 10 sts and 4 rows. Happy knitting!
18.02.2016 - 09:53
![]() Hev escribió:
Hev escribió:
Hi, the instruction "First row in M.1 and M.3 = WS." Is saying m1 and m3 start on the WS, but doesn't the m2 chart start on WS as well? If so, that instruction should probably include m2. Please clarify. Thank you.
17.02.2016 - 12:17DROPS Design respondió:
Dear Hev, that's right, 1st row in M.2 will be also worked here from WS. Happy knitting!
17.02.2016 - 17:04
|
|||||||||||||
Little Pixie#littlepixiejacket |
|||||||||||||
 |
 |
||||||||||||
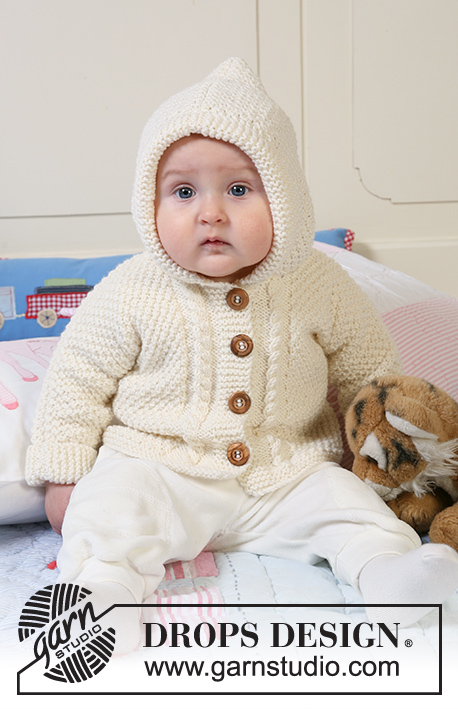
Chaqueta en punto de arroz tejida en una pieza con capucha, patrón texturado y torsadas para bebé y niños en DROPS Merino Extra Fine
DROPS Baby 19-5 |
|||||||||||||
|
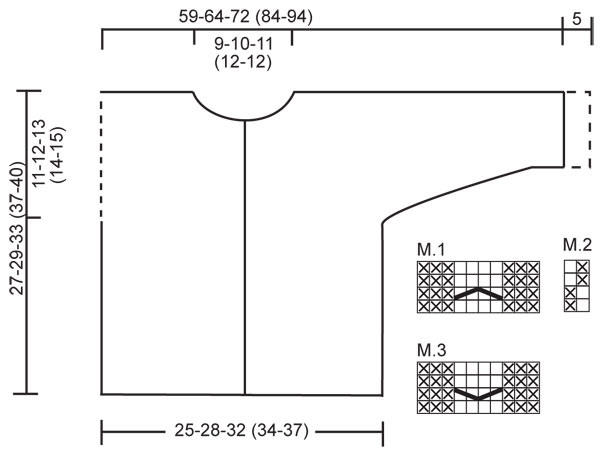
CHAQUETA: PT MUSGO (de ida y vuelta en la ag): Tejer todas las hileras de derecho. PATRÓN: Ver diagrama M.1 a M.3. Los diagramas muestran el patrón por el LD. La primera hilera de M.1 y M.3 = LR. OJALES: Hacer los ojales en el borde delantero derecho. 1 ojal = tejer juntos de derecho el 2º y 3er pt a partir del centro del frente y hacer 1 HEB (lazada). En la hilera sig, tejer la HEB de derecho. Hacer los ojales cuando la pieza mida: Talla 1/3 meses: 4, 10, 16 y 22 cm. Talla 6/9 meses: 4, 11, 18 y 24 cm. Talla 12/18 meses: 3, 9, 15, 21 y 27 cm. Talla 2 años: 3, 10, 17, 24 y 31 cm. Talla 3/4 años: 3, 11, 19, 27 y 34 cm. ------------------------------------------------------ ------------------------------------------------------ CHAQUETA: Tejida de ida y vuelta en ag circular a partir del centro del frente hasta la sisa. Después, las piezas del frente y de la espalda son tejidas por separado y nuevos pts son montados de cada lado de la pieza para las mangas. La chaqueta es ensamblada cosiendo la parte de arriba de la manga/hombro y la parte de abajo de las mangas. CUERPO: Mon 117-131-145 (155-169) pts (incluye 6 pts del borde delantero de cada lado del centro del frente) en ag circular tamaño 4 mm con Merino Extra Fine. Tejer 6 hileras en PT MUSGO – ver arriba (primera hilera = LD), después tejer 1 hilera de derecho por el LD y, AL MISMO TIEMPO, aum 1 pt en el 10º y 11º pt a partir del centro del frente, repetir los aum al final de la hilera (en el 11º y 10º pt en la ag) = 121-135-149 (159-173) pts. Insertar un marcapuntos a 34-38-42 (44-48) pts a partir de cada lado (= 53-59-65 (71-77) pts entre los marcapuntos en la pieza de la espalda). Ahora tejer la hilera sig, de la manera sig, por el LR: 6 pts en pt musgo (= borde delantero), M.3 (= 10 pts), M.2 en los 89-103-117 (127-141) pts sig, M.1 (= 10 pts) y 6 pts en pt musgo (= borde delantero). Continuar en el patrón de esta manera – RECUERDE LOS OJALES EN EL BORDE DELANTERO DERECHO – ver arriba. RECUERDE MANTENER LA MISMA TENSIÓN DE TEJIDO DE LA MUESTRA! Cuando la pieza mida 16-17-20 (23-25) cm, dividir la pieza en los marcapuntos y terminar las piezas del frente y de la espalda por separado. FRENTE DERECHO: = 34-38-42 (44-48) pts. Continuar en el patrón como antes y, AL MISMO TIEMPO, mon nuevos pts para la manga al final de cada hilera, en el lado, de la manera sig: 4 pts 2-2-3 (3-3) veces, 8 pts 1-1-1 (1-3) veces, 10 pts 1-1-1 (2-1) veces y 19-22-23 (23-24) pts 1 vez = 79-86-95 (107-118) pts – NOTA: incorporar los pts aum en M.2 a medida que avanza. Después del último aum, continuar como antes, pero tejer 10 pts del lado de la orilla de la manga en pt musgo (= orilla de doblez en la manga). Cuando reste 1 hilera para que la pieza mida 23-25-28 (32-35) cm – ajustar para una hilera por el LR – dism 4 pts sobre la torsada, tejiendo 2 pjr dos veces en los 4 pts de la torsada. En la hilera sig, por el LD, deslizar los 9-11-12 (12-13) pts del lado del centro del frente a un gancho o seguro aux para el escote. Rem para formar el escote al inicio de cada hilera a partir del centro del frente: 2 pts 2 veces y 1 pt 2-2-3 (3-3) veces = 62-67-74 (86-96) pts restantes en la ag (= hombro + manga). Continuar en M.2 y rem cuando la pieza mida 27-29-33 (37-40) cm. FRENTE IZQUIERDO: Como la pieza del frente derecho, pero en sentido inverso. ESPALDA: = 53-59-65 (71-77) pts. Continuar en M.2 como antes y, AL MISMO TIEMPO, mon nuevos pts de cada lado, al final de cada hilera, como se describe para el frente = 143-155-171 (197-217) pts. Ahora continuar en M.2 con 10 pts en pt musgo de cada lado en las orillas de las mangas. Cuando la pieza mida 25-27-31 (35-38) cm, rem los 17-19-21 (23-23) pts centrales para el escote y terminar cada hombro/manga por separado. Rem 1 pt del lado del escote en la hilera sig = 62-67-74 (86-96) pts restantes en la ag (= hombro + manga). Rem cuando la pieza mida 27-29-33 (37-40) cm. Repetir en el otro lado. ENSAMBLAJE: Hacer la costura de los hombros/parte de arriba de las mangas, orilla con orilla, con puntos invisibles. Hacer la costura de la parte de abajo de las mangas. Coser los botones. Doblar los 5 cm inferiores en ambas orillas de las mangas para el LD y, si necesario, fijarlas con unos puntos de costura. CAPUCHA: Levantar por el LD aprox 55 a 75 pts alrededor del escote (incluye los pts de los ganchos o seguros aux del frente) en ag circular tamaño 4 mm con Merino Extra Fine. Tejer 1 hilera de derecho por el LR, después tejer 1 hilera de derecho por el LD y, AL MISMO TIEMPO, distribuir aum equitativamente para 85-89-93 (97-101) pts. Continuar en M.2 con 6 pts de cada lado en pt musgo – AL MISMO TIEMPO, mon 6 nuevos pts al final de las 2 hileras sig para la orilla del doblez = 97-101-105 (109-113) pts – tejer estos 6 pts en pt musgo. Continuar en M.2 con 12 pts en pt musgo de cada lado hasta que la capucha mida 21-23-25 (27-28) cm, rem. Doblar la capucha en dos y unir con una costura en la parte de arriba. Doblar la orilla en pt musgo en dos, para el LD, y coserla en la parte de abajo de cada uno de los lados de la capucha. |
|||||||||||||
Explicaciones del diagrama |
|||||||||||||
|
|||||||||||||
 |
|||||||||||||
¿Terminaste este patrón?Entonces, etiqueta tus fotos con #dropspattern #littlepixiejacket o envíalas a la galería #dropsfan. ¿Necesitas ayuda con este patrón?Encontrarás 10 videos tutoriales, un espacio para comentarios/preguntas y más visitando la página del patrón en garnstudio.com © 1982-2026 DROPS Design A/S. Todos los derechos reservados. Este documento, incluyendo todas sus sub-secciones, está protegido por los derechos de autor (copyright). Lee más acerca de lo que puedes hacer con nuestros patrones en la parte de abajo de cada patrón de nuestro sitio. |
|||||||||||||


Con más de 40 años en el diseño de modelos de punto y de ganchillo, DROPS Design ofrece una de las más vastas colecciones de patrones gratuitos en el internet - traducidos en 17 idiomas. Al día de hoy, contamos con 324 catálogos y 12290 patrones - de los cuales 11685 están traducidos en español.
Nosotros trabajamos con mucho esmero para brindarte lo mejor que las labores de punto y ganchillo tienen para ofrecer,inspiración y consejos, así como hilos de magnífica calidad a precios increíbles! Te gustaría usar nuestros patrones para otro fin además del uso personal? Puedes leer acerca de lo que estás permitida a hacer en el texto de Copyright en la parte de abajo de todos nuestros patrones. Felices labores!
Escribe un comentario sobre DROPS Baby 19-5
¡Nos encantaría saber qué piensas acerca de este patrón!
Si quieres escribir una pregunta referente al patrón, por favor asegúrate de elegir la categoría correcta en el formulario debajo, para acelerar el proceso de respuesta. Los campos obligatorios están marcados con un *.